In this document, we will setup an application to be deployed and run on Google Cloud Run.
We will create a NodeJS frontend application and deploy it on GCP Cloud Run.
Prerequisites
- A server running Ubuntu, along with a non-root user with sudo privileges.
- Docker installed on the server. You can follow the instructions here to install Docker.
- Node.js and npm installed. You can follow the instructions on Downloading and installing NodeJS and npm to install NodeJS and npm on your machine.
- A Docker Hub account.
- gcloud CLI installed on the server. You can follow the instructions on this page.
- Ensure
gcloud initis performed. - You will need Admin privileges for GCP Artifact Registry and GCP Cloud Run.
Setup NodeJS Application
We will create a directory for the project in the non-root user’s home directory. We will name the project cars_project, but you should feel free to replace this with something else:
# Create the project directory
$ mkdir cars_project

# Enter into project directory
$ cd cars_project
This will be the root directory of the project.
Next, create a package.json file with your project’s dependencies and other identifying information. You can create this file using the command:
$ vi package.json
Put in appropriate information about the project in the package.json file. We will also include the required dependencies in the project.
{
  "name": "cars_project",
  "version": "1.0.0",
  "description": "NodeJS project on Cars",
  "author": "John Doe <john.doe@example.com>",
  "license": "MIT",
  "main": "app.js",
  "keywords": [
    "nodejs",
    "bootstrap",
    "express"
  ],
  "dependencies": {
    "express": "^4.16.4"
  }
}
Save and close the file when you’ve finished making changes.
To install the project’s dependencies, run the following command:
$ npm install
This will install the packages listed in the package.json file in the project directory.
Create NodeJS Application
As mentioned in the package.json file, the entrypoint of the application is app.js. Create app.js file in the cars_project directory, and put in the following contents:
const express = require('express');
const app = express();
const router = express.Router();

const path = __dirname + '/views/';
const port = 8080;
The require function loads the express module, which we then use to create the app and router objects. The router object will perform the routing function of the application, and as we define HTTP method routes we will add them to this object to define how our application will handle requests.
This section of the file also sets a couple of constants, path and port:
path: Defines the base directory, which will be the views subdirectory within the current project directory. port: Tells the app to listen on and bind to port 8080.
Next, in the same file, set the routes for the application using the router object:
router.use(function (req, res, next) {
  console.log('/' + req.method);
  next();
});

router.get('/', function(req, res){
  res.sendFile(path + 'index.html');
});

router.get('/cars', function(req, res){
  res.sendFile(path + 'cars.html');
});
The router.use function loads a middleware function that will log the router’s requests and pass them on to the application’s routes. These are defined in the subsequent functions, which specify that a GET request to the base project URL should return the index.html page, while a GET request to the /cars route should return cars.html.
Finally, in the same file, mount the router middleware and the application’s static assets and tell the app to listen on port 8080:
app.use(express.static(path));
app.use('/', router);

app.listen(port, function () {
  console.log('Example app listening on port 8080!')
})
The finished app.js file will look like this:
const express = require('express');
const app = express();
const router = express.Router();

const path = __dirname + '/views/';
const port = 8080;

router.use(function (req,res,next) {
  console.log('/' + req.method);
  next();
});

router.get('/', function(req,res){
  res.sendFile(path + 'index.html');
});

router.get('/cars', function(req,res){
  res.sendFile(path + 'cars.html');
});

app.use(express.static(path));
app.use('/', router);

app.listen(port, function () {
  console.log('Example app listening on port 8080!')
})
Save and close the file when you are finished.
Next, let’s add some static content to the application. Start by creating the views directory:
$ mkdir views
Create the index.html file under the views directory using:
$ vi views/index.html
Add the following code to the index.html file, which will import Boostrap and create a [jumbotron](https://getbootstrap.com/docs/4.0/components/jumbotron/) component with a link to the more detailed cars.html info page:
<!DOCTYPE html>
<html lang="en">
<body>
<nav class="navbar navbar-dark bg-dark navbar-static-top navbar-expand-md">
<div class="container">
<button type="button" class="navbar-toggler collapsed" data-toggle="collapse" data-target="#bs-example-navbar-collapse-1" aria-expanded="false"> <span class="sr-only">Toggle navigation</span>
</button> <a class="navbar-brand" href="#">All About Cars</a>
<div class="collapse navbar-collapse" id="bs-example-navbar-collapse-1">
<ul class="nav navbar-nav mr-auto">
<li class="active nav-item"><a href="/" class="nav-link">Home</a>
</li>
<li class="nav-item"><a href="/cars" class="nav-link">Cars</a>
</li>
</ul>
</div>
</div>
</nav>
<div class="jumbotron">
<div class="container">
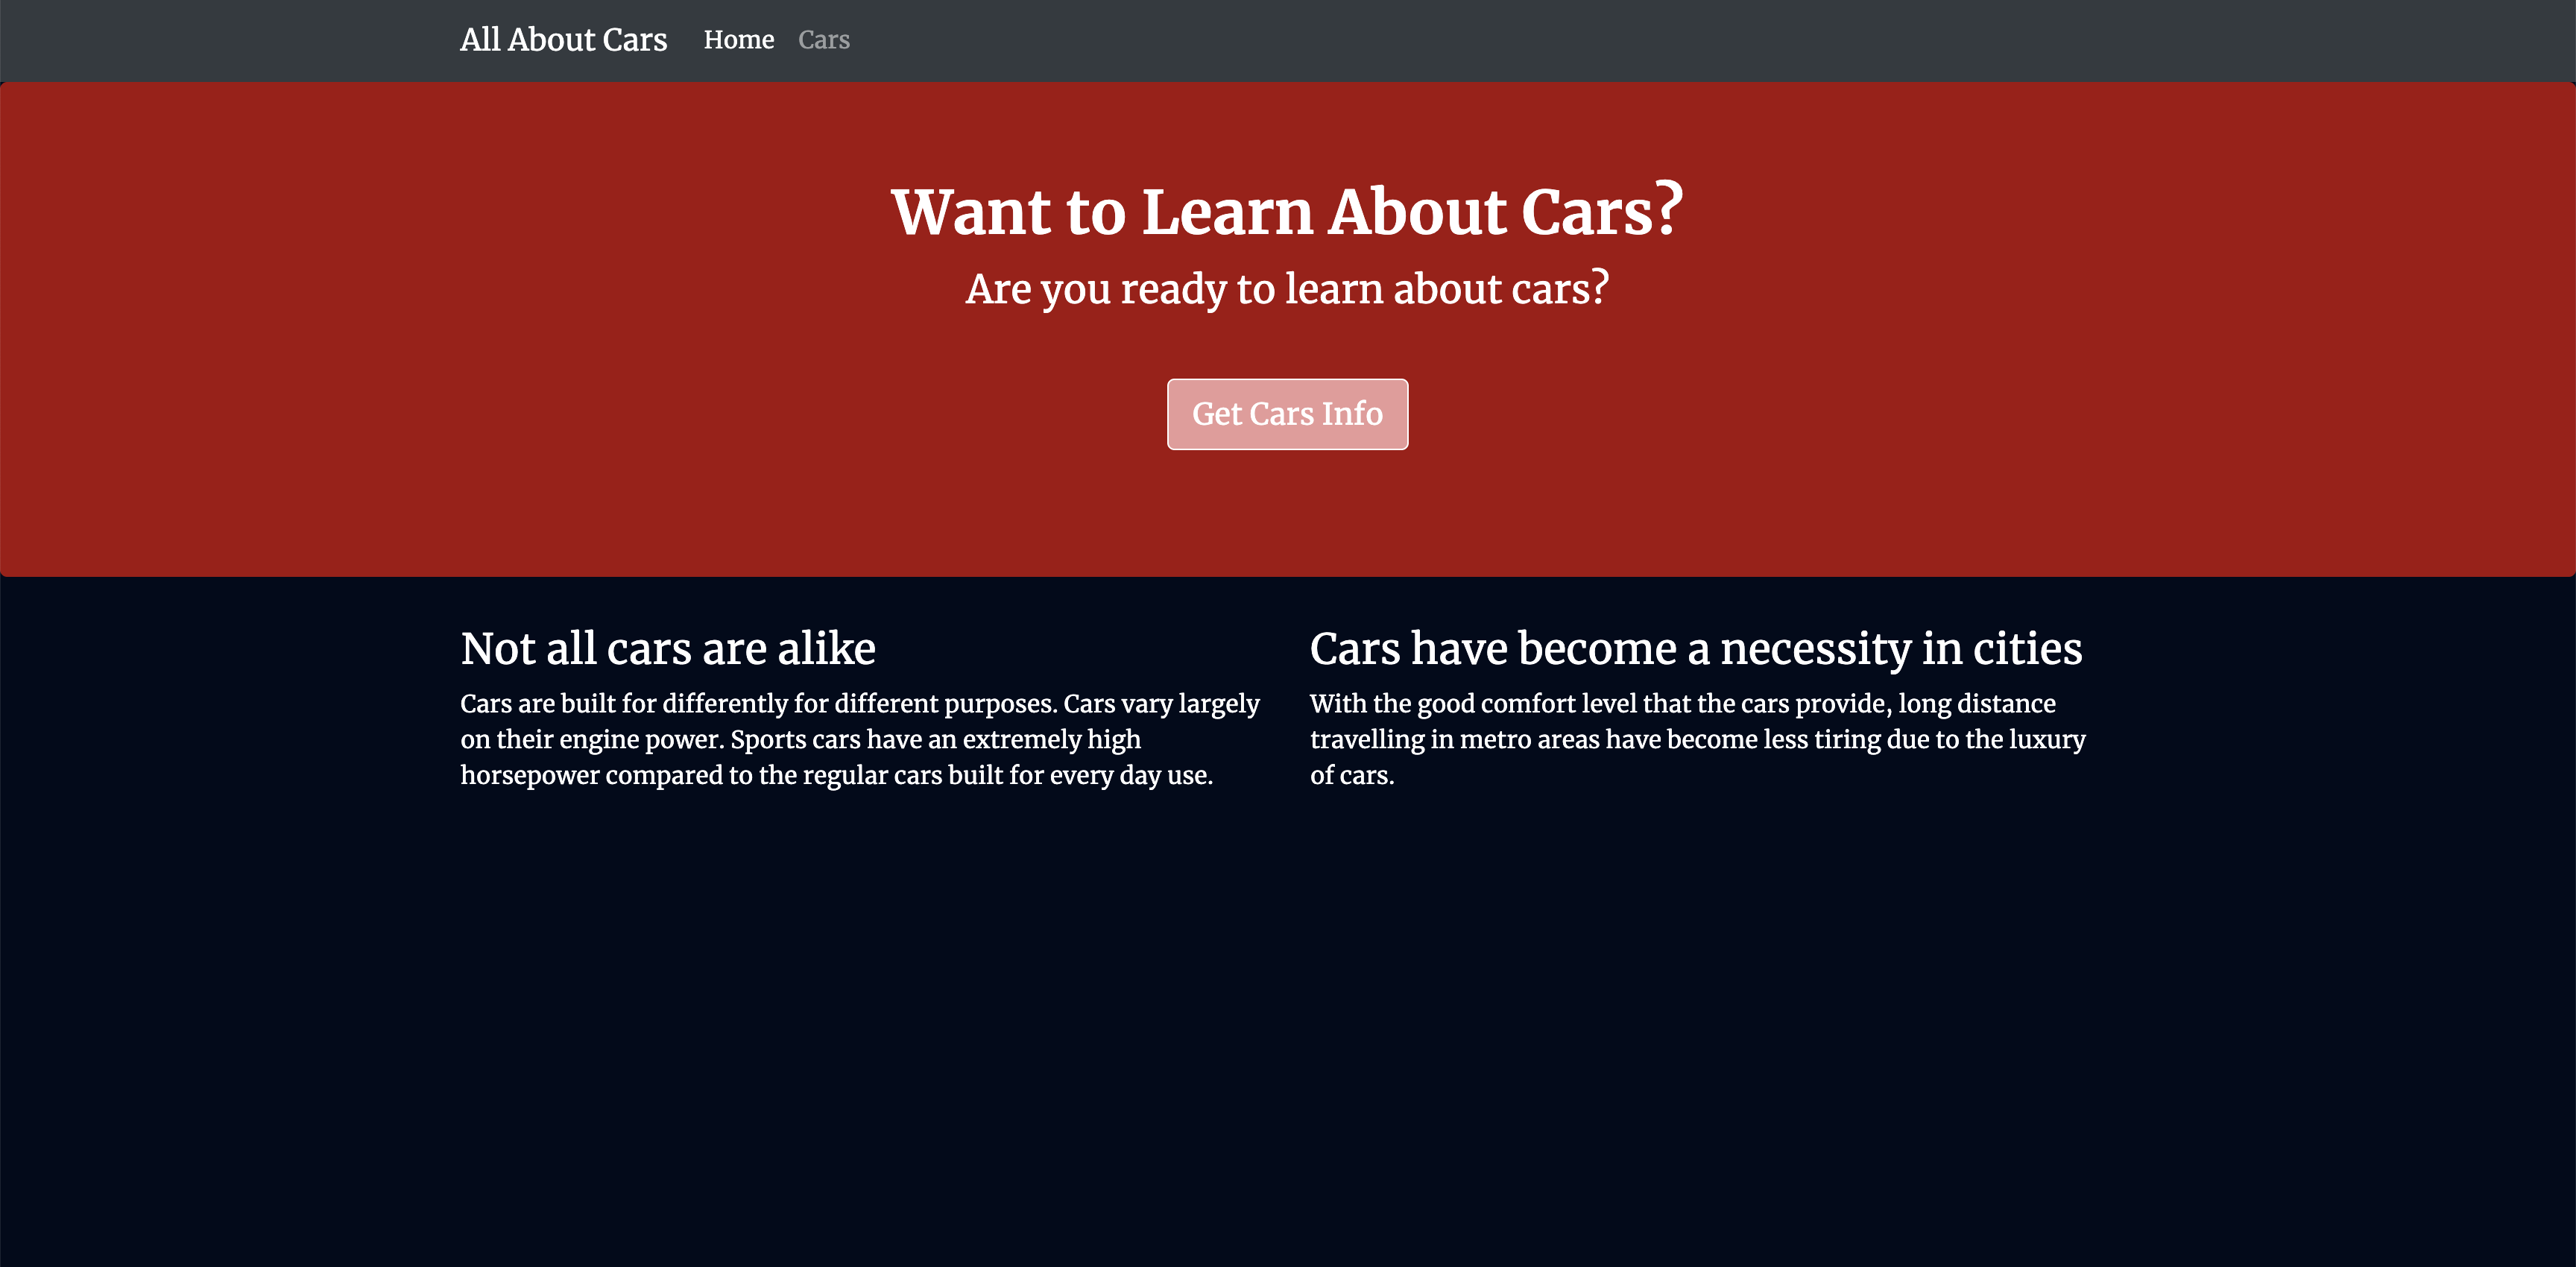
<h1>Want to Learn About Cars?</h1>
<p>Are you ready to learn about cars?</p>
<br>
<p><a class="btn btn-primary btn-lg" href="/cars" role="button">Get Cars Info</a>
</p>
</div>
</div>
<div class="container">
<div class="row">
<div class="col-lg-6">
<h3>Not all cars are alike</h3>
<p>Cars are built for differently for different purposes. Cars vary largely on their engine power. Sports cars have an extremely high horsepower compared to the regular cars built for every day use.
</p>
</div>
<div class="col-lg-6">
<h3>Cars have become a necessity in cities</h3>
<p>With the good comfort level that the cars provide, long distance travelling in metro areas have become less tiring due to the luxury of cars.
</p>
</div>
</div>
</div>
</body>
</html>
We have created a standard html page. We have also used stylesheet in the header <link href="css/styles.css" rel="stylesheet"> which we will create later.
Save and close the file when you are finished.
With the application landing page in place, we can create our cars information page, cars.html, which will offer interested users more information about cars.
Open the file:
$ vi views/cars.html
Add the following code, which imports Bootstrap and the custom style sheet and offers users detailed information about certain cars:
<!DOCTYPE html>
<html lang="en">
<nav class="navbar navbar-dark bg-dark navbar-static-top navbar-expand-md">
    <div class="container">
        <button type="button" class="navbar-toggler collapsed" data-toggle="collapse" data-target="#bs-example-navbar-collapse-1" aria-expanded="false"> <span class="sr-only">Toggle navigation</span>
        </button> <a class="navbar-brand" href="/"> All About Cars</a>
        <div class="collapse navbar-collapse" id="bs-example-navbar-collapse-1">
            <ul class="nav navbar-nav mr-auto">
                <li class="nav-item"><a href="/" class="nav-link">Home</a>
                </li>
                <li class="active nav-item"><a href="/cars" class="nav-link">Cars</a>
                </li>
            </ul>
        </div>
    </div>
</nav>
<div class="jumbotron text-center">
    <h1>Cars Info</h1>
</div>
<div class="container">
    <div class="row">
        <div class="col-lg-6">
            <p>
                <div class="caption">The latest electric cars offer instantaneous torque, delivering exhilarating acceleration and a whisper-quiet ride.
                </div>
                <img src="https://cdn.pixabay.com/photo/2017/07/27/13/07/electric-car-2545290_1280.png" alt="Electric Cars">
            </p>
        </div>
        <div class="col-lg-6">
            <p>
                <div class="caption">Advanced driver assistance systems, like adaptive cruise control and automatic emergency braking, are significantly reducing accident rates on the road.</div>
                <img src="https://cdn.pixabay.com/photo/2022/07/18/05/11/car-7328751_1280.jpg" alt="Electric Car">
            </p>
        </div>
    </div>
</div>

</html>
Save and close the file when you are finished.
Finally, create the custom CSS style sheet that is linked to in index.html and cars.html by first creating a css folder in the views directory:
$ mkdir views/css
Open the style sheet:
$ vi views/css/styles.css
Add the following code, which will set the desired color and font for our pages:
.navbar {
    margin-bottom: 0;
}

body {
    background: #020A1B;
    color: #ffffff;
    font-family: 'Merriweather', sans-serif;
}

h1,
h2 {
    font-weight: bold;
}

p {
    font-size: 16px;
    color: #ffffff;
}

.jumbotron {
    background: #a50c0c;
    color: white;
    text-align: center;
}

.jumbotron p {
    color: white;
    font-size: 26px;
}

.btn-primary {
    color: #fff;
    text-color: #000000;
    border-color: white;
    background-color: #ea9999;
    margin-bottom: 5px;
}

img,
video,
audio {
    margin-top: 20px;
    max-width: 80%;
}

div.caption: {
    float: left;
    clear: both;
}
Save and close the file when you are finished.
To start the application, make sure that you are in your project’s root directory. Start the application with the command:
$ node app.js
In your browser, open the URL http://localhost:8080. The landing page of the application should get loaded.
NodeJS Application
Writing the Dockerfile
Let us now create the Dockerfile which specifies what will be included in the application container when it is executed. Using a Dockerfile allows you to define your container environment and avoid discrepancies with dependencies or runtime versions.
In the project’s root directory, create the Dockerfile:
$ vi Dockerfile
The contents of the Dockerfile will be:
FROM node:10-alpine

RUN mkdir -p /home/node/app/node_modules && chown -R node:node /home/node/app

WORKDIR /home/node/app

COPY package*.json ./

USER node

RUN npm install

COPY --chown=node:node . .

EXPOSE 8080

CMD [ "node", "app.js" ]
Save and close the file.
Here is what the Dockerfile contains:
- The
FROMinstruction is used to set the application's base image. The image usednode:10-alpineincludes Node.js and npm. - Next, using
RUNcommand, we run the instructions to create thenode_modulesdirectory, and apply appropriate ownership usingchown. - Then, we set the working directory as
/home/node/app. - We copy the
package.jsonandpackage-lock.jsonfiles to the working directory. - To ensure that all of the application files are owned by the non-root
nodeuser, including the contents of thenode_modulesdirectory, switch the user tonode. - After copying the project dependencies and switching our user, we can run
npm install. - Copy the application code with the appropriate permissions to the application directory on the container.
- Expose port
8080on the container and start the application using the commandnode app.js.
Before building the application image, let’s add a .dockerignore file. Working in a similar way to a .gitignore file, .dockerignore specifies which files and directories in your project directory should not be copied over to your container.
Open the .dockerignore file:
$ vi .dockerignore
Inside the file, add your local node modules, npm logs, Dockerfile, and .dockerignore file:
node_modules
npm-debug.log
Dockerfile
.dockerignore
Save and close the file when you are finished.
Let us now build the docker image using the command:
$ sudo docker buildx build --platform linux/amd64 -t <your_dockerhub_username>/cars_project .
It will take a couple of minutes to build the image. Once it is complete, check the images using the command:
$ sudo docker images
You should be able to see your image <your_dockerhub_username>/cars_project in the list of images.
You can now run the application as a docker container using the command:
$ sudo docker run --name cars_project -p 80:8080 -d <your_dockerhub_username>/cars_project
Note that -p flag in the above command publishes the port on the container and maps it to a port on our host. We will use port 80 on the host, but you should feel free to modify this as necessary if you have another process running on that port.
Once the container is up and running, you can inspect a list of the running containers with:
$ sudo docker ps
You will receive the output containing all the running docker containers:
Output
CONTAINER ID        IMAGE                                                COMMAND             CREATED             STATUS              PORTS                  NAMES
20bff92d0ea7        <your_dockerhub_username>/cars_project               "node app.js"       8 seconds ago       Up 7 seconds        0.0.0.0:80->8080/tcp   cars_project
With the container running, you can now visit the application by navigating your browser to the server IP without the port: http://localhost/. You should see the application's landing page.
Uploading the image to GCP Artifact Registry
Setup GCP Artifact Registry
On the GCP console, search for Artifact Registry, and open the corresponding application. Enable the Artifact Registry if directed to the enabling Artifact Registry API page.
Click on CREATE REPOSITORY button at the top of the page to create a new repository.

Artifact Registry Landing Page
On the Create repository page,
- Provide an appropriate name to the repository
- Select Format as
Docker, and Mode asStandard. - You can select the location type as per your requirement. Here, we will select
Region, and choose an appropriate Region from the dropdown. Here, we have selectedus-central1. - You can optionally provide a description for the repository.
- All the remaining settings can be left as default.
- Click on CREATE button at the bottom of the page.
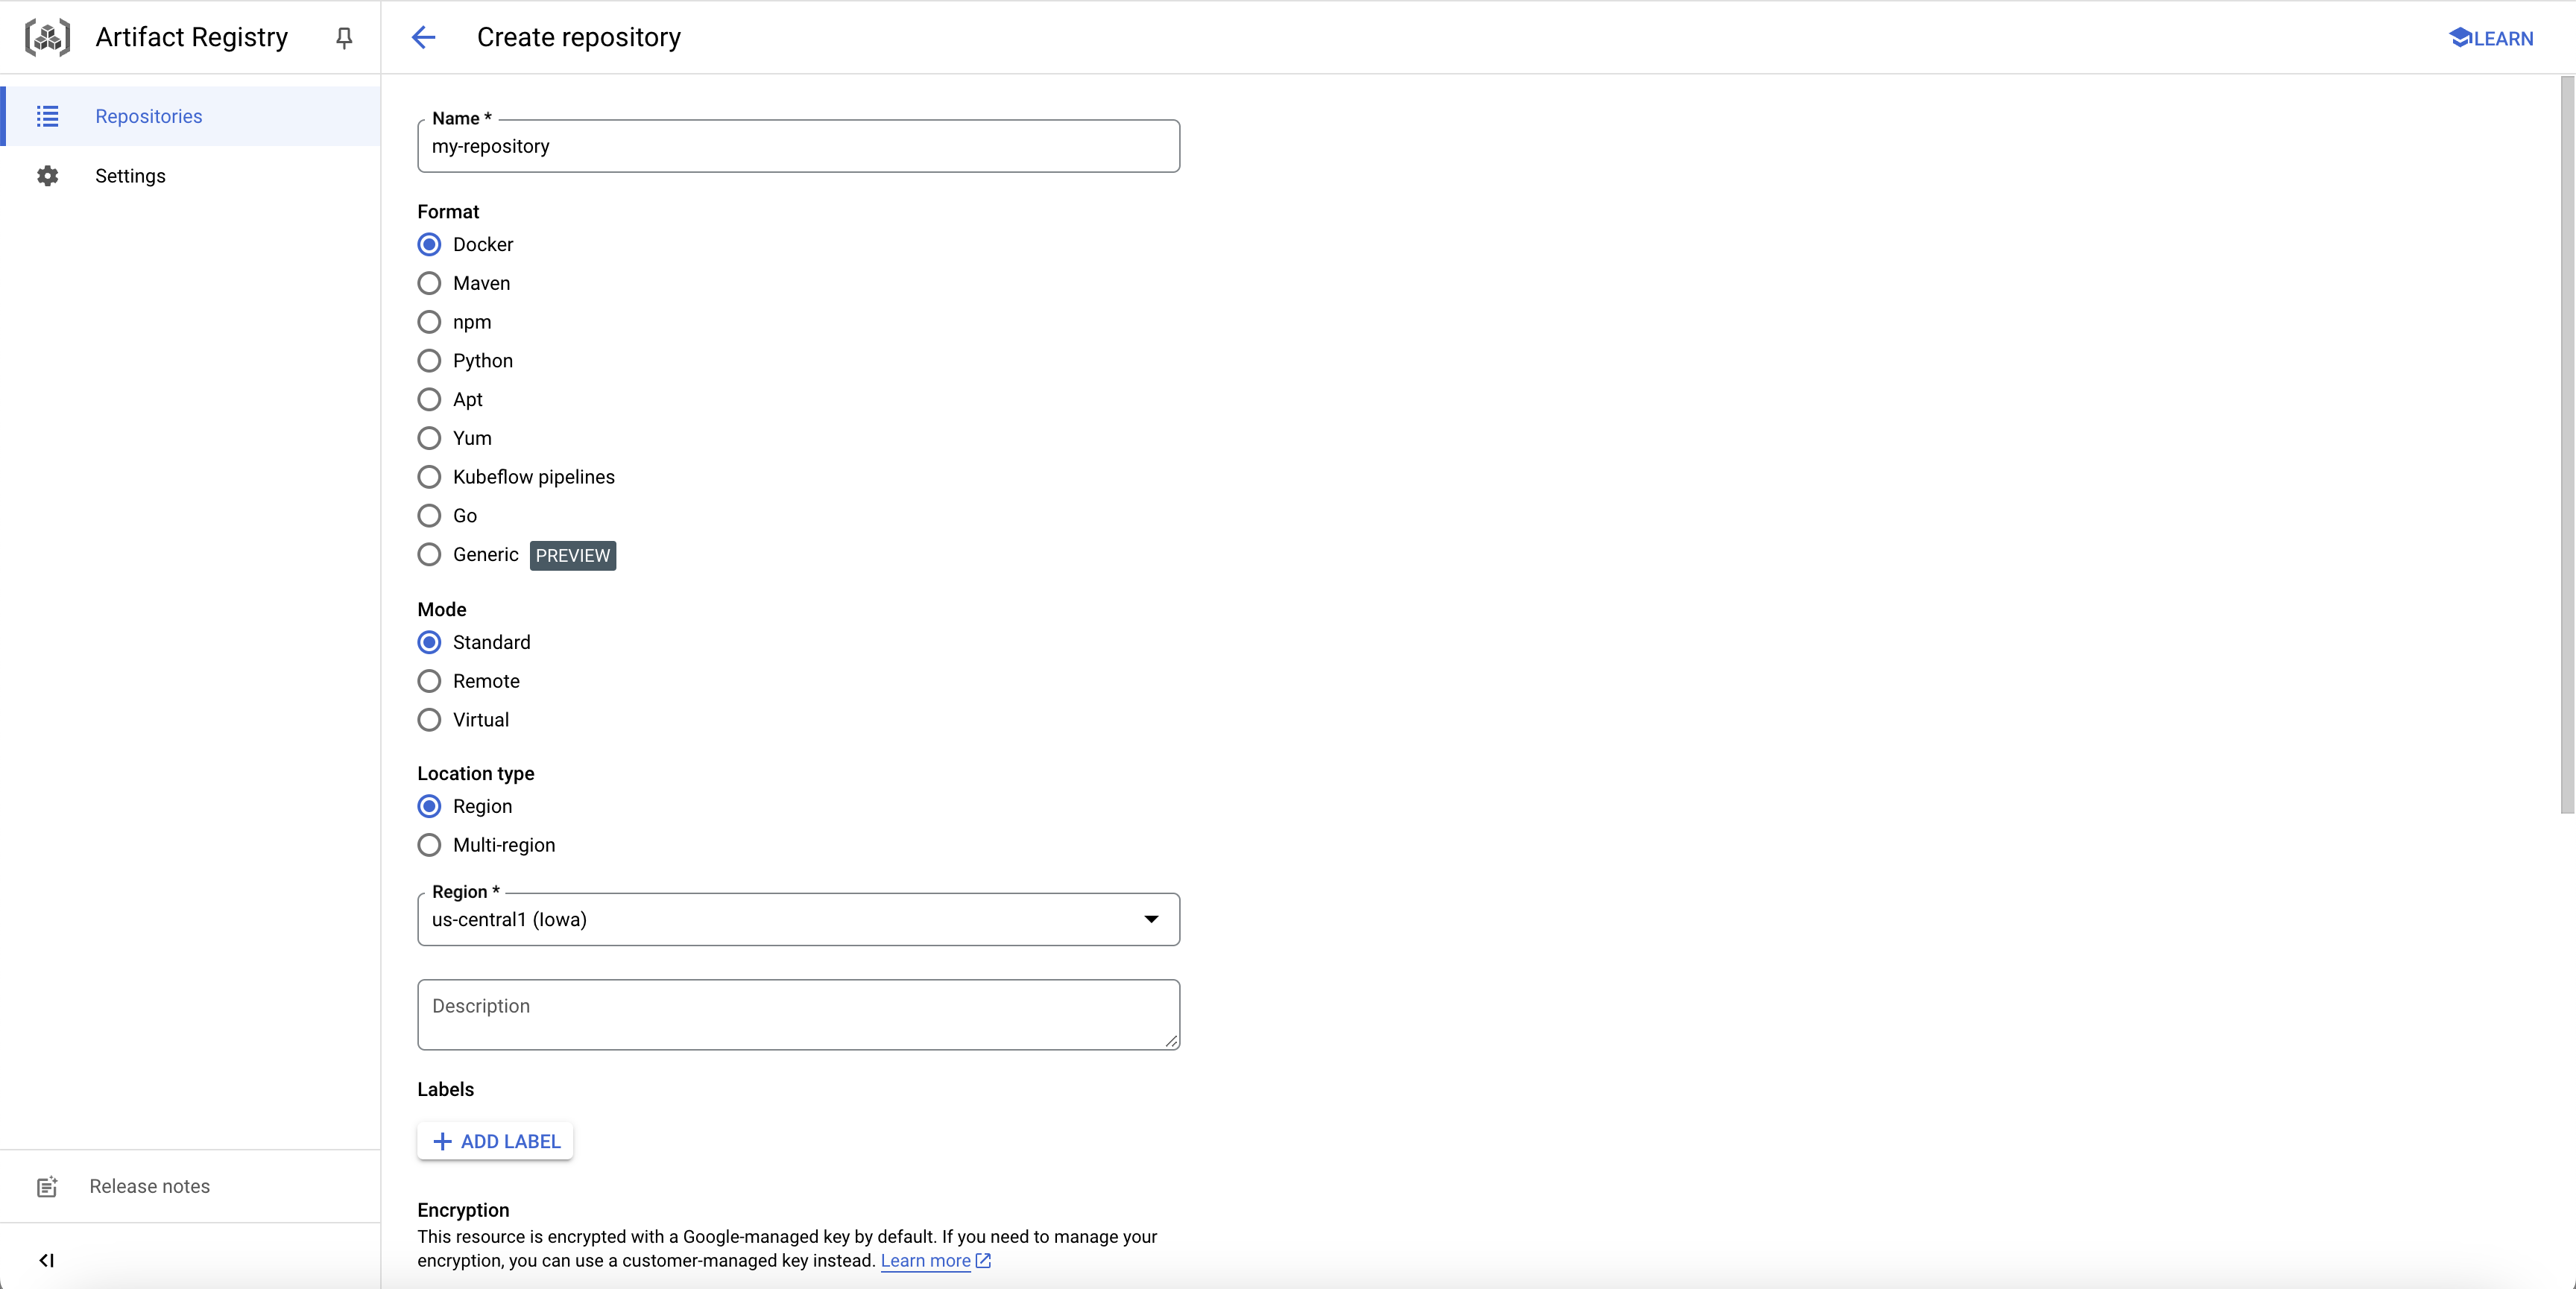
Create Artifact Registry
Upload image to GCP Artifact Registry
From the terminal, run the command:
$ gcloud auth configure-docker <repository_region>-docker.pkg.dev

# With `us-central1` as the region, the command will be as follows
$ gcloud auth configure-docker us-central1-docker.pkg.dev
Tag the docker image using the following command:
$ docker tag {local-image-name} <repository_region>-docker.pkg.dev/{project-name}/{repo-name}/{gcp-image-name}

# In this case, the command will be:
$ docker tag <your_dockerhub_username>/cars_project us-central1-docker.pkg.dev/omni-project/my-repository/cars_project
Then, push the image onto Artifact Registry.
$ docker push <repository_region>-docker.pkg.dev/{project-name}/{repo-name}/{gcp-image-name}

# In this case, the command will be:
$ docker push us-central1-docker.pkg.dev/omni-project/my-repository/cars_project
This command will take a couple of minutes. Once complete, you should be able to see the image on the repository's page.

Uploaded image of cars_project
Run the image container on GCP Cloud Run
On the Artifact Registry page, when you enter the repository, you will see the image that we have just uploaded. Click on the image link.
On the image's page, you will see the image version we have uploaded. Click on the three dots beside the version, and from the dropdown that appears, click on Deploy to Cloud Run.
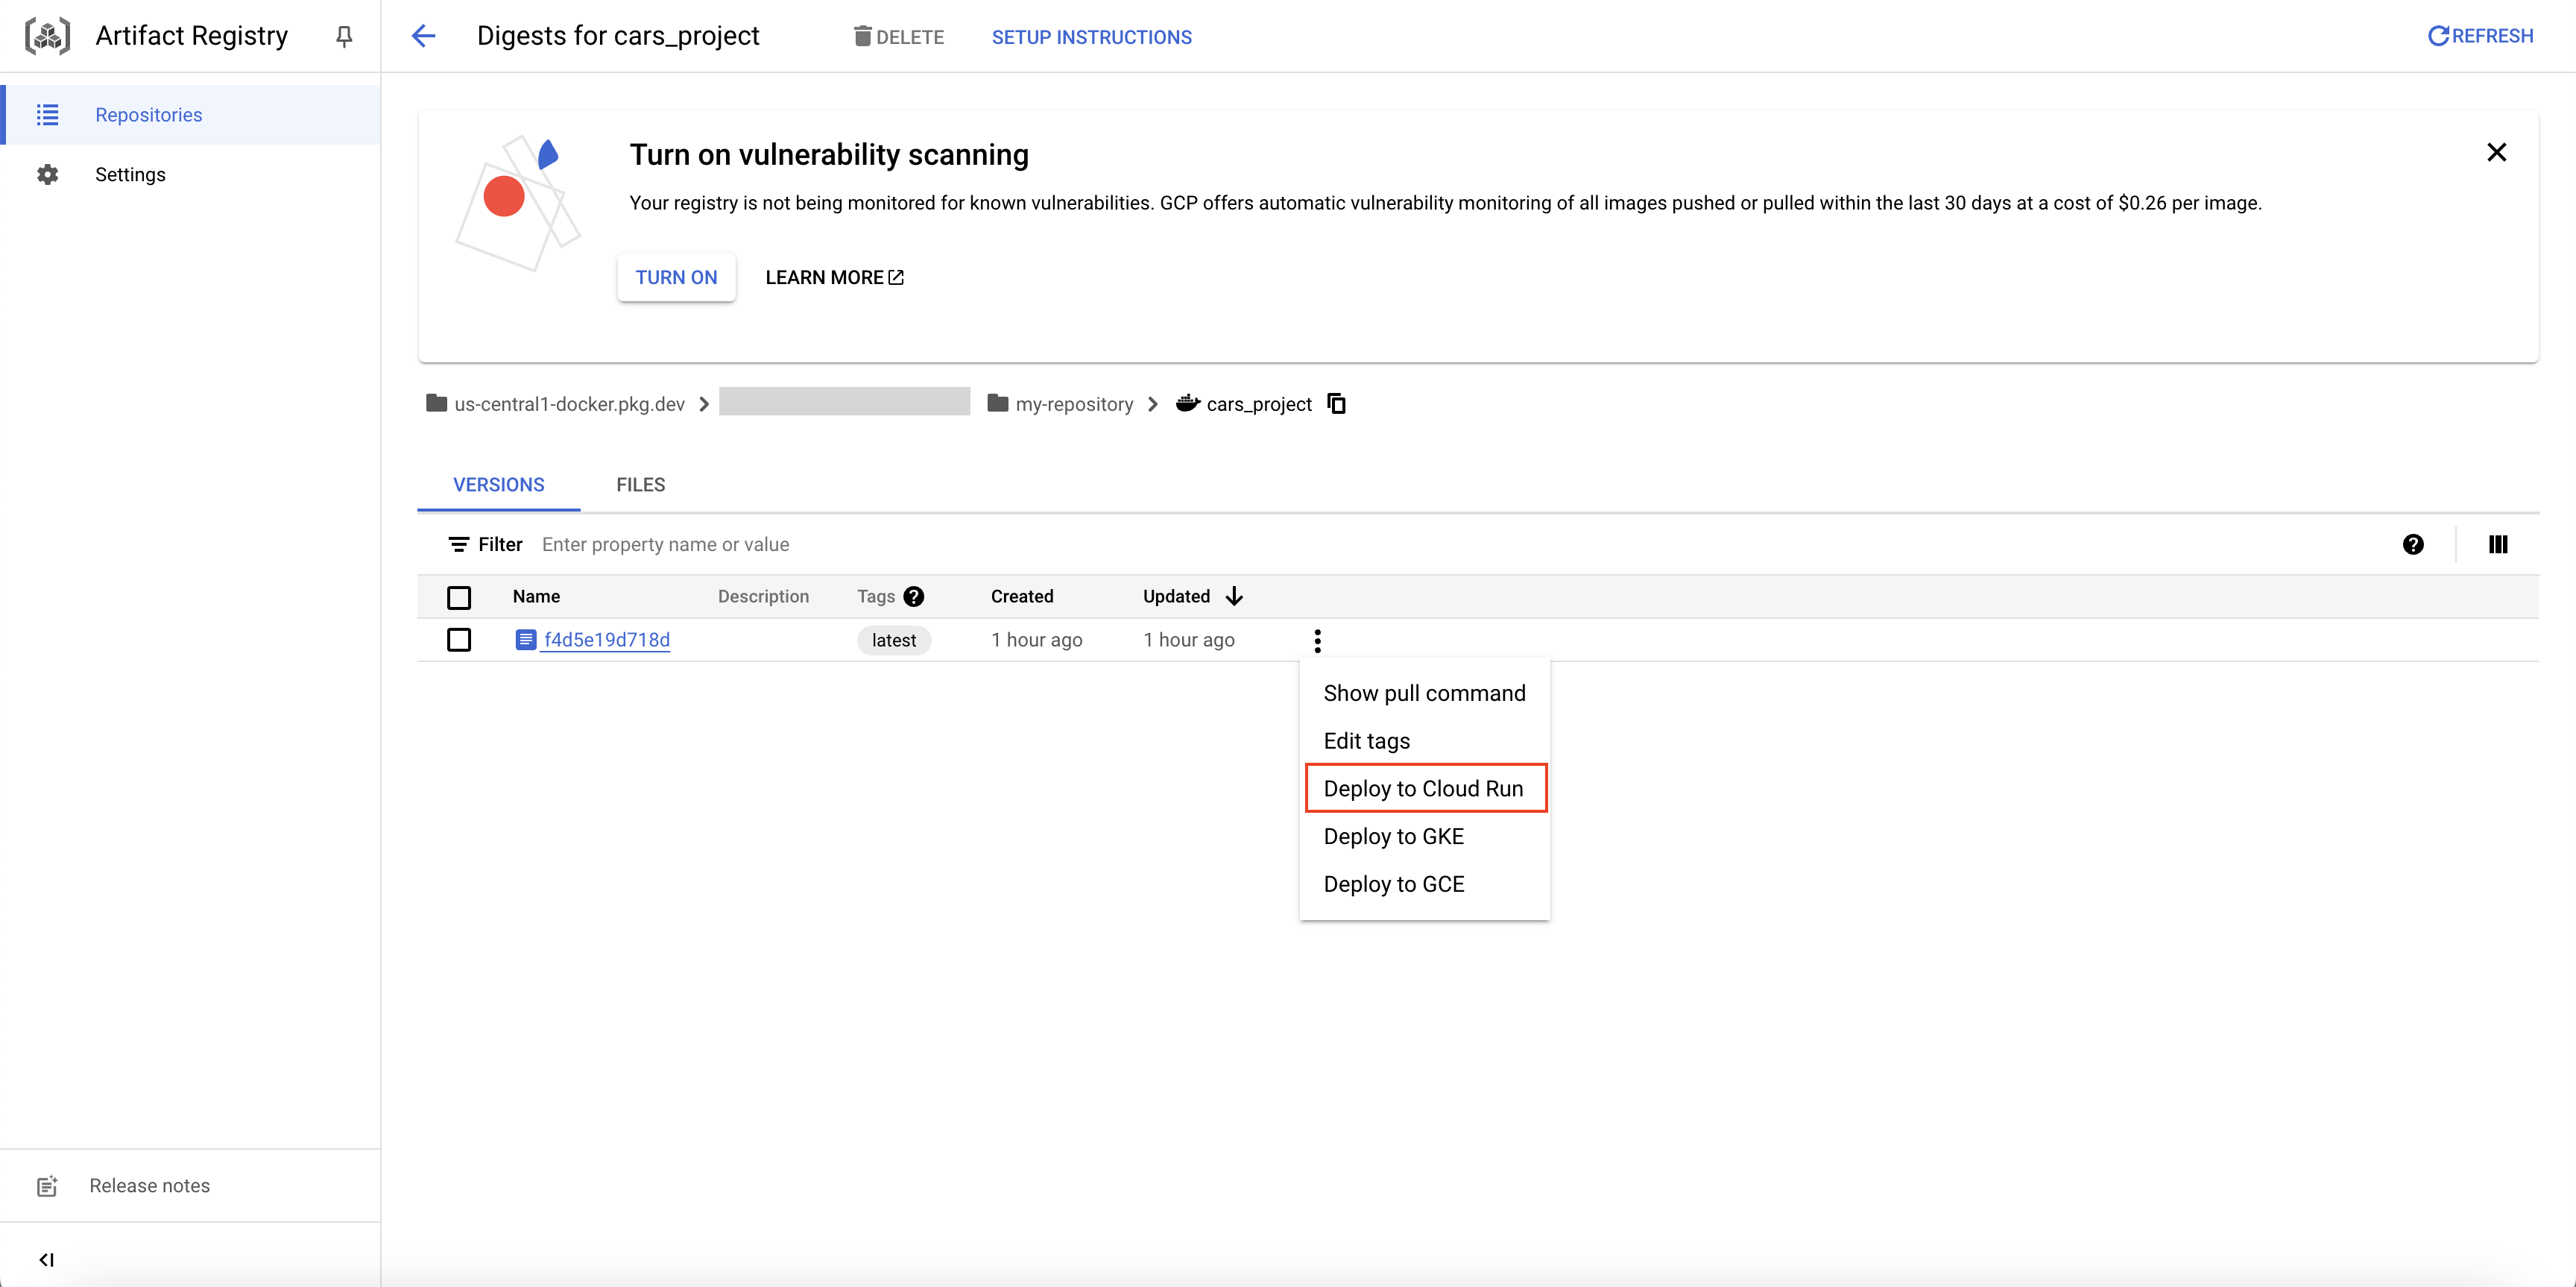
Deploy image to Cloud Run
You will land onto Cloud Run's Create Service page. In the Authentication section, we will select Allow unauthenticated invocations. Rest of the options stay as is.
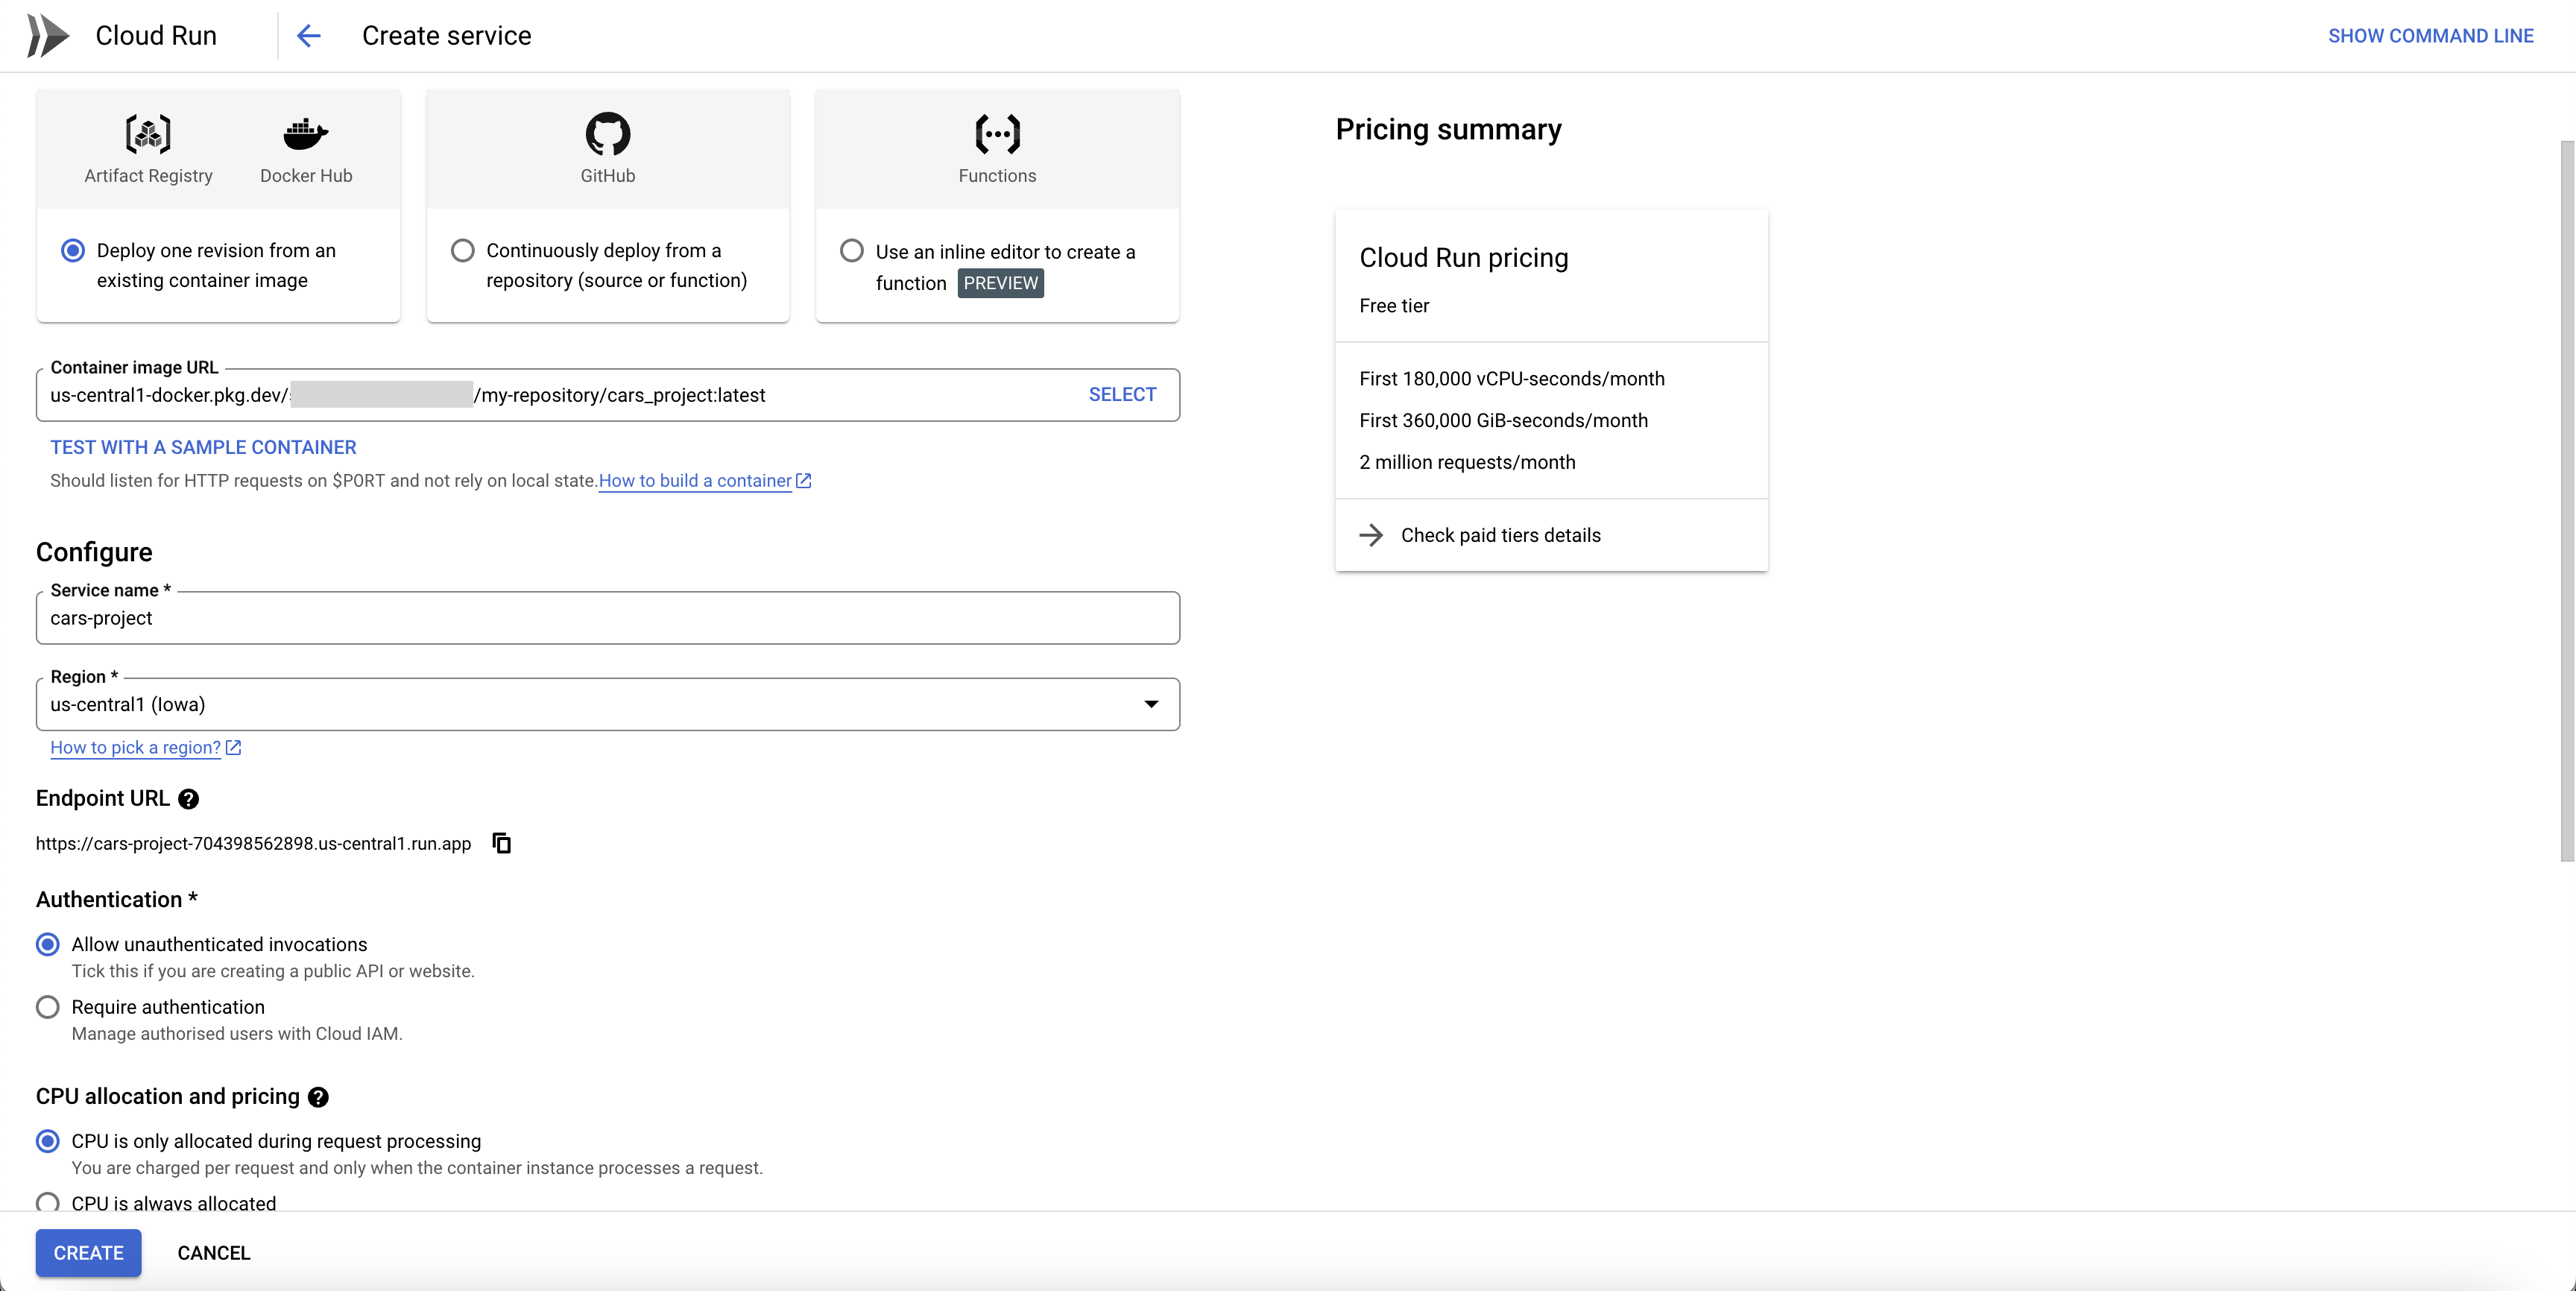
Create Cloud Run Service
Click on CREATE button at the bottom of the page.
The service will be deployed on Cloud Run. You can now click the URL at the top, and this will land on the application's home page.
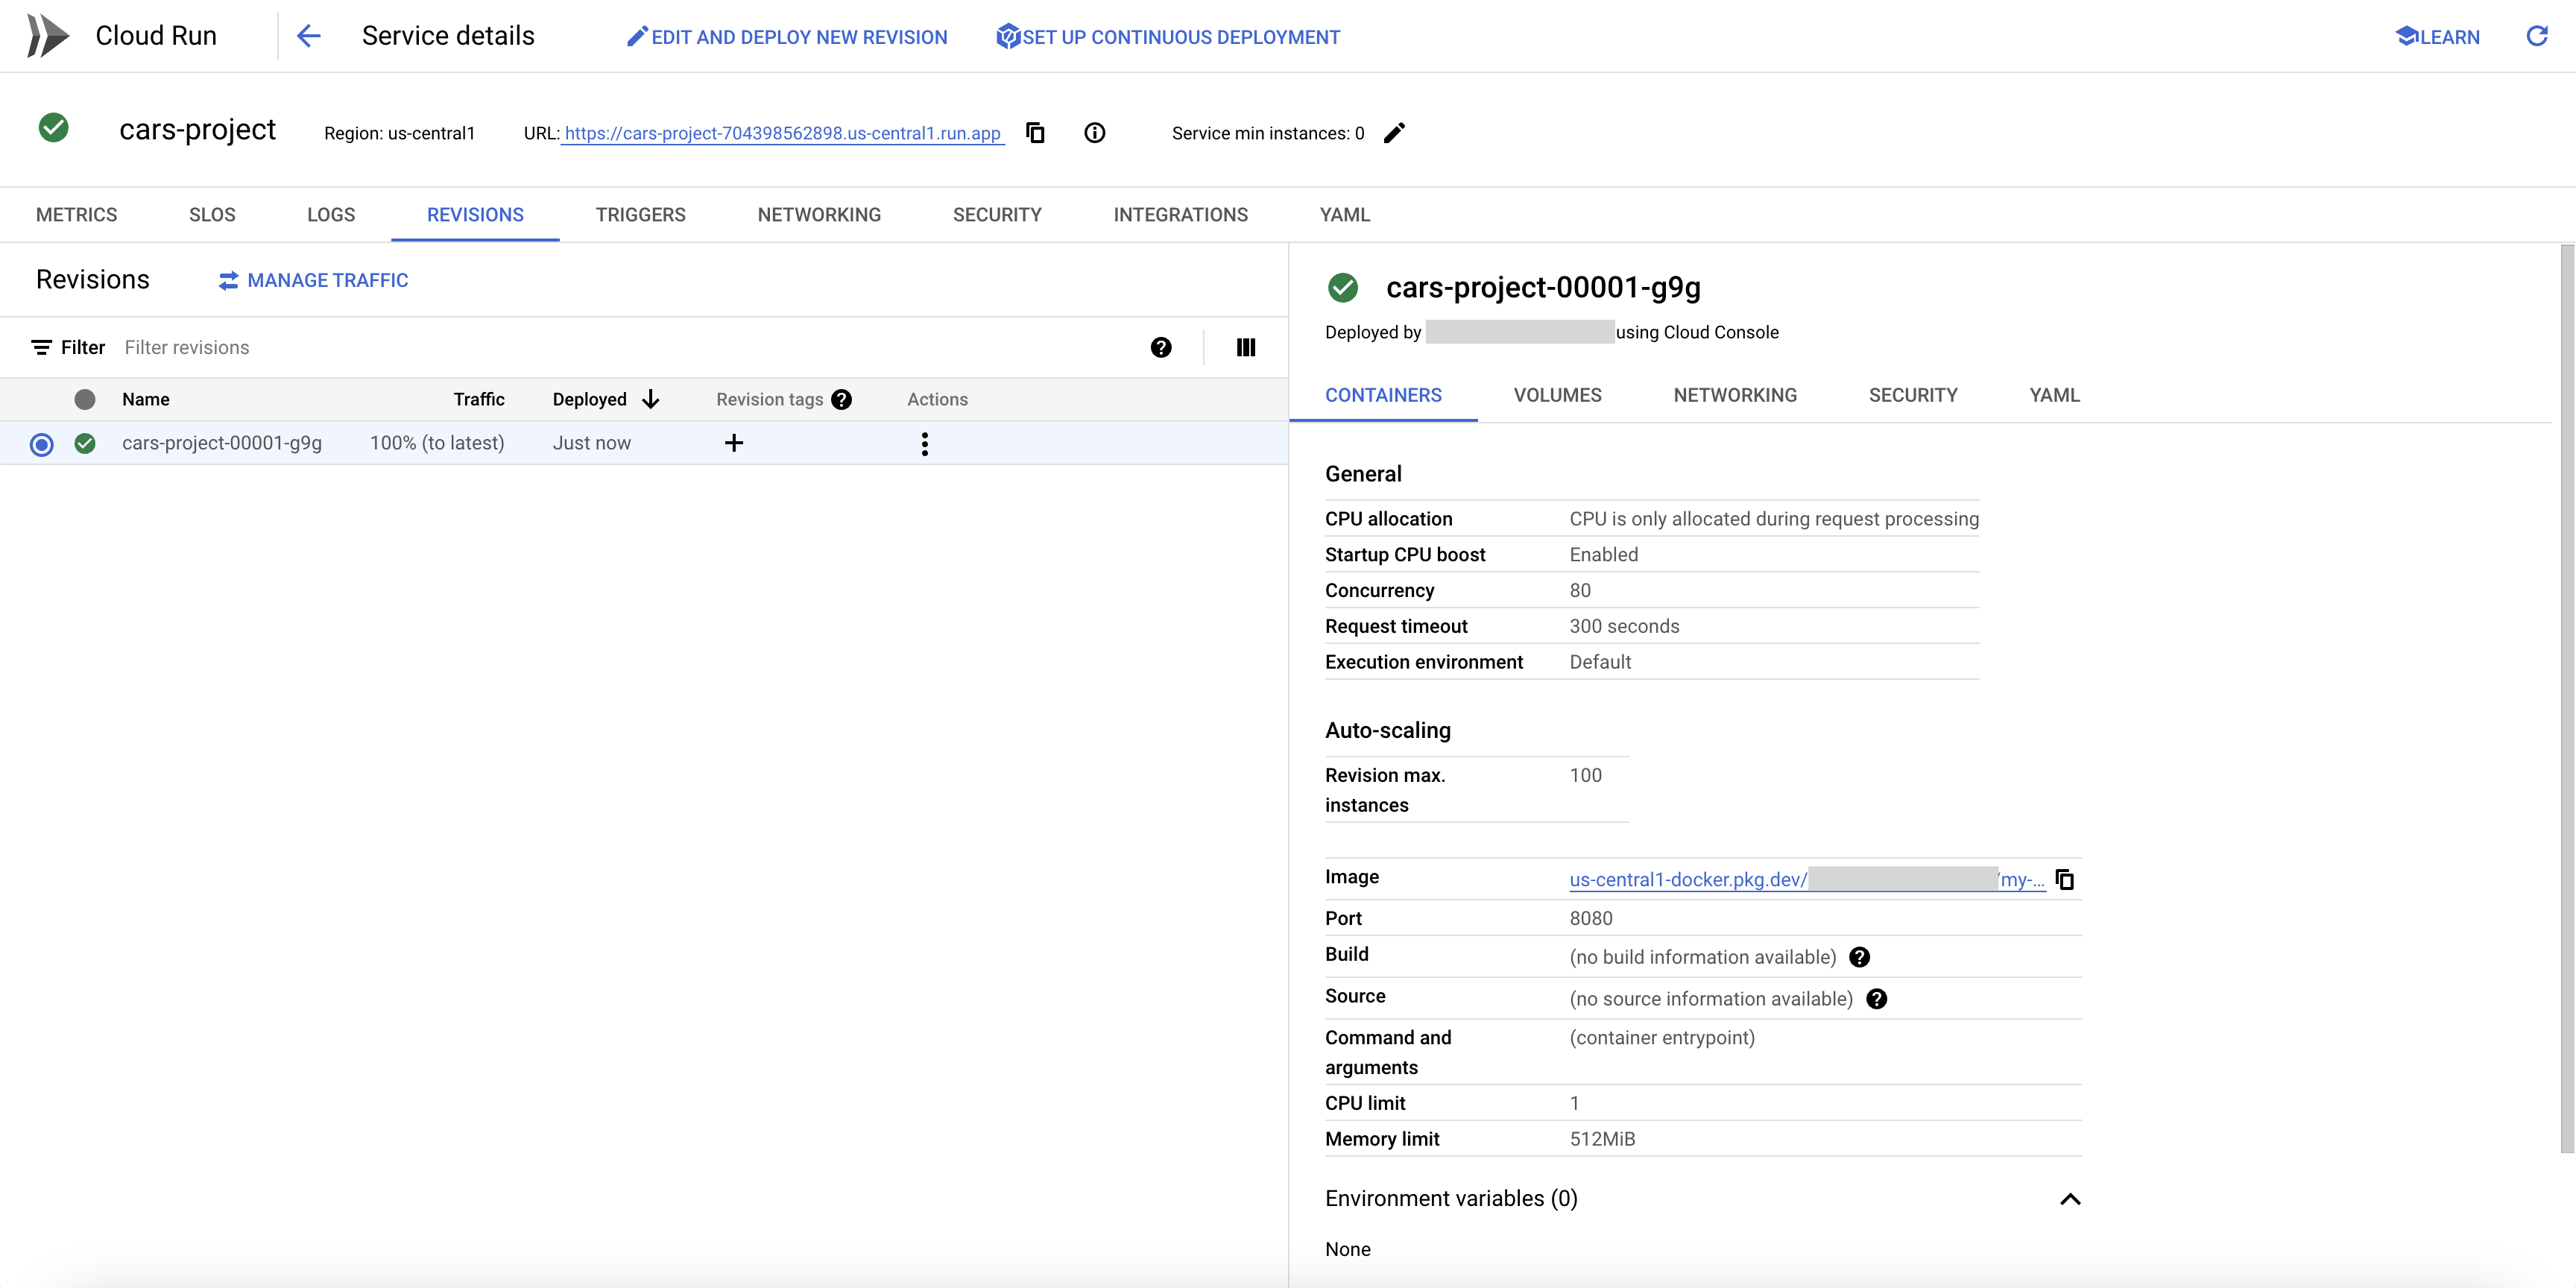
Successfully deployed Cloud Run Service
