Monitoring Backstage with OpenTelemetry:Closing the observability blind spot
‘One small step for a man, but a huge leap for developers’
— me, when I realised how to observe my Backstage with OpenTelemetry.
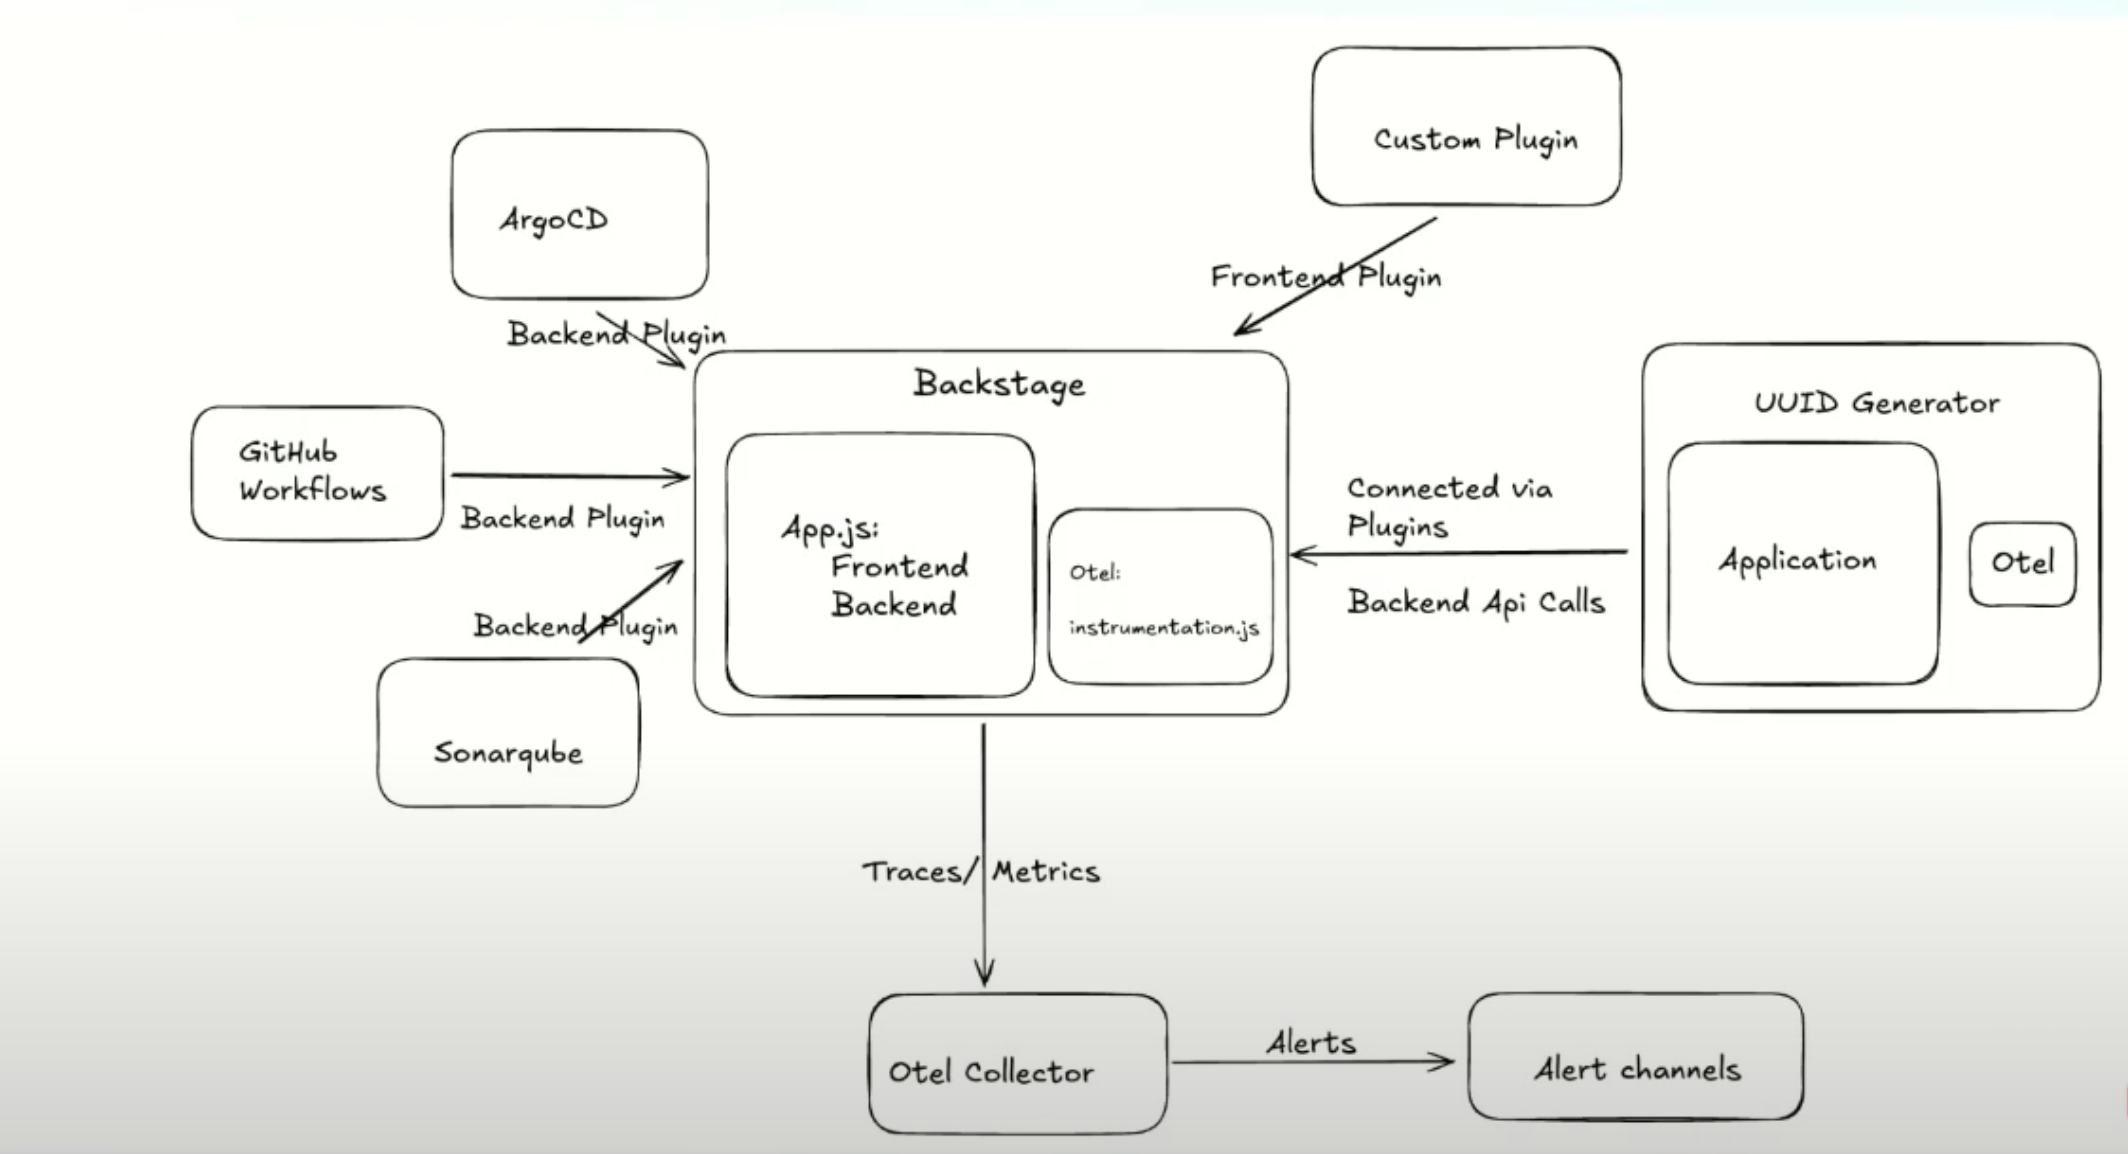
Backstage is often the “portal” through which we manage all our other systems, but who watches the watcher? Recently, we gave a KubeCon Talk, highlighting that monitoring Backstage itself is critical. When Backstage isn’t observable, it becomes a blind spot in your infrastructure. This blog captures the key ideas and technical walkthrough we shared during our talk.
The Blind Spot: Why Monitoring Backstage Matters
Backstage is a central developer portal called an Internal Developer Platform [IDP] that unifies infrastructure tooling, CI/CD, service catalogues, and more. If Backstage goes down or misbehaves, developer productivity can grind to a halt. Yet teams often focus on using Backstage to manage other services and forget to monitor Backstage itself. Common failure modes when Backstage isn’t observable include:
Plugin Failures
Backstage’s functionality is extended via plugins. A plugin might fail to fetch data or throw runtime errors.
For example, a Cloud provider plugin that can’t reach its API. Without monitoring, such failures can go unnoticed until users report broken UI components. Observability lets you catch these errors via error logs or failed trace spans as soon as they occur.
Broken Scaffolder Workflows
The software templating/scaffolding feature is key to Backstage. If the scaffolder tasks hang or fail, for example, due to misconfiguration or credential issues, new projects won’t get created.
In an unobserved Backstage, you might only see this as a vague timeout in the UI. With proper metrics and traces for each workflow step, you can quickly pinpoint and resolve such issues.
Integration Issues
Backstage integrates with many external systems [CI pipelines, CD tools like ArgoCD, artifact repositories, etc]. If an integration breaks, parts of Backstage’s UI will silently stop updating.
Monitoring these interactions via traces and timing metrics ensures you catch integration failures or performance degradation. Each external call can be traced and timed, turning integration problems into actionable alerts rather than mysterious blind spots.
In short, when Backstage itself isn’t monitored, you inevitably risk flying blind on your developer portal’s health. Downtime or slowness in Backstage impacts all engineering teams. We must treat Backstage as a production service with full observability, just like any microservice in our stack.
OpenTelemetry as a Solution for Backstage Observability
OpenTelemetry [OTel] is an open-source framework for collecting telemetry data from applications. With OpenTelemetry, you can instrument Backstage to emit tracing spans for operations, metrics for key performance indicators, and even logs with context.

OpenTelemetry’s architecture has a few key components,
Instrumentation Libraries
Language-specific SDKs [in our case, Node.js] and auto-instrumentation packages that hook into frameworks. Backstage’s backend is a Node application [Express server], so we will use the OpenTelemetry Node SDK and Node auto-instrumentations. These will automatically capture things like incoming HTTP requests, database queries, etc, and allow custom instrumentation in code.
Resource and Context Propagation
OTel attaches context [like trace IDs] to operations and propagates it across function calls and even between services. Backstage already has built-in support for OTel’s context propagation and uses the OTel APIs for some of its internals. This means when we enable OTel, many Backstage components [catalogue, scaffolder, etc.] will start emitting traces/metrics without heavy custom coding.
Collectors and Exporters
OpenTelemetry data can be exported to a backend of your choice. Often this is done via an OpenTelemetry Collector, a separate service that receives data and forwards it to one or more observability platforms. You can export data in OTLP format and send it to backends like SigNoz, Jaeger or Prometheus.
Signals like Traces, Metrics, Logs
With OTel, Backstage can emit distributed traces, metrics and logs. By capturing all three signals, we can correlate issues from multiple angles. For instance, an error log can be tied to a specific trace of a failing request, and metrics can alert on error rates or latency.
In summary, OpenTelemetry provides the tools to instrument and export Backstage’s internal behaviour. Next, we’ll walk through how to apply OTel to Backstage’s backend.
Instrumenting the Backstage Backend with OpenTelemetry
To get Backstage emitting telemetry, we need to integrate the OpenTelemetry Node.js SDK into the Backstage backend service. Backstage is built on Node/Express, so we can leverage OTel’s Node auto-instrumentation to capture many out-of-the-box data points like HTTP requests and certain database or HTTP client calls. We can also add manual instrumentation for anything custom.
Step 1: Install OpenTelemetry packages
In your Backstage project, add the OTel SDK and the auto-instrumentation package [and any exporters you plan to use]:
# from the root of the repo, install into the backend package
yarn --cwd packages/backend add @opentelemetry/sdk-node @opentelemetry/auto-instrumentations-node
# Add exporters for metrics and traces:
yarn --cwd packages/backend add @opentelemetry/exporter-trace-otlp-http @opentelemetry/exporter-metrics-otlp-http\
(If you prefer Prometheus for metrics or a different exporter, adjust accordingly. Backstage’s documentation uses a Prometheus exporter in their example, but here we’ll use OTLP exporters to send data to an OpenTelemetry Collector.)
Step 2: Create an instrumentation startup file
In the Backstage backend source [usually packages/backend/src], create a file named instrumentation.js [or tracing.js]. This file will initialise the OTel SDK before the rest of Backstage loads. It’s important that this runs first, so that all incoming requests and library calls are instrumented from the start.
In packages/backend/src/instrumentation.js:
// Prevent multiple initialization (especially if Backstage uses worker threads)
const { isMainThread } = require('worker_threads');
if (!isMainThread) {
  return;
}

const { NodeSDK } = require('@opentelemetry/sdk-node');
const { getNodeAutoInstrumentations } = require('@opentelemetry/auto-instrumentations-node');

// Import OTLP exporters for traces and metrics
const { OTLPTraceExporter } = require('@opentelemetry/exporter-trace-otlp-http');
const { OTLPMetricExporter } = require('@opentelemetry/exporter-metrics-otlp-http');
const { PeriodicExportingMetricReader } = require('@opentelemetry/sdk-metrics');

// Configure the exporters (assuming a local OTel collector or SigNoz endpoint)
const traceExporter = new OTLPTraceExporter({
  // e.g., sending to a collector running on localhost
  url: 'http://localhost:4318/v1/traces'
});
const metricExporter = new OTLPMetricExporter({
  url: 'http://localhost:4318/v1/metrics'
});

// Set up the OpenTelemetry Node SDK with auto-instrumentation
const sdk = new NodeSDK({
  traceExporter,// export traces via OTLP
  metricReader: new PeriodicExportingMetricReader({ exporter: metricExporter }),  // export metrics via OTLP
  instrumentations: [getNodeAutoInstrumentations()]
});

// Start the SDK (this registers global providers for traces/metrics)
sdk.start();
Let’s break down what this does:
We create a NodeSDK instance, providing it with the OTLP Trace Exporter and OTLP Metric Exporter pointed at our collector. We wrap the metric exporter in a PeriodicExportingMetricReader [which periodically pushes metrics].
For a production setup, you’d point the URL to your OpenTelemetry Collector, SigNoz ingestion endpoint, or your backend vendor's endpoint.
We include getNodeAutoInstrumentations(), which enables a suite of auto-instrumentation plugins for Node. This covers Express, HTTP, DNS, MySQL, and more, automatically generating spans for operations in those libraries.
Finally, we call sdk.start().
This initialises the SDK and registers the global OpenTelemetry tracer and meter providers, so instrumentation is active.
Step 3: Load the instrumentation at startup
We need to ensure instrumentation.js is loaded before the Backstage server starts. In development, one convenient method is to modify the start script in packages/backend/package.json:
"scripts": {
  "start": "backstage-cli package start --require ./src/instrumentation.js",
  ...
}
Using Node’s --require flag preloads our instrumentation module. Now, when you run yarn start for the backend, it will automatically run the OpenTelemetry initialisation first. For production, say Docker, you can do something similar by copying the file into the container and adding --require ./instrumentation.js in the Docker CMD entrypoint.
At this point, if you start Backstage, it should begin emitting telemetry:
- Traces of incoming requests and internal operations will be captured.
- Metrics defined by Backstage or OTel auto-instrumentation will be collected. By default, Backstage’s core plugins already define many useful metrics when OTel is enabled.
Step 4: Verify telemetry data
You can check that your OTel Collector or SigNoz is receiving data. With OTLP and SigNoz, you’d look in the SigNoz UI for your service name or check the collector logs to ensure data is flowing.

Advanced Use Cases and Benefits
Beyond basic monitoring, instrumenting Backstage with OpenTelemetry opens the door to more advanced observability scenarios,
Alerting on Plugin Failures:
Once Backstage emits metrics and error traces, you can set up alerts for abnormal conditions.
For example, you might alert on a high error span rate in a particular plugin’s trace data, or a drop to 0 in a critical metric [e.g., if scaffolder.task.count suddenly drops over a period when you expect activity, it could indicate the scaffolder is stuck or failing].
You could also create a custom metric for “plugin failure count” by incrementing a counter whenever a plugin catches an exception, and alert on that.
With OTel data centralised in a backend, defining such alerts becomes straightforward.
Performance Profiling
Traces allow you to perform performance analysis of Backstage. By looking at trace timelines, you can identify slow operations and bottlenecks. For instance, if loading the Backstage homepage is slow, a trace might reveal that one plugin’s API call is the culprit. You can measure durations of database queries, external API calls, or heavy in-memory operations. Moreover, metrics like histograms of response times [e.g., the scaffolder.task.duration histogram] can show you long-term performance trends and variance.
This data helps with capacity planning and optimising Backstage’s performance.
Observability of CI/CD and ArgoCD Integrations
Those features must be reliable if you’ve integrated your CI/CD pipelines or GitOps [ArgoCD] into Backstage. By instrumenting Backstage’s interactions with these systems, you gain insight into the health of your delivery pipelines through Backstage.
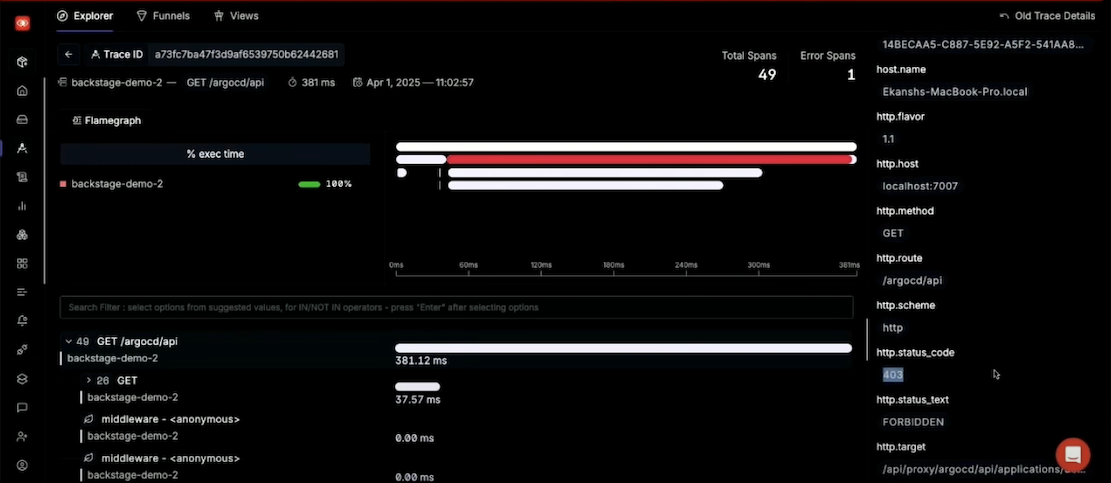
For example, Backstage might periodically fetch the status of ArgoCD applications to display deployment status. With OTel, each fetch can be a traced operation, if ArgoCD’s API is down or returns errors, you’ll see error spans in Backstage indicating the failure.
You can also track metrics like “pipeline status fetch latency” or “number of failed pipeline fetches”. This essentially turns Backstage into a window on your delivery ecosystem’s health. Instead of treating CI/CD plugins as black boxes, you’ll have telemetry from the Backstage side that shows integration issues [even if the external system isn’t directly monitored, Backstage will surface its failures].
In practice, this means faster detection of issues like an unreachable ArgoCD server or permissions problems because Backstage will log and trace those errors.
Unified View for Developers
By having Backstage instrumented, developers using Backstage can benefit from in-app observability cues.
For instance, if a plugin fails to load data, you could surface an error message that includes a trace ID. The developer can then use that trace ID in their observability tooling to get a full trace and logs for the failed request.
This tight coupling between Backstage and your monitoring system transforms Backstage into not just a portal for your services, but a monitored app itself that engineers can trust. It reduces MTTR for Backstage issues significantly.
In conclusion, observing Backstage with OpenTelemetry turns the lights on for your developer portal. No longer is Backstage a blind spot; it becomes a well-instrumented part of your ecosystem. Backstage was built to boost developer experience and productivity; monitoring it is a huge leap in that direction.
