Overview
This documentation provides a detailed walkthrough on how to set up a Pub/Sub to collect Cloud Load Balancer (CLB) logs and forward them to SigNoz.
Prerequisites
- Google Cloud account with administrative privilege or load balancer Admin privilege.
- Cloud Load Balancer (logging should be enabled)
- Access to a project in GCP
- Google Cloud Monitoring API enabled
Setup
Create a Pub/Sub topic
Follow the steps mentioned in the Creating Pub/Sub Topic document to create the Pub/Sub topic.
Create Log Router to Pub/Sub Topic
Follow the steps mentioned in the Log Router Setup document to create the Log Router.
To ensure you filter out only the Load Balancer logs, use the following filter conditions:
resource.type="Application Load Balancer"
In case you want the logs only from a particular Load Balancer, you can add the following query to the Query text box:
resource.type="load balancer"
resource.labels.service_name="<FORWARDING RULE NAME>"
Provide permissions to Log Router Sink
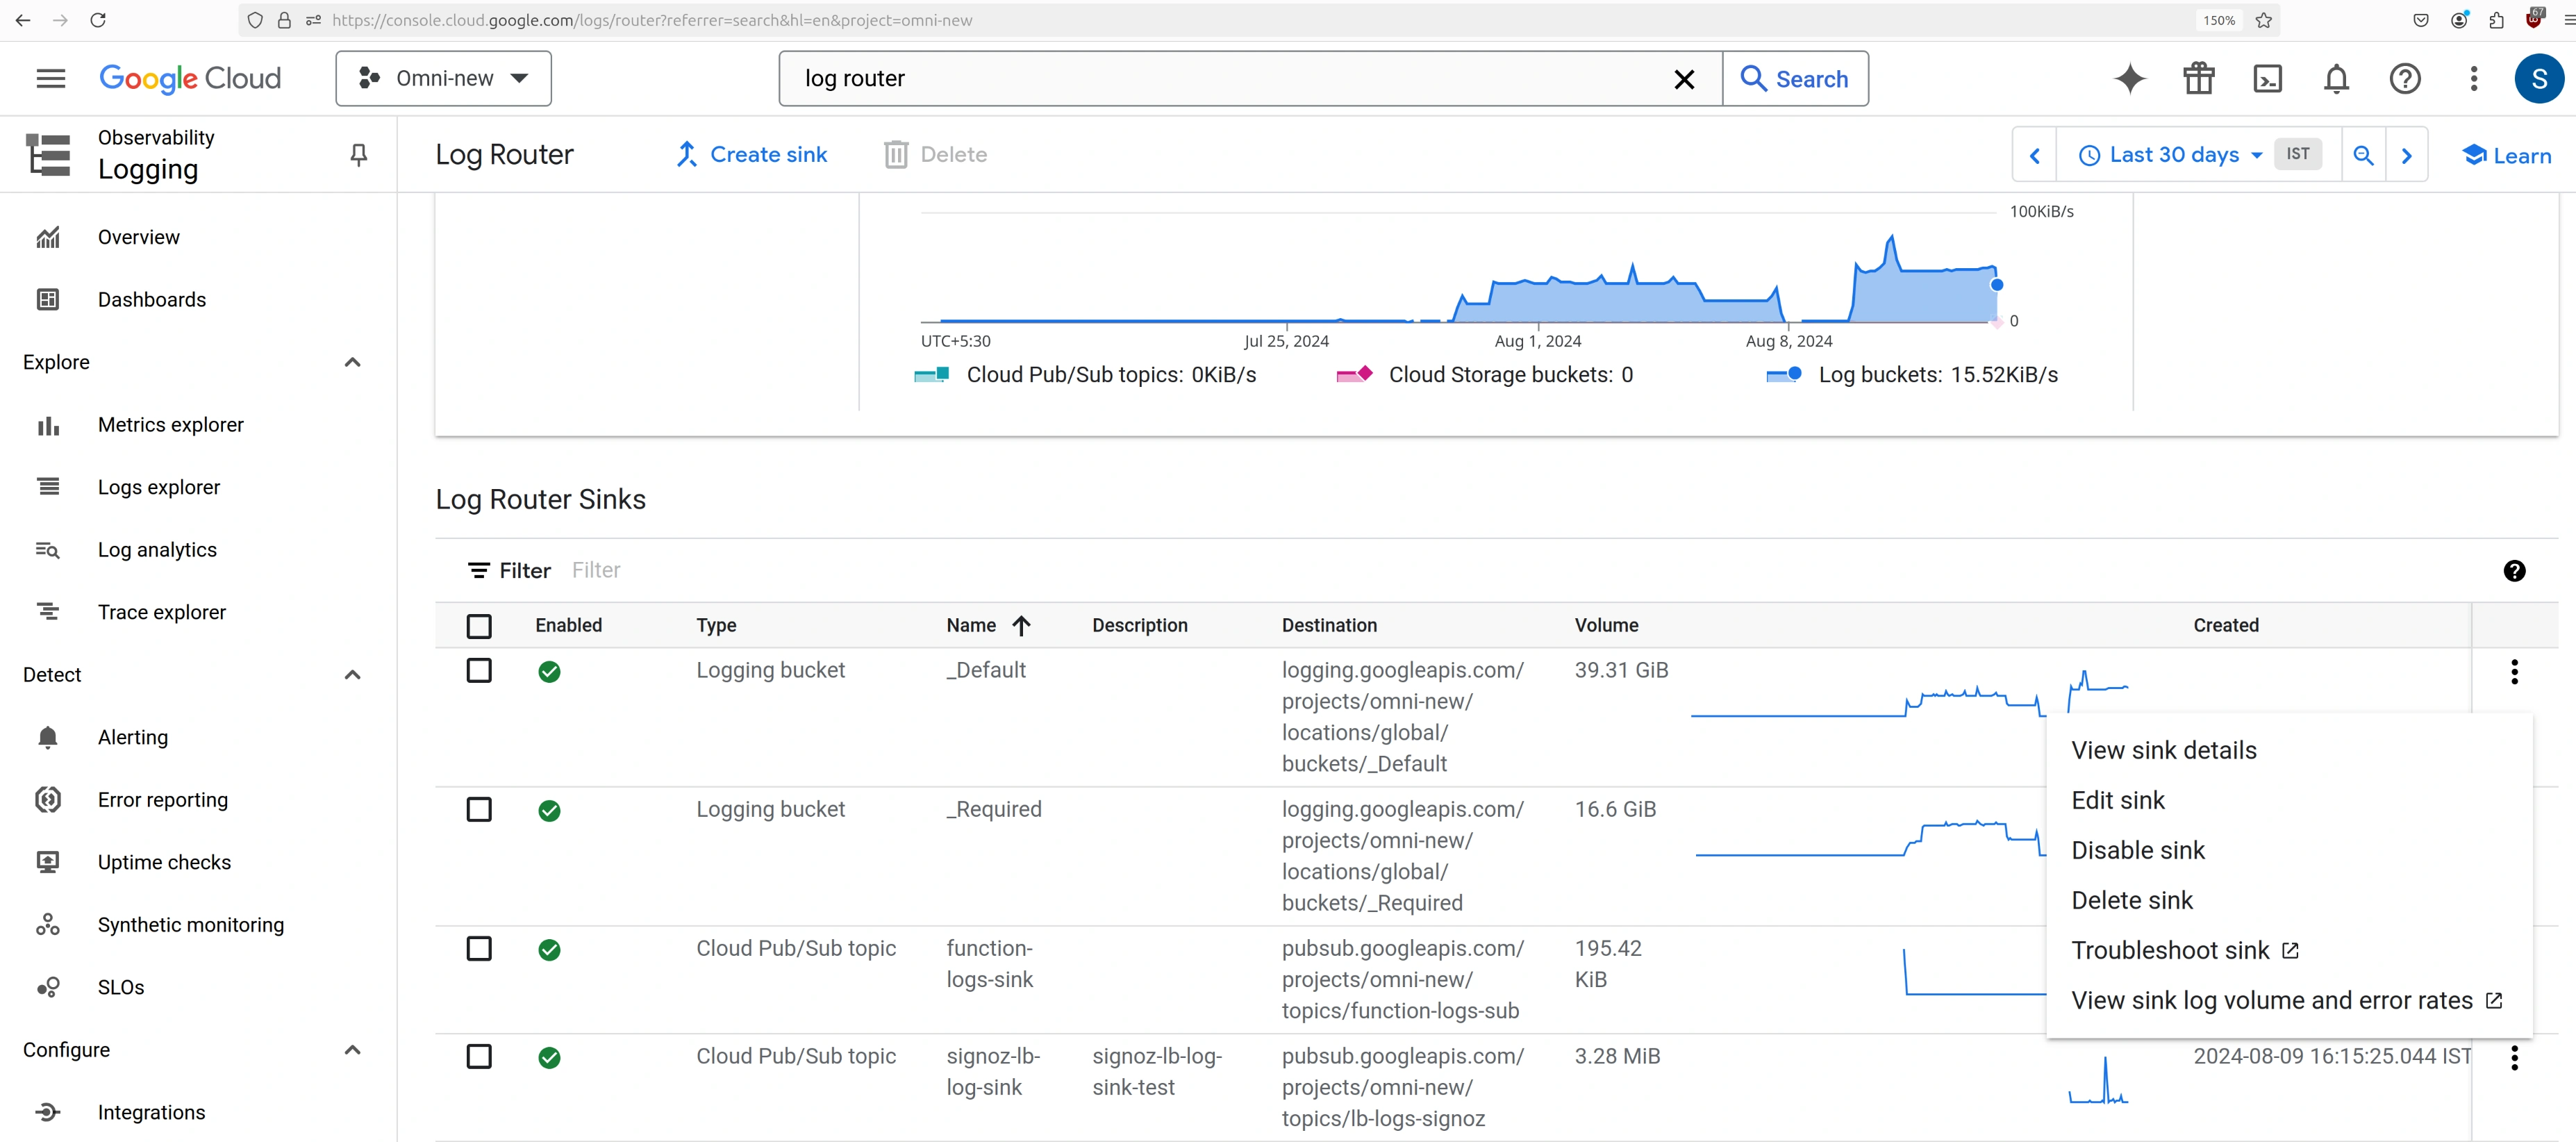
- On the GCP console, search for Log Router, and navigate to Logs Router in the GCP Logging service.
- Click on the 3 dots to the right of the Log Router sink that we created in the earlier steps, and select_ View sink details_ from the dropdown.
View Sink details
- From the sink details, copy the Writer identity and keep it with you. We will require this in the upcoming steps.

Copy Writer Identity
- In order to provide the Log Router sink with the permissions to write to the Pub/Sub topic, navigate to the Pub/Sub service, and click on the 3 dots to the right of the Pub/Sub topic where the router is going to sink the logs. Select View permissions from this dropdown.
- Click on the APP PRINCIPAL button on the top. In the New principal's textbox, copy the value from the Writer identity (remove the serviceAccount: prefix from the value), and select any value from the dropdown that appears. In the Select a role dropdown, search for Pub/Sub Publisher and select it.
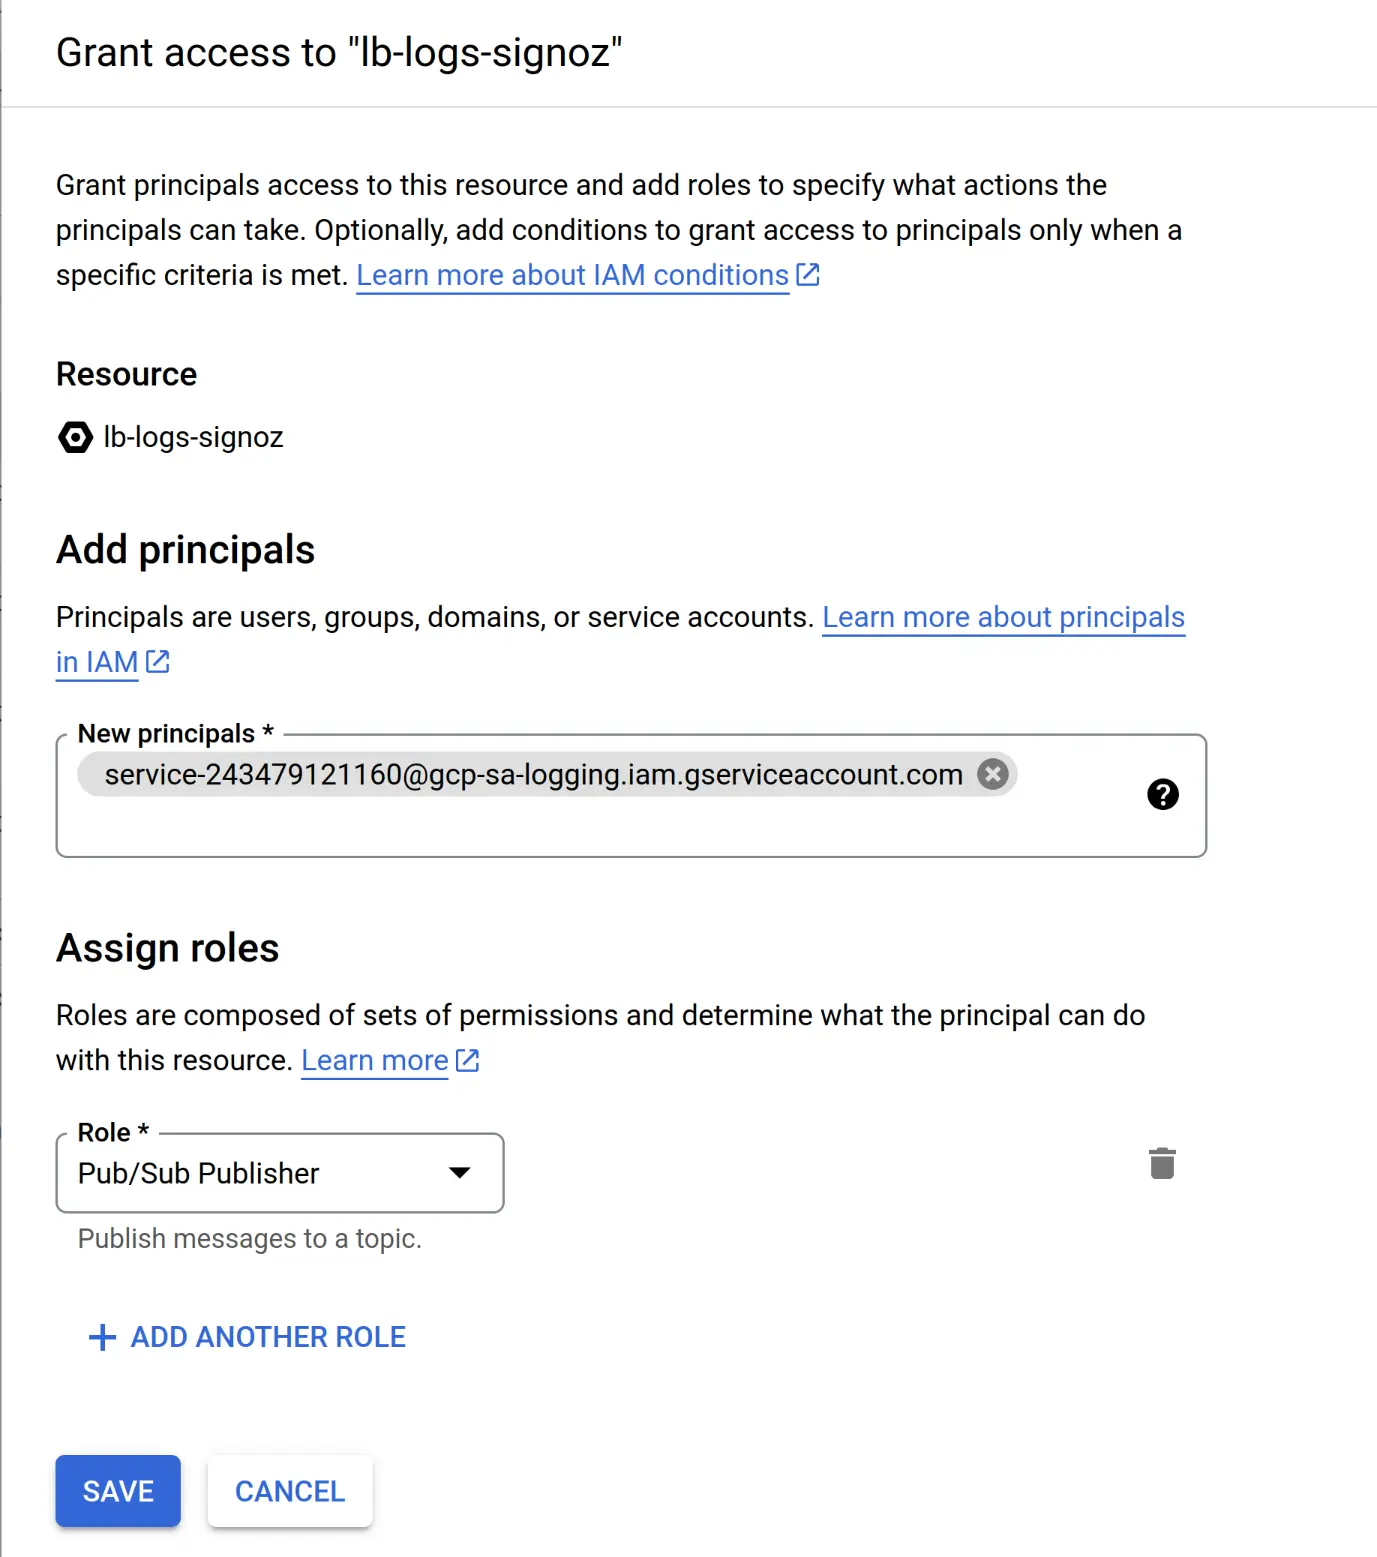
Grant Access to Log Router Sink
- Click on Save. With this, the Log Router sink now has permission to write to the Pub/Sub topic.
- Wait for ~1 minute for the permissions to take effect, and now trigger the Cloud Load Balancer a few times. You should see the Log Router's volume increasing, as well as the Pub/Sub topic's metrics showing up published requests.
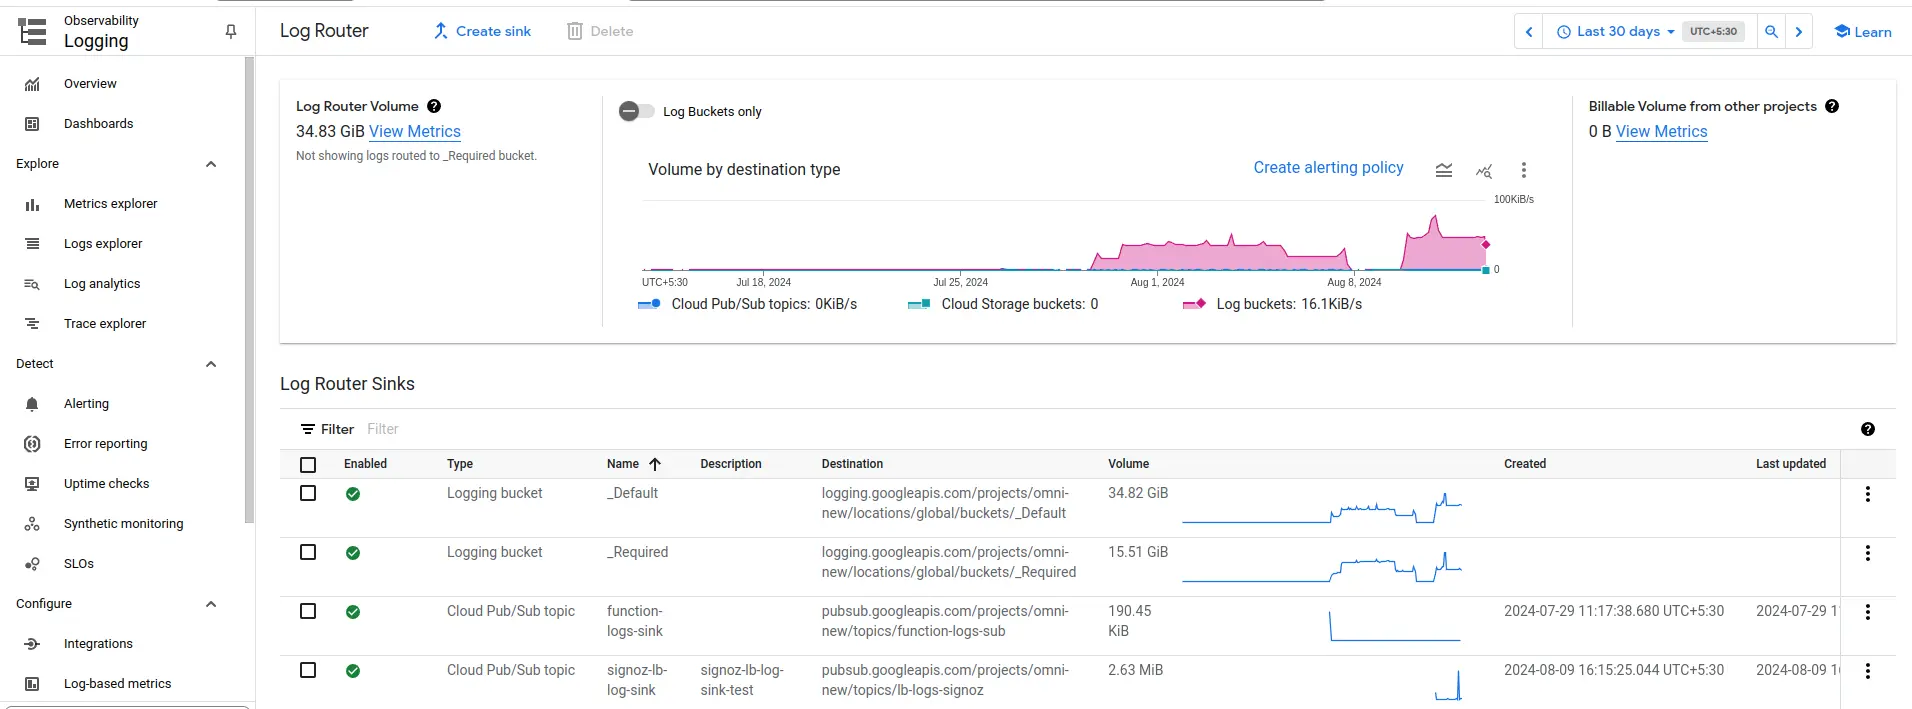
Verify log router getting volume upon any trigger of CLB.
After the log router configuration and permission is done, let’s configure the OTel collector to receive these logs.
OTel Collector Configuration
Follow the steps mentioned in the Creating Compute Engine document to create the Compute Engine instance.
Install OTel Collector as agent
Firstly, we will establish the authentication using the following commands:
- Initialize
gcloud:
gcloud init
- Authenticate into GCP:
gcloud auth application-default login
Let us now proceed to the OTel Collector installation:
Step 1: Download otel-collector tar.gz for your architecture
wget https://github.com/open-telemetry/opentelemetry-collector-releases/releases/download/v0.135.0/otelcol-contrib_0.135.0_linux_amd64.tar.gz
Step 2: Extract otel-collector tar.gz to the otelcol-contrib folder
mkdir otelcol-contrib && tar xvzf otelcol-contrib_0.135.0_linux_amd64.tar.gz -C otelcol-contrib
Step 3: Create config.yaml in the folder otelcol-contrib with the below content in it. Replace <region> with the appropriate SigNoz Cloud region. Replace "<SIGNOZ_INGESTION_KEY>" with what is provided by SigNoz:
Note: The googlecloudpubsub receiver’s encoding was updated from the deprecated raw_text to text_encoding. This configuration has been tested and works with otelcol-contrib v0.135.0.
extensions:
  text_encoding:
    encoding: utf-8
receivers:
  otlp:
    protocols:
      grpc:
        endpoint: 0.0.0.0:4317
      http:
        endpoint: 0.0.0.0:4318
  googlecloudpubsub:
    project: <gcp-project-id>
    subscription: projects/<gcp-project-id>/subscriptions/lb-logs-signoz-sub-new-9-aug
    encoding: text_encoding
processors:
  batch: {}
  resource/env:
    attributes:
    - key: deployment.environment
      value: prod
      action: upsert
exporters:
  otlp:
    endpoint: "ingest.<region>.signoz.cloud:443"
    tls:
      insecure: false
    headers:
      "signoz-ingestion-key": "<SigNoz-Key>"
service:
  extensions: [text_encoding]
  pipelines:
    traces:
      receivers: [otlp]
      processors: [batch]
      exporters: [otlp]
    metrics:
      receivers: [otlp]
      processors: [batch]
      exporters: [otlp]
    logs:
      receivers: [otlp, googlecloudpubsub]
      processors: [batch, resource/env]
      exporters: [otlp]
Step 4: Once we are done with the above configurations, we can now run the collector service.
If you want to run otel collector process in the background:
./otelcol-contrib --config ./config.yaml &> otelcol-output.log & echo "$!" > otel-pid
You can now trigger the Cloud Load Balancer a few times, and see the logs from the GCP Cloud Load Balancer on SigNoz.
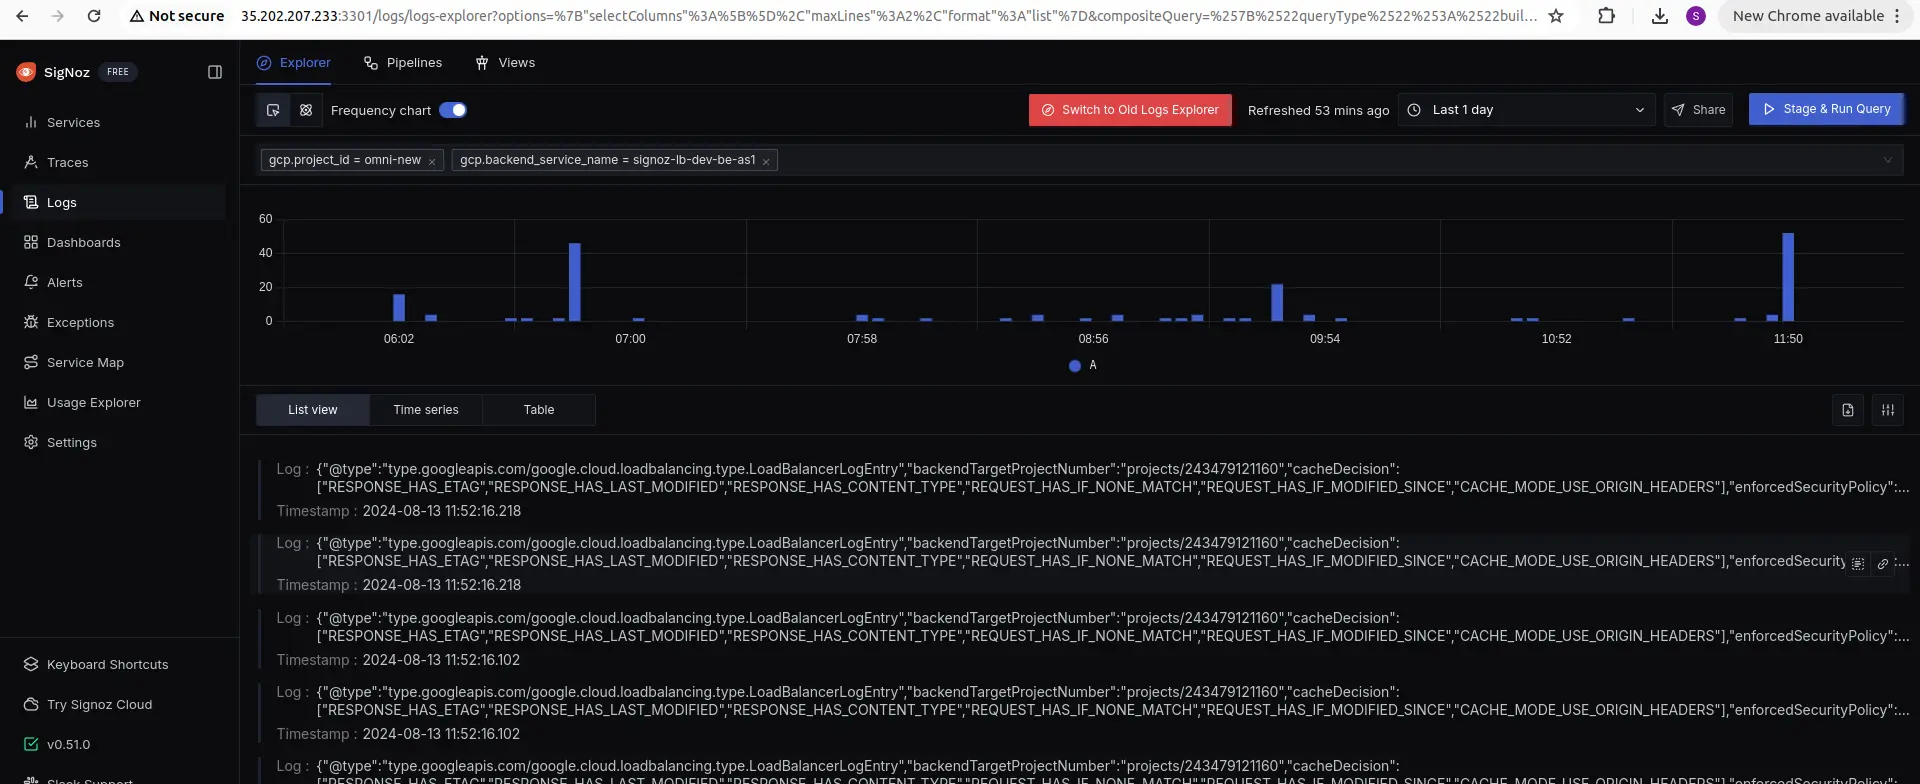
Visualize the logs in SigNoz Cloud
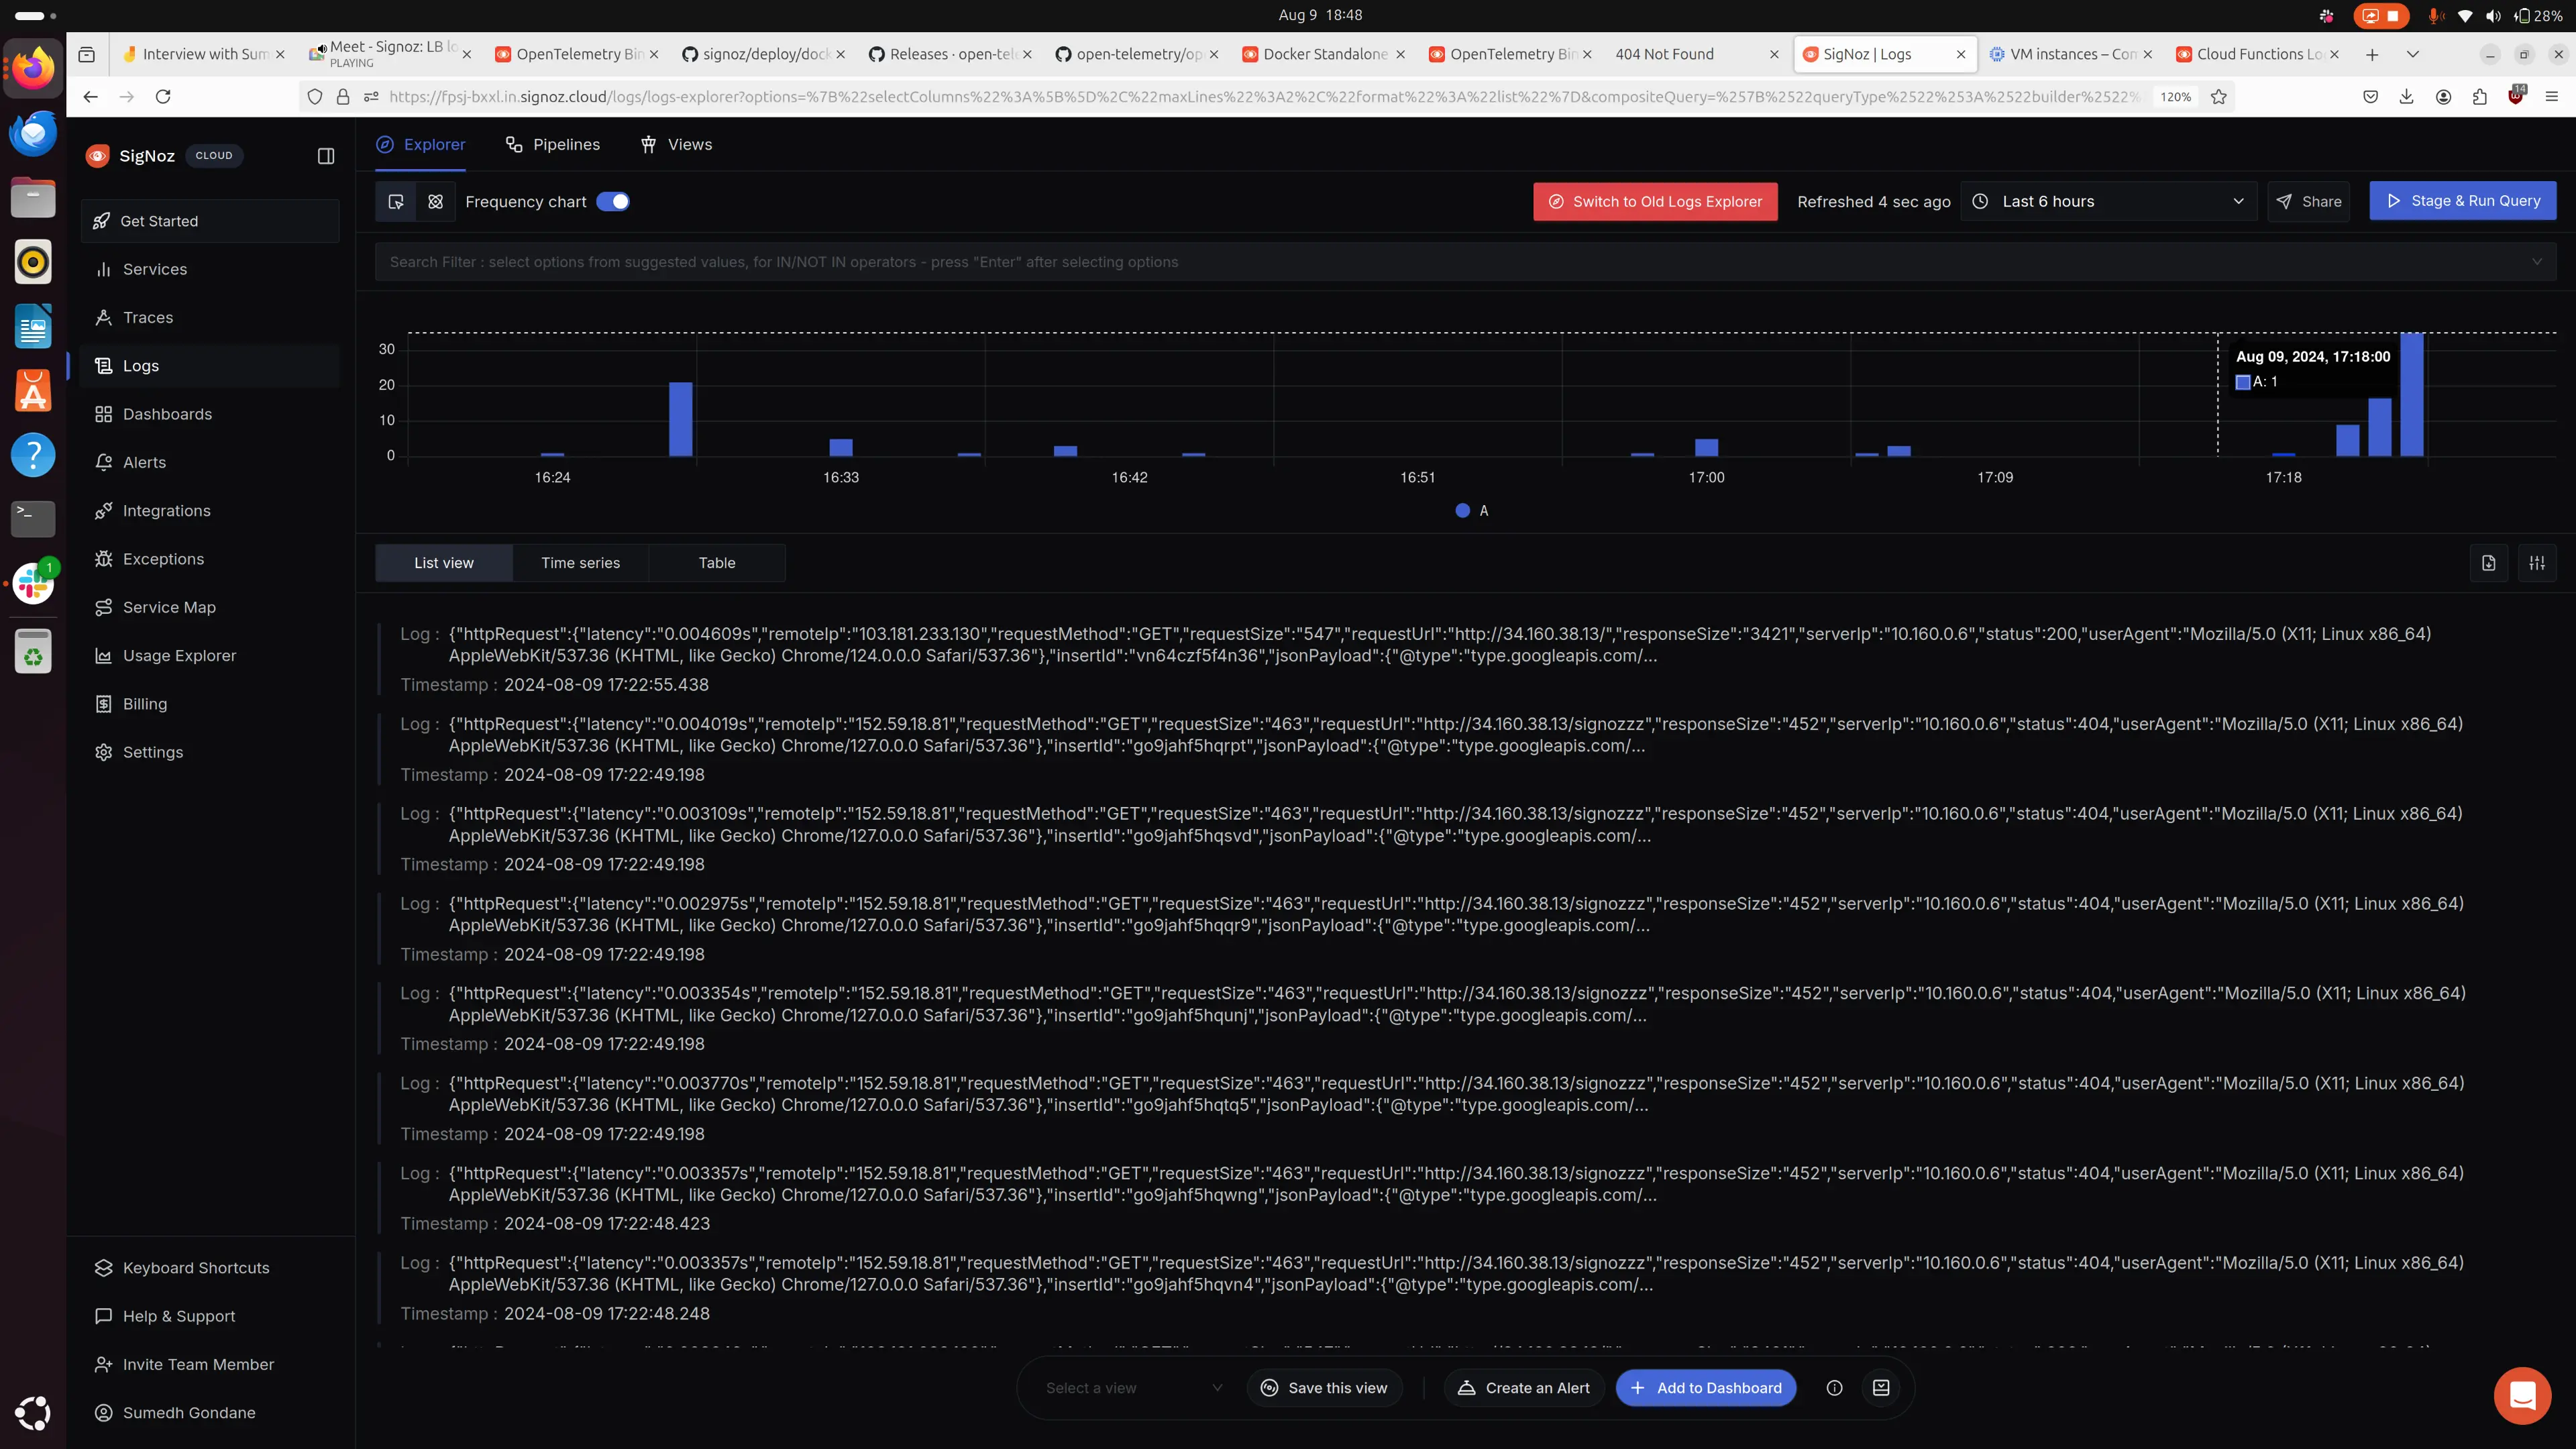
Logs captured by the SigNoz
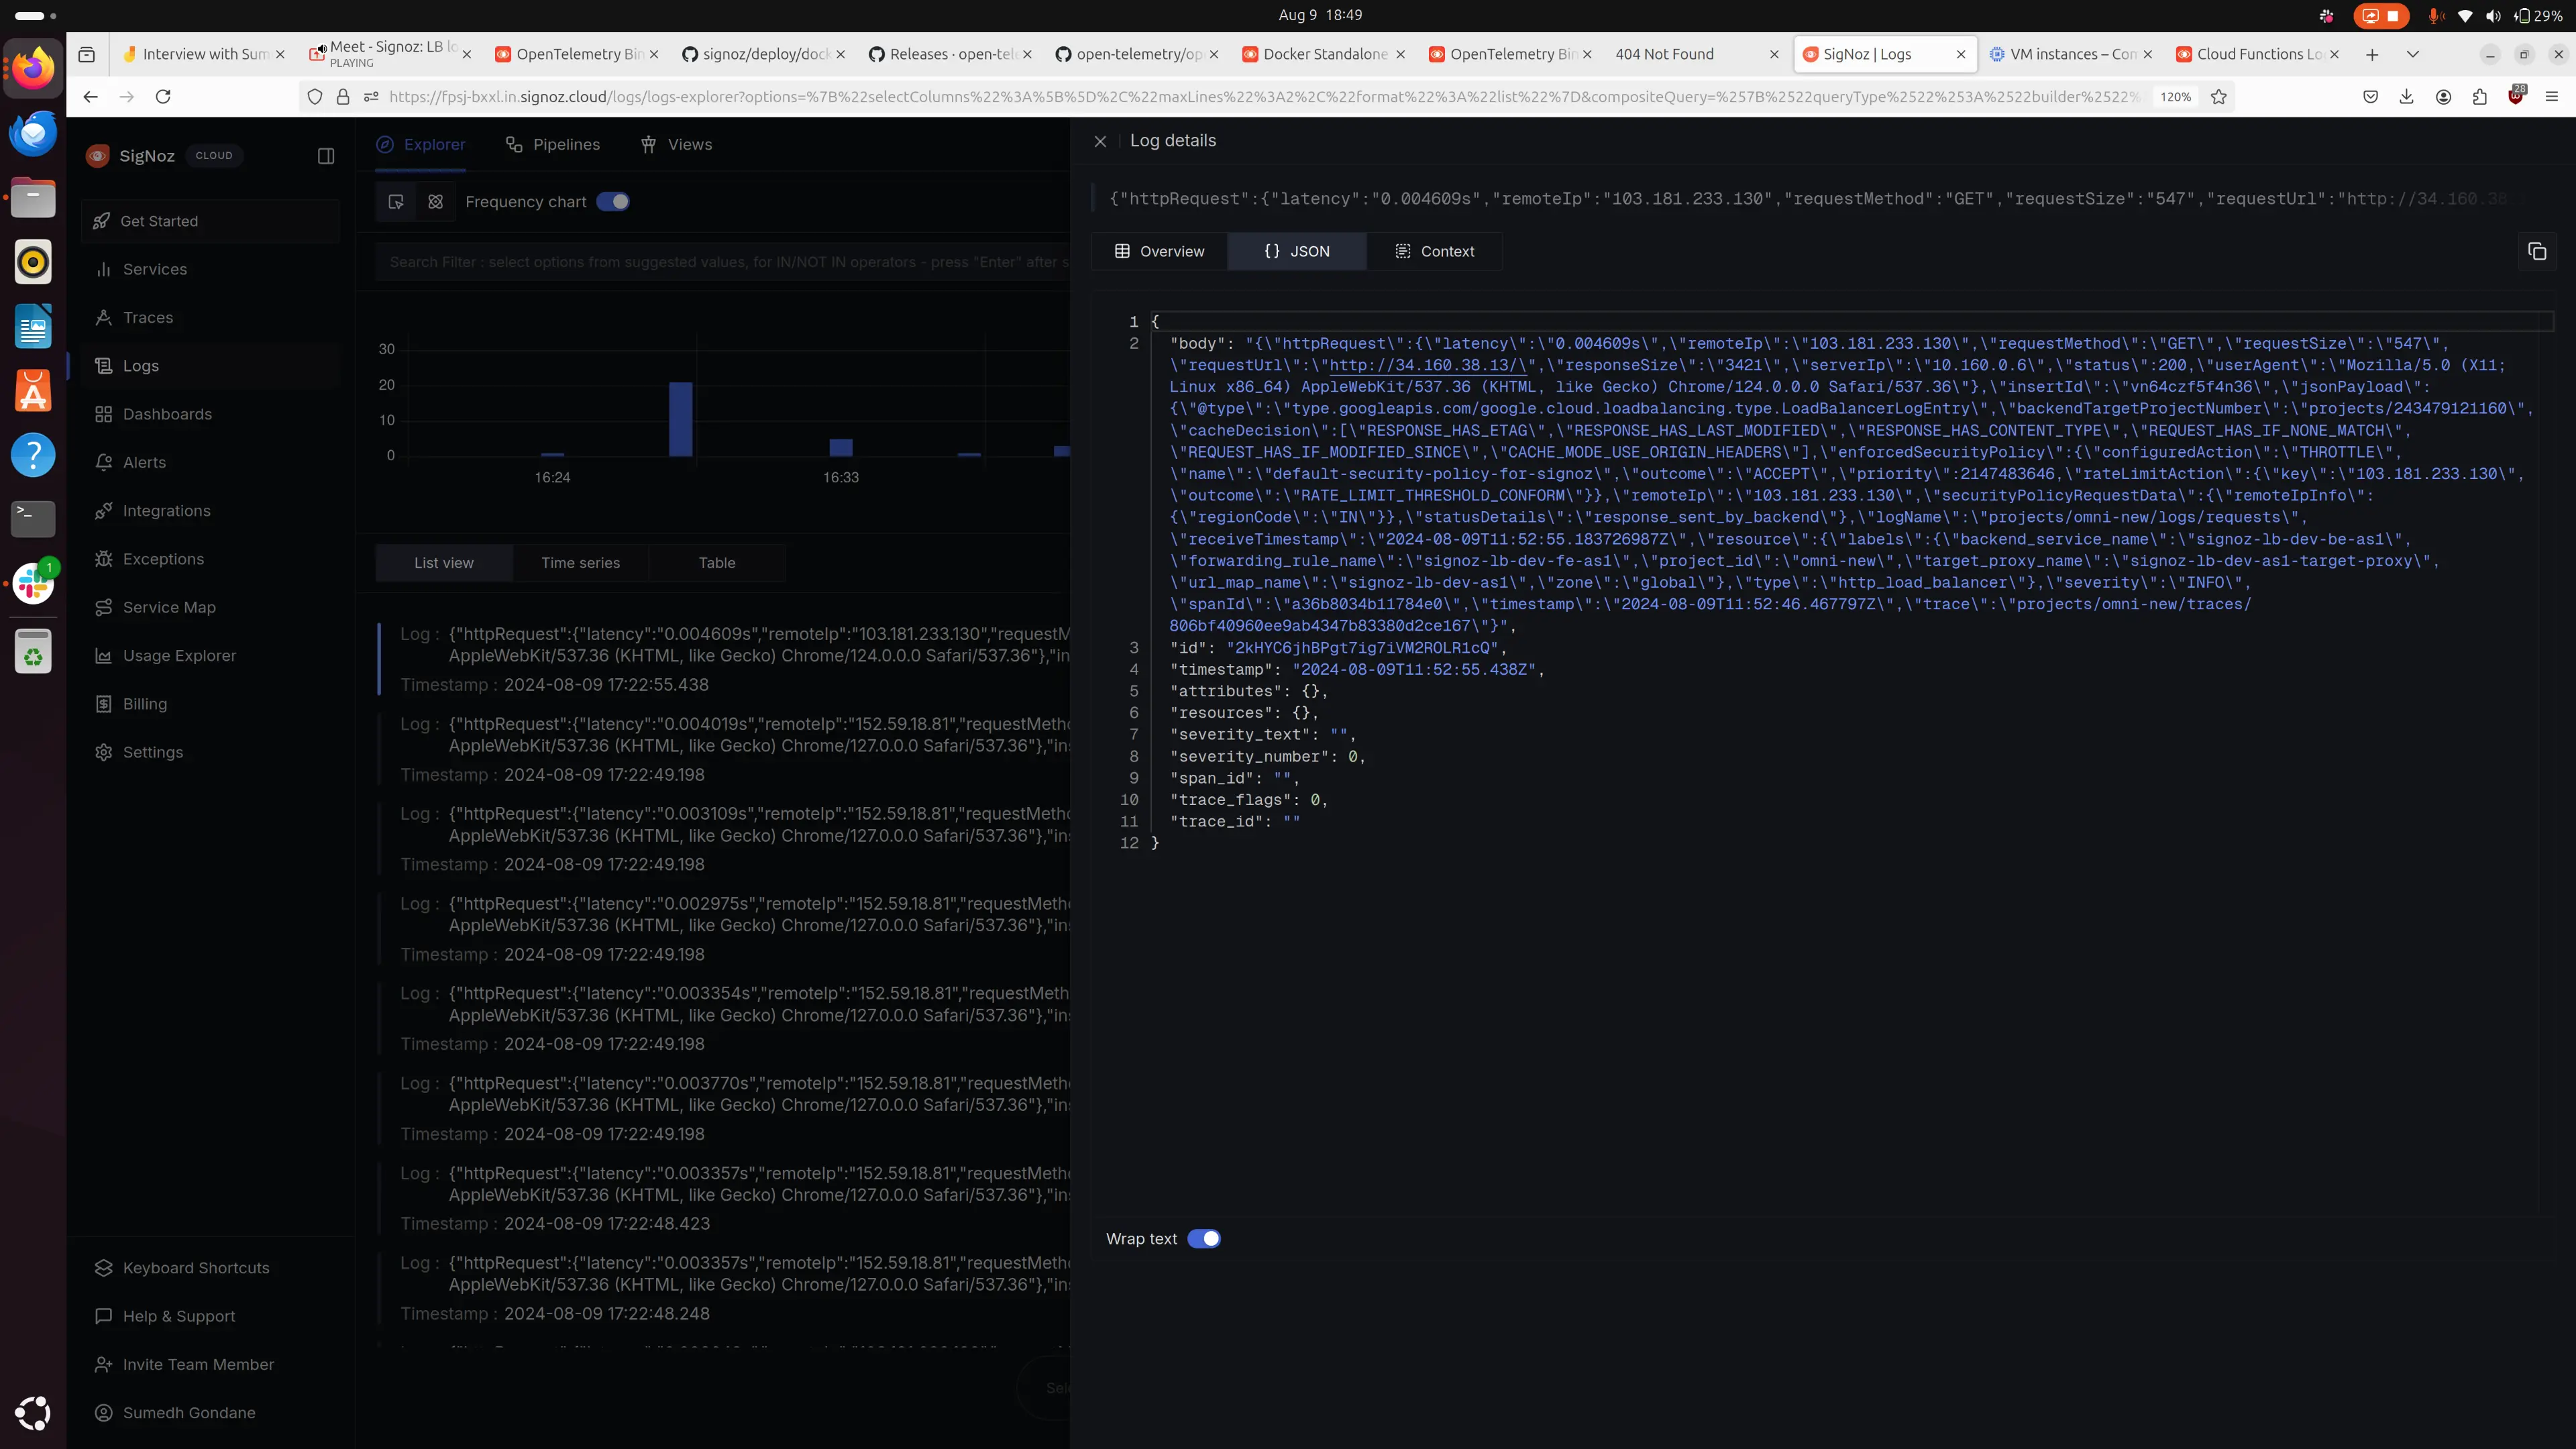
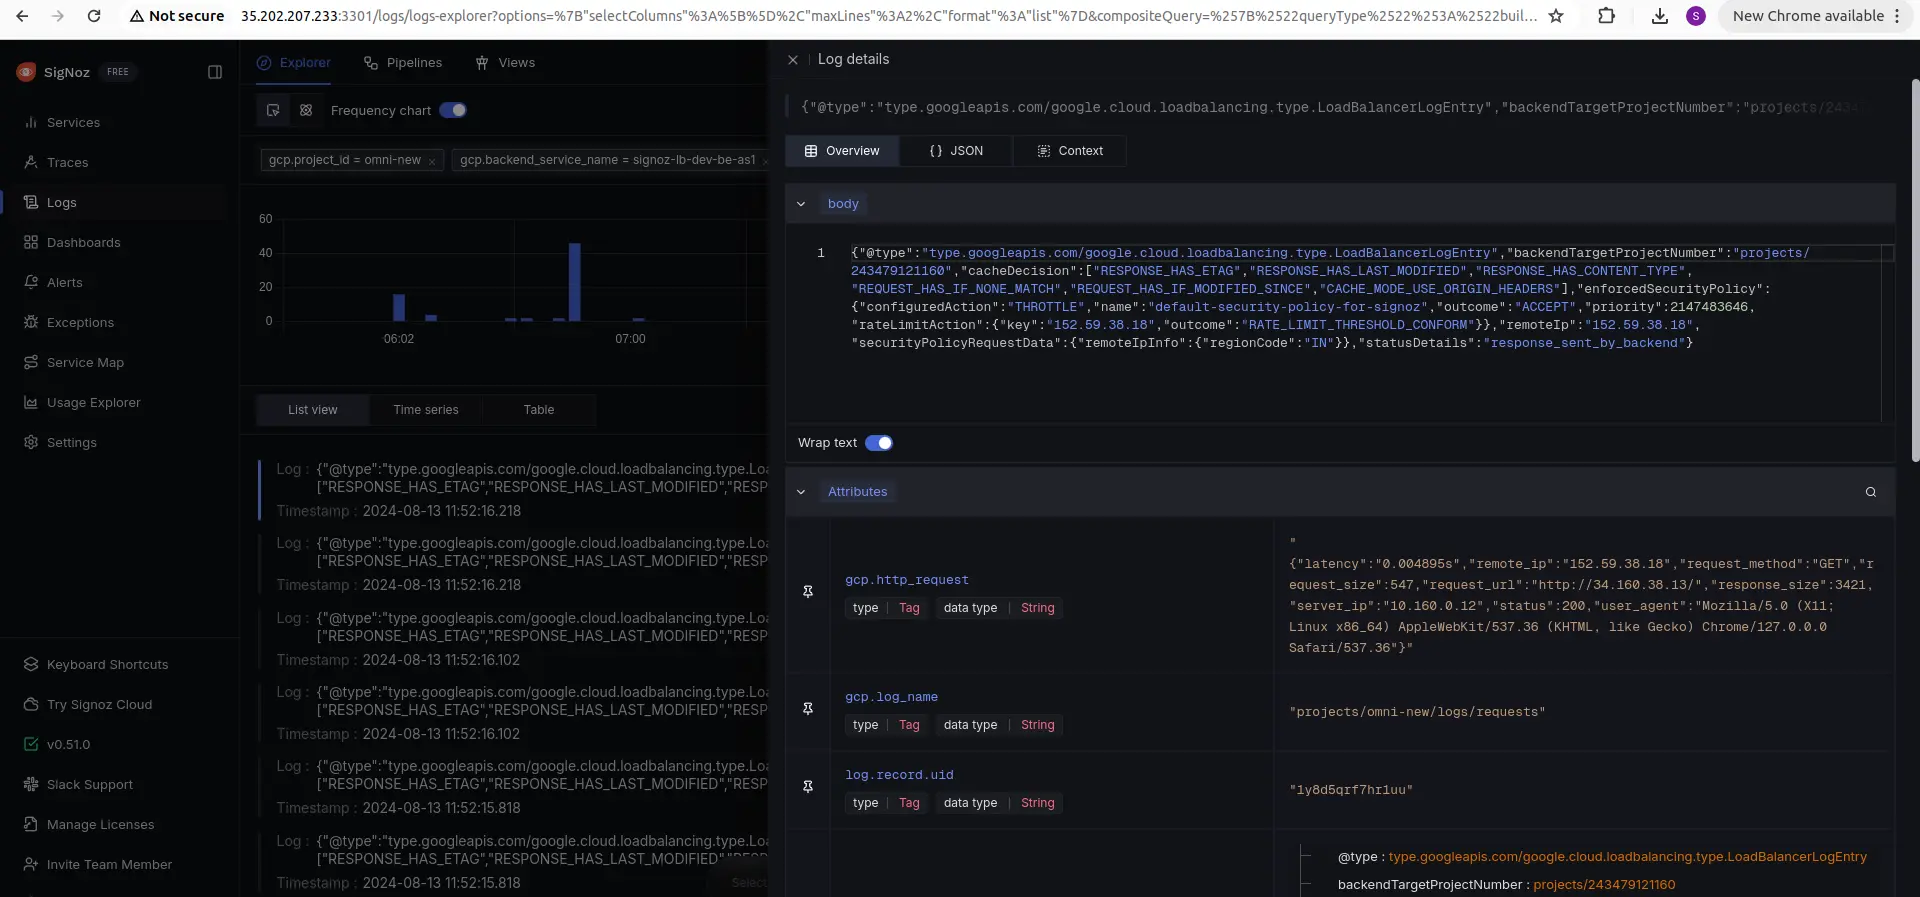
Detailed overview of the particular log
That's it! You have successfully set up monitoring for your Cloud Load Balancer logs with SigNoz Cloud.
Troubleshooting
If you encounter any issues while setting up monitoring for your Cloud Load Balancer logs with SigNoz cloud, here are a few troubleshooting steps you can try:
- Verify that your Cloud Load Balancer is configured correctly and is accessible.
- Ensure you have the necessary permissions to access the logs in your Load Balancer.
- Check and mention the correct URL and access key for SigNoz Cloud, along with the OpenTelemetry (OTel) configuration and routing details.
By following this guide, you should be able to easily send the logs from your Google Cloud Load Balancer to SigNoz Cloud and gain valuable insights in case any issues arise.
Prerequisites
- Google Cloud account with administrative privilege or load balancer Admin privilege.
- Cloud Load Balancer (logging should be enabled)
- Google Cloud Monitoring API enabled
Setup
Create a Pub/Sub topic
Follow the steps mentioned in the Creating Pub/Sub Topic document to create the Pub/Sub topic.
Create Log Router to Pub/Sub Topic
Follow the steps mentioned in the Log Router Setup document to create the Log Router.
To ensure you filter out only the Load Balancer logs, use the following filter conditions:
resource.type="Application Load Balancer"
In case you want the logs only from a particular Load Balancer, you can add the following query to the Query text box:
resource.type="load balancer"
resource.labels.service_name="<FORWARDING RULE NAME>"
Provide permissions to Log Router Sink
- On the GCP console, search for Log Router, and navigate to Logs Router in the GCP Logging service.
- Click on the 3 dots to the right of the Log Router sink that we created in the earlier steps, and select View sink details from the dropdown.
View Sink details
- From the sink details, copy the Writer identity and keep it with you. We will require this in the upcoming steps.
Copy Writer Identity
- In order to provide the Log Router sink with the permissions to write to the Pub/Sub topic, navigate to the Pub/Sub service, and click on the 3 dots to the right of the Pub/Sub topic where the router is going to sink the logs. Select View permissions from this dropdown.
- Click on the APP PRINCIPAL button on the top. In the New principal's textbox, copy the value from the Writer identity (remove the serviceAccount: prefix from the value), and select any value from the dropdown that appears. In the Select a role dropdown, search for Pub/Sub Publisher and select it.
Grant Access to Log Router Sink
- Click on Save. With this, the Log Router sink now has permission to write to the Pub/Sub topic.
- Wait for ~1 minute for the permissions to take effect, and now trigger the Cloud Load Balancer a few times. You should see the Log Router's volume increasing, as well as Pub/Sub topic's metrics showing published requests.
Verify log router getting volume upon any trigger of CLB.
After the log router configuration and permission, let’s configure the OTel collector to receive these logs.
OTel Collector Configuration
Follow the steps mentioned in the Creating Compute Engine document to create the Compute Engine instance.
Install OTel Collector as agent
Firstly, we will establish the authentication using the following commands:
- Initialize
gcloud:
gcloud init
- Authenticate into GCP:
gcloud auth application-default login
Let us now proceed to the OTel Collector installation:
Step 1: Download otel-collector tar.gz for your architecture
wget https://github.com/open-telemetry/opentelemetry-collector-releases/releases/download/v0.116.0/otelcol-contrib_0.116.0_linux_amd64.tar.gz
Step 2: Extract otel-collector tar.gz to the otelcol-contrib folder
mkdir otelcol-contrib && tar xvzf otelcol-contrib_0.116.0_linux_amd64.tar.gz -C otelcol-contrib
Step 4: Replace otel-collector-contrib’s default configuration with the following config in /etc/otelcol-contrib/config.yaml.
receivers:
  googlecloudpubsub/logs:
    project: omni-new
    subscription: projects/<your-project-id>/subscriptions/<name-of-the-pub-sub-subscription>
    encoding: cloud_logging # Make sure to use cloud_logging for logs
exporters:
  debug:
    verbosity: detailed
  otlphttp:
    endpoint: "http://localhost:4318"  # Replace with your SigNoz OTLP HTTP endpoint
    compression: "gzip"
service:
  pipelines:
    logs:
      receivers: [googlecloudpubsub/logs]
      exporters: [debug,otlphttp]
Here localhost:4318 is pointing to SigNoz's collector, use VM IP address or domain name in case of running otel-collector-contrib on some other host.
Step 5: Restart otel-collecotor-contrib with
systemctl restart otelcol-contrib
You can now trigger the Load Balancer a few times, and see the logs from the GCP Cloud Load Balancer on SigNoz.
Visualize the logs in Self-Hosted SigNoz
Logs captured by the SigNoz
Detailed overview of the particular log
That's it! You have successfully set up monitoring for your Cloud Load Balancer logs with Self-Hosted SigNoz.
Troubleshooting
If you encounter any issues while setting up monitoring for your Cloud Load Balancer logs with Self-Hosted SigNoz, here are a few troubleshooting steps you can try:
Verify that your Cloud Load Balancer is configured correctly and is accessible.
Ensure you have the necessary permissions to access the logs in your Load Balancer.
Check and mention the correct URL for Self-Hosted SigNoz, along with the OpenTelemetry (OTel) configuration and routing details.
journalctl -u otelcol-contrib.service --since "15 min ago"
By following this guide, you should be able to easily send the logs from your Google Cloud Load Balancer to Self-Hosted SigNoz and gain valuable insights in case any issues arise.
