Overview
This guide walks you through setting up SSO using Keycloak, a powerful open-source identity and access management solution, with SigNoz.
What you'll accomplish:
- Configure Keycloak as an identity provider (IdP) for SigNoz
- Enable your team to access SigNoz using their existing Keycloak accounts
Prerequisites
Before you begin, ensure you have:
- Keycloak with administrative access
- SigNoz account (Cloud or Self-Hosted with License) with administrative access
- Your SigNoz instance URL (e.g.,
https://signoz.example.com)
Keycloak Configuration Steps
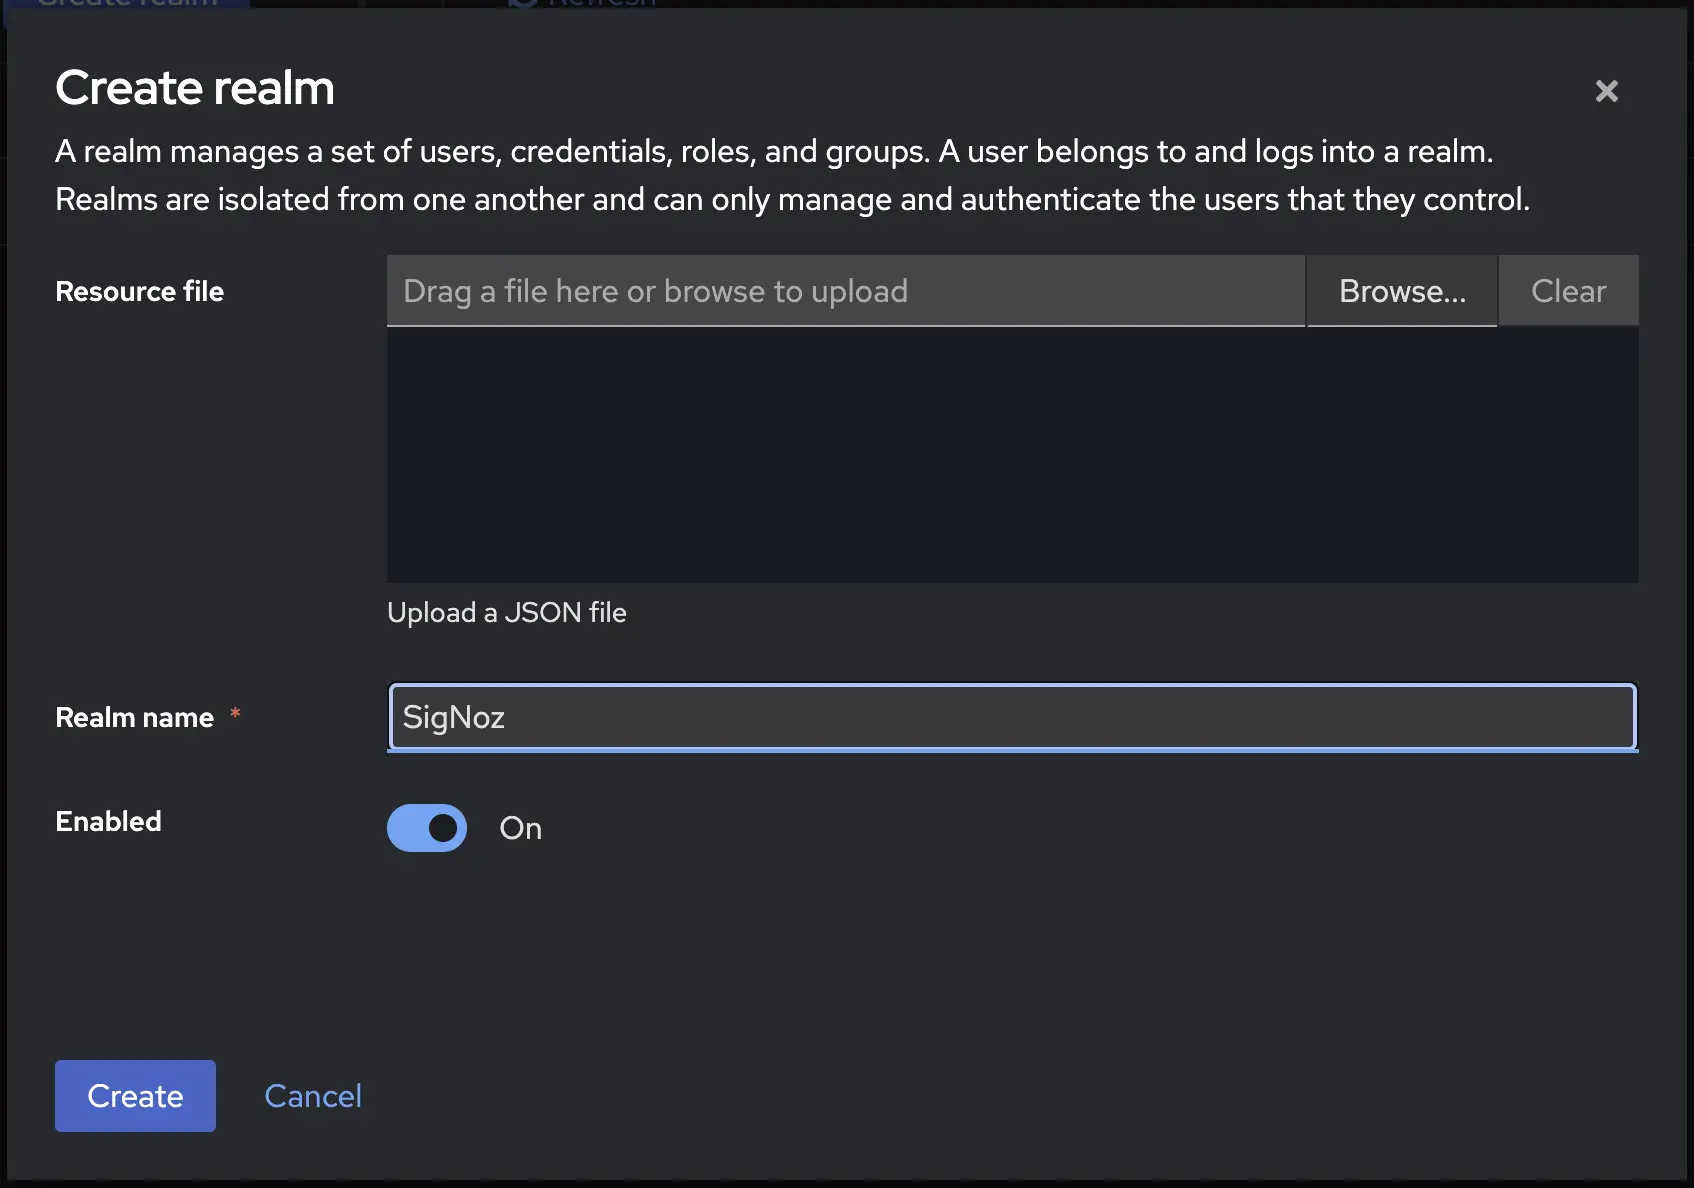
Step 1: Create SigNoz Realm in Keycloak Admin Console
- Login to Keycloak Admin Console
- Create a new realm (or use an existing one) for your SigNoz integration
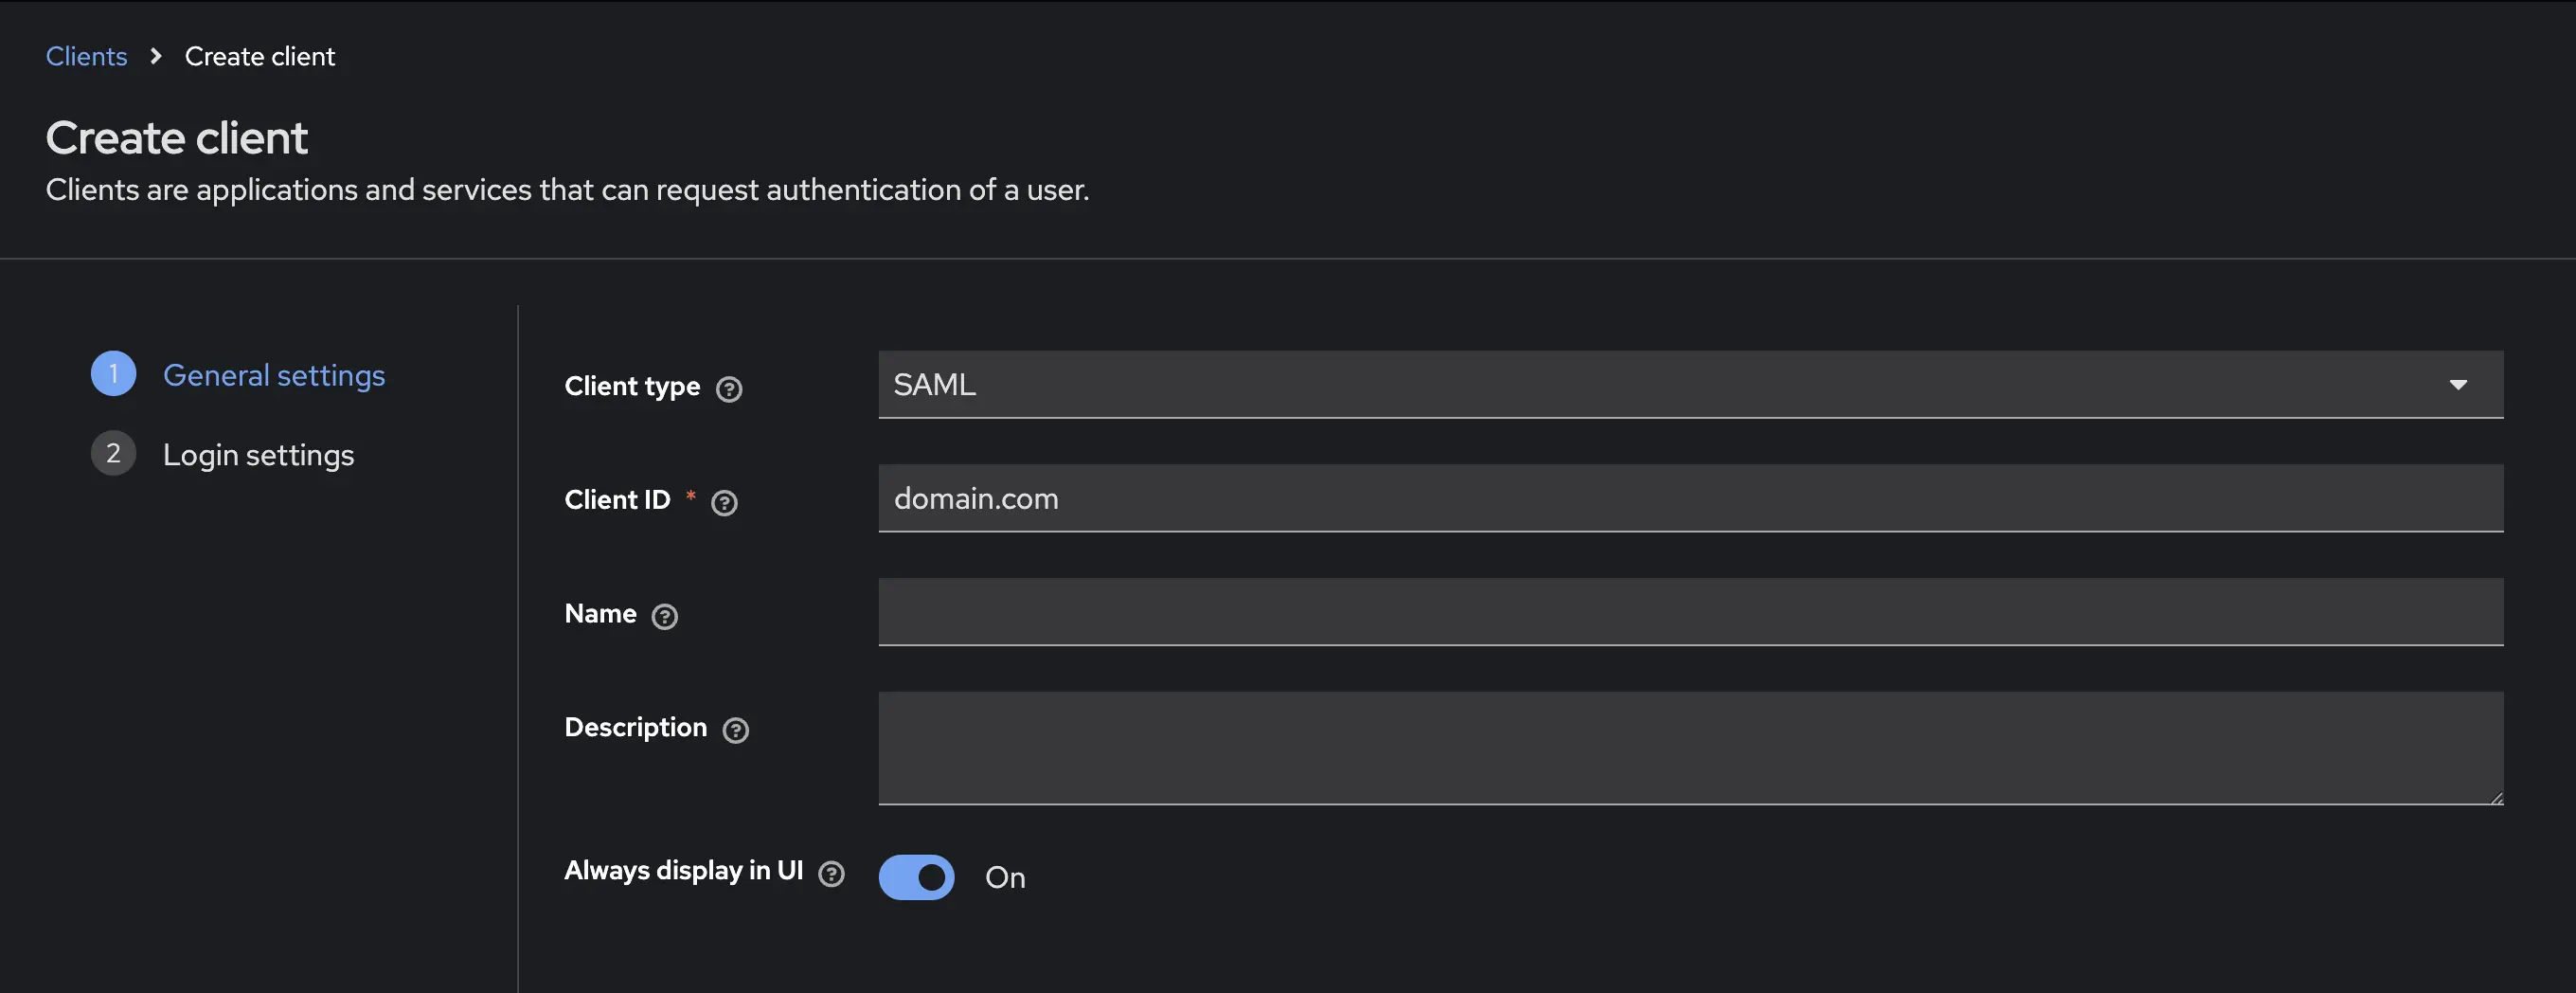
Step 2: Configure a new SAML Client
- Navigate to Clients → Create client
- Under Client type, select SAML
- Set Client ID to your SigNoz domain (e.g.,
signoz.example.com) - Click Next
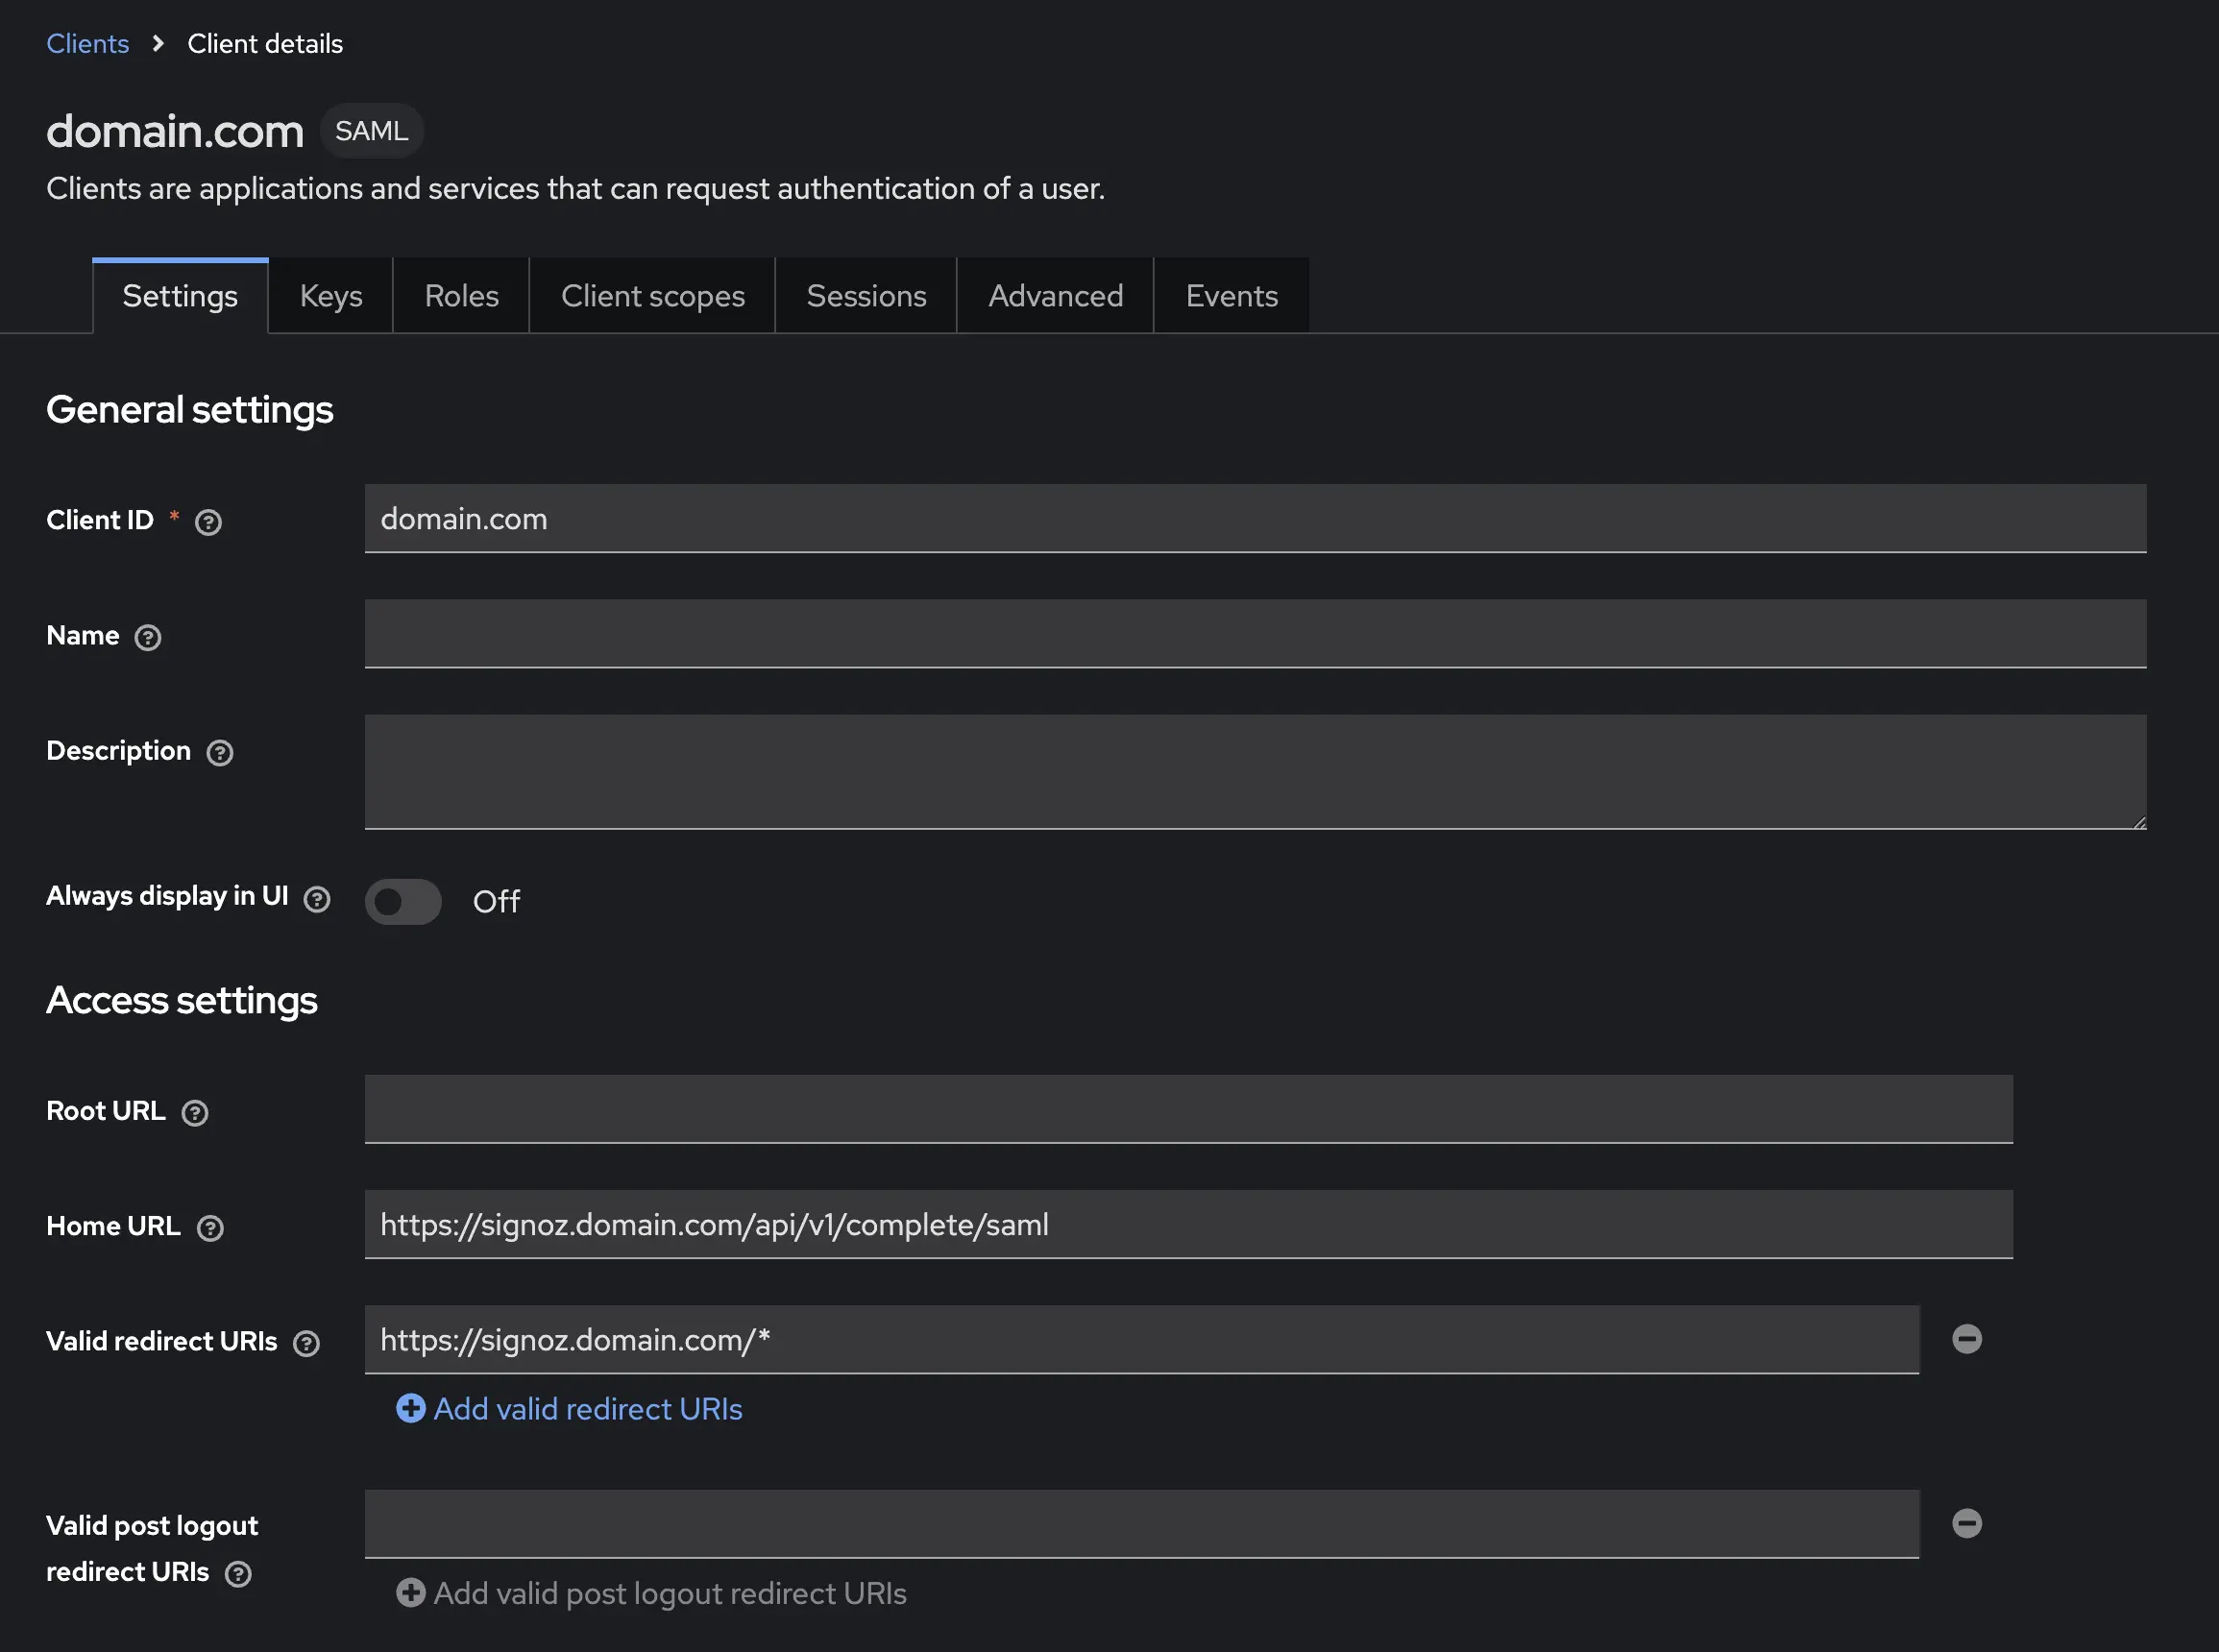
Step 3: Configure Client Settings
Login Settings (on the second wizard page, or under Settings tab after creation):
- Set Home URL to
<your-instance-url>/api/v1/complete/saml - Set Valid redirect URIs to
<your-instance-url>/* - Click Save
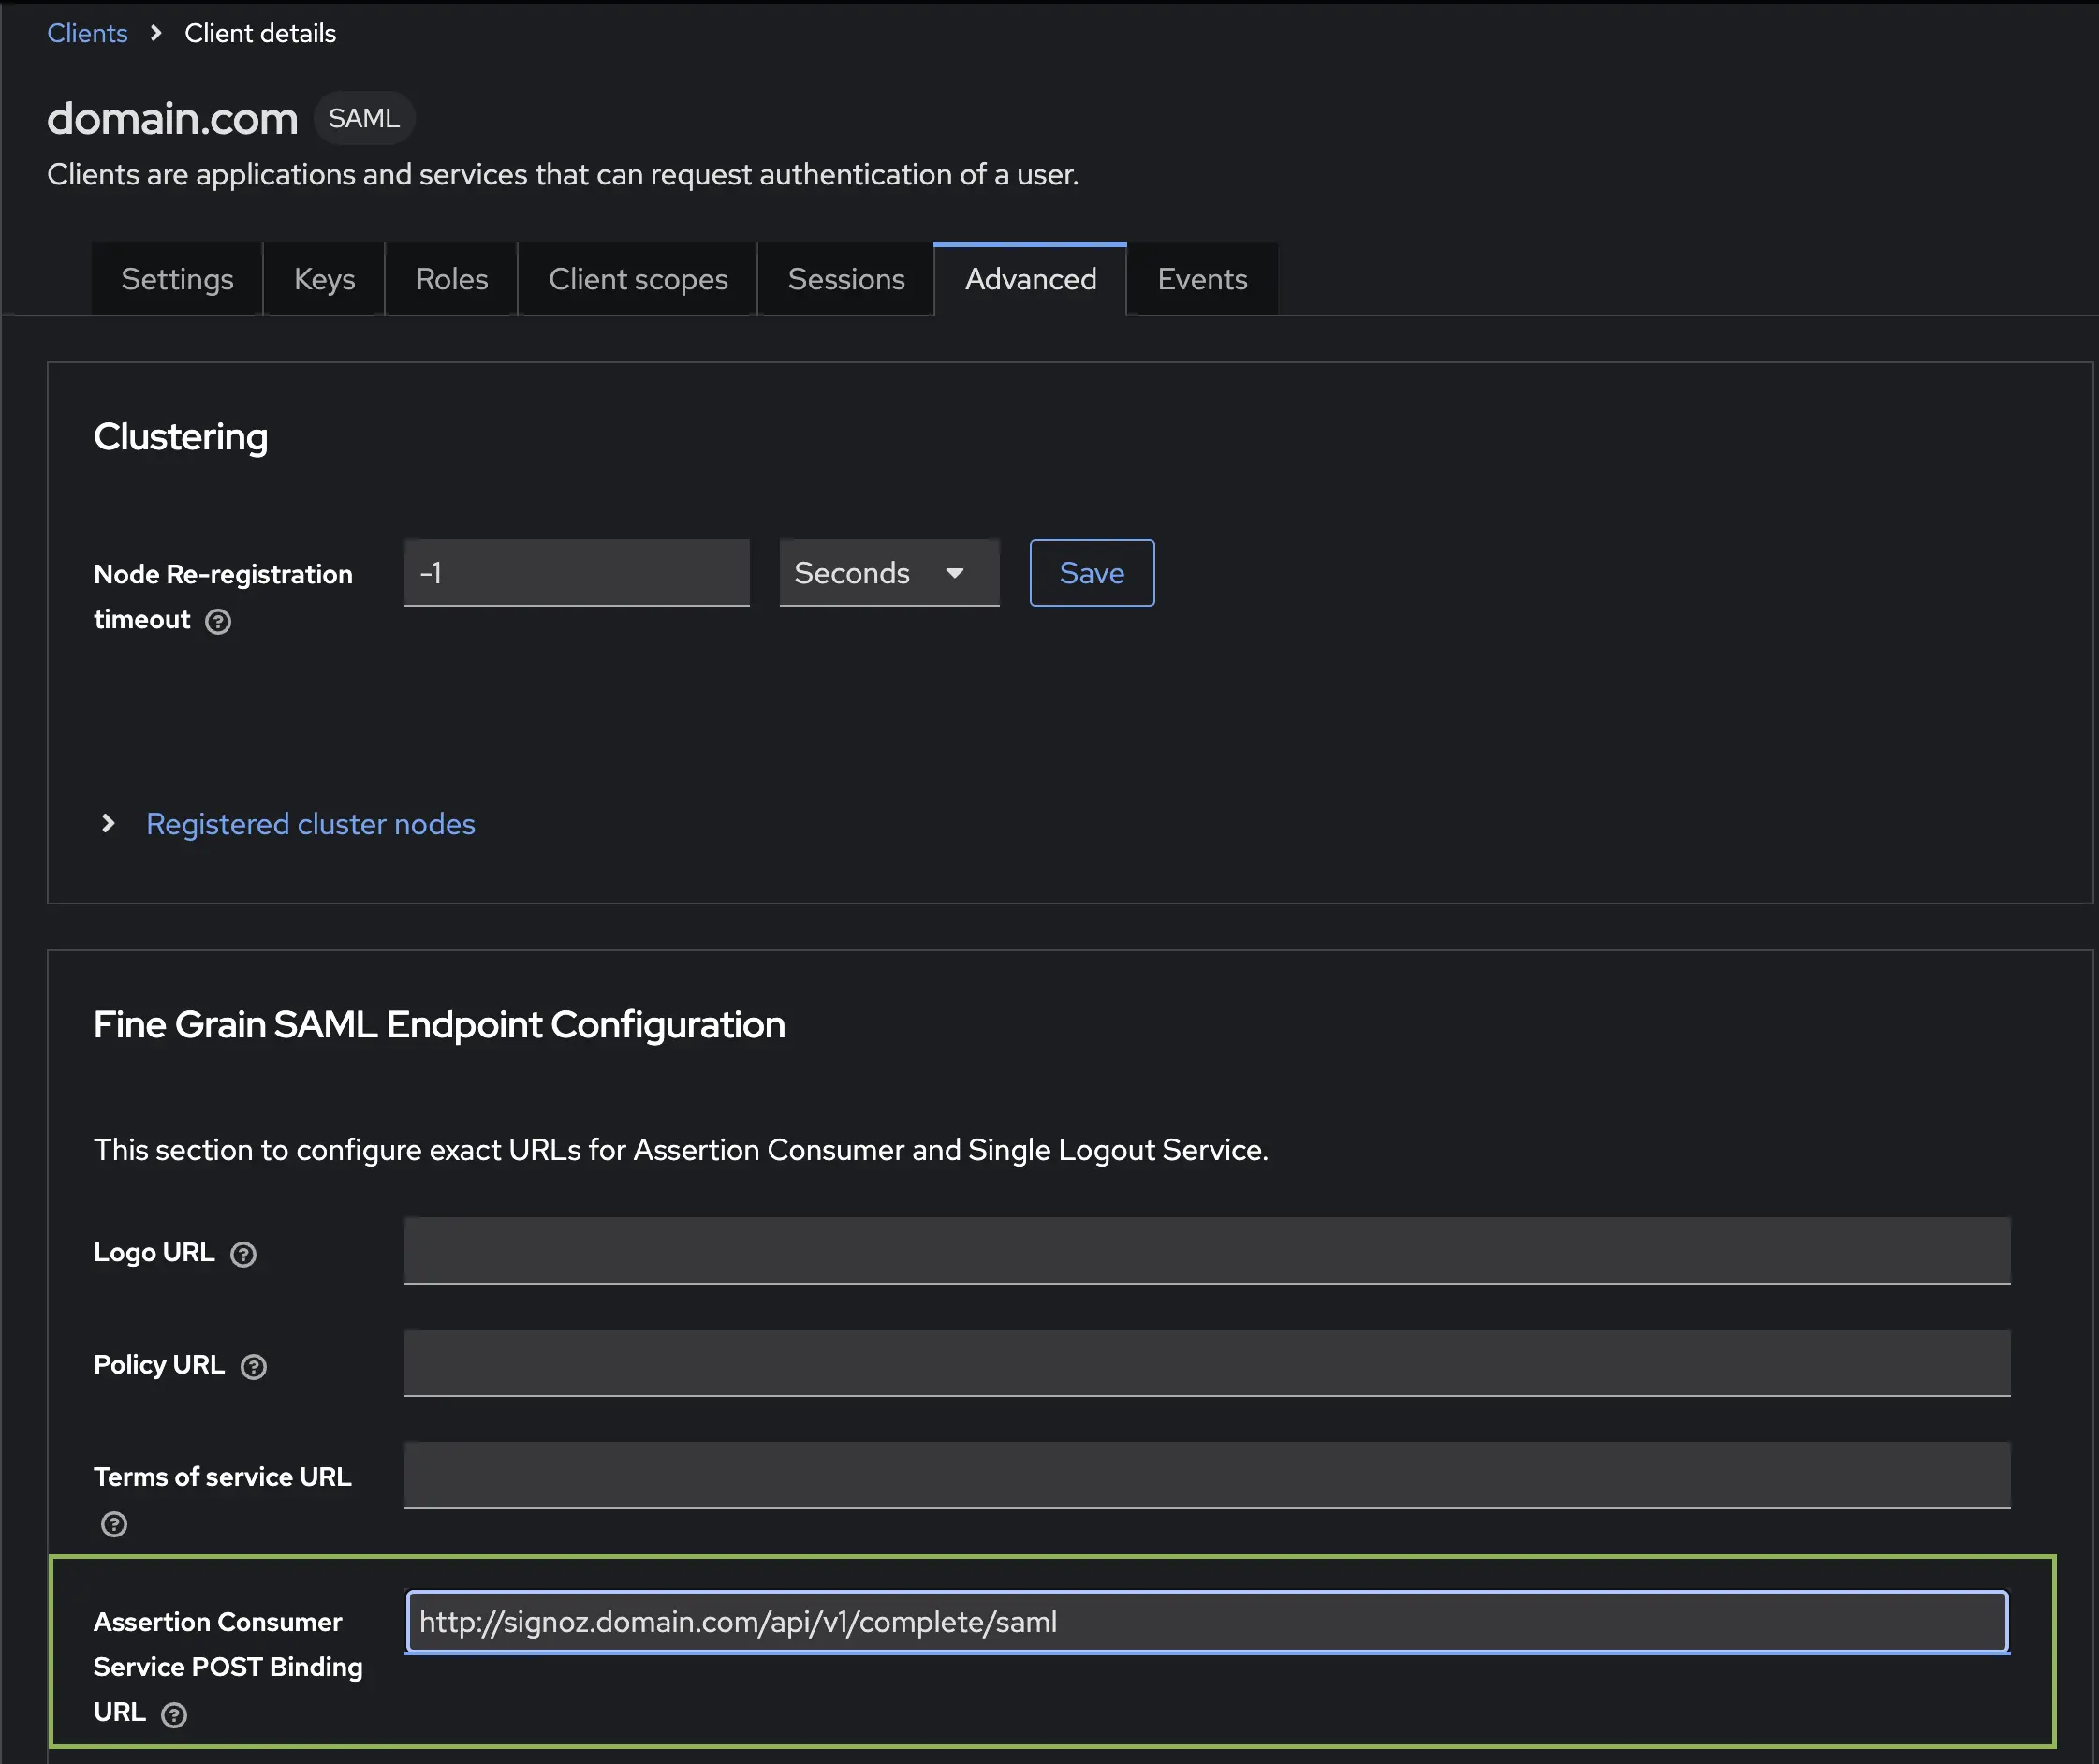
Fine Grain SAML Endpoint Configuration (under the Advanced tab):
- Open the Advanced tab of your client
- Scroll to Fine Grain SAML Endpoint Configuration
- Set Assertion Consumer Service POST Binding URL to
<your-instance-url>/api/v1/complete/saml - Click Save
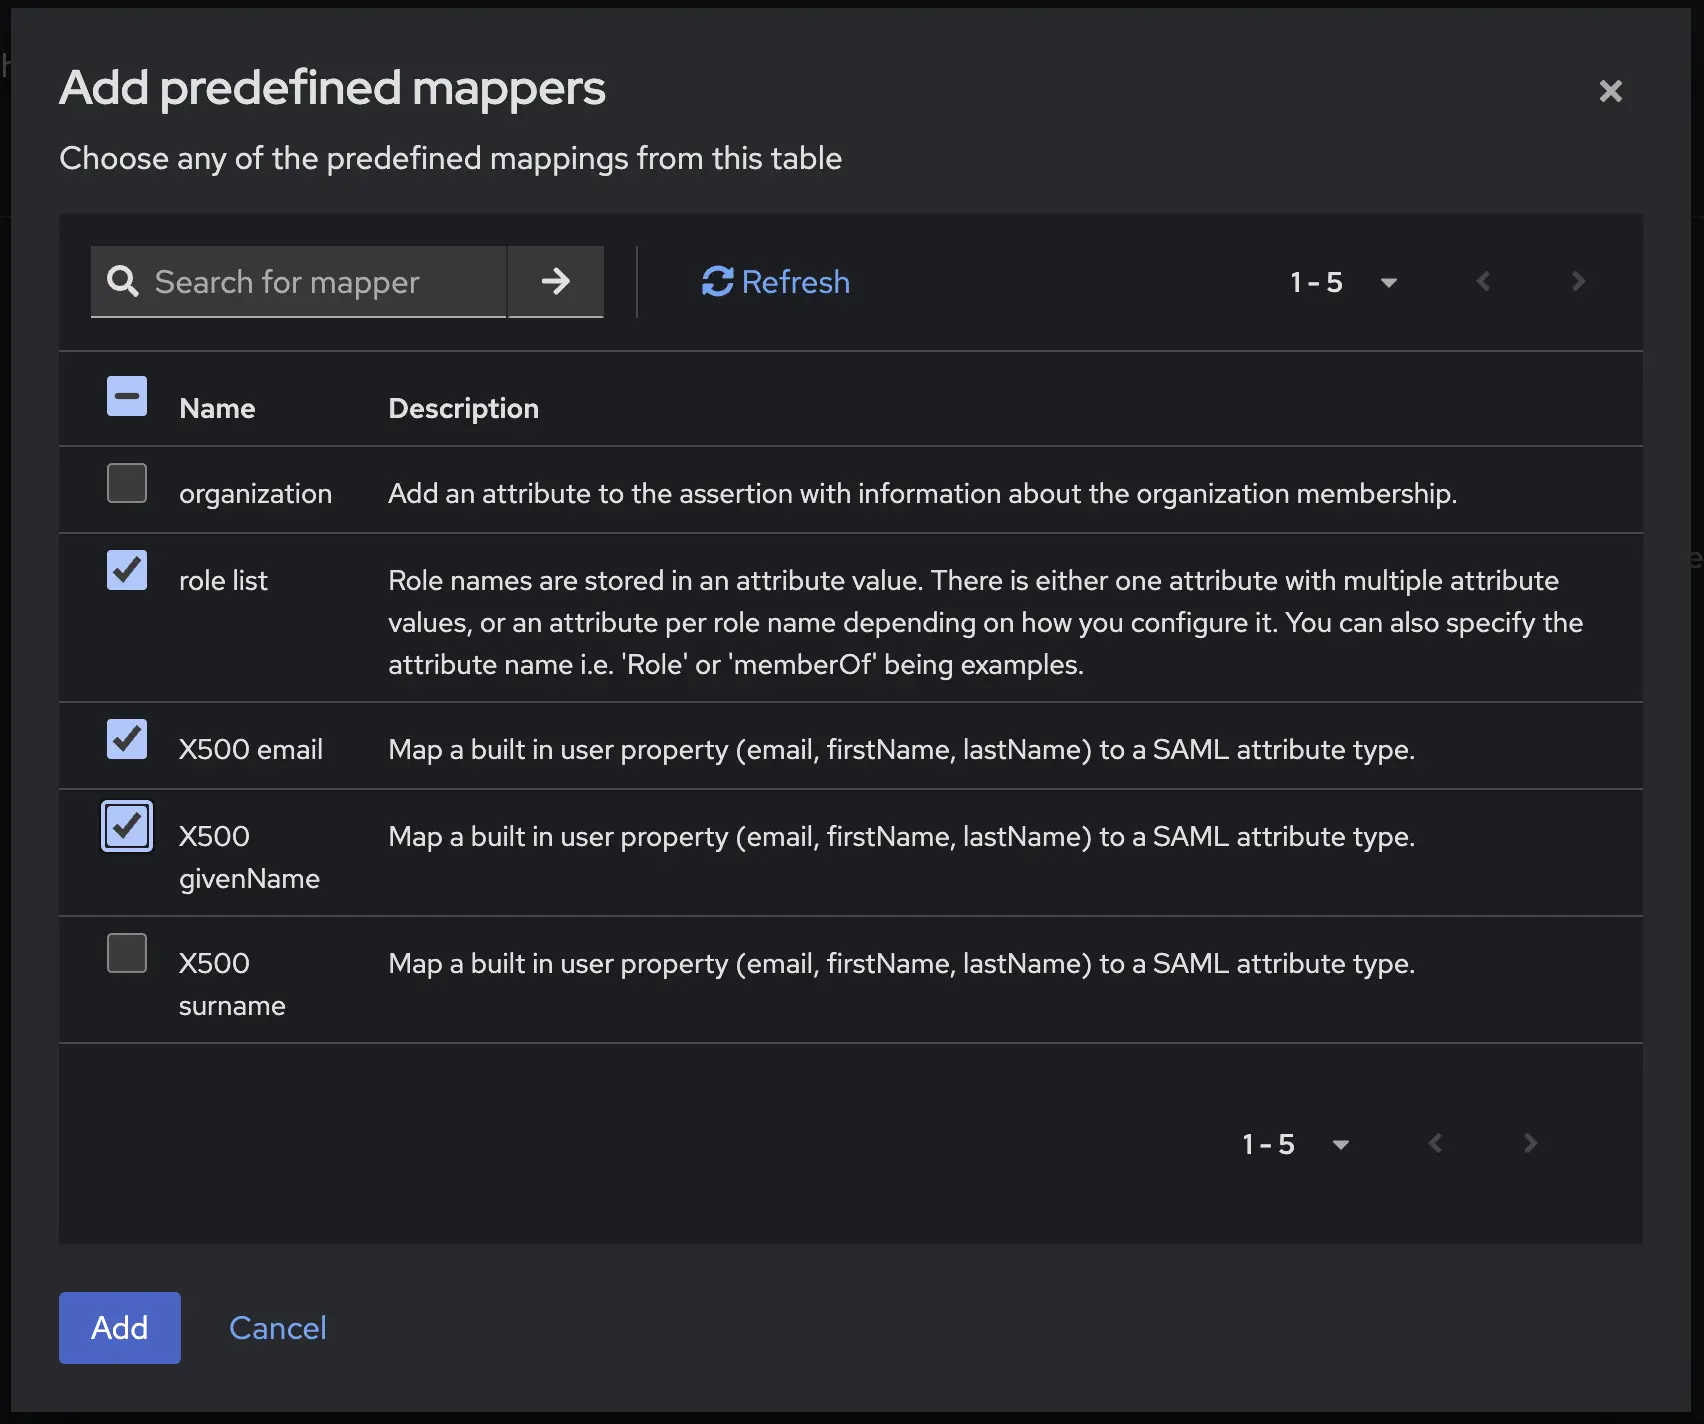
Step 4: Set Up SAML Mappers
- Go to the Client scopes tab of your SAML client
- Click on
<your-client-id>-dedicated(e.g.,signoz.example.com-dedicated) - Click Add predefined mapper and select:
- role list
- X500 email
- X500 givenName
- Click Add
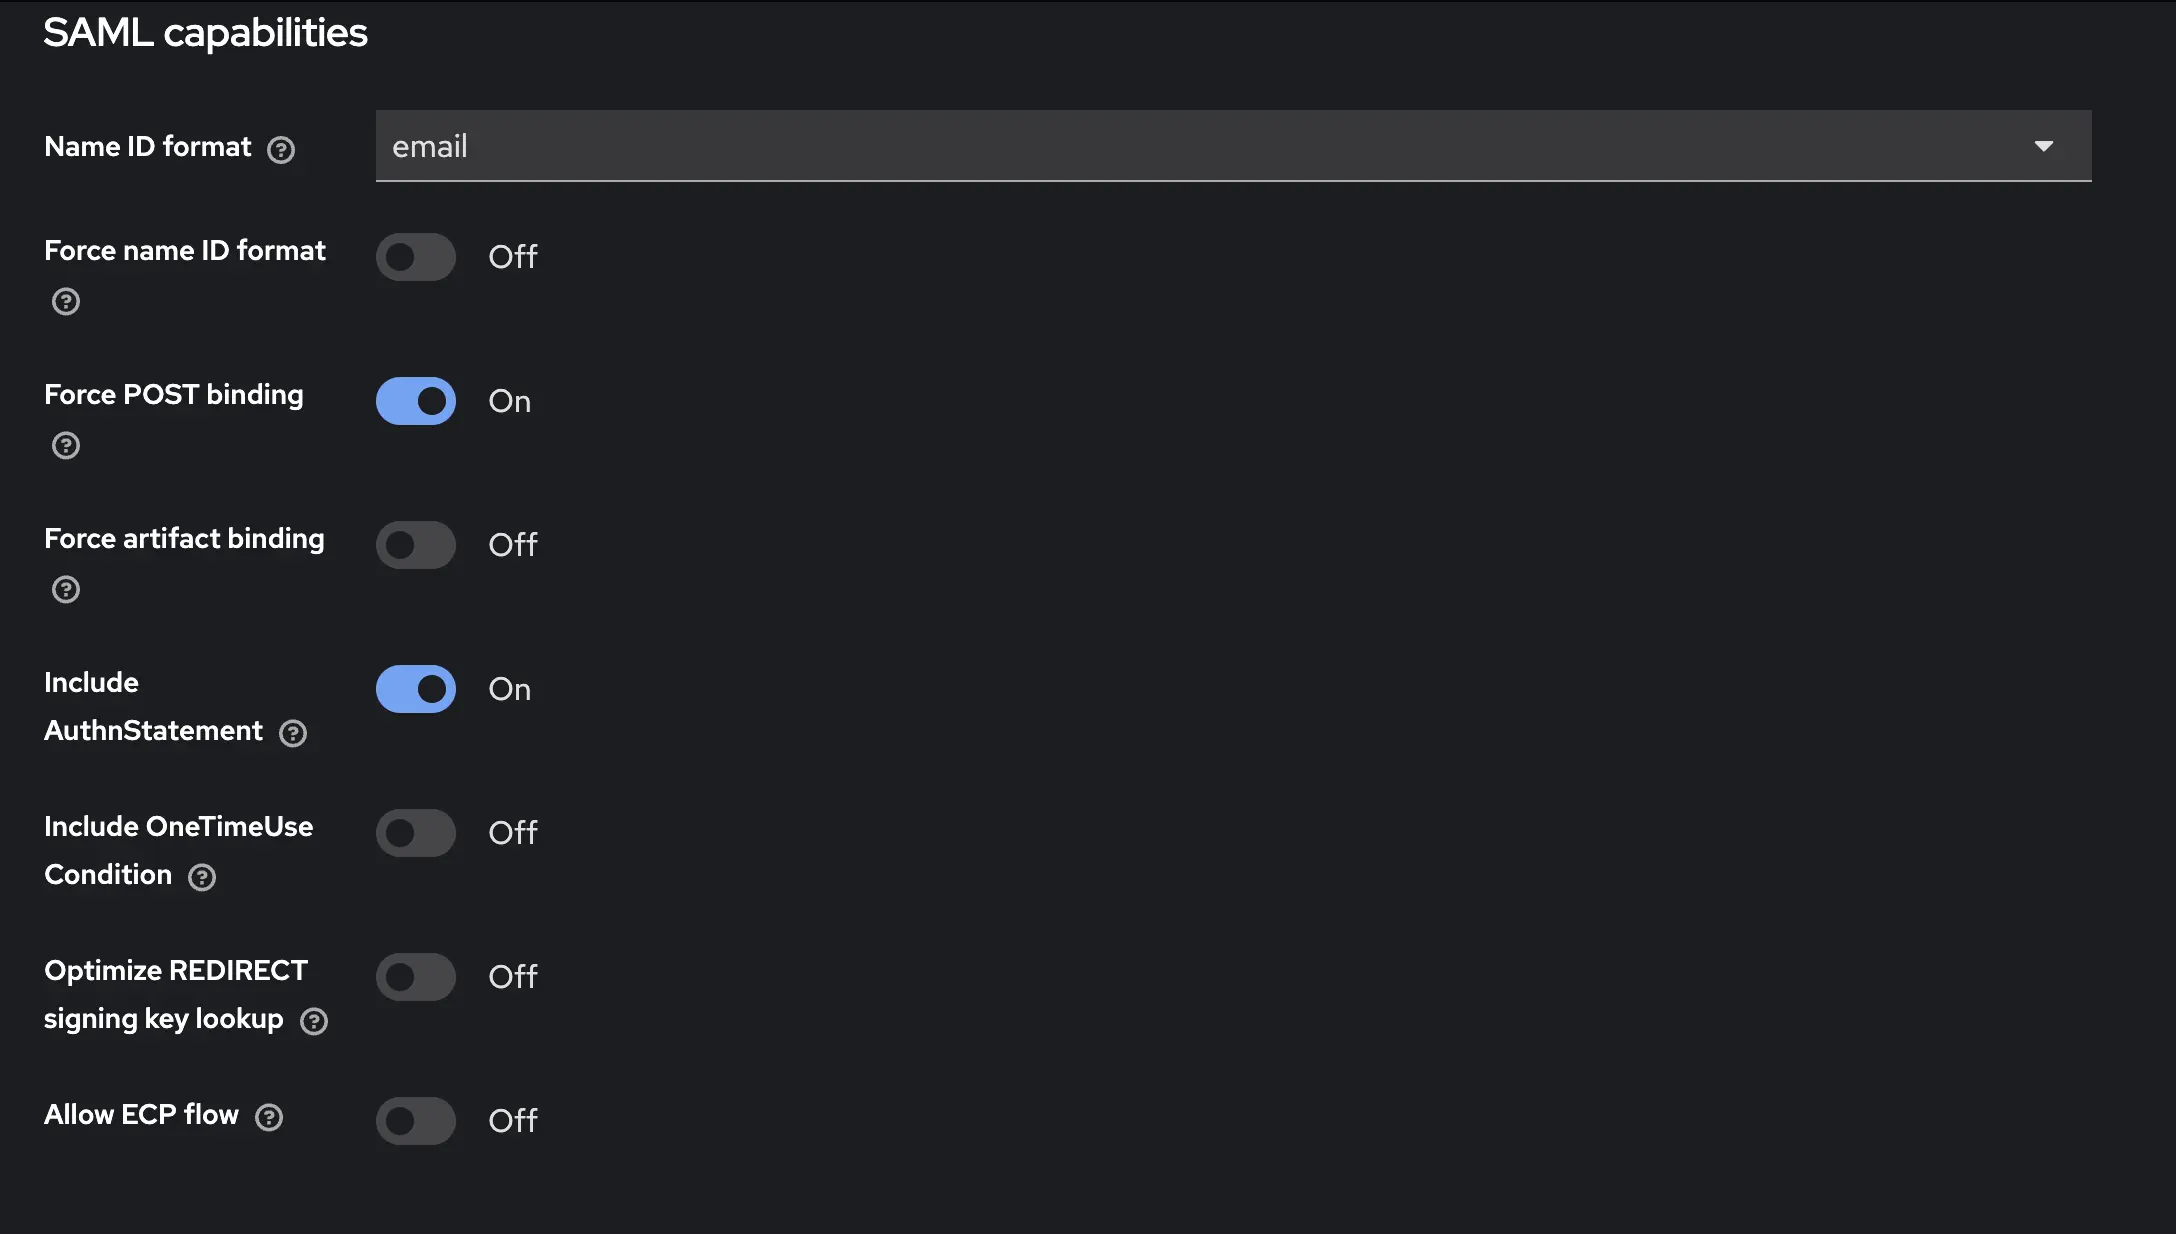
Step 5: Configure SAML Capabilities
Name ID format (under the Settings tab):
- Scroll to the SAML capabilities section
- Set Name ID format to email
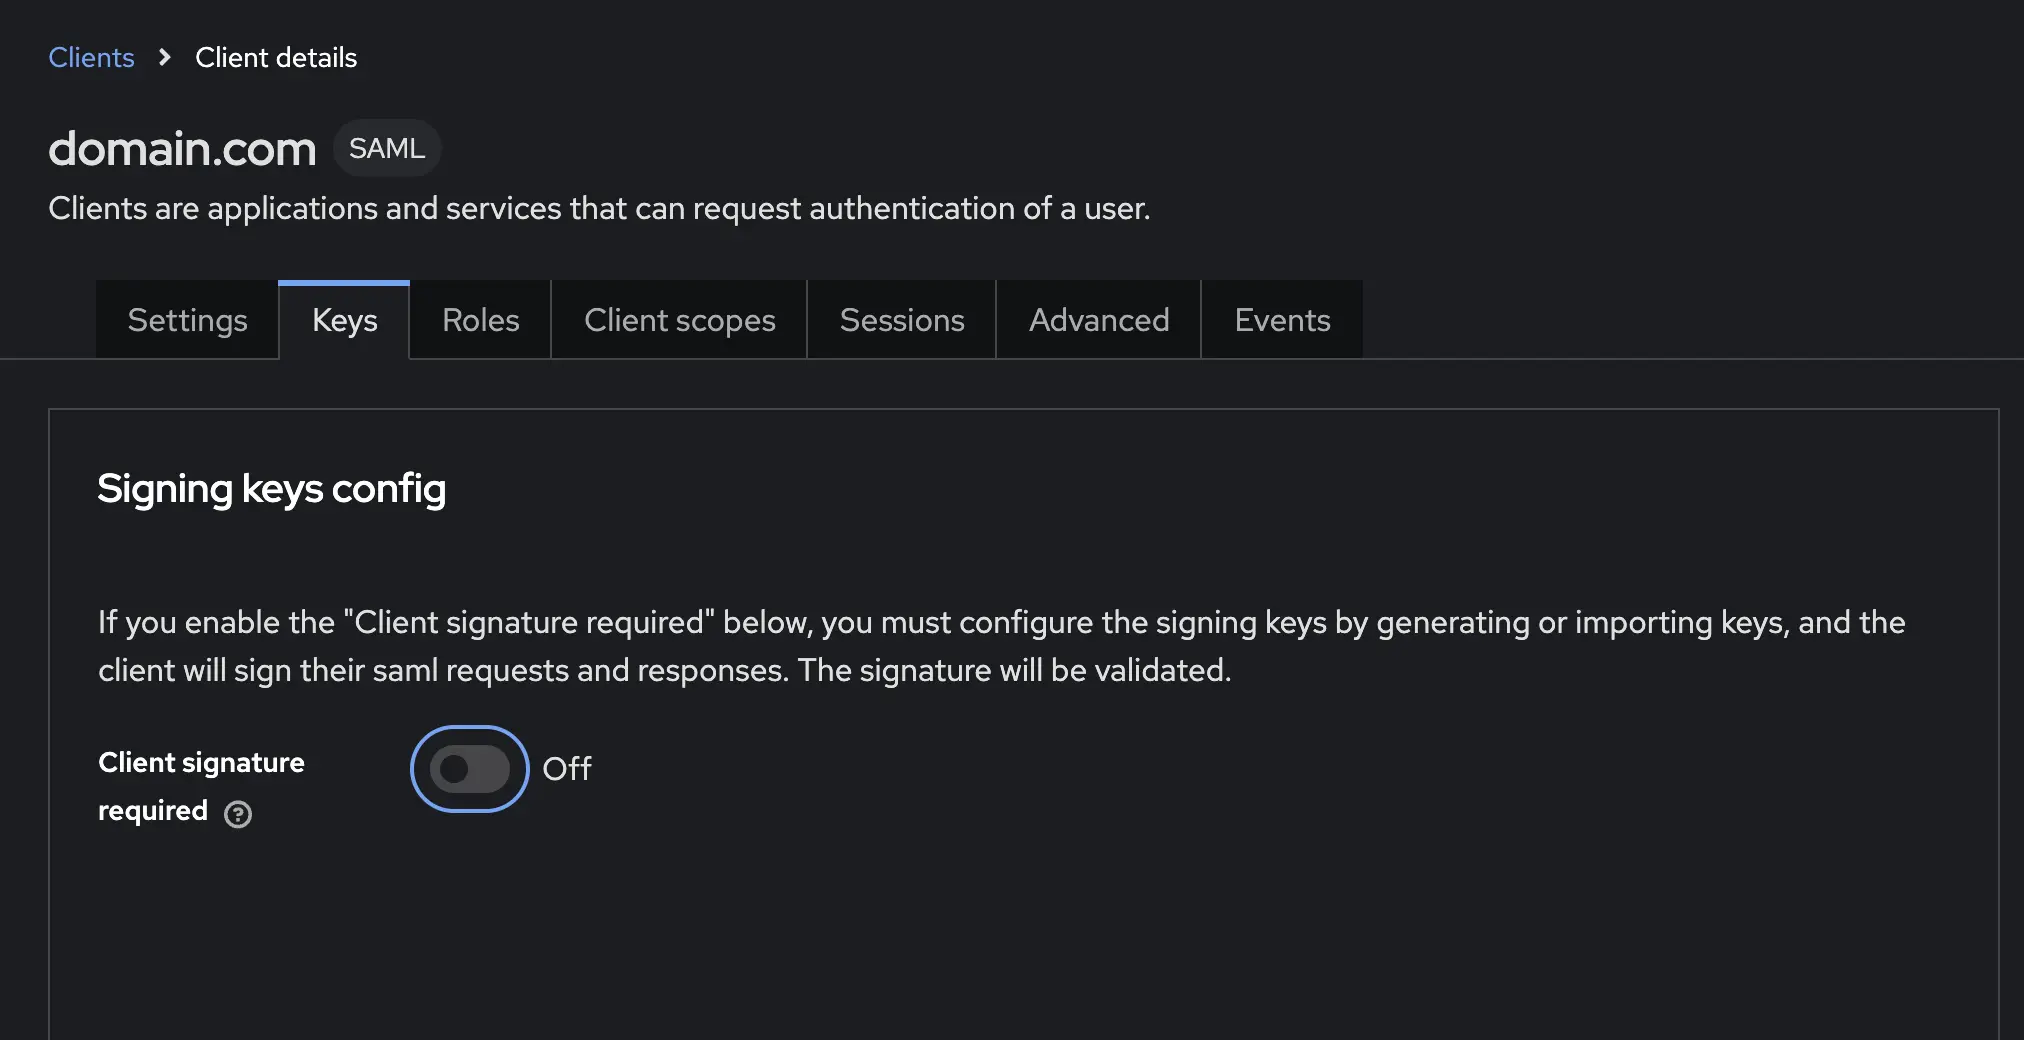
Disable Client Signature Required (under the Keys tab):
- Open the Keys tab of your client
- Turn Client Signature Required to OFF
- Click Save
SigNoz Configuration Steps
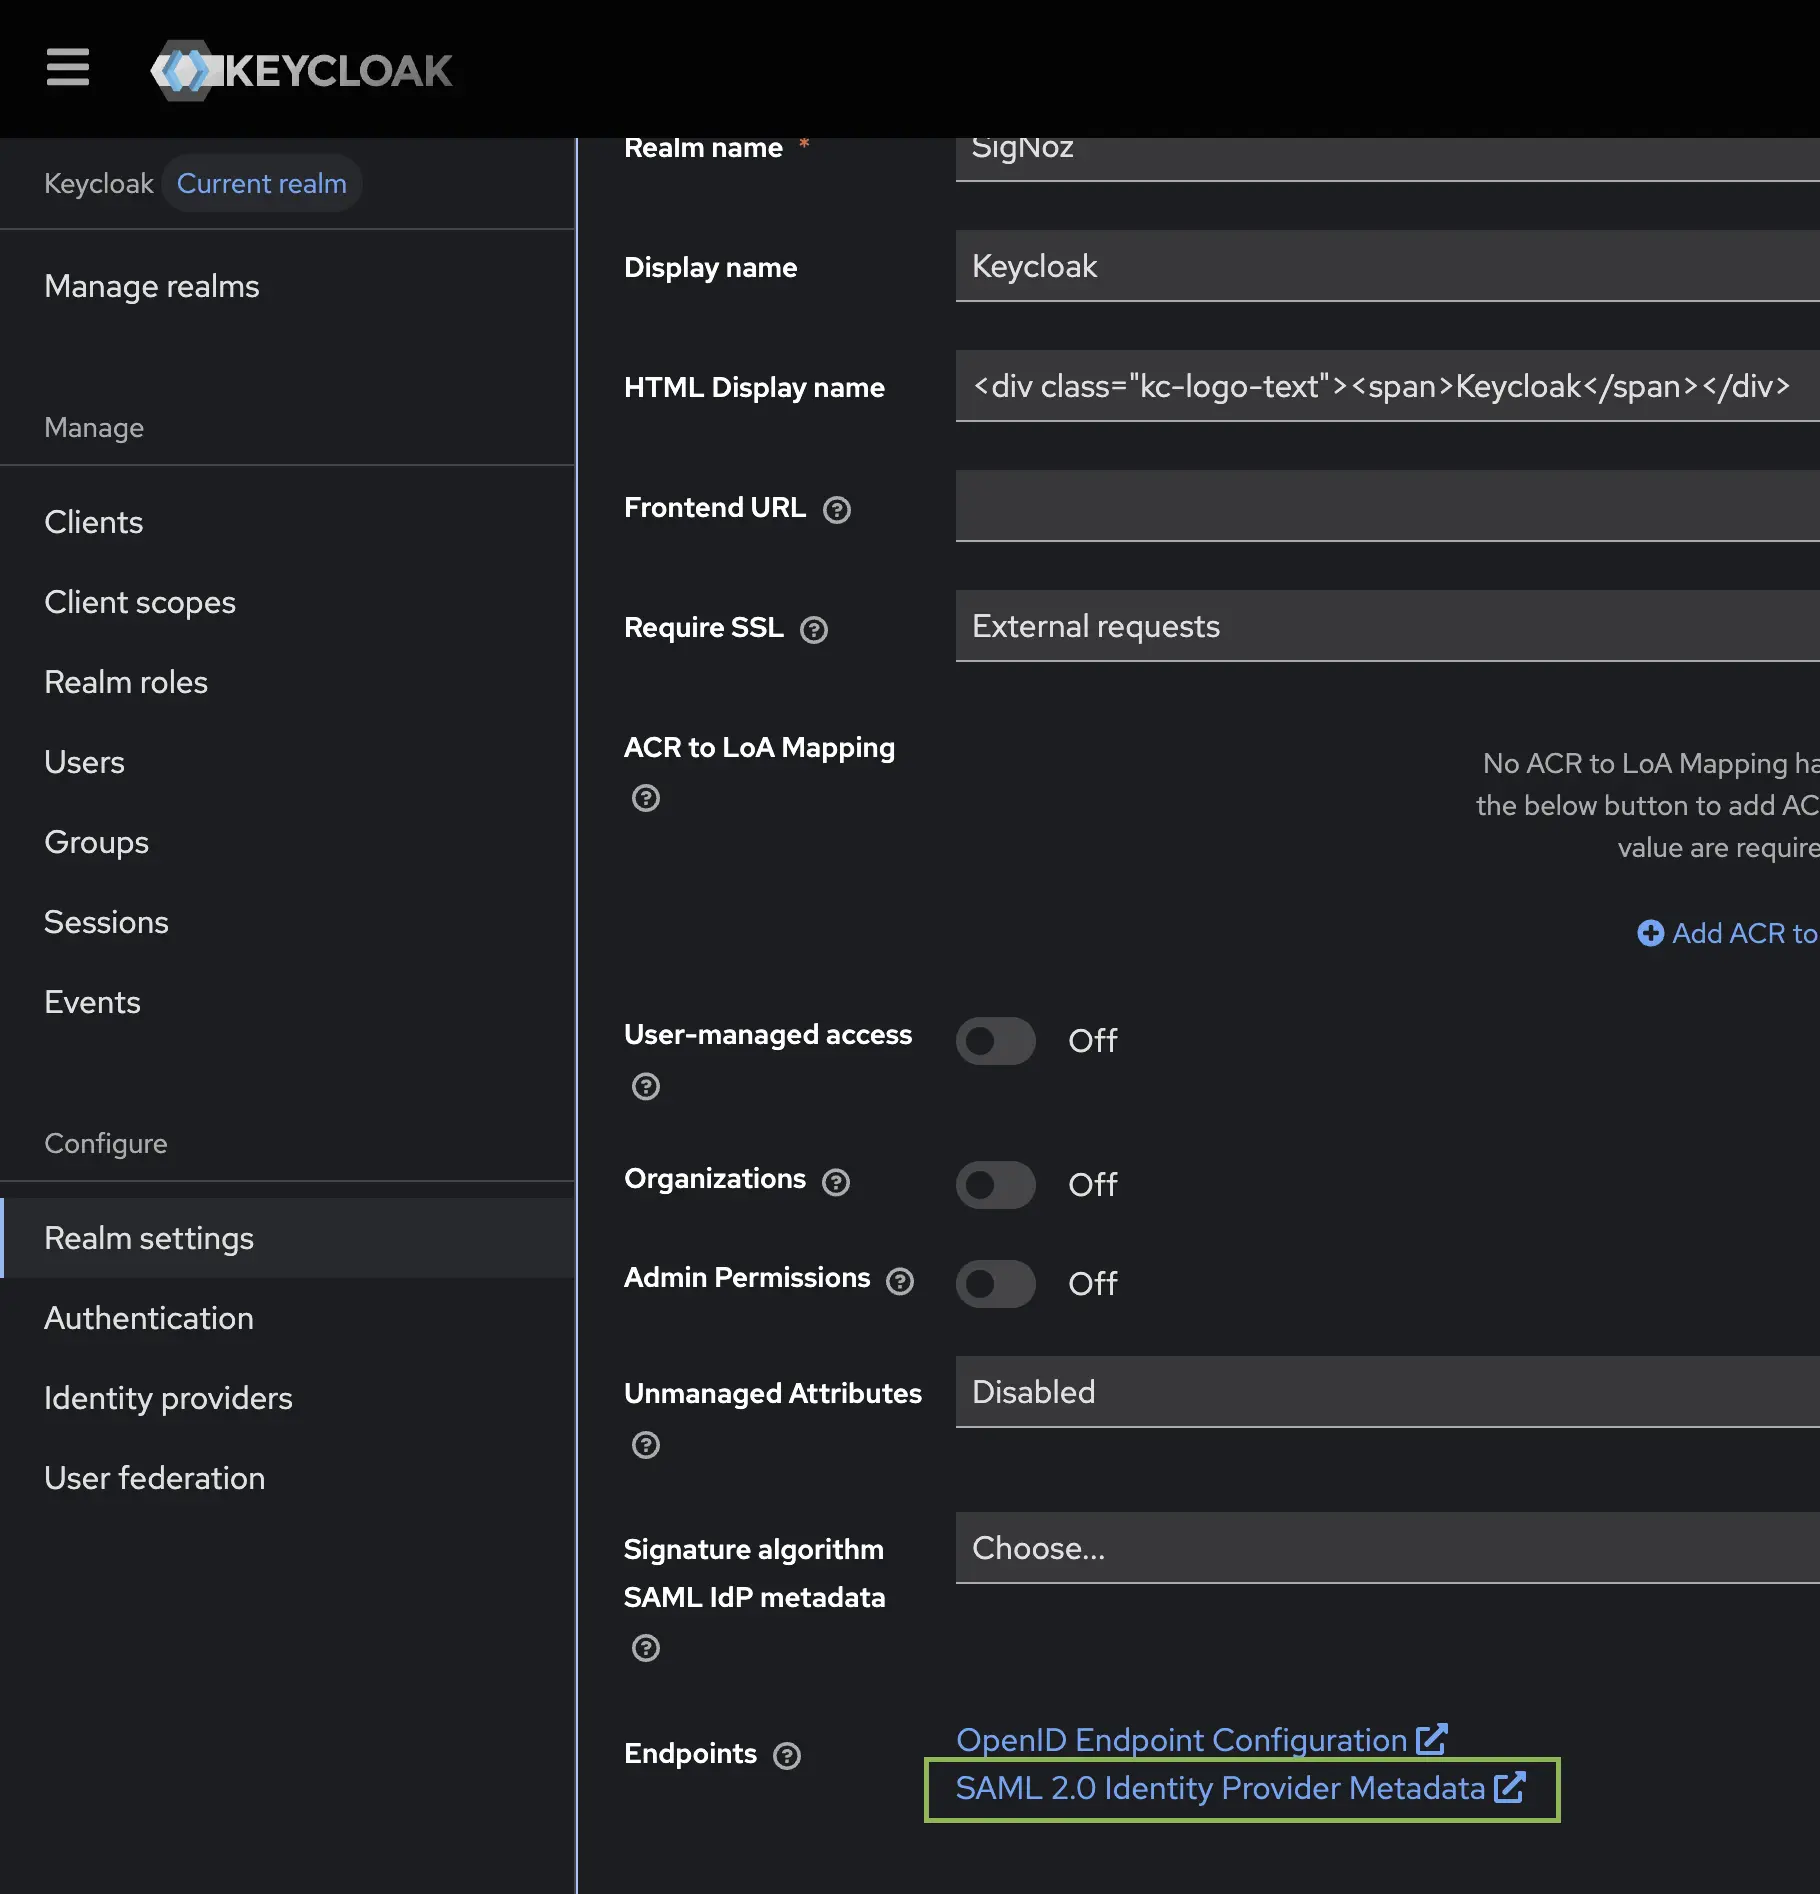
Gather SAML Information
- In Keycloak, go to Realm settings → General tab
- Scroll to the Endpoints section and click SAML 2.0 Identity Provider Metadata
- From the XML metadata, note down:
- Entity ID — the
entityIDattribute of the root element - SSO URL — the
Locationattribute of theSingleSignOnServiceelement with POST binding (ends with/protocol/saml) - X.509 Certificate — the certificate inside the
X509Certificateelement
- Entity ID — the
Configure SigNoz
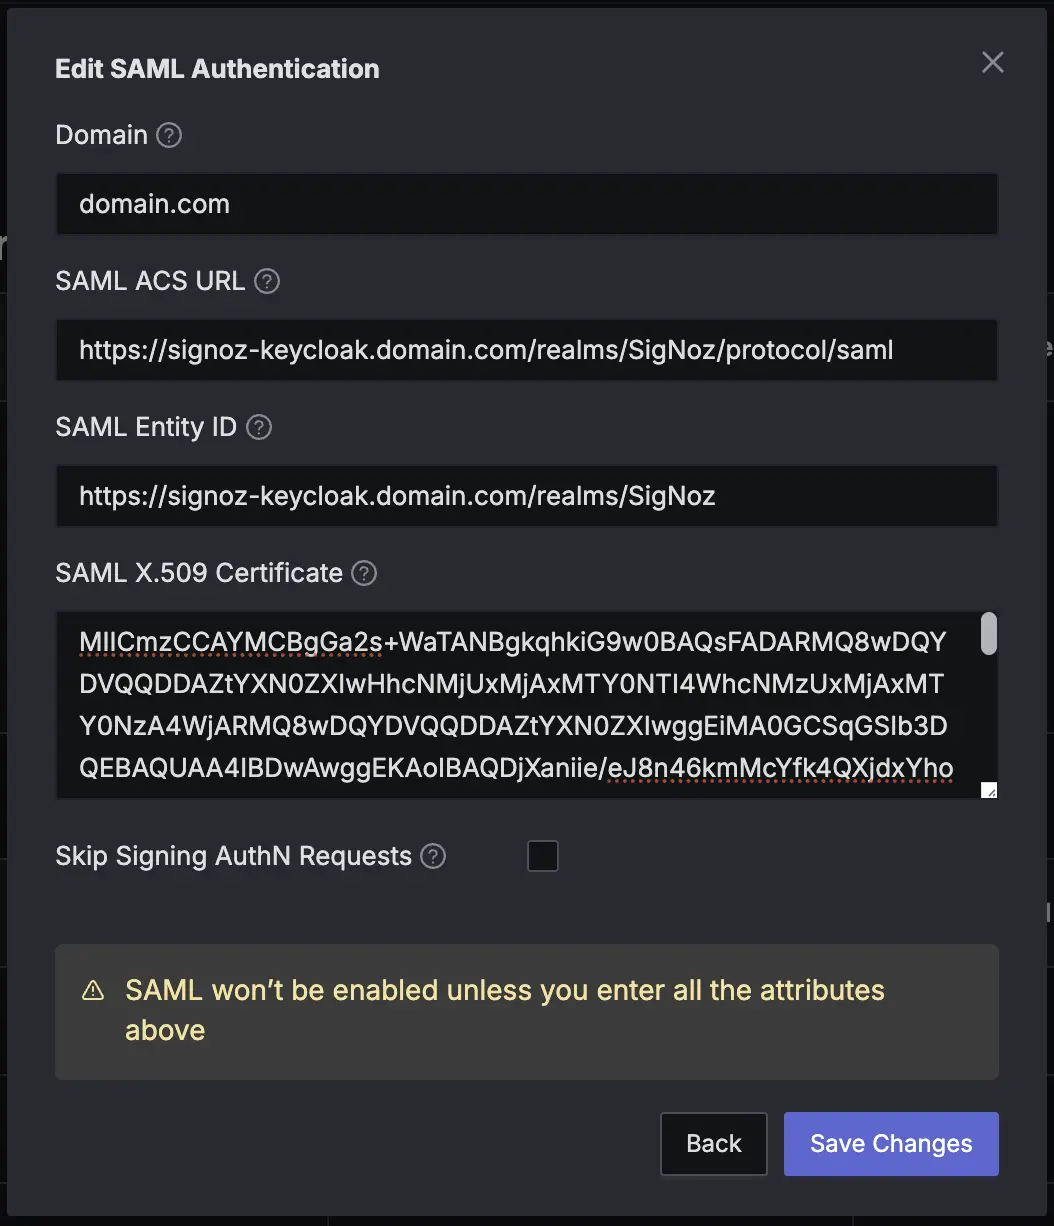
- Go to Settings → Organization Settings → Members & SSO → Authenticated Domains
- Click on Add Domain button and select SAML Authentication
- Add your email domain (e.g.,
your-domain.com) - Configure SAML settings with collected information
- Enable Enforce SSO toggle
Configure IdP-initiated Login
- In SigNoz, go to Settings → Organization Settings → Members & SSO → Authenticated Domains
- Copy the IDP Initiated SSO URL shown for your domain
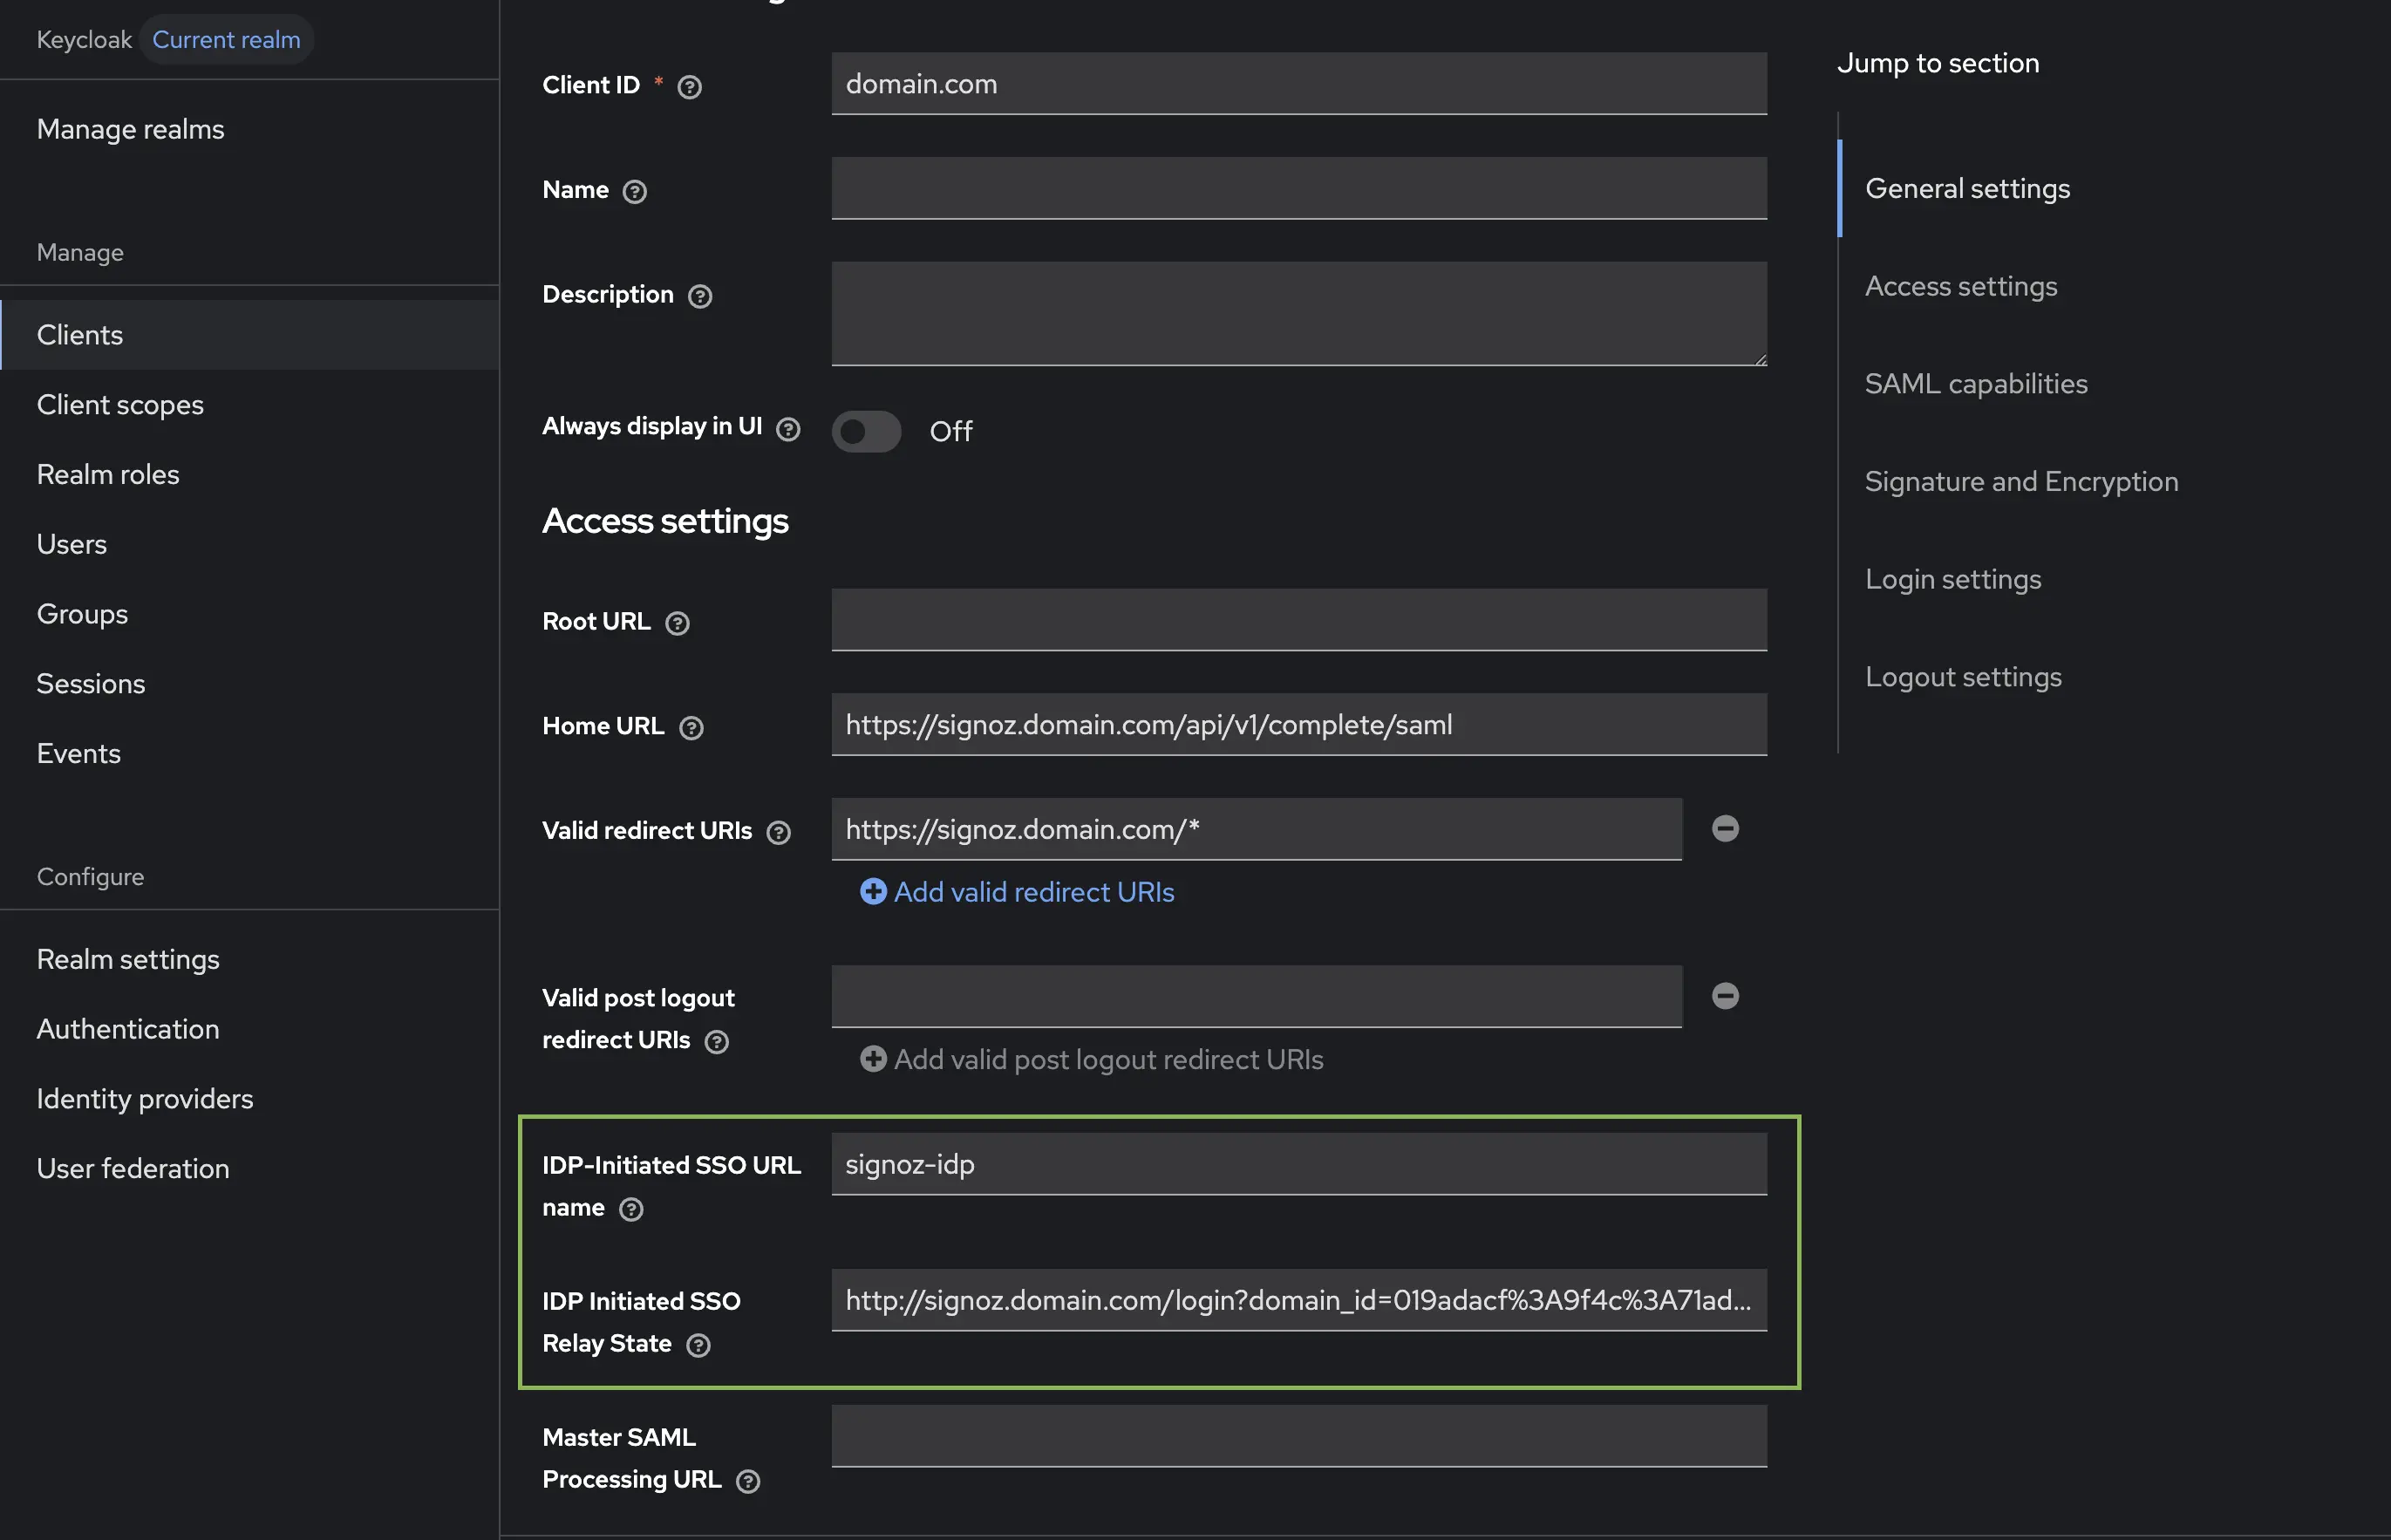
- In Keycloak, open your SAML client → Settings tab
- Scroll to the Login settings section
- Set IDP-Initiated SSO URL name to a unique identifier (e.g.,
signoz-idp) - Set IDP Initiated SSO Relay State to the URL copied from SigNoz in step 2
- Click Save
Verify the setup
- Provide access to the Keycloak Realm to some user or create a new one
- Navigate to your SigNoz URL
- Click "Login" → "SSO Login"
- Enter Keycloak credentials when prompted
- Verify successful authentication
To verify IdP-initiated login
- Navigate to
<your-keycloak-domain>/realms/master/protocol/saml/clients/<your-unique-sso-url-name>(likesignoz-idpabove) - Enter Keycloak credentials when prompted
- Verify successful authentication
Configure Attribute Mapping (Optional)
Attribute mapping tells SigNoz which SAML assertion attributes contain the user's email, display name, groups, and role. The defaults work if your Keycloak mappers use standard attribute names, but you can customize them when your mappers use different names.
Attribute Mapping Fields
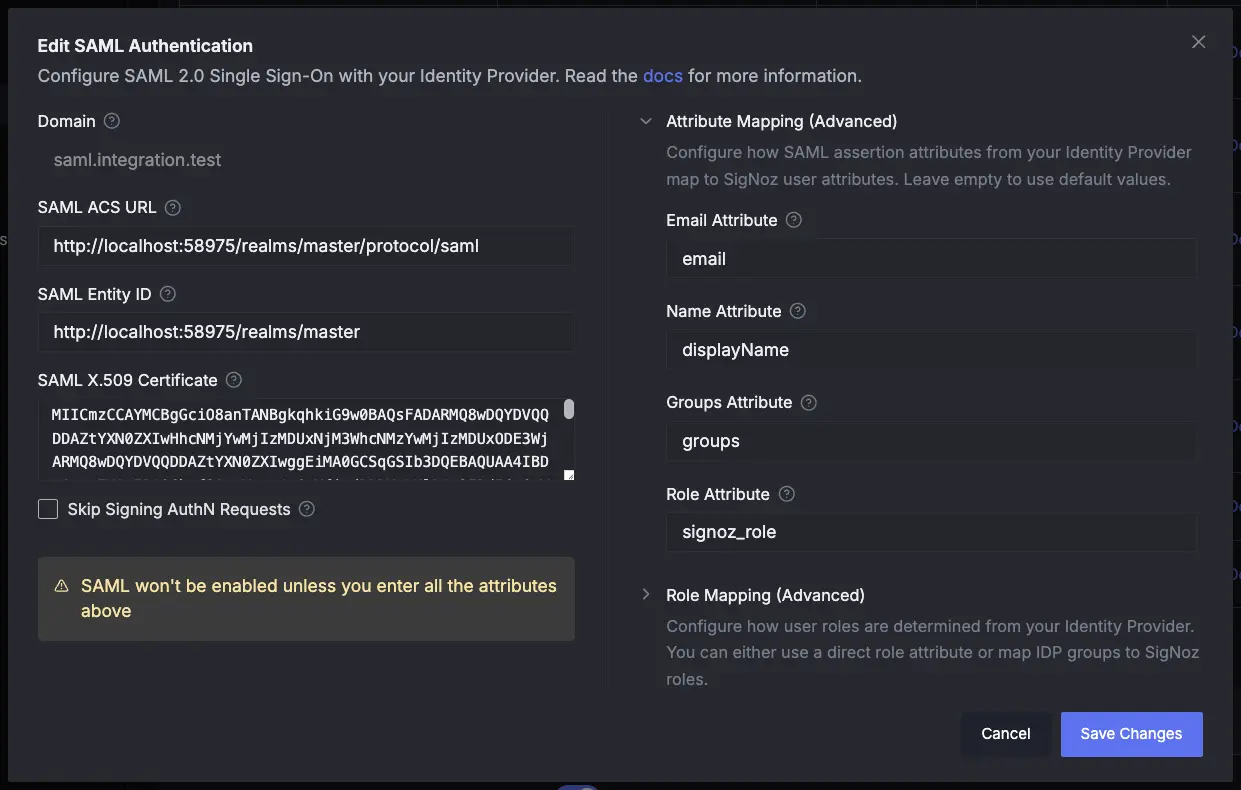
Configure these in SigNoz under Settings → Organization Settings → Members & SSO → Authenticated Domains → edit your domain → Attribute Mapping section:
| Field | Default | Description |
|---|---|---|
email | SAML attribute name containing the user's email address | |
| Name | name | SAML attribute name containing the user's display name |
| Groups | groups | SAML attribute name containing the user's group memberships |
| Role | role | SAML attribute name containing the user's role |
Each value must match the SAML Attribute Name (or Friendly Name) configured in the corresponding Keycloak mapper. The predefined mappers added in Step 4 already cover email and name — the sections below explain how to add mappers for groups and role.
Add a Group Mapper in Keycloak
To include group memberships in the SAML assertion:
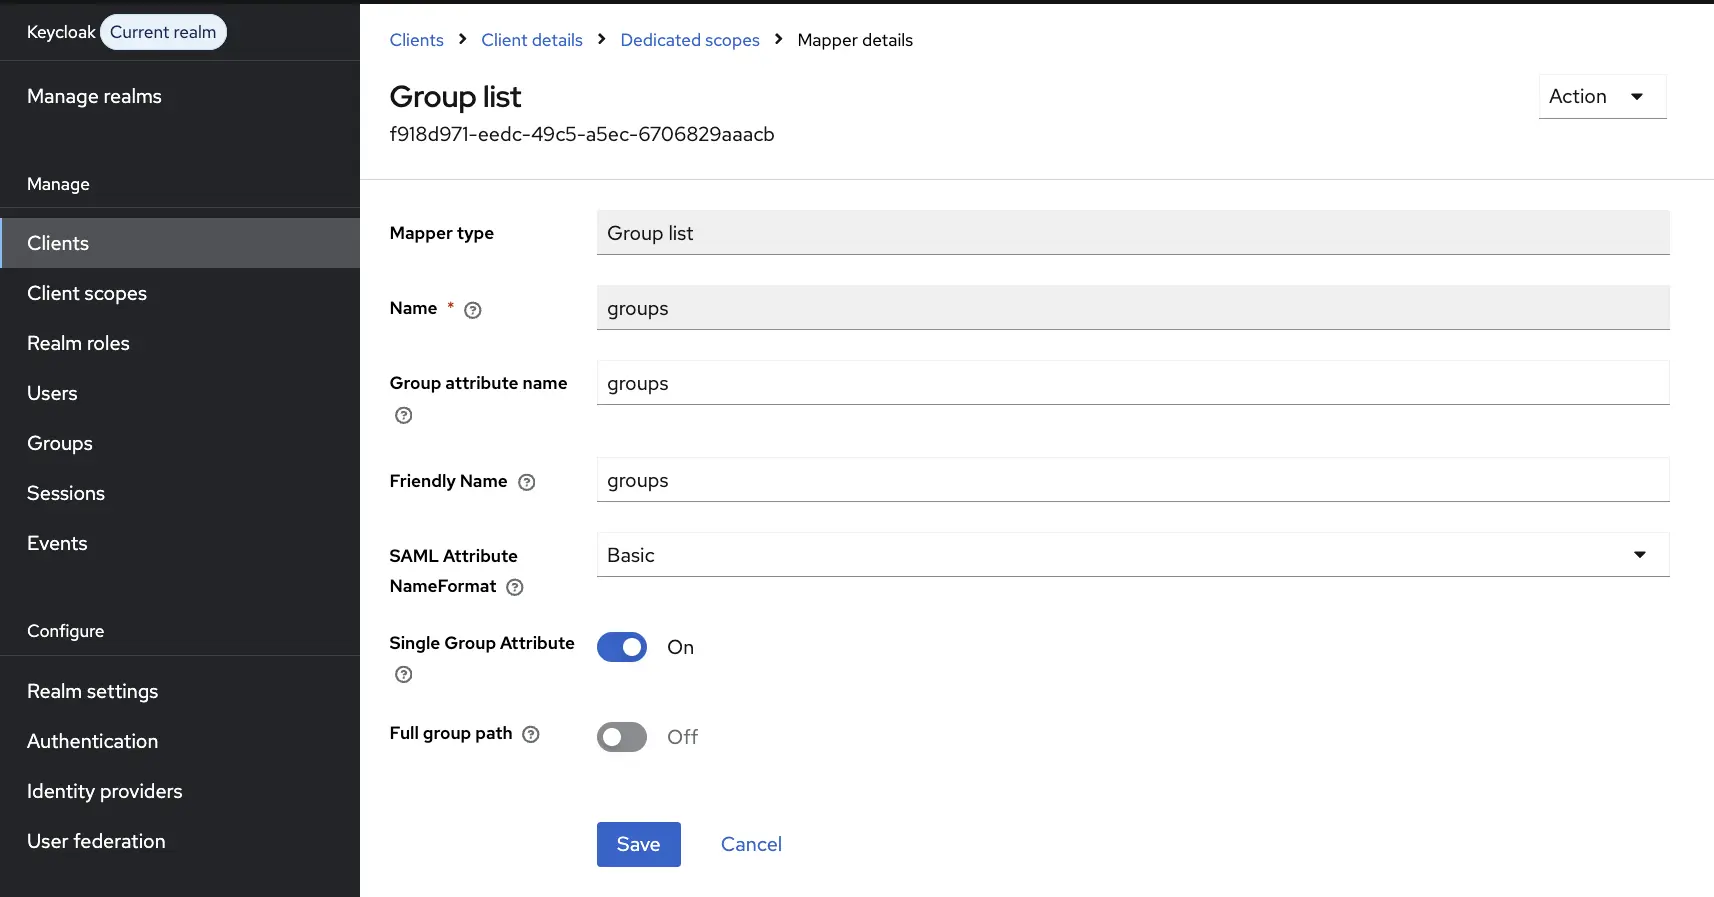
- In Keycloak, go to Clients → select your SigNoz client → Client scopes tab
- Click on
<your-client-id>-dedicated(e.g.,signoz.example.com-dedicated) - Go to the Mappers tab and click Add mapper → By configuration
- Select Group list
- Fill in the fields:
- Name:
groups - Group attribute name:
groups - SAML Attribute NameFormat:
Basic - Single Group Attribute: ON
- Full group path: OFF
- Name:
- Click Save
Add a Role Attribute Mapper in Keycloak (Optional)
If you want to assign SigNoz roles directly via a Keycloak user attribute (instead of group-based mapping), you need to:
- Register the custom attribute in the user profile
- Create a SAML mapper for it
- Set the attribute value on each user
Register the Custom Attribute
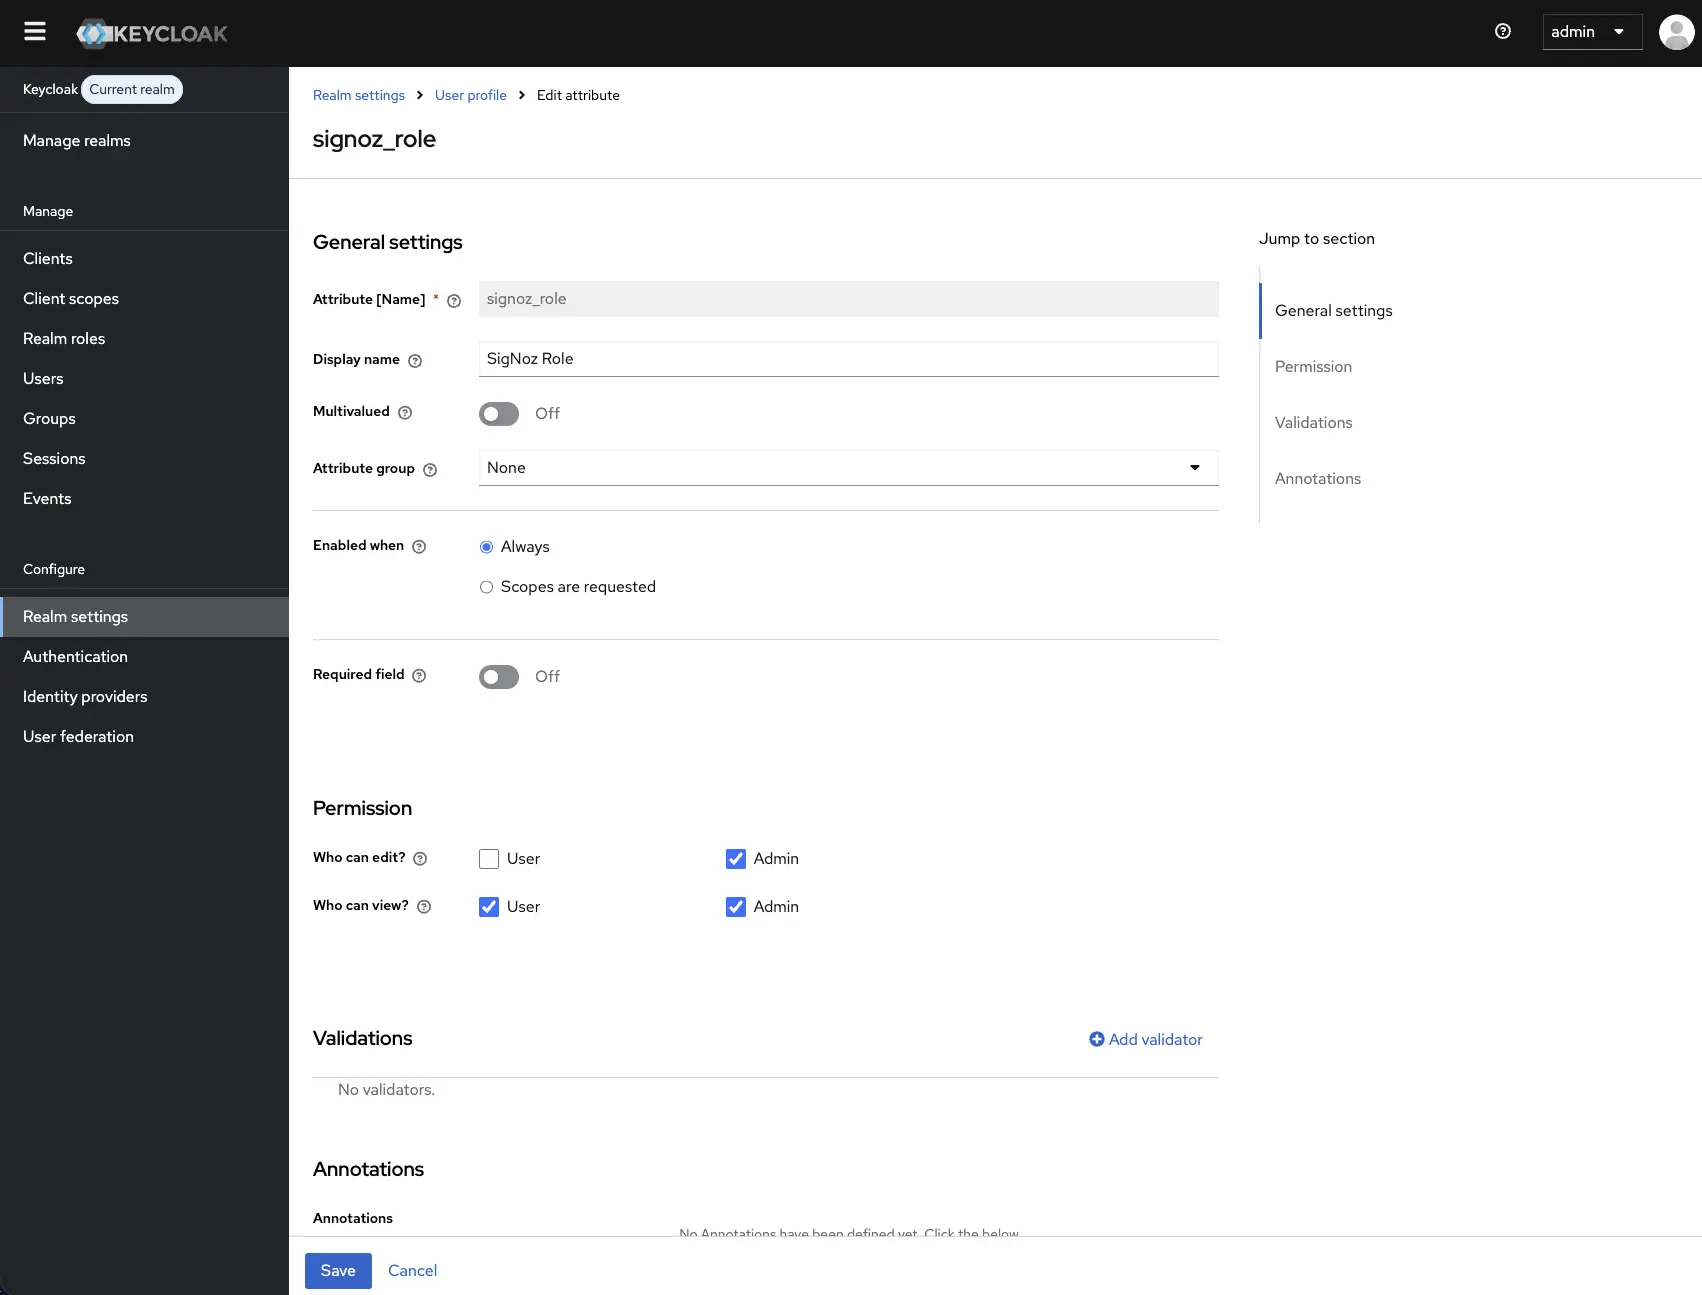
- In Keycloak, go to Realm settings → User profile tab
- Click Create attribute
- Fill in:
- Attribute name:
signoz_role - Display name:
SigNoz Role - Under Permissions, enable Can user view? and Can admin edit?
- Attribute name:
- Click Create
Create the SAML Mapper
- Go to Clients → select your SigNoz client → Client scopes tab
- Click on
<your-client-id>-dedicated - Go to the Mappers tab and click Add mapper → By configuration
- Select User Attribute
- Fill in the fields:
- Name:
signoz_role - User Attribute:
signoz_role - SAML Attribute Name:
signoz_role - SAML Attribute NameFormat:
Basic
- Name:
- Click Save

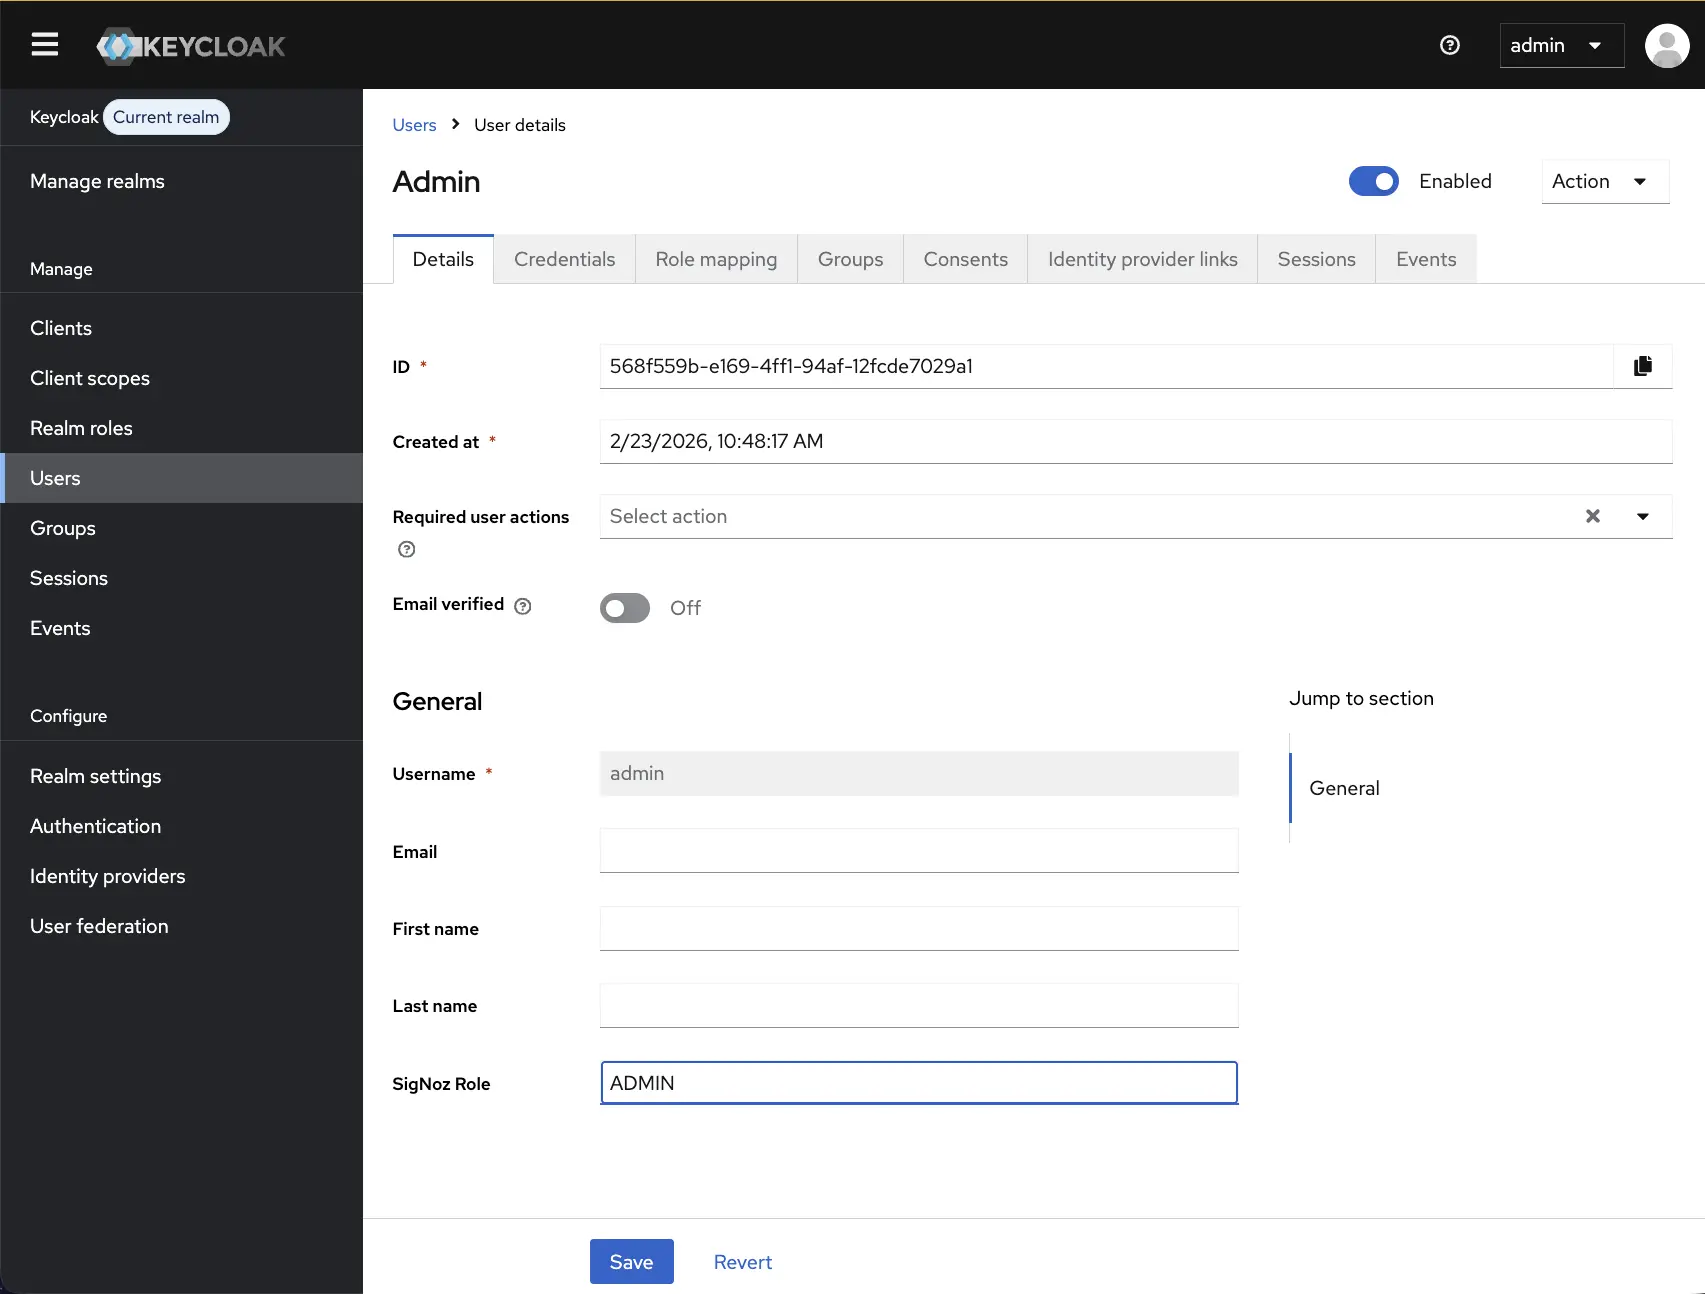
Set the Attribute on Users
- Go to Users → select a user → Attributes tab
- Set the key
signoz_rolewith a value ofADMIN,EDITOR, orVIEWER - Click Save
Configure Attribute Mapping in SigNoz
- Go to Settings → Organization Settings → Members & SSO → Authenticated Domains
- Click on your SAML domain to edit it
- In the Attribute Mapping section, set the fields to match your Keycloak mappers:
- Name:
givenName(matches the X500 givenName predefined mapper's friendly name) - Groups:
groups(matches the group mapper created above) - Role:
signoz_role(matches the role attribute mapper created above)
- Name:
- Click Save
Configure Role Mapping (Optional)
Role mapping automatically assigns SigNoz roles (VIEWER, EDITOR, ADMIN) to users when they log in via SAML, based on their Keycloak groups or a custom role attribute.
Role Resolution Priority
When a user logs in, SigNoz determines their role using this priority (highest to lowest):
- Use Role Attribute — if enabled and the SAML assertion contains a role attribute, that value is used directly
- Group Mappings — if the user belongs to multiple mapped groups, the highest-privilege role wins (ADMIN > EDITOR > VIEWER)
- Default Role — fallback role from configuration
- VIEWER — ultimate default if nothing else is configured
Option A: Group-Based Role Mapping
Map Keycloak groups to SigNoz roles. Users are assigned the highest-privilege role from their group memberships.
Create Groups in Keycloak
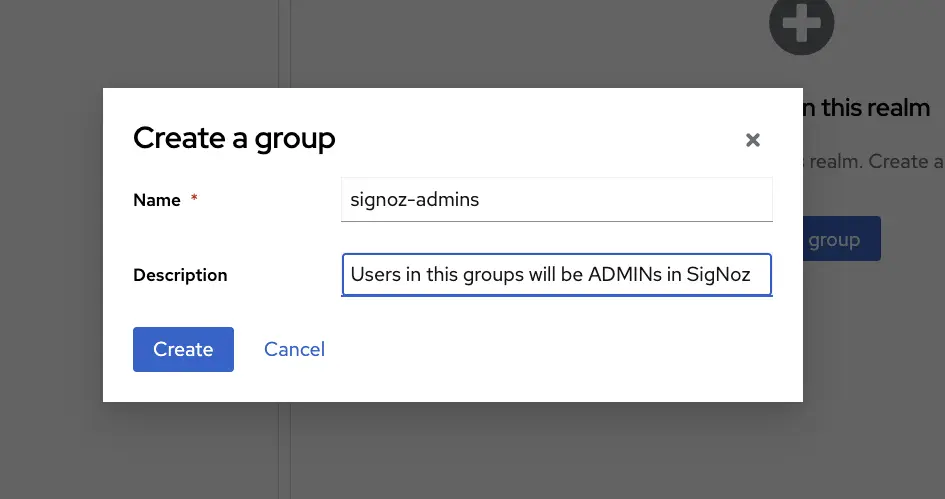
- In Keycloak, go to Groups in the left sidebar
- Click Create group
- Enter a group name (e.g.,
signoz-admins) and click Create - Repeat for other groups (e.g.,
signoz-editors,signoz-viewers)
Assign Users to Groups
- Go to Users → select a user → Groups tab
- Click Join Group
- Select the group (e.g.,
signoz-admins) and click Join

Configure in SigNoz
- Ensure you have added a group mapper and configured attribute mapping for groups
- Go to Settings → Organization Settings → Members & SSO → Authenticated Domains
- Click on your SAML domain to edit it
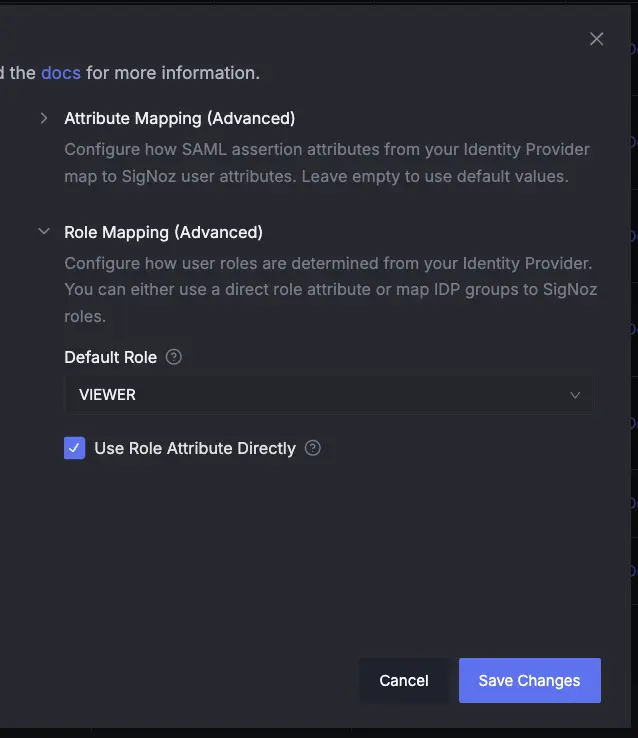
- In the Role Mapping section:
-
Set Default Role to
VIEWER -
Under Group Mappings, add entries mapping each Keycloak group name to a SigNoz role:
Keycloak Group SigNoz Role signoz-adminsADMINsignoz-editorsEDITORsignoz-viewersVIEWER -
Leave Use Role Attribute turned OFF
-
- Click Save

Option B: Direct Role Attribute Mapping
Assign SigNoz roles directly via a custom user attribute in Keycloak, without using groups.
Set Up Keycloak
- Register the
signoz_rolecustom attribute in the user profile - Create the SAML mapper for the attribute
- Set the
signoz_roleattribute on each user toADMIN,EDITOR, orVIEWER
Configure in SigNoz
- Ensure you have configured attribute mapping with Role set to
signoz_role - Go to Settings → Organization Settings → Members & SSO → Authenticated Domains
- Click on your SAML domain to edit it
- In the Role Mapping section:
- Set Default Role to
VIEWER(used as fallback) - Turn Use Role Attribute to ON
- Set Default Role to
- Click Save
Troubleshooting
Common issues and solutions:
- "Authentication failed" error: Verify that the Assertion Consumer Service POST Binding URL in Keycloak exactly matches
<your-instance-url>/api/v1/complete/saml - Stuck in a login loop: Ensure Enforce SSO is enabled in SigNoz and the user's email domain matches the configured authenticated domain
- User created with wrong role: Check the role resolution priority — if Use Role Attribute is ON, it takes precedence over group mappings. Verify the SAML attribute name in the Keycloak mapper matches the Role field in SigNoz attribute mapping
- Groups not appearing in SAML assertion: Ensure the group mapper is added to the
<client-id>-dedicatedscope (not a shared scope), Single Group Attribute is ON, and the user is assigned to groups in Keycloak - Custom attribute not included in assertion: Make sure the attribute is registered in the user profile and the SAML mapper is saved in the dedicated client scope
- IdP-initiated login fails: Confirm that IDP-Initiated SSO URL name is set in Keycloak and the IDP Initiated SSO Relay State matches the URL from SigNoz's Authenticated Domains page
- Locked out?: If you're unable to login because of faulty SSO setup, use password authentication by appending
?password=Yto your login URL:<your-instance-url>/login?password=Y
