Authentication Model in OpenTelemetry
In any type of software that involves the movement of data or information, there is a pressing need to make the passage of data secure. One way of achieving this is by authentication. You must have experience authenticating API calls or other data streams.
In modern systems, where even a small mishap can wreak havoc and you might wake up to a $$$ bill the next day, we should do whatever is within our capacity to secure our systems.
In this blog we talk about something crucial but often overlooked: authentication for your OpenTelemetry Collectors. These collectors are the busy data hubs of your observability pipeline, handling huge amounts of information every moment. Securing them is non-negotiable, and also a perfect use case for strong authentication.
Authentication in OpenTelemetry Collector
Firstly, OpenTelemetry on its own doesn’t define an authentication protocol or an auth model. OpenTelemetry's primary aim was to define a standard data model (like for metrics and logs) and a transport protocol (OTLP). It leaves us the flexibility to work with any authentication scheme, based on our collector pipeline and the backend we are using.
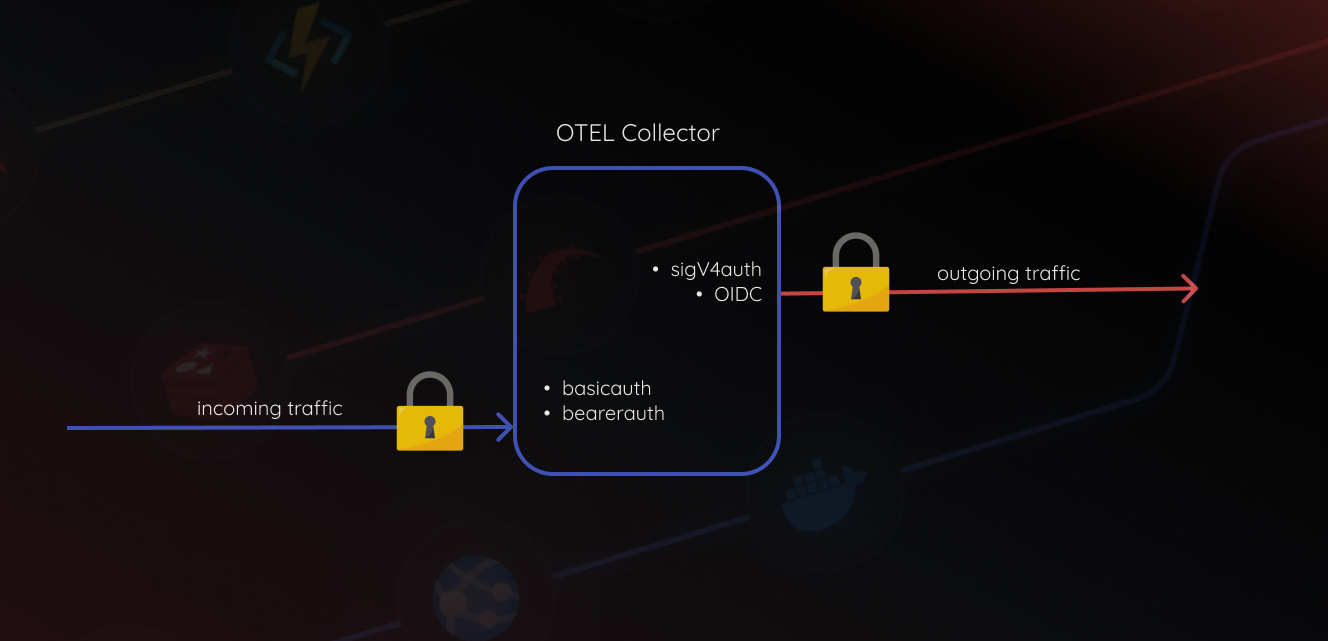
In a Collector pipeline, data has one point of entry, the receivers and one point of exit, the exporters. Authentication is critical at both of these points.

Authenticating Incoming Traffic
As we saw before, the receiver is the point of entry for data traffic, hence it’s crucial to examine if the data is coming from a reliable source. We achieve this by auth extensions. You can read more about extensions here.
In this scenario, we will configure our Collector to only accept requests that include a valid secret token in their Authorization: Bearer <token> header. This is a three-step process in your Collector’s config.yaml file.
Step 1: Define the Authenticator in extensions
First, we define our authentication method. We’ll use the built-in bearerauth authenticator and provide it with a list of valid tokens.
extensions:
   bearerauth:
   # This defines a list of valid secret tokens the collector will accept.
   # Any client request must present one of these tokens to be authenticated.
       tokens:
          “${CLIENT_A_TOKEN}”
          “${CLIENT_B_TOKEN}”
Just registering the authentication here under the extension doesn’t enforce it. It gets enforced when it’s applied to a receiver, as shown in the next section.
Never hardcode secrets directly in your configuration file. The ${...} syntax tells the Collector to load the token from an environment variable. You should inject these variables securely using a tool like Kubernetes Secrets or Docker Secrets.
Step 2: Apply the Authenticator to a Receiver
Next, we tell our otlpreceiver that it must use the authenticator we just defined. We do this by adding an auth setting within the receiver’s configuration.
receivers:
  otlp:
    protocols:
      grpc:
        endpoint: “0.0.0.0:4317”
        auth:
          authenticator: bearerauth
   # use the bearerauth extension
Step 2: Apply the Authenticator to a Receiver
Next, we tell our otlpreceiver that it must use the authenticator we just defined. We do this by adding an auth setting within the receiver’s configuration.
receivers:
  otlp:
    protocols:
      grpc:
        endpoint: “0.0.0.0:4317”
        auth:
          authenticator: bearerauth   # use the bearerauth extension
      http:
        endpoint: “0.0.0.0:4318”
        auth:
          authenticator: bearerauth   # same auth on HTTP
Step 3: Enable the Extension in the service Block
Finally, the extension must be activated for the Collector by listing it in the service section. This is the entire flow of code.
service:
  extensions: [bearerauth]  # This activates the bearerauth extension
  pipelines:
    traces:
      receivers: [otlp]
      processors: [batch]
      exporters: [otlp]
With this configuration in place, your Collector’s incoming traffic is now secure. Any request arriving at the OTLP receiver without a valid token will be rejected, ensuring only your trusted applications can send data into your observability pipeline.
There are other ways of authentication as well, like — basicauth, oidc, etc, depending on your particular use case. Now let’s see how we deal with outgoing traffic.
Securing Outgoing Traffic
Exporters are the exit point for data leaving the collector. The next destination for your data is most likely an observability backend like SigNoz, and the collector often needs to authenticate itself to prove it has permission to send that data. Now, there are two ways to do this.
The easiest way is to add a headers section directly to your exporter’s configuration in your config.yaml. This tells the exporter to attach the specified headers (containing your secret key) to every outgoing request. The code is shown below,
exporters:
  otlp:
    endpoint: “ingest.us.signoz.cloud:443”
    headers:
      # This header authenticates the Collector with the SigNoz backend
      signoz-ingestion-key: “${SIGNOZ_API_KEY}” # as env var
For more complex authentication, you can follow the same sequence of steps as we did for receivers above. That is, Step 1 - Define the Authenticator in Extensions, AND Step 2: Apply the Authenticator to an Exporter. At the end, we register the extension under exporters. Here’s the entire code sample.
extensions:
    region: “us-east-1”
    service: “aoss”

exporters:
  otlp:
    endpoint: “ingest.us.signoz.cloud:443”
    headers:
      signoz-ingestion-key: “${SIGNOZ_API_KEY}”


  otlphttp/aws:
    endpoint: “https://my-opensearch-domain.us-east1.aoss.amazonaws.com”
    auth:

      authenticator: sigv4auth

 --- Example Service Configuration ---
 Choose which exporters and extensions to enable.
 Uncomment and modify as needed.

 service:
   extensions: [sigv4auth]
   pipelines:
     traces:
       receivers: [otlp]
       processors: [batch]
       exporters: [otlp]
In summary, for most backends that use a simple API key, the static headers setting is all you need. For more complex scenarios involving cloud provider IAM roles or OAuth2, we use Collector’s auth extensions.
What’s next?
Now that we’ve laid a foundation for securing data flowing into your OpenTelemetry collectors, you can get hands-on and experiment with different authentication methods to get a well-rounded idea. To read more on OpenTelemetry collectors and their various parts, this is a good read.
