Can you have a career in Node without knowing Observability?
Why Observability Matters to JS Developers
”Isn’t Observability something for Ops to worry about?” I’ve heard this response more than once when talking about how developers should learn OpenTelemetry. I wanted to write this piece to show you how important and how easy it is to learn observability from day one as a coder. We’ll start with explaining observability’s role in software development, and the second half of this piece is a guide to instrumenting a demo app with the open source tools OpenTelemetry and SigNoz.

Feeling it out: we need observability to write code
How do we code now? Specifically, what’s the ratio of writing code to running it? In my grandmother’s generation, coding was something that started on a legal pad. You got at most once chance a day to run the code you’d written, and you often had several humans reading over your code before it ever touched a computer.

Modern developers… don’t work like that. For most of us, the second we hit cmd + s on our file, our code is run in a local development environment. When working in a new codebase I often find myself ‘feeling my way through’ a coding problem: trying small changes in series, making sure little steps compile and run correctly, and changing no more than 5-10 lines of code before seeing it run.
This is how modern development works, and its why you can’t release production code without observability. No one would claim that you could practically write code without a linter, logging, or debugger; it would be like driving a car with a blindfold. However, astoundingly, when we release code from our dev environment to production we often find ourselves in the dark with very limited information about how our code is worse.
Without observability the situation is worse than life without a local debugger: when we work in our dev environment the whole situation is controlled with a limited number of inputs and expected outputs. In production you’ll find scale issues, emergent behaviors, and incoming requests your test suite never predicted. Without monitoring your production code with observability, you’ll never really know why your code sometimes fails.
Being a developer requires more than before: pretending you’re in a production team
There are some key skills that all developers need that are outside of coding. I’m not referring here to people skills or the need to understand that you’re not going to have a breakthrough by sitting at your desk for seven hours’ straight. No, these are the technical skills that aren’t precisely bound by the art of writing and running code. When I was learning programming, pretty much the only extracurricular knowledge you needed was:
- Basic Linux knowledge
- How to use a command line tool like bash
- version control with git
- at least one database
In the last five years a few key skills have been added to the list:
- Running a container on your machine - have you seen a cool open source project that wasn’t distributed as a docker image?
- How to deploy your code - I remember when my work was done once code was merged to
mainon GitHub. Now, from Netlify to Dockerhub, developers have had to understand how their code goes from ‘works on my machine’ to ‘running in production - Security Best Practices - everything from 2fa to software supply chains are something every developer should understand
- Observability - The topic of this article. While logging and even debugging were afterthoughts a few years ago, now we expect competent developers to bake in observability features right from the start
Something that’s true about all four points above is, in any large software team, none of these areas will be handled entirely by you, a lone developer. As you increase your skills, understanding these areas will help you ship clean code that gets deployed fast and is easy to maintain. Observability is part of that story.
Another common thread connects the four points above: as you learn programming all of these skills can be hard to run on a laptop by yourself. Without an operations team to support you it can be tough to learn the right way to run containers, secure your code, and observe running software.
Observability as a team of one can be easy
This article will show you how to add instrumentation to your NodeJS code, how to report it to and endpoint, and how to actually see the data that’s flowing. In the process we’ll simulate a few failures and stumbling blocks that you might run into.
Since we don’t want to use expensive paid tools, we’ll use OpenTelemetry to gather data from our application, and SigNoz as an endpoint to report and view OpenTelemetry data.
Instrumenting a Node application with OpenTelemetry
This guide starts from the OpenTelemetry getting started guide for Javascript, but resolves some fragmentation in that documentation and adds a final part where you report data to an OpenTelemetry dashboard with SigNoz. This guide requires no special knowledge beyond the ability to read Javascript and run commands in bash.
Step 1: Building our app
Start by creating a new directory with mkdir and initializing a package.json with
npm init -y
Then install Express with
npm install express
Now let’s make our dice rolling app.
/*app.js*/
const express = require("express");
const PORT = parseInt(process.env.PORT || "8080");
const app = express();

function getRandomNumber(min, max) {
  return Math.floor(Math.random() * (max - min) + min);
}

function rollTheDice(rolls, min, max) {
  const result = [];
  for (let i = 0; i < rolls; i++) {
    result.push(getRandomNumber(min, max));
  }
  return result;
}

app.get("/rolldice", (req, res) => {
  const rolls = req.query.rolls ? parseInt(req.query.rolls.toString()) : NaN;
  if (isNaN(rolls)) {
    res
      .status(400)
      .send("Request parameter 'rolls' is missing or not a number.");
    return;
  }
  res.send(JSON.stringify(rollTheDice(rolls, 1, 6)));
});

app.listen(PORT, () => {
  console.log(`Listening for requests on http://localhost:${PORT}`);
});
This version of the dice roller accepts a rolls parameter and returns an array with that many rolls. This is useful to us since we’ll want to measure each dice roll with OpenTelemetry tracing a bit later.
You can start the application with node app.js and you can visit http://localhost:8080/rolldice?rolls=3 to see an array of responses like [3,1,5]
Step 2: Add Auto-instrumentation
A source of some confusion for new developers is the difference between manual instrumentation and auto-instrumentation. Remember that our goal with a basic application is trace data that shows where work is occurring as our application handles requests. It’s possible to construct this trace data 100% manually by adding calls into your code similar to the way you might be adding logging now. The OpenTelemetry SDK has support for creating and sending traces, letting you define trace context, add attributes and starting and stopping the time measurements (called ‘spans’) that make up a trace. For this example we’ll use the automatic option, which requires no direct changes to our code, and instead patches in wrappers for our functions that will automatically create traces.
If you haven’t interacted with an automatic instrumentation package before it can seem quite magical, but if you look at our Flask app it’s rather easy to imagine how we can start a trace (when handing a request at a single route) and how we can label the following spans (function names), and how they can be connected.
We’re starting with automatic instrumentation since it should create full traces for us, and the OTel SDK has the tools we need to get data reporting connected. From there you can use custom instrumentation to add detail or kick off different trace types.
Start by installing the dependencies for OpenTelemetry auto-instrumentation, and the SDK with tools for sending data:
npm install @opentelemetry/sdk-node \
  @opentelemetry/api \
  @opentelemetry/auto-instrumentations-node \
  @opentelemetry/sdk-metrics
Next we’ll create an instrumentation file that will instruct our automatic instrumentation to send both traces and metrics straight to our console. Create a separate instrumentation.js file
/*instrumentation.js*/
// Require dependencies
const { NodeSDK } = require("@opentelemetry/sdk-node");
const { ConsoleSpanExporter } = require("@opentelemetry/sdk-trace-node");
const {
  getNodeAutoInstrumentations,
} = require("@opentelemetry/auto-instrumentations-node");
const {
  PeriodicExportingMetricReader,
  ConsoleMetricExporter,
} = require("@opentelemetry/sdk-metrics");

const sdk = new NodeSDK({
  traceExporter: new ConsoleSpanExporter(),
  metricReader: new PeriodicExportingMetricReader({
    exporter: new ConsoleMetricExporter(),
  }),
  instrumentations: [getNodeAutoInstrumentations()],
});

sdk.start();
The real meat of this process are the ConsoleSpanExporter for traces and ConsoleMetricExporter for any metrics calls. By default the metrics emitted will be fairly simple but metrics become really important as we start trying to answer business questions from inside your application.
To make sure our functions get correctly wrapped, we need to make sure that instrumentation.js runs before any other part of our application. In our small example this is easily handled with a --require call to Node at startup:
node --require ./instrumentation.js app.js
But this requirement is worth noting since it can complicate production deployment.
Once you run your dice roller app and send it a request, you should get large amount of data dumped to the console, ending with an object that looks like:
{
  "traceId": "770e3ec56b4e75bb5dda2083994e755f",
  "parentId": undefined,
  "traceState": undefined,
  "name": "GET /rolldice",
  "id": "d410de7ac1d353b0",
  "kind": 1,
  "timestamp": 1695705076935000,
  "duration": 5649.458,
  "attributes": {
    "http.url": "http://localhost:8080/rolldice?rolls=3",
    "http.host": "localhost:8080",
    "net.host.name": "localhost",
    "http.method": "GET",
    "http.scheme": "http",
    "http.target": "/rolldice?rolls=3",
    "http.user_agent": "Mozilla/5.0 (Macintosh; Intel Mac OS X 10_15_7) AppleWebKit/537.36 (KHTML, like Gecko) Chrome/116.0.0.0 Safari/537.36",
    "http.flavor": "1.1",
    "net.transport": "ip_tcp",
    "net.host.ip": "::1",
    "net.host.port": 8080,
    "net.peer.ip": "::1",
    "net.peer.port": 59101,
    "http.status_code": 200,
    "http.status_text": "OK",
    "http.route": "/rolldice"
  },
  "status": { "code": 0 },
  "events": [],
  "links": []
}
If you leave the application running, the PeriodicExportingMetricReader will emit further metric objects. These will track things like HTTP request times and DB connection metrics (not meaningful on our demo app but good to have!).
Step 3: Report Traces to a SigNoz dashboard
We’ll report traces to a dashboard on SigNoz.io. SigNoz offers a fully free and open source version you can run on your own cloud or laptop, but since we’re developers not operations specialists, we can use the new SigNoz cloud to create an online endpoint and dashboard.
Head to https://signoz.io/teams/ to sign up for a team account to try it out.
Once your account is set up and your email verified, log in to get your domain issued and ingestion key.
Start by adding one additional dependency, to let us send traces not to the console but instead via the OTLP standard:
npm install @opentelemetry/exporter-trace-otlp-http
Next, add a new instrumentation file, let’s call this one tracing.js, that sends data directly to SigNoz.
You’ll want to set the exporterOptions:url and SemanticResourceAttributes.SERVICE_NAME within your own version of this file.
// tracing.js
"use strict";
const process = require("process");
const opentelemetry = require("@opentelemetry/sdk-node");
const {
  getNodeAutoInstrumentations,
} = require("@opentelemetry/auto-instrumentations-node");
const {
  OTLPTraceExporter,
} = require("@opentelemetry/exporter-trace-otlp-http");
const { Resource } = require("@opentelemetry/resources");
const {
  SemanticResourceAttributes,
} = require("@opentelemetry/semantic-conventions");

// do not set headers in exporterOptions, the OTel spec recommends setting headers through ENV variables
// https://github.com/open-telemetry/opentelemetry-specification/blob/main/specification/protocol/exporter.md#specifying-headers-via-environment-variables

const exporterOptions = {
  url: "https://ingest.us.signoz.cloud:443/v1/traces",
};

const traceExporter = new OTLPTraceExporter(exporterOptions);
const sdk = new opentelemetry.NodeSDK({
  traceExporter,
  instrumentations: [getNodeAutoInstrumentations()],
  resource: new Resource({
    // this service name will show up in the SigNoz ui, name it something descriptive
    // if you're working in a team!
    [SemanticResourceAttributes.SERVICE_NAME]: "node_dice_app",
  }),
});

// initialize the SDK and register with the OpenTelemetry API
// this enables the API to record telemetry
sdk.start();

// gracefully shut down the SDK on process exit
process.on("SIGTERM", () => {
  sdk
    .shutdown()
    .then(() => console.log("Tracing terminated"))
    .catch((error) => console.log("Error terminating tracing", error))
    .finally(() => process.exit(0));
});
Find your ingestion key in the account setup email, then run our revised app with:
OTEL_EXPORTER_OTLP_HEADERS="signoz-ingestion-key=<SIGNOZ_INGESTION_KEY>" node --require ./tracing.js app.js
exercise your application a few times by visiting http://localhost:8080/rolldice?rolls=3 a few more times.
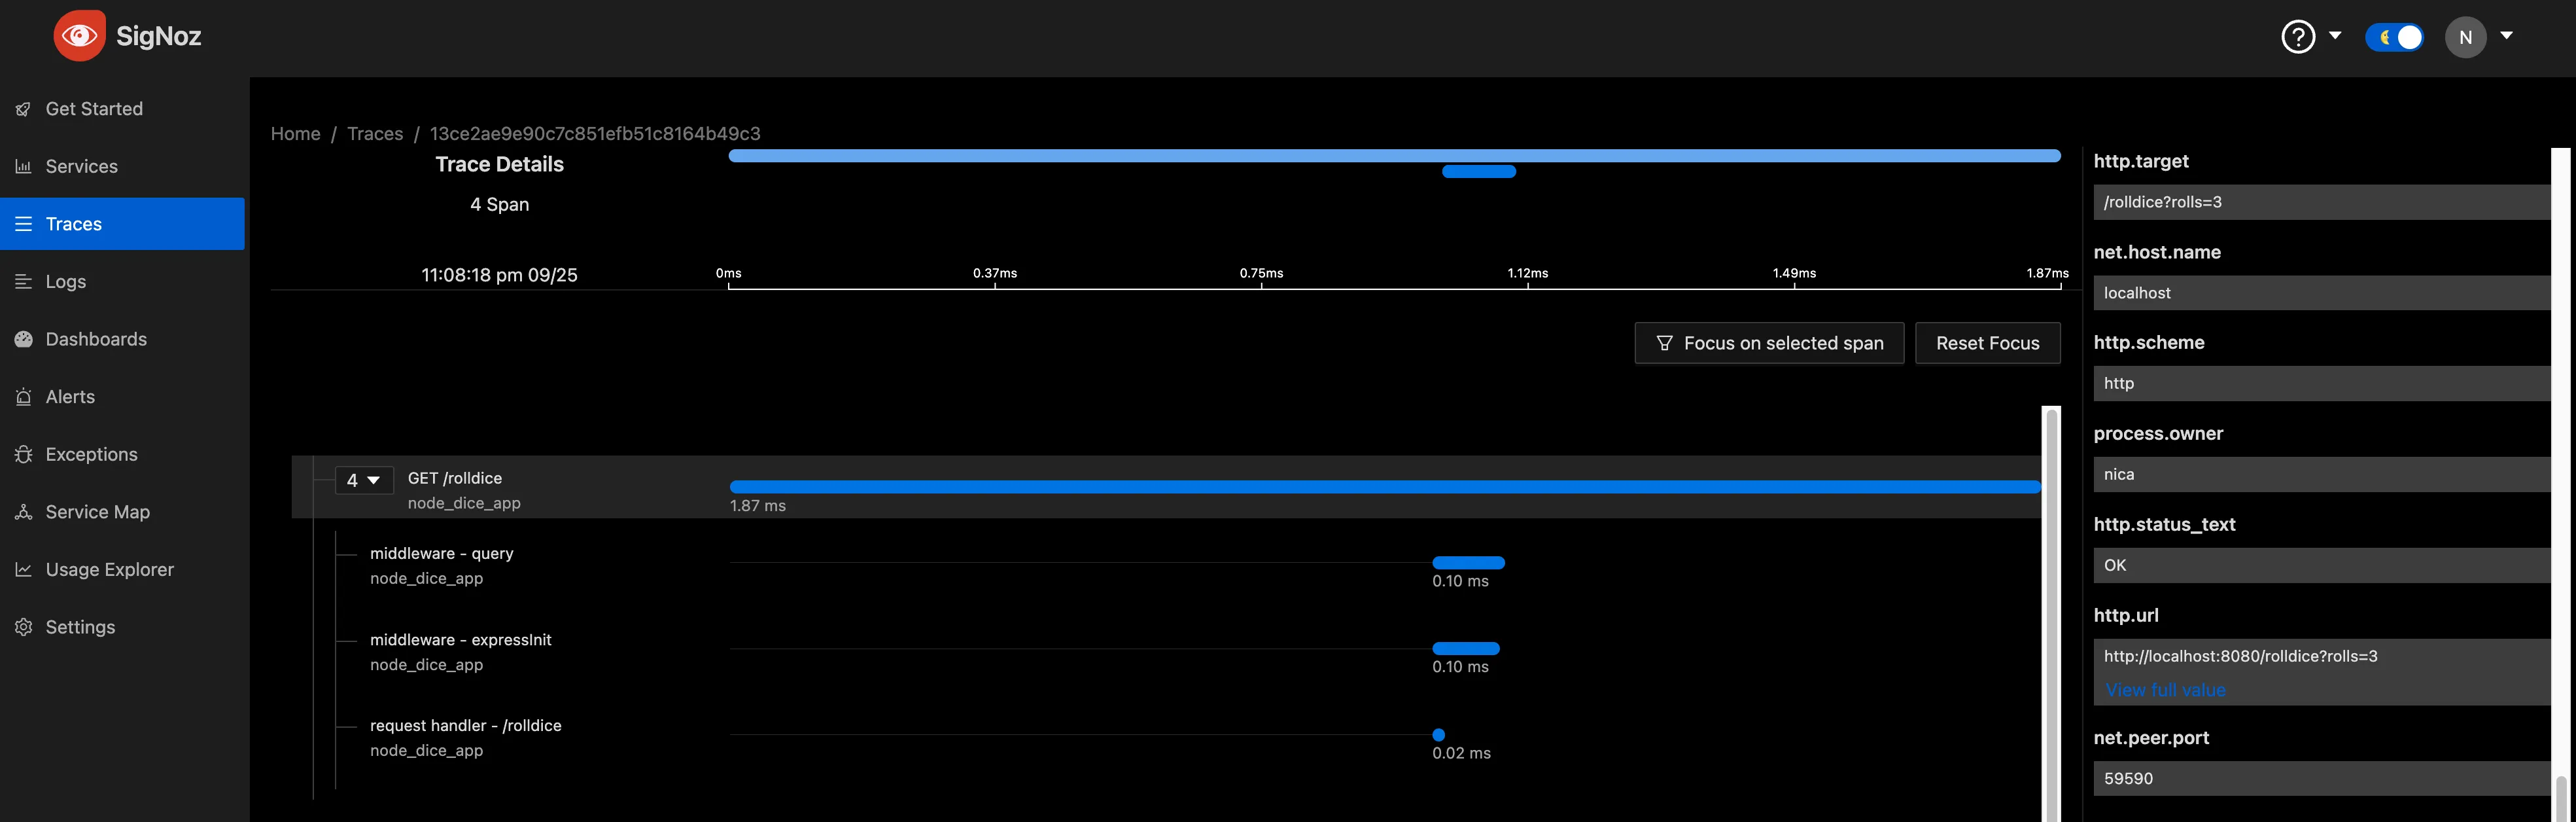
If your settings are correct you’ll be able to log into SigNoz and see your first few traces.
Next steps
Now that you’ve reported your first traces to a dashboard, there are a number of ways to grow your mastery of OpenTelemetry. In no particular order these are:
- Report data to an OpenTelemetry collector on your system, and connect that collector to SigNoz
- Add custom spans, attributes, and events to your traces with custom instrumentation
- Report metrics to SigNoz
Conclusion: OpenTelemetry should be for everyone
Learning how to implement OpenTelemetry in applications is a valuable skill for developers, especially those who are trying to get their first roles as production developers. Observability is a critical element in modern software development, especially in complex, distributed systems. OpenTelemetry offers a unified approach to collecting distributed traces, metrics, and logs, allowing you to understand not just what is happening inside your application but also why it’s happening. This knowledge is instrumental in diagnosing issues, improving system performance, and understanding user behavior.
By integrating OpenTelemetry, developers get a consistent and standardized way to collect telemetry data across various parts of an application, critical for reducing the mean time to resolve (MTTR) during incidents. Without proper observability, debugging issues becomes a time-consuming and error-prone process.
Understanding OpenTelemetry also enables better collaboration with operations engineers. When everyone speaks the same observability language, it eases the process of diagnosing where a problem originates, whether it's in the code, infrastructure, or elsewhere.
OpenTelemetry is gaining industry-wide adoption. This broad acceptance means that learning it will likely serve developers well in future projects and career opportunities.
Mastering OpenTelemetry can make a difference in the overall quality of your applications and the efficiency of your workflow, making it a worthwhile skill for any developer to acquire.
