Complete guide to OpenTelemetry Tracing (with code examples)
Distributed tracing is an essential technique for monitoring modern, cloud-native applications. It provides a holistic view of a request's entire journey as it propagates through a multi-service architecture, making it invaluable for performance optimization and root cause analysis. But how do you generate and collect this trace data in a standardized, vendor-agnostic way? That's where OpenTelemetry comes in. As the open-source standard for observability, OpenTelemetry provides the tools and libraries to implement distributed tracing easily. This article will serve as your complete guide post to getting started.
What is distributed tracing?
Imagine a user clicks 'Add to Cart' on an e-commerce website. In a modern microservices architecture, this simple action might trigger a chain of events:
- The
frontend-servicereceives the click and makes an API call to thecart-service. - The
cart-service, before adding the item, first calls theauth-serviceto verify the user's session is valid. - Once authenticated, the
cart-servicethen calls theinventory-serviceto ensure the item is in stock. - The
inventory-serviceconfirms the stock and responds. - Finally, the
cart-serviceadds the item to the cart in its database and confirms the success of the operation back to thefrontend-service.
Without distributed tracing, if this process was slow or failed, you would have to manually check the logs of four different services to piece together what happened.
With distributed tracing, this entire end-to-end journey is captured as a single Trace. The work done by each individual service (frontend-service, cart-service, inventory-service, etc.) is captured as a Span. The trace visually stitches these spans together, showing you exactly how long each step took and how they are connected, allowing you to instantly spot the bottleneck or point of failure.
So, let's circle back to the question in context, what is Distributed Tracing?
Formally, distributed tracing is a method used to monitor applications, particularly those built using a microservices architecture. It tracks a single request from start to finish as it travels across all the different services and systems it interacts with.
The two core components of a distributed trace are:
- Trace: Represents the entire end-to-end journey of a request. A trace is a collection of all the spans related to that single request. Every trace is identified by a unique TraceID.
- Span: Represents a single unit of work or operation within a trace (e.g., an API call, a database query, or a function execution). Each span has its own unique SpanID and is linked to its parent span, forming a complete, hierarchical view of the request's lifecycle.
Using OpenTelemetry for distributed tracing
Now that we almost understand the concepts behind distributed tracing, let's look at how we can implement it. OpenTelemetry (OTel) is the open-source industry standard that provides the tools, libraries, and specifications to bring distributed tracing to your applications. It handles the complex work of creating, connecting, and exporting traces for you.
What is OpenTelemetry (OTel)?
OpenTelemetry is a project under the Cloud Native Computing Foundation (CNCF) that provides a single, vendor-agnostic standard for instrumentation. Its goal is to standardize how we generate and collect telemetry data, specifically the three pillars of observability: traces, metrics, and logs.
By using OpenTelemetry, you are not locked into any specific observability vendor. You can instrument your code once and then choose to send your data to any OpenTelemetry-compatible backend, giving you complete control and flexibility over your observability stack.

This is just the beginning, if you want to learn more about OTel, here's an interesting read.
Some Basic Concepts
Before we get to implementing tracing, let's understand it's vocabulary (pretty vast!).
Trace format
The native and recommended format for OpenTelemetry traces is OTLP (The OpenTelemetry Protocol).
OTLP is a high-performance, binary format designed to efficiently transmit all telemetry data—including traces, metrics, and logs. When carrying trace data, its structure is a direct representation of the concepts of a trace.
An OTLP trace contains a batch of Spans. Each Span in the payload is a structured object with fields that directly map to the OpenTelemetry trace data model, including:
- trace_id and span_id
- The span name
- kind (e.g., SERVER, CLIENT)
- start and end timestamps
- status (Ok or Error)
- A list of attributes (key-value pairs)
- A list of events
If you are wondering why it looks like a more structured log, it's because it is! Atleast kind of.
Spans and Span ID
It is the smallest unit in a trace, representing a single, named, and timed operation. A span could be an HTTP request, a database query, a message being published to a queue, or an important function executing within your code. One of my favourite analogies is to think od traces as a story and spans as the chapters in that story.
Every span captures critical information:
- A start time and an end time, from which its duration is calculated.
- A name, kind, and status (which we'll cover next).
- A set of key-value Attributes.
- A list of timed Events.
- A link to its parent span.
Each span is identified by its own unique SpanID, an 8-byte random identifier.
Parent/ Child Spans
Spans are organized into a hierarchy or tree structure that reflects the flow of execution. When one operation (the parent) makes a call to another operation (the child), a parent-child relationship is formed. The child span stores the SpanID of its parent, creating an explicit link.
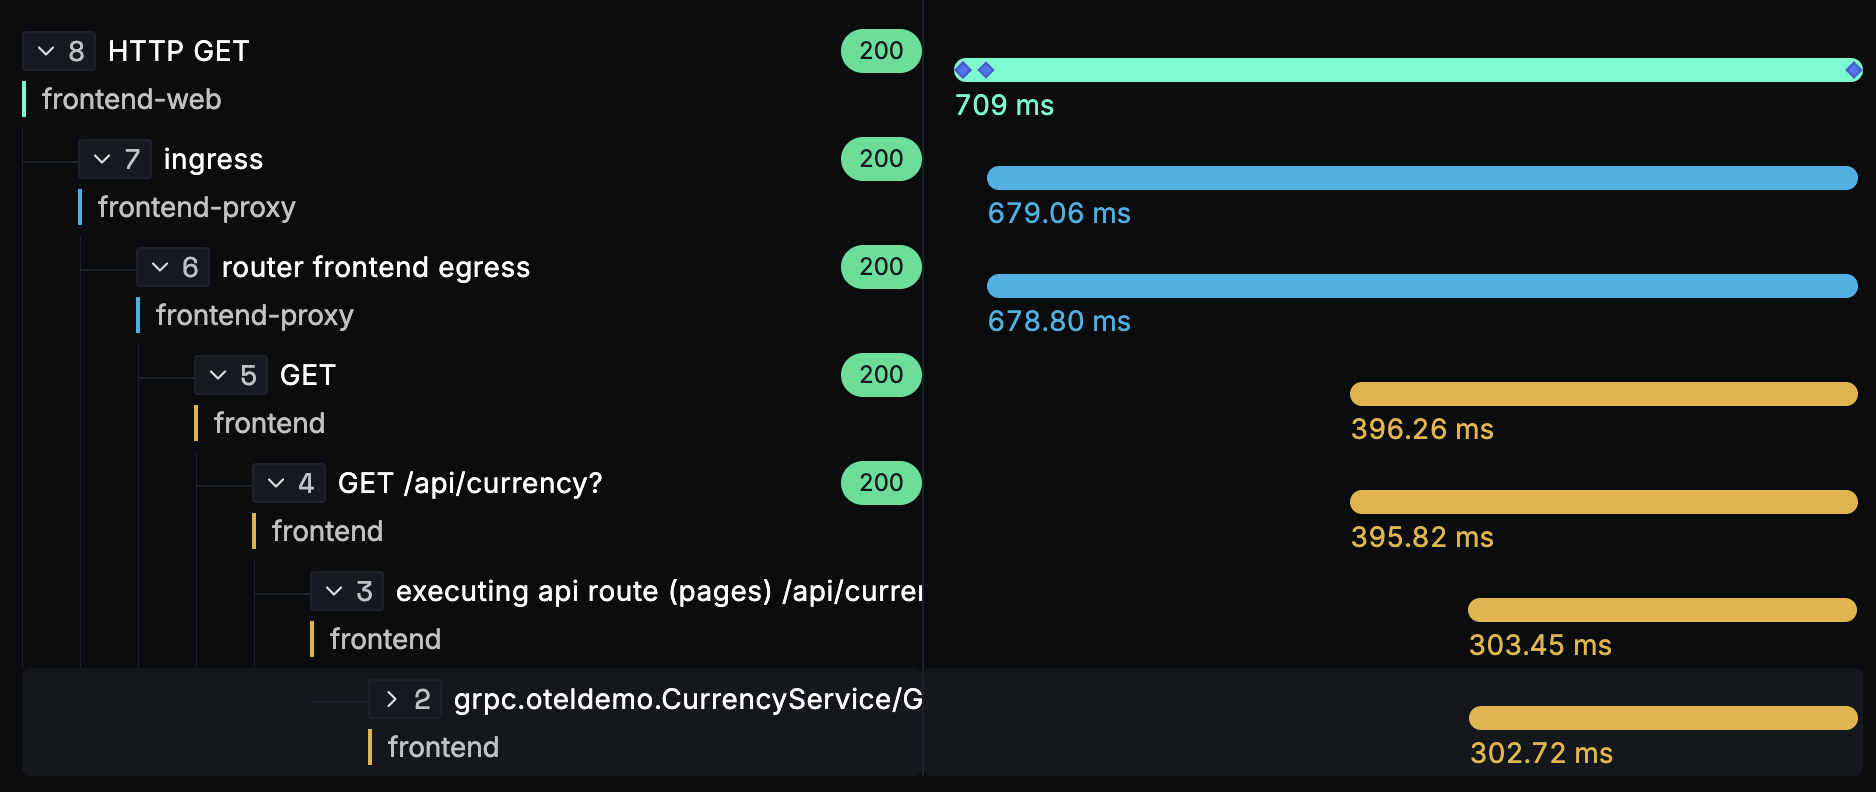
This hierarchy is what allows visualization tools to render the cascading "waterfall graph" you see in tracing backends. It clearly shows which operations caused others to occur and helps you understand the what happened and their order. A span with no parent is known as a root span; which is also the first operation in the trace.

Span Name
A Span Name is a human-readable string that summarizes the operation the span represents. This is one of the most important fields for making traces understandable awt a glance.
Best Practice: Span names should have low cardinality, meaning they should represent a class of operations rather than a specific one. Do not include unique IDs or other high-cardinality data in the name. The reason is that backends often aggregate data and generate metrics based on span names (e.g., average latency for "HTTP GET /api/products"). If every name is unique, these aggregations become useless and can dramatically increase costs.
- Good: HTTP GET /api/products, db.query, CheckoutService.process_order
- Bad: HTTP GET /api/products/12345, SELECT * FROM users WHERE id=987
Span Kind
A Span Kind is a field that clarifies a span's role in a remote interaction, from the perspective of the service creating the span. Here are different types of span kinds:
SERVER: Represents the server-side handling of a request. Its duration measures the time the server spent processing.CLIENT: Represents the client-side making of a request. Its duration measures the full round-trip time, including network latency, from the client's perspective.PRODUCER / CONSUMER: Used for asynchronous messaging.PRODUCERrepresents the act of sending a message and ends when the message is successfully sent.CONSUMERrepresents the processing of that message, which may happen much later on a different machine.INTERNAL: The default kind. It represents an internal operation within an application that does not cross a service boundary (e.g., instrumenting an important internal function).
Span Status
A Span Status is a flag that explicitly marks the outcome of an operation. It's mainly used to signal errors that happen in a trace.
Unset: The default status. It implies success unless an error is indicated elsewhere, butOkis suggested as it is more explicit.Ok: Explicitly confirms that the operation completed successfully without any errors.Error: Indicates that the operation failed. You should always set a span's status toErrorwhen the operation it represents, fails or reaches an erroroneous state. This is what observability backends use to aggregate and calculate error rates and trigger alerts.
Attributes
Attributes are key-value pairs used to add rich, queryable metadata to a span. While the span name should be generic, attributes are more specific in nature. They are the queryable index for your traces, allowing you to ask intuitive questions like, Show me all traces for user.id = 'abc-123' that had an http.status_code >= 500.
OpenTelemetry provides Semantic Conventions, which are standardized names for attributes (e.g., http.method, db.statement). Using these conventions is highly recommended as it lets observability backends to provide better analysis and visualizations.
Events
An Event is a timestamped log message attached to a specific span. Going back to our earlier analogy, if a span is a chapter in a story, events are like footnotes annotating a precise moment in time within that chapter.
One of the use cases for events is to record exceptions. When an error occurs, you can record the exception as an event on the span, including its message, type, and stack trace.
Context
Context is an object that carries the active TraceID and SpanID. This object is passed around your application so that OpenTelemetry always knows which span is currently active. When a new span is created, it looks at the Context to find its parent an build the hierarchy.
- In-Process: Within a single service, the SDK typically manages the context automatically.
- Inter-Process: Between services, the context is serialized into request headers or message metadata by a Propagator. This is the mechanism of Context Propagation that allows a trace to continue across network boundaries.
Baggage
Baggage is a mechanism to pass additional data alongside context. Baggage is also a key-value store and can be passed by context propagation. Baggage lets you to propagate information that is available at the top of the request or operation further down.
Note: An important thing about baggages is that it is a separate key-value store and is unassociated with attributes on spans, metrics, or logs without explicitly adding them.
Implementing OpenTelemetry Tracing
Now that we are aware of the various terms and concepts that are involved in distributed tracing, let's see how we can implement it. the language used in the implementation will be Java Springboot. Although, OTel's auto-instrumentation can handle most of the use-cases, manually creating spans helps us get deeper insights also, understand the whole instrumentaiton process better!
Instrumenting the code
You should obtain a Tracer from a configured OpenTelemetry SDK instance, typically once per instrumentation library (e.g., for your application's specific code). It's good practice to name it after the library or component it instruments and include a version.
import io.opentelemetry.api.OpenTelemetry;
import io.opentelemetry.api.trace.Tracer;

// Assuming 'openTelemetry' is an initialized OpenTelemetry SDK instance
Tracer tracer =
   openTelemetry.getTracer("instrumentation-library-name", "1.0.0");
Generating Spans
Once you have a Tracer, you can create spans to represent operations.
Creating a Single Span
To create a span, you use a spanBuilder with a name. The OpenTelemetry SDK automatically handles the start and end timestamps. The standard way to manage a span's lifecycle in Java is with a try-with-resources block, which ensures the span is correctly handled even if errors occur.
import io.opentelemetry.api.trace.Span;
import io.opentelemetry.context.Scope;

Span span = tracer.spanBuilder("my-first-span").startSpan();

// Make the span the current active span in this scope
try (Scope scope = span.makeCurrent()) {
  // Your main logic goes here.
  // This code runs within the context of "my-first-span"
} catch (Throwable t) {
  span.setStatus(StatusCode.ERROR, "Something bad happened!");
  span.recordException(t);
  throw t;
} finally {
  span.end(); // Always end the span
}
Adding Attributes
You can add queryable metadata to your spans using Attributes. This is where you add the specific details of the operation. Later, these attributes help you query and identify issues faster, meaning you have to make sure that the attributes are queryable.
span.setAttribute("http.method", "GET");
span.setAttribute("http.url", "https://example.com");
span.setAttribute("user.id", "12345");
Creating Nested Spans
Creating nested spans is simple and automatic. When you start a new span, it will automatically become a child of whatever span is currently active in the scope. You do not need to pass span objects around manually.
void parentOperation() {
     Span parentSpan = tracer.spanBuilder("parent-operation").startSpan();
     try (Scope scope = parentSpan.makeCurrent()) {
       // Because parentSpan is now active, childOperation will create a child span
       childOperation();
     } finally {
       parentSpan.end();
     }
 }

 void childOperation() {
     // This span is automatically a child of "parent-operation"
    Span childSpan = tracer.spanBuilder("child-operation").startSpan();
    try (Scope scope = childSpan.makeCurrent()) {
   // do work...
 } finally {
       childSpan.end();
     }
  }
Context Propagation
Context Propagation is the science that allows OpenTelemetry to connect spans across different services into a single distributed trace.
For most common protocols like HTTP and gRPC, this is handled automatically by OpenTelemetry's instrumentation libraries. When your application makes an outgoing HTTP request, the SDK injects the current trace context into the request headers (using the W3C traceparent standard). When the downstream service receives the request, its SDK extracts the context from the headers and continues the trace. We don't have to do anything manually here.
Exporting data
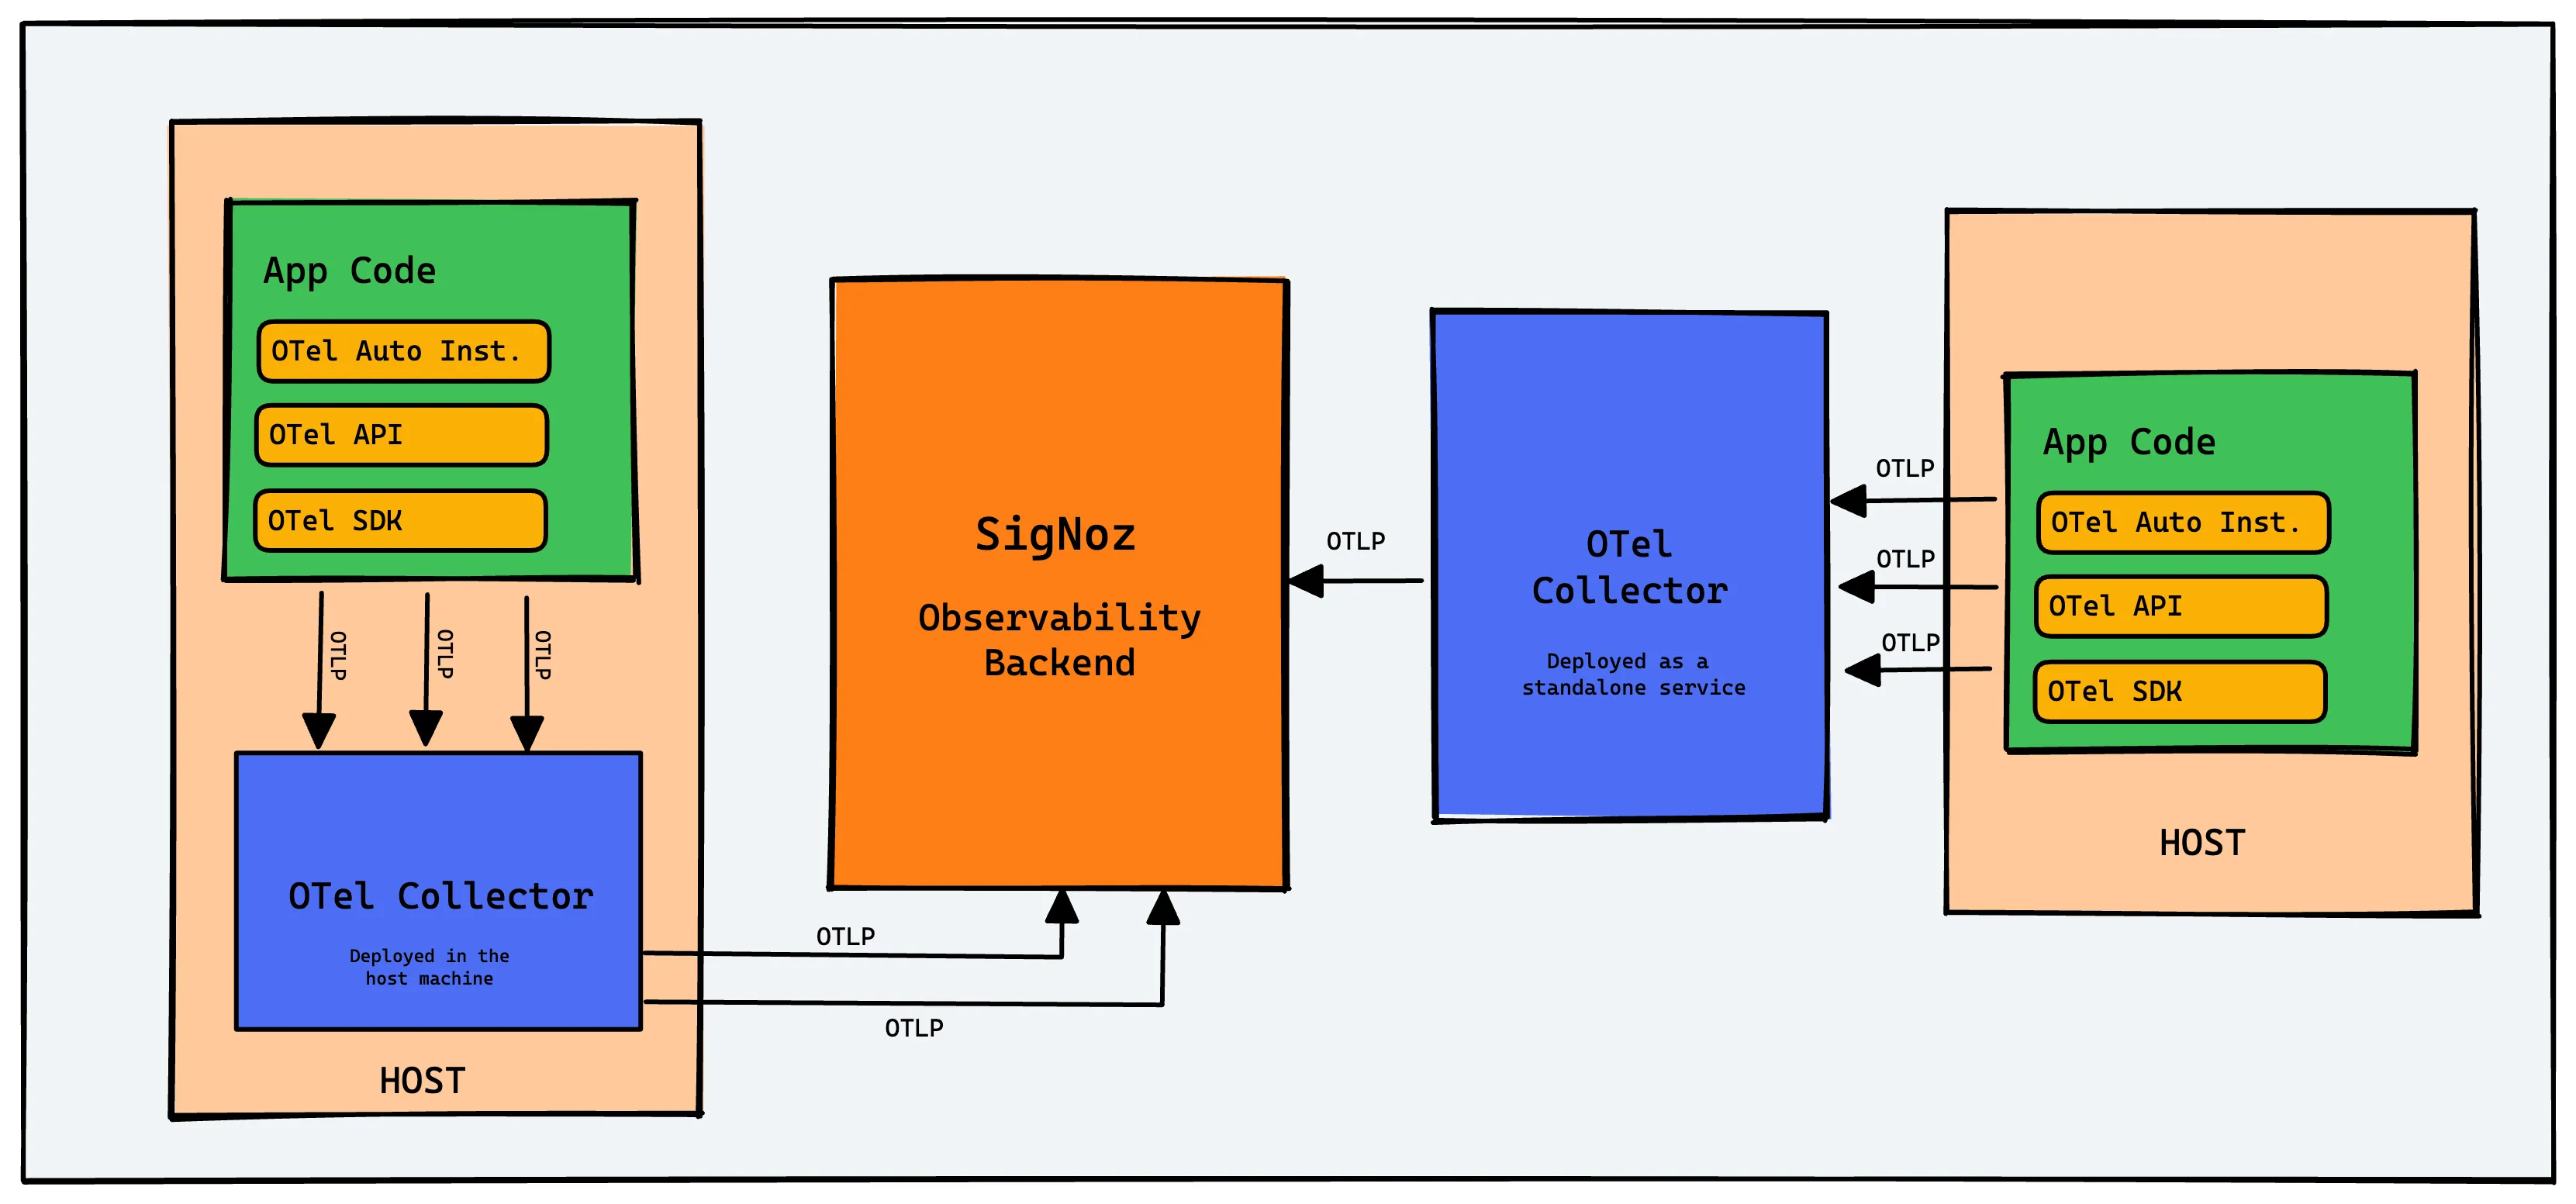
Creating spans within your application is only the first step. For the data to be useful, it must be sent to a backend like SigNoz for storage, visualization, and analysis.
This is the job of an Exporter.
An exporter is configured as part of a TracerProvider at application startup. It is typically wrapped in a SpanProcessor (like the BatchSpanProcessor) which optimizes the sending of data by collecting spans into batches before sending them over the network.
Here is a conceptual example of how you would configure an OTLP exporter to send trace data directly to a SigNoz Cloud endpoint.
 // Conceptual setup at application startup
   import io.opentelemetry.api.OpenTelemetry;
   import io.opentelemetry.api.common.Resource;
  import io.opentelemetry.exporter.otlp.trace.OtlpGrpcSpanExporter;
  import io.opentelemetry.sdk.OpenTelemetrySdk;
  import io.opentelemetry.sdk.trace.SdkTracerProvider;
  import io.opentelemetry.sdk.trace.export.BatchSpanProcessor;
   import io.opentelemetry.sdk.trace.export.SpanProcessor;

// ...

 // 1. Create your OTLP exporter for SigNoz Cloud
 OtlpGrpcSpanExporter spanExporter = OtlpGrpcSpanExporter.builder()
 .setEndpoint("https://ingest.{region}.signoz.cloud:443")
 .addHeader("signoz-ingestion-key", "<YOUR_SIGNOZ_INGESTION_KEY>")
   .build();

// 2. Create a processor to batch spans before sending
SpanProcessor spanProcessor = BatchSpanProcessor.builder(spanExporter).build();

// 3. Create the SDK instance and register the processor
SdkTracerProvider tracerProvider = SdkTracerProvider.builder()
    .addSpanProcessor(spanProcessor)
    .setResource(Resource.getDefault().toBuilder().put("service.name", "my-java-service").build())
    .build();

// 4. Set this as the global OpenTelemetry instance for your application
OpenTelemetry openTelemetry = OpenTelemetrySdk.builder()
    .setTracerProvider(tracerProvider)
    .buildAndRegisterGlobal();
In the configuration above, you would need to:
- Replace
{region}with the region for your SigNoz Cloud account (e.g., us, eu, in). - Replace
<YOUR_SIGNOZ_INGESTION_KEY>with the ingestion key provided in your SigNoz Cloud account settings.
With this setup, all traces generated by your application will be securely sent directly to SigNoz for analysis. You can check our official docs to see how to implemet traces for other languages.
Analysing Traces With SigNoz
Traces are powerful signals for monitoring, but we have to understand our way around them and learn ways to aggregate, query and visualise them in the best possible ways. We can use any observability backend for this, but for now, let me show some cool stuff you can do with traces in SigNoz.
Visualising and Analysing Traces
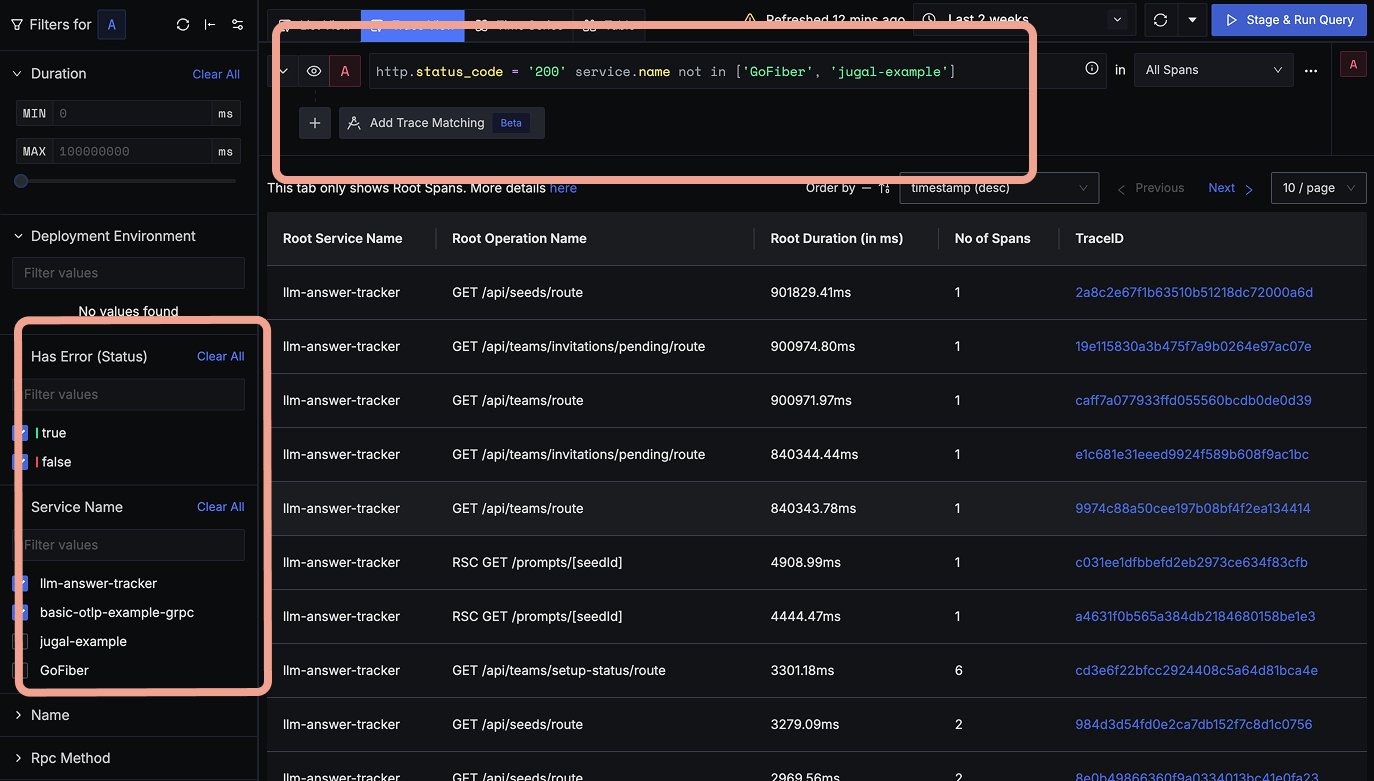
You can run queries and get aggregated traces based on different attributes like service.name, http.method, status.code, etc. Check the screen shot below!

Flamegraphs & Gantt charts
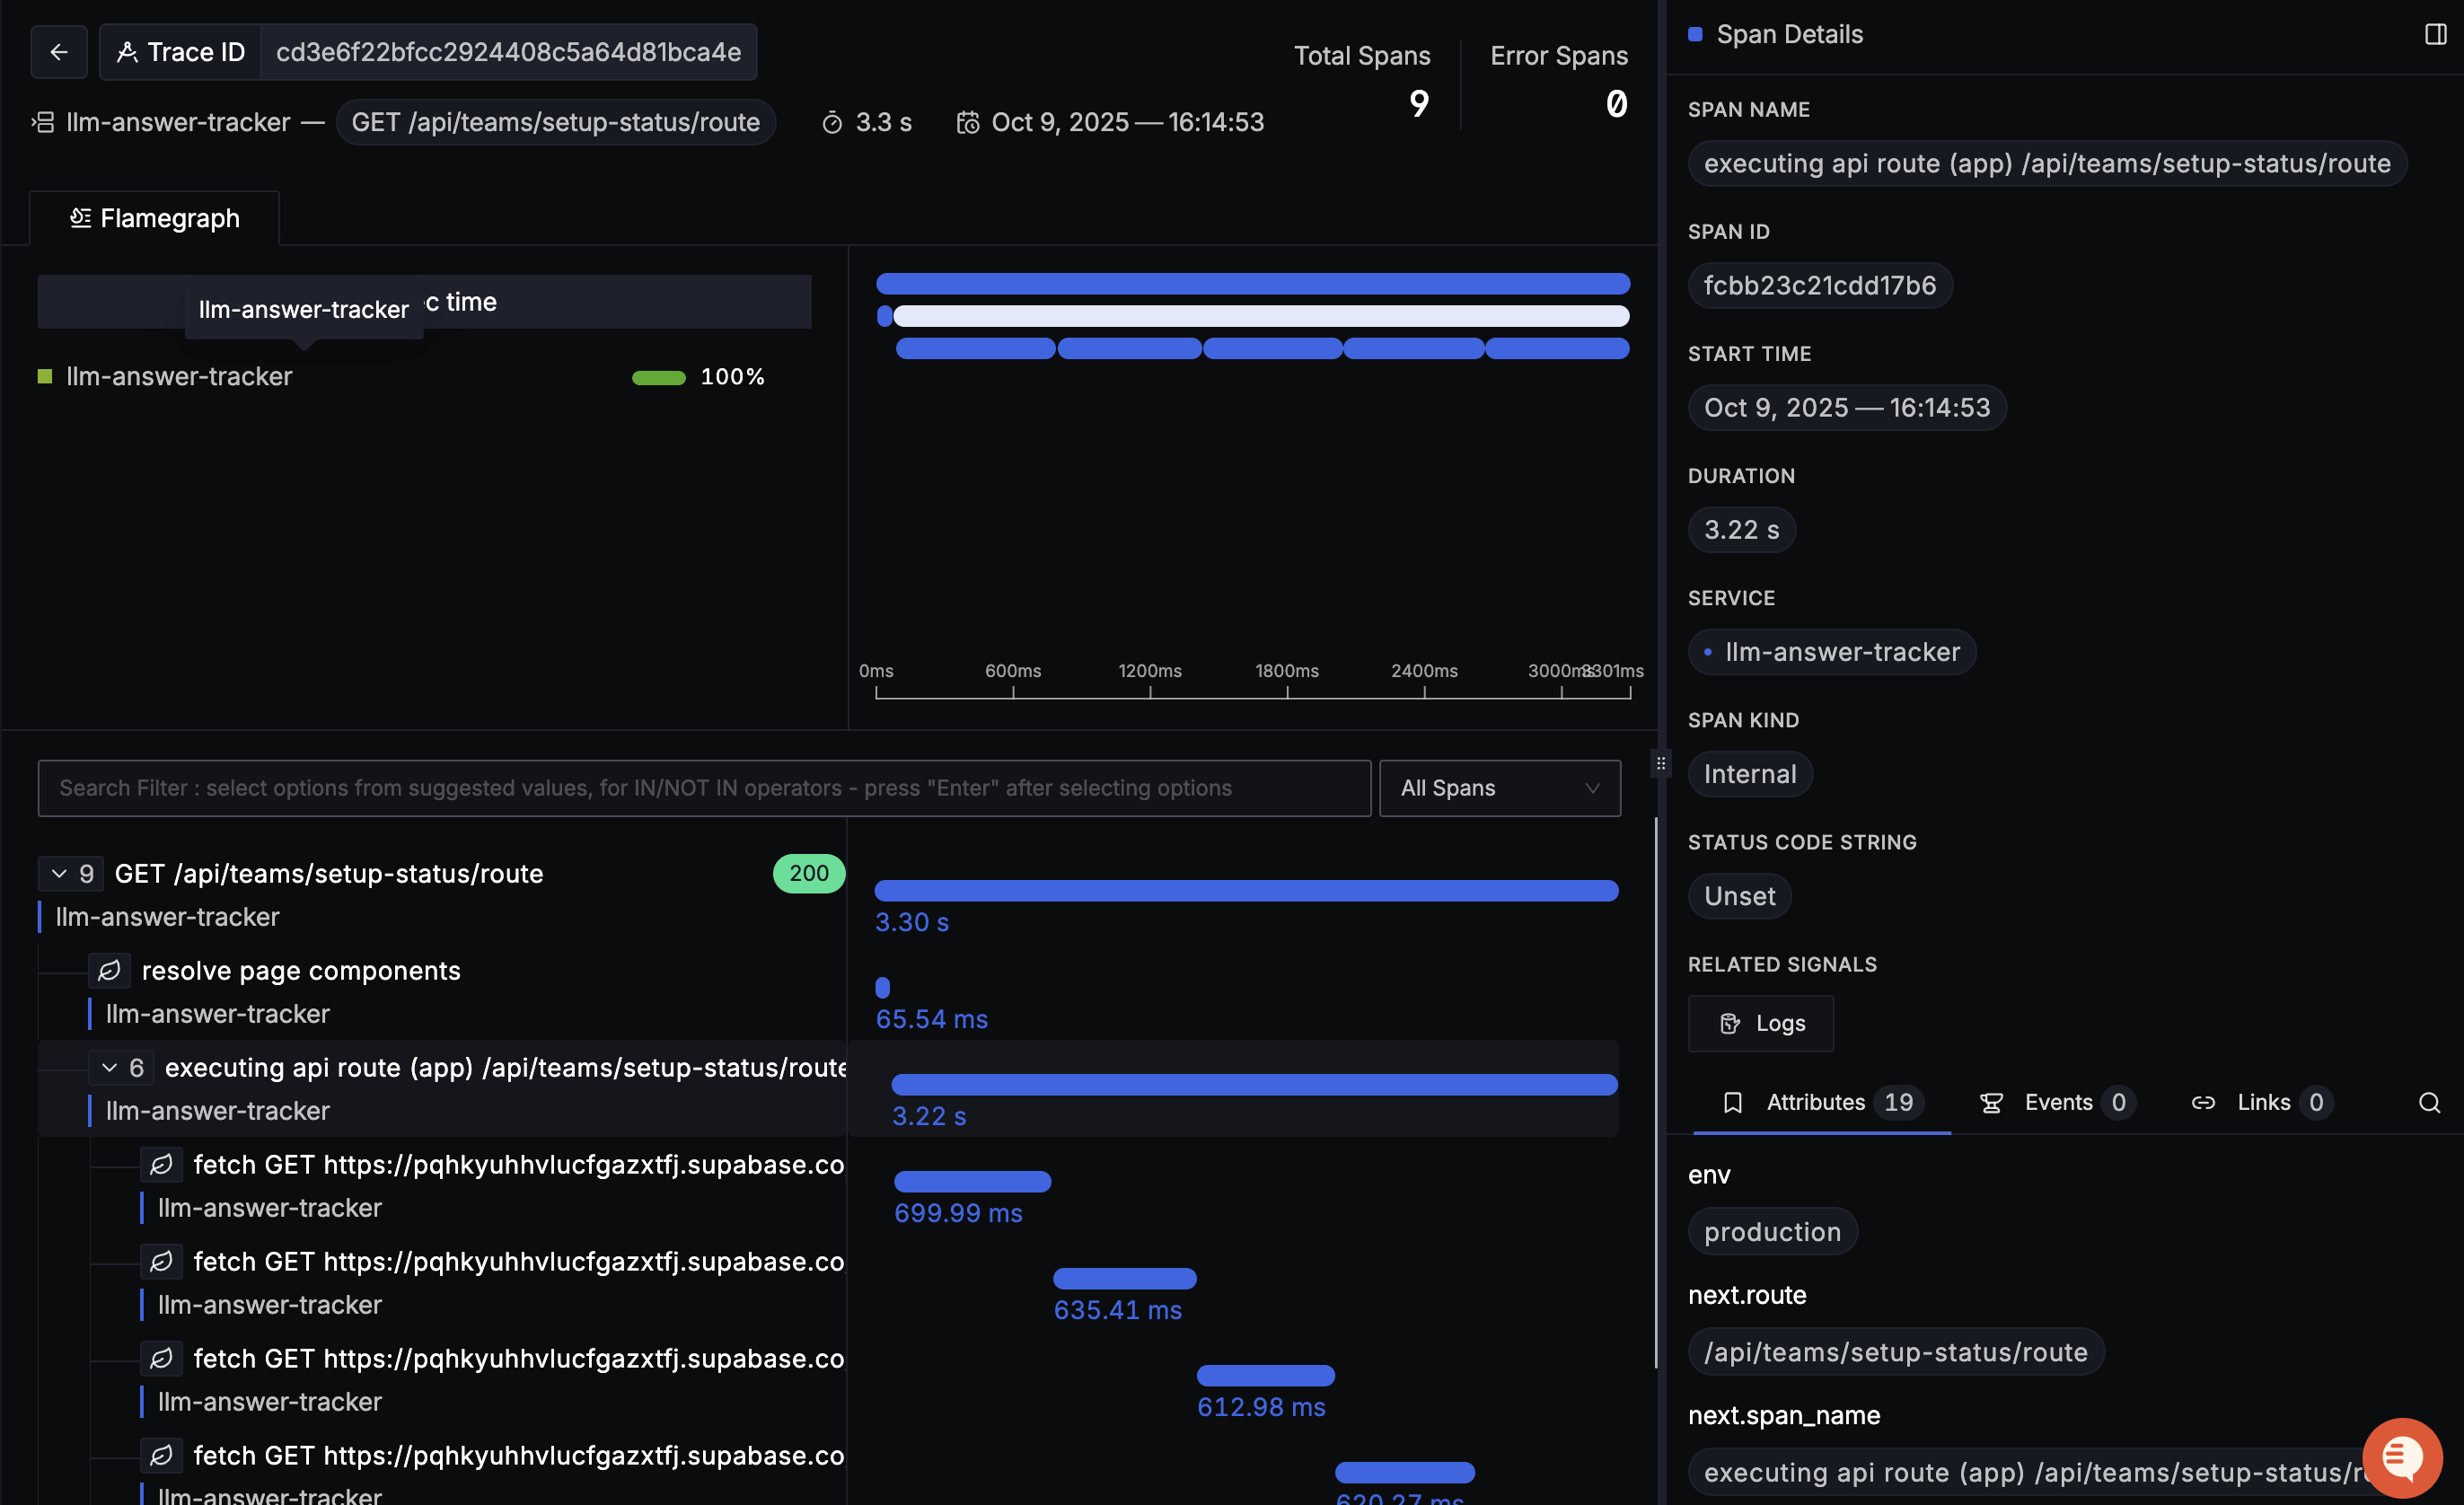
You can inspect each span in the table with Flamegraphs and Gantt charts to see a complete breakdown of the request. Establishing a sequential flow of the user request along with info on time taken by each part of the request can help identify latency issues quickly. There's a small example below!

SigNoz Cloud is the easiest way to run SigNoz. Sign up for a free account and get 30 days of unlimited access to all features.
You can also install and self-host SigNoz yourself since it is open-source. With 24,000+ GitHub stars, open-source SigNoz is loved by developers. Find the instructions to self-host SigNoz.
