Overview
This guide walks you through setting up SAML (Security Assertion Markup Language) authentication between Google Workspace and SigNoz.
What you'll accomplish:
- Configure Google Workspace as an identity provider (IdP) for SigNoz
- Enable your team to access SigNoz using their existing Google Workspace accounts
Prerequisites
Before starting, ensure you have:
- Google Workspace account with Super-Admin access to the Google Admin console
- SigNoz account (Cloud or Self-Hosted with License) with administrative access
- Your SigNoz instance URL (e.g.,
https://signoz.example.com)
Configuration Steps
Step 1: Create a custom SAML app in Google Workspace
- Sign in to the Google Admin console as a super admin.
- Go to Apps > Web and mobile apps.
- Click Add app > Add custom SAML app.
- Enter an App name (e.g.,
SigNoz), then click Continue.
Step 2: Copy Google's IdP details
On the Google Identity Provider details page, Google shows the values SigNoz needs:
- SSO URL (e.g.,
https://accounts.google.com/o/saml2/idp?idpid=...) - Entity ID (e.g.,
https://accounts.google.com/o/saml2?idpid=...) - Certificate
Click DOWNLOAD CERTIFICATE, copy the SSO URL and Entity ID, then click Continue. You'll add these to SigNoz in Step 6.
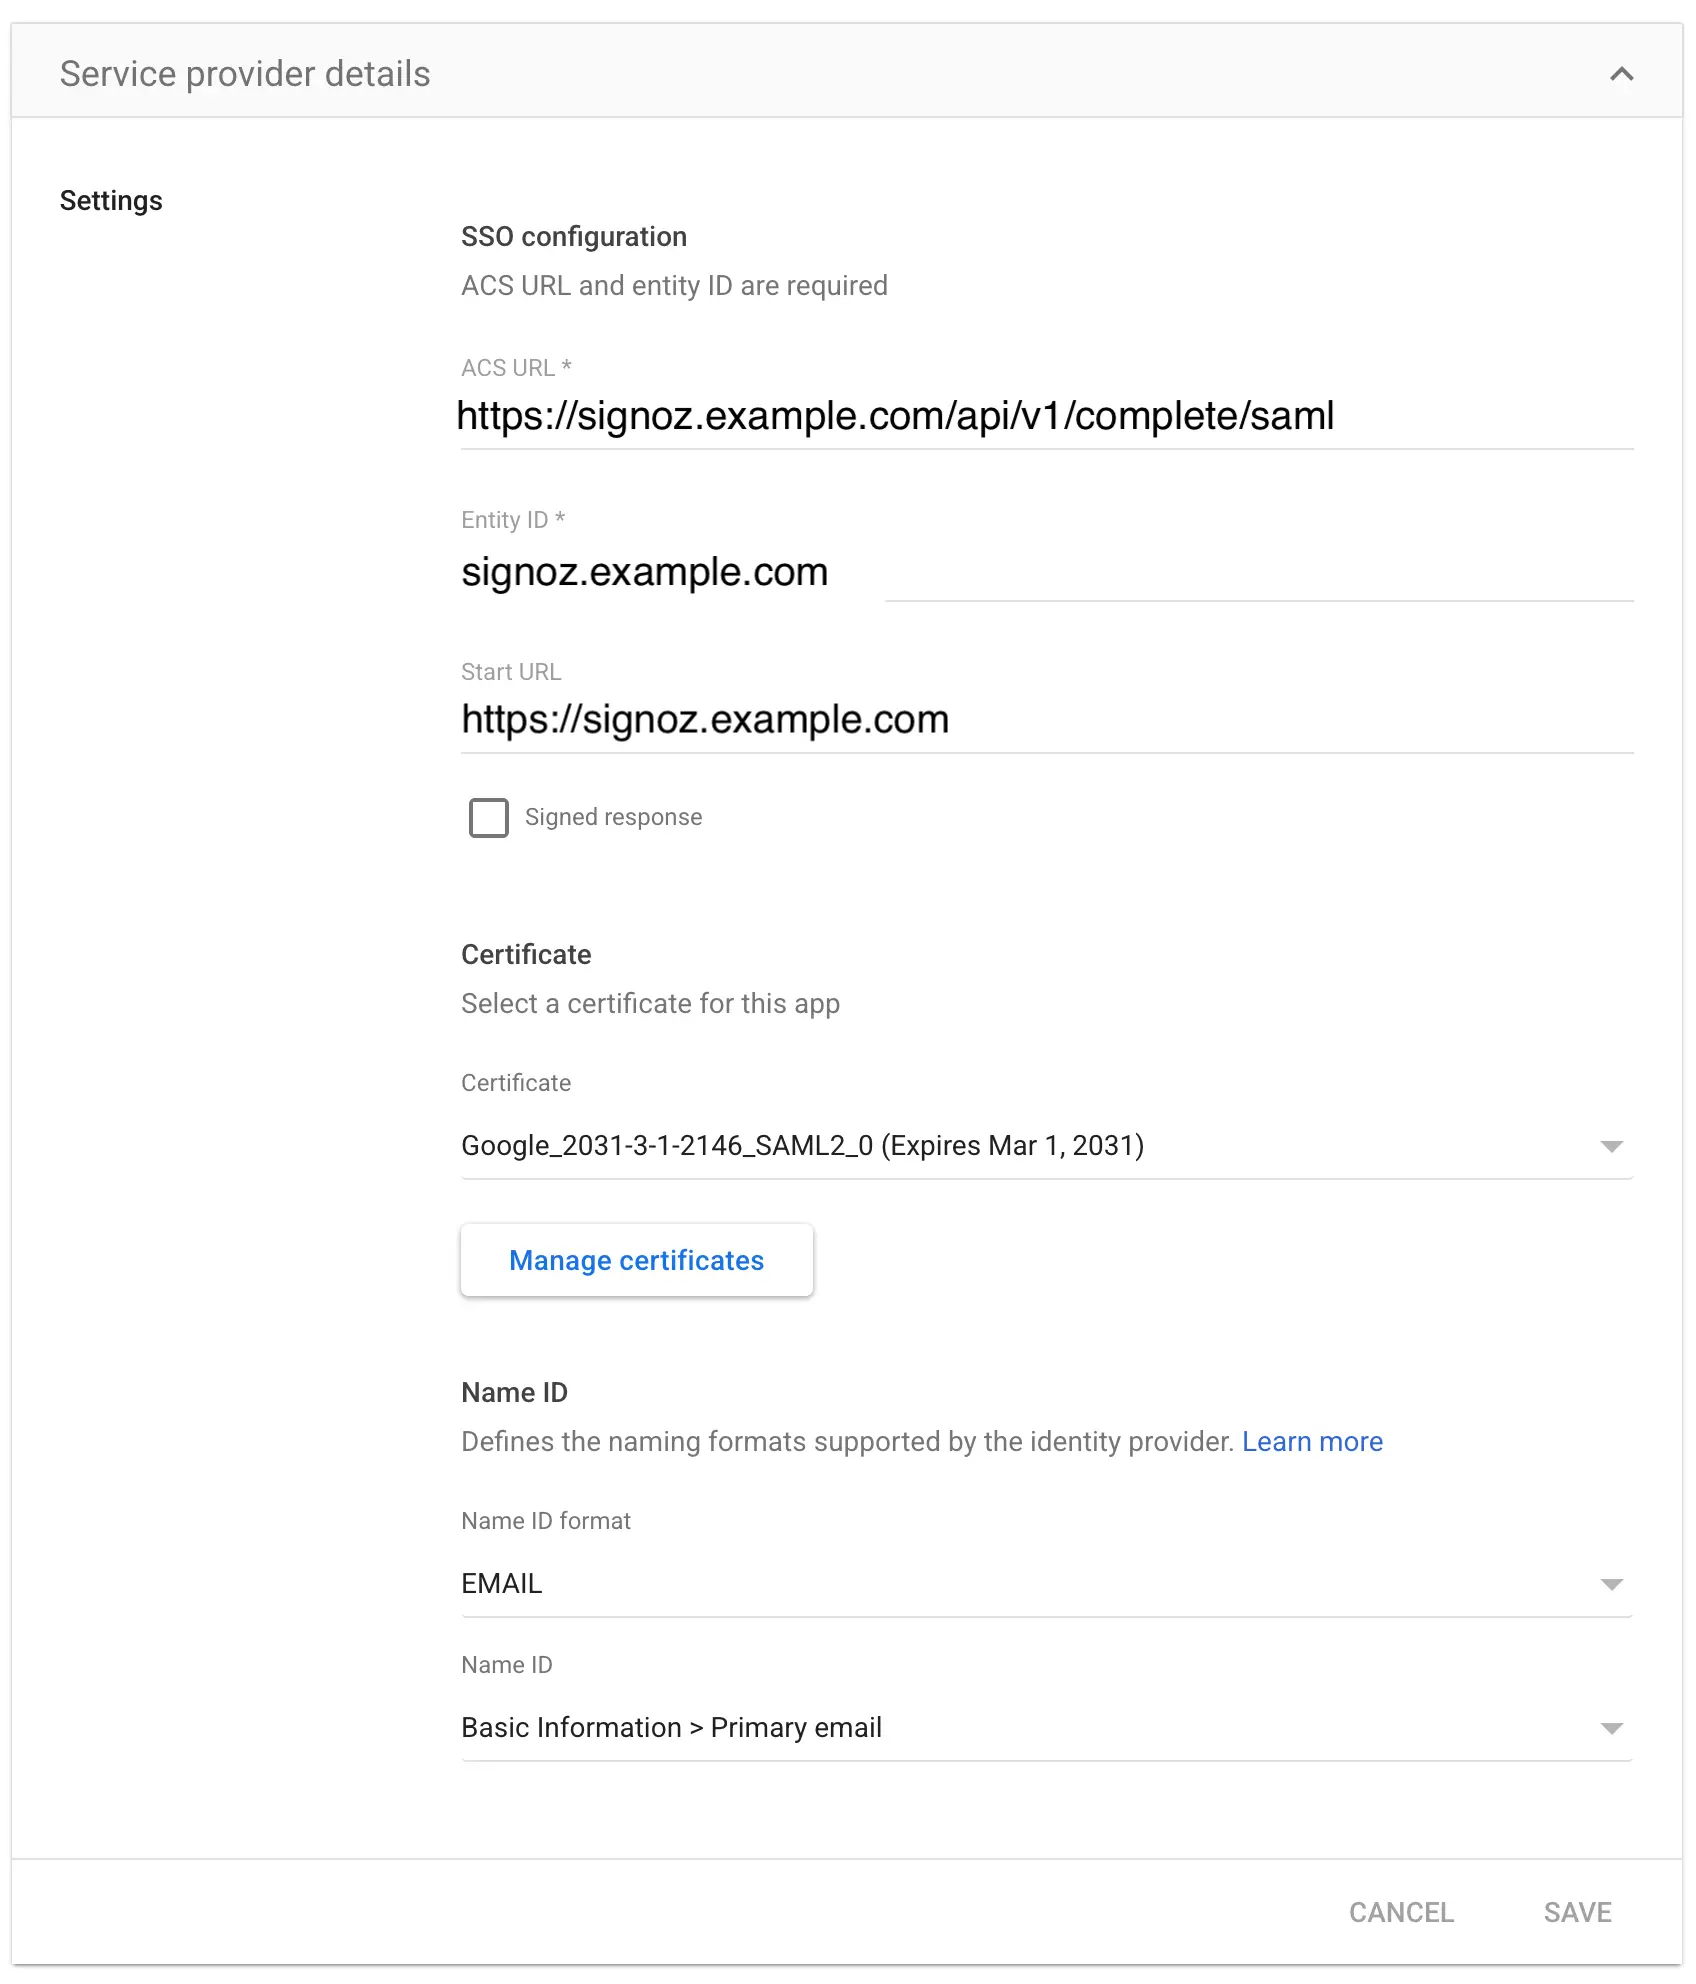
Step 3: Enter SigNoz service provider details
On the Service provider details page, enter the following:
| Field | Value |
|---|---|
| ACS URL | https://<your-instance-url>/api/v1/complete/saml |
| Entity ID | <your-instance-host> (your SigNoz host without https://, e.g., signoz.example.com) |
| Start URL (optional) | https://<your-instance-url> |
| Signed response | Leave unchecked |
| Name ID format | EMAIL |
| Name ID | Basic Information > Primary email |
Click Continue.
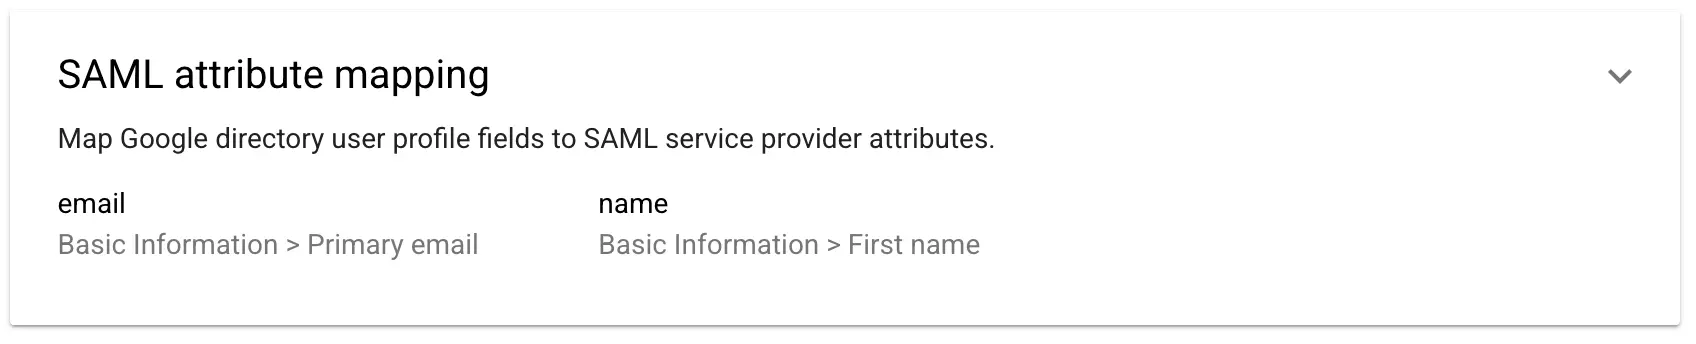
Step 4: Map SAML attributes
On the Attribute mapping page, add these mappings:
| Google Directory attribute | App attribute |
|---|---|
| Basic Information > Primary email | email |
| Basic Information > First name | name |
Click Finish.
Step 5: Turn on user access
A new app is off by default. To let users sign in:
- On the app's page, open the User access card.
- Set the service status to ON for everyone, or turn it on for specific organizational units or groups.
- Click Save.

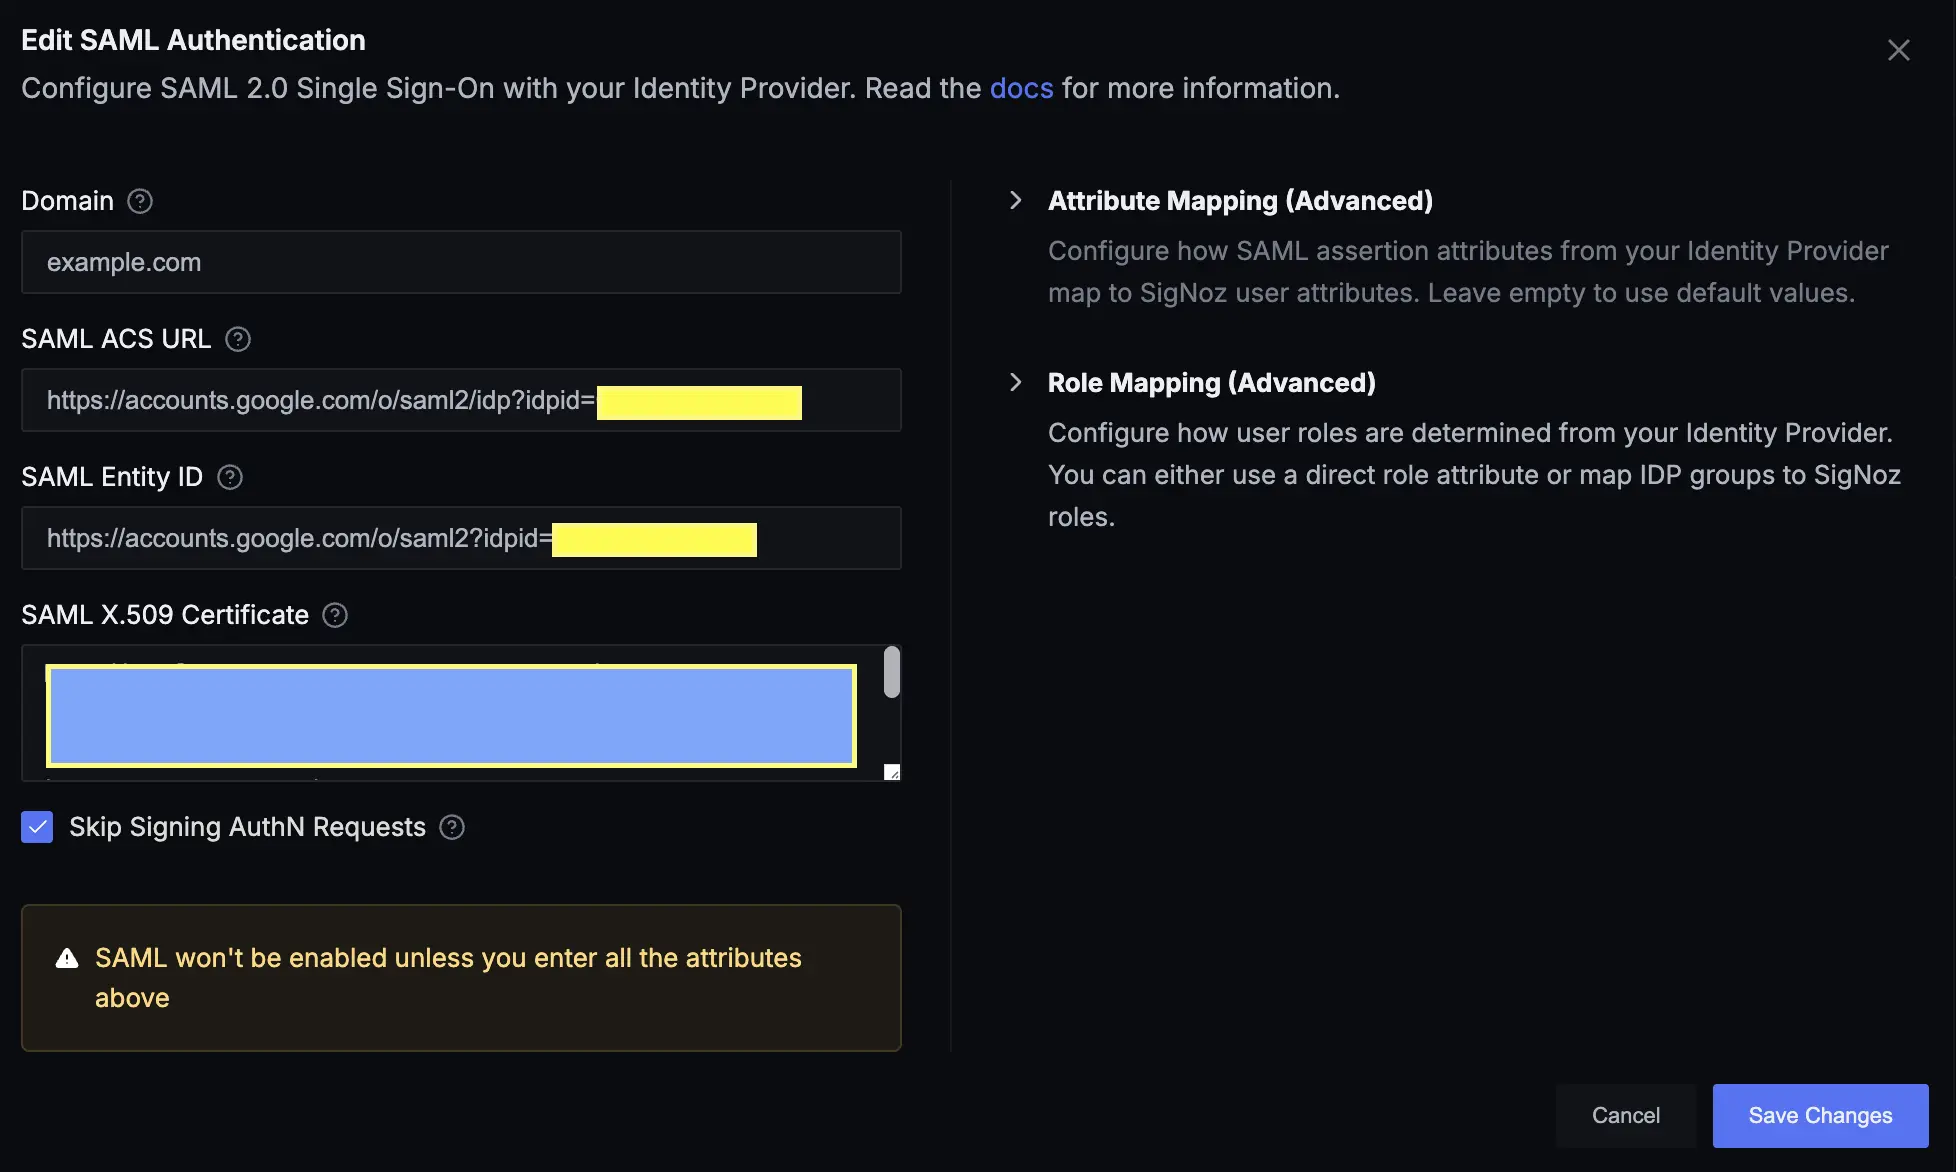
Step 6: Configure SigNoz for SAML authentication
Now add the Google IdP details you copied in Step 2 to SigNoz:
-
Navigate to SigNoz Settings:
- Go to your SigNoz dashboard
- Click on Settings in the left sidebar
- Navigate to Organization Settings
- Click on Authenticated Domains
-
Add New Domain:
- Click Add Domain
- Enter the domain your users log in with (e.g., for emails like
john@example.com, enterexample.com)
-
Enter Configuration Details:
Domain: example.com
SAML ACS URL/SAML IDP URL: <google-sso-url>
SAML X.509 Certificate: <google-certificate-data>
SAML Entity ID: <google-entity-id>
Skip AuthN Requests Signed: True
Where to find these values:
-
Save Configuration:
- Click Save to apply the SAML configuration
Step 7: Test the integration
- Log out of SigNoz if you're currently logged in.
- Open your SigNoz login page in a private/incognito window.
- Log in with a Google Workspace user email.
- Verify that you're redirected to Google for authentication.
- Complete the Google login.
- Confirm you're logged into SigNoz.
Troubleshooting
Common issues and solutions:
- "Authentication failed" error: Check that the ACS URL in Google exactly matches
https://<your-instance-url>/api/v1/complete/saml, and that the SSO URL, Entity ID, and certificate in SigNoz match Google's IdP details. - Wrong values entered: Make sure you added Google's details (SSO URL, Entity ID, certificate) to SigNoz, not your SigNoz ACS URL and Entity ID.
- User can't sign in: Make sure the app's User access is ON for that user (see Step 5), and allow a few minutes for it to take effect.
- Locked out?: If you can't log in because of a faulty setup, use password authentication by appending
?password=Yto your login URL:<your-instance-url>/login?password=Y
