CI/CD Observability with OpenTelemetry - A Step by Step Guide
In the fast-paced world of CI/CD, understanding the performance and behaviour of your pipelines is crucial. GitHub Actions has become a popular choice for automating builds and deployments, but anyone who's debugged a flaky workflow or long-running job knows how challenging it can be to get visibility into what's happening under the hood. We usually rely on build logs, timing data, or guesswork when something goes wrong. Wouldn't it be nice to trace a pipeline run step-by-step, or have metrics on how your workflows are performing over time? This is where OpenTelemetry comes into play.
OpenTelemetry [OTel] is an open-source observability framework that enables collecting traces, metrics, and logs in a standard, vendor-agnostic way. With a bit of configuration, OTel can capture telemetry from even our CI/CD pipelines. In this guide, we'll walk through setting up OpenTelemetry for GitHub Actions [covering both tracing and metrics], with practical examples and configuration snippets.
Why Observe CI/CD Pipelines with OpenTelemetry [OTel]?
Just as we use traces and metrics to understand microservices and applications, we can apply the same to CI/CD pipelines. Instrumenting GitHub Actions with OpenTelemetry yields several benefits:
End-to-end visibility: You can trace the entire lifecycle of a workflow run, from trigger to completion. Each job and step can be visualised, showing how they execute and interact.
Performance optimisation: By measuring the duration of each job and step, you can identify bottlenecks or slow steps in your pipeline.
For example, a long testing phase or a slow dependency installation.
Error detection and debugging: Traces can pinpoint exactly where a workflow failed or took an unexpected path, making it easier to debug broken pipelines. Instead of combing through logs, you'll see which step or action resulted in an error.
Dependency analysis: In complex workflows with multiple jobs [possibly with dependencies or concurrent runs], tracing helps you understand how different jobs and steps relate to each other within the workflow.
Traditionally, engineering teams have monitored CI pipelines using ad-hoc methods, maybe exporting build logs to an ELK stack, timing data to Prometheus, or using CI-specific analytics. Those approaches often cover only metrics [like durations, success/failure counts] or logs. OpenTelemetry provides a unified approach, it can capture traces [for structure and timing] and metrics [for quantitative monitoring] in one system.
Every pipeline run can become a trace, and important KPIs can be emitted as metrics using OTel. Next, we'll see how to set this up with GitHub Actions.
How OpenTelemetry Captures GitHub Actions Data
To make GitHub Actions observable with OTel, we leverage a component of the OTel Collector known as the GitHub Receiver. This receiver can do some very cool things like,
- Ingest GitHub workflow events as traces: GitHub can send events [via webhooks] whenever workflows run or jobs execute. The GitHub Receiver accepts these events and converts them into trace data.
- Scrape GitHub metrics via the API: The same receiver can use GitHub's APIs [GraphQL and REST] to scrape repository and workflow-related metrics. This includes information like repository size, star count, open pull requests, issue counts, contributor statistics, and more.
We can set intervals at which scraping should take place when configuring the receiver as shown below:
github:
	initial_delay: 1s
	collection_interval: 60s
In the sections below, we'll go through the steps to configure the OpenTelemetry Collector with the GitHub receiver for both traces and metrics.
Setting Up the OpenTelemetry Collector for GitHub Actions Observability
Okay. Let's dive into the setup.
Step 0: Updating Your GitHub Config
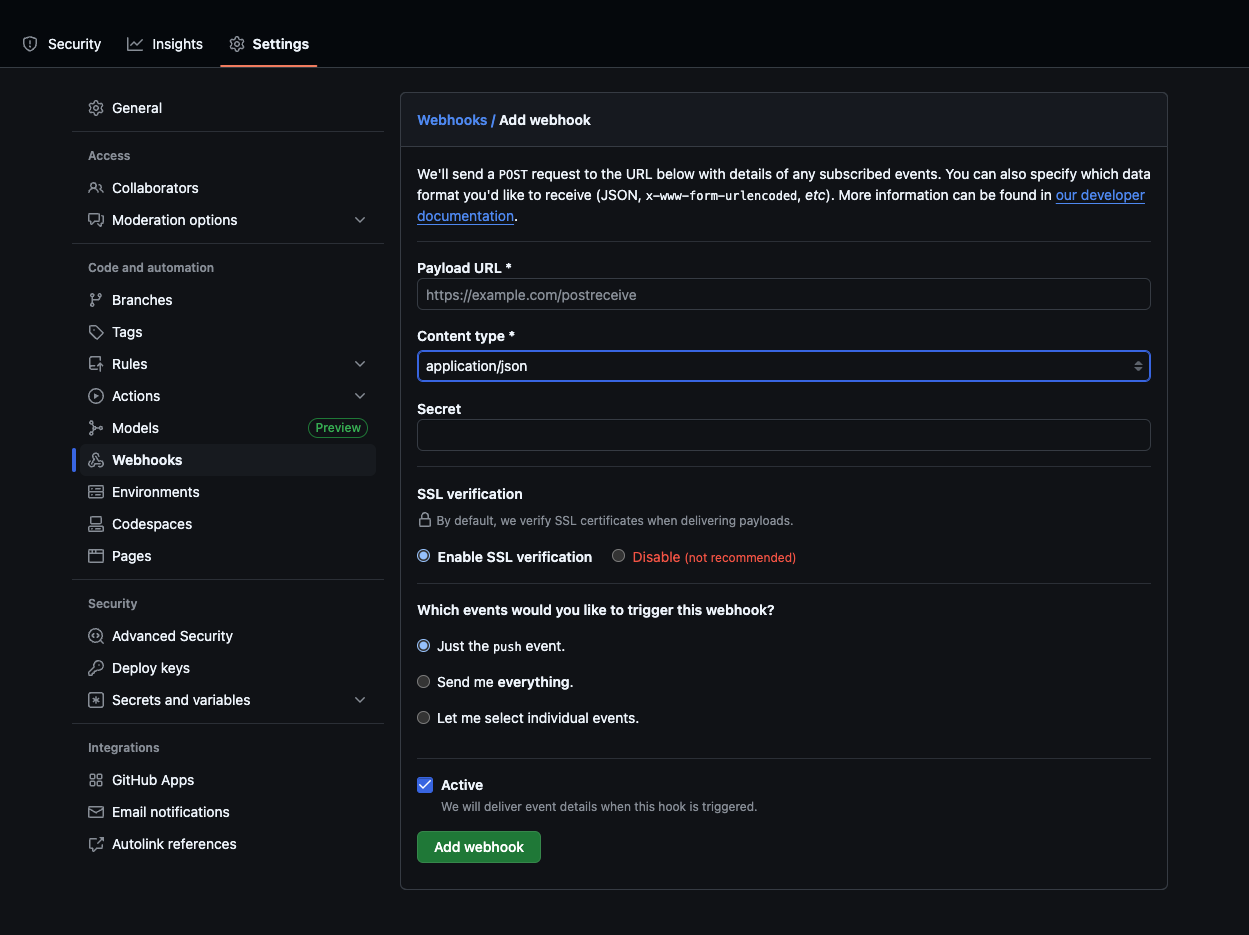
On the GitHub side of things, you'll need to set up a webhook on your repository [or organization] that sends workflow_run and workflow_job events to your Collector endpoint. In GitHub's settings, add a new webhook and select at least these two event types, with the content type set to application/json.
We will configure the Collector to listen for these events on a specific URL. You'll also need a secret token for the webhook [a random string] to secure it; the Collector will use the same secret to validate incoming events.
For metrics, if you want to scrape data from the GitHub API, you'll need an access token with permissions to read repo and workflow data. You can read this guide to understand how to get your personal access token.

With that in place, let's set up the Collector step by step.
Step 1: Install/ Update the OTel Collector
If you haven't already, install the OpenTelemetry Collector [we'll use the otelcol-contrib distribution because the GitHub receiver is part of the contrib components]. Check this guide for more details on installation.
Ensure you have a recent version of otelcol-contrib, the GitHub receiver and CI/CD features are relatively new, so using the latest release is important.
Step 2: Configure the GitHub Receiver for Traces
In our OpenTelemetry configuration yaml file, we need to add the GitHub receiver under the receivers section. Below is a snippet for enabling trace collection via GitHub webhooks:
receivers:
  github:
    webhook:
      endpoint: 0.0.0.0:19418   # Listening on port 19418 for GitHub events
      path: /events    # URL path for incoming events
      health_path: /health  # Optional health check path
      secret: ${GITHUB_WEBHOOK_SECRET}   # Secret for validating GitHub payloads
      service_name: <service_name> # To identify this service's traces [optional]
    scrapers:
      scraper: {} # Placeholder for scrapers [none needed for traces only]
Depending on where you have your collector running, your 'endpoint' setting will change. If you are trying in your local, you can use ngrok to tunnel the public webhook url to the specified port in your local.
With this in place, the collector knows how to receive GitHub events and turn them into trace data. But we're not done yet, we have to tell the collector what to do with these traces once received.
Step 3: Configure the GitHub Receiver For Metrics
In the same receivers section of the Collector config, we will expand the github receiver settings to enable metric scraping. The GitHub receiver uses GitHub's APIs to pull various metrics about your repositories. Here's a snippet to add [we'll merge it with the earlier receiver conf].
receivers:
  github:
    # ... (webhook config as above)
    scrapers:
      scraper:
        github_org: your-github-org # The organization to scrape
        metrics:
          vcs.contributor.count:
            enabled: true
        auth:
          authenticator: bearertokenauth/github
After adding the above, our github receiver config now has both the webhook section [for traces] and the scraper section [for metrics] configured. The receiver will handle both concurrently.
Step 3: Add Metadata and Authentication for Collecting Metrics
Once your GitHub receiver is in place, you'll need two supporting components to make everything work smoothly,
1/ a processor to tag your data
2/ an extension to authenticate your API requests to GitHub.
Observability tools always group and query telemetry by the service.name attribute. Since the GitHub receiver doesn't add this by default, we should explicitly tag our metrics.
In your Collector config:
processors:
  resource/github:
    attributes:
      - key: service.name
        value: `<service-name>`
        action: insert
This processor inserts 'service.name=<service-name>' into all telemetry data flowing through the pipeline, making it easier to search and slice them later in our dashboards and queries.
The GitHub receiver scrapes metrics by calling GitHub's REST and GraphQL APIs. To do this reliably, it needs authentication via a Personal Access Token [we had discussed earlier on how to access this].
Let's add this to your config,
extensions:
  bearertokenauth/github:
    token: ${GH_PAT}
Step 4: Add the GitHub Receiver to a Traces & Metrics Pipeline
Next, in the collector config, we need to include our github receiver in the traces and metrics pipeline and set up where to export the trace data to.
service:
	extensions: [bearertokenauth/github]
  pipelines:
    traces:
      receivers: [github]
      processors: []
      exporters: [otlp]

    metrics:
      receivers: [github]
      processors: [resource/github]
      exporters: [otlp, debug]
Make sure to include bearertokenauth/github in the extensions under service itself! [as shown in the code above]
Step 6: Provide Authentication Tokens and Run the Collector
Before running the Collector, we need to supply the two secret values we referenced in the config:
- GITHUB_WEBHOOK_SECRET – the secret token for validating webhook events.
- GH_PAT – the GitHub token used by the bearer token authenticator for metrics [used by the.
Make sure you have these values handy. The PAT should have permissions to read repository and Actions data. A classic Personal Access Token with repo scope or a fine-grained PAT with appropriate read permissions should suffice, or you can use a GitHub App token if you set one up.
Now we're ready to start the collector. Export the environment variables and run the collector binary [or pass the env vars to your container if running via Docker:
export GITHUB_WEBHOOK_SECRET=<your-webhook-secret>
export GH_PAT=<your-github-access-token>
otelcol-contrib --config ./config.yaml
This launches the OpenTelemetry Collector with our configuration. It will start the HTTP server for webhooks and schedule the metric scrapers.
Step 7: Send Data to a Backend
You can configure your collector to send data to any backend you choose by adding it to the exporters field. We are sending data to SigNoz for this example, you can find the instructions here. 
Step 8: View Incoming Data
If everything is set up correctly, as soon as your collector is running and the GitHub webhook is configured, any new GitHub Actions workflow run should trigger events that hit the collector. You can test this by manually running a workflow or simply waiting for the next run [including failed runs]. You should see logs in the collector.
At this point, the collector will be pushing telemetry to SigNoz or any observability platform of your choice. Next, we'll head over to SigNoz to visualise and verify the traces and metrics.
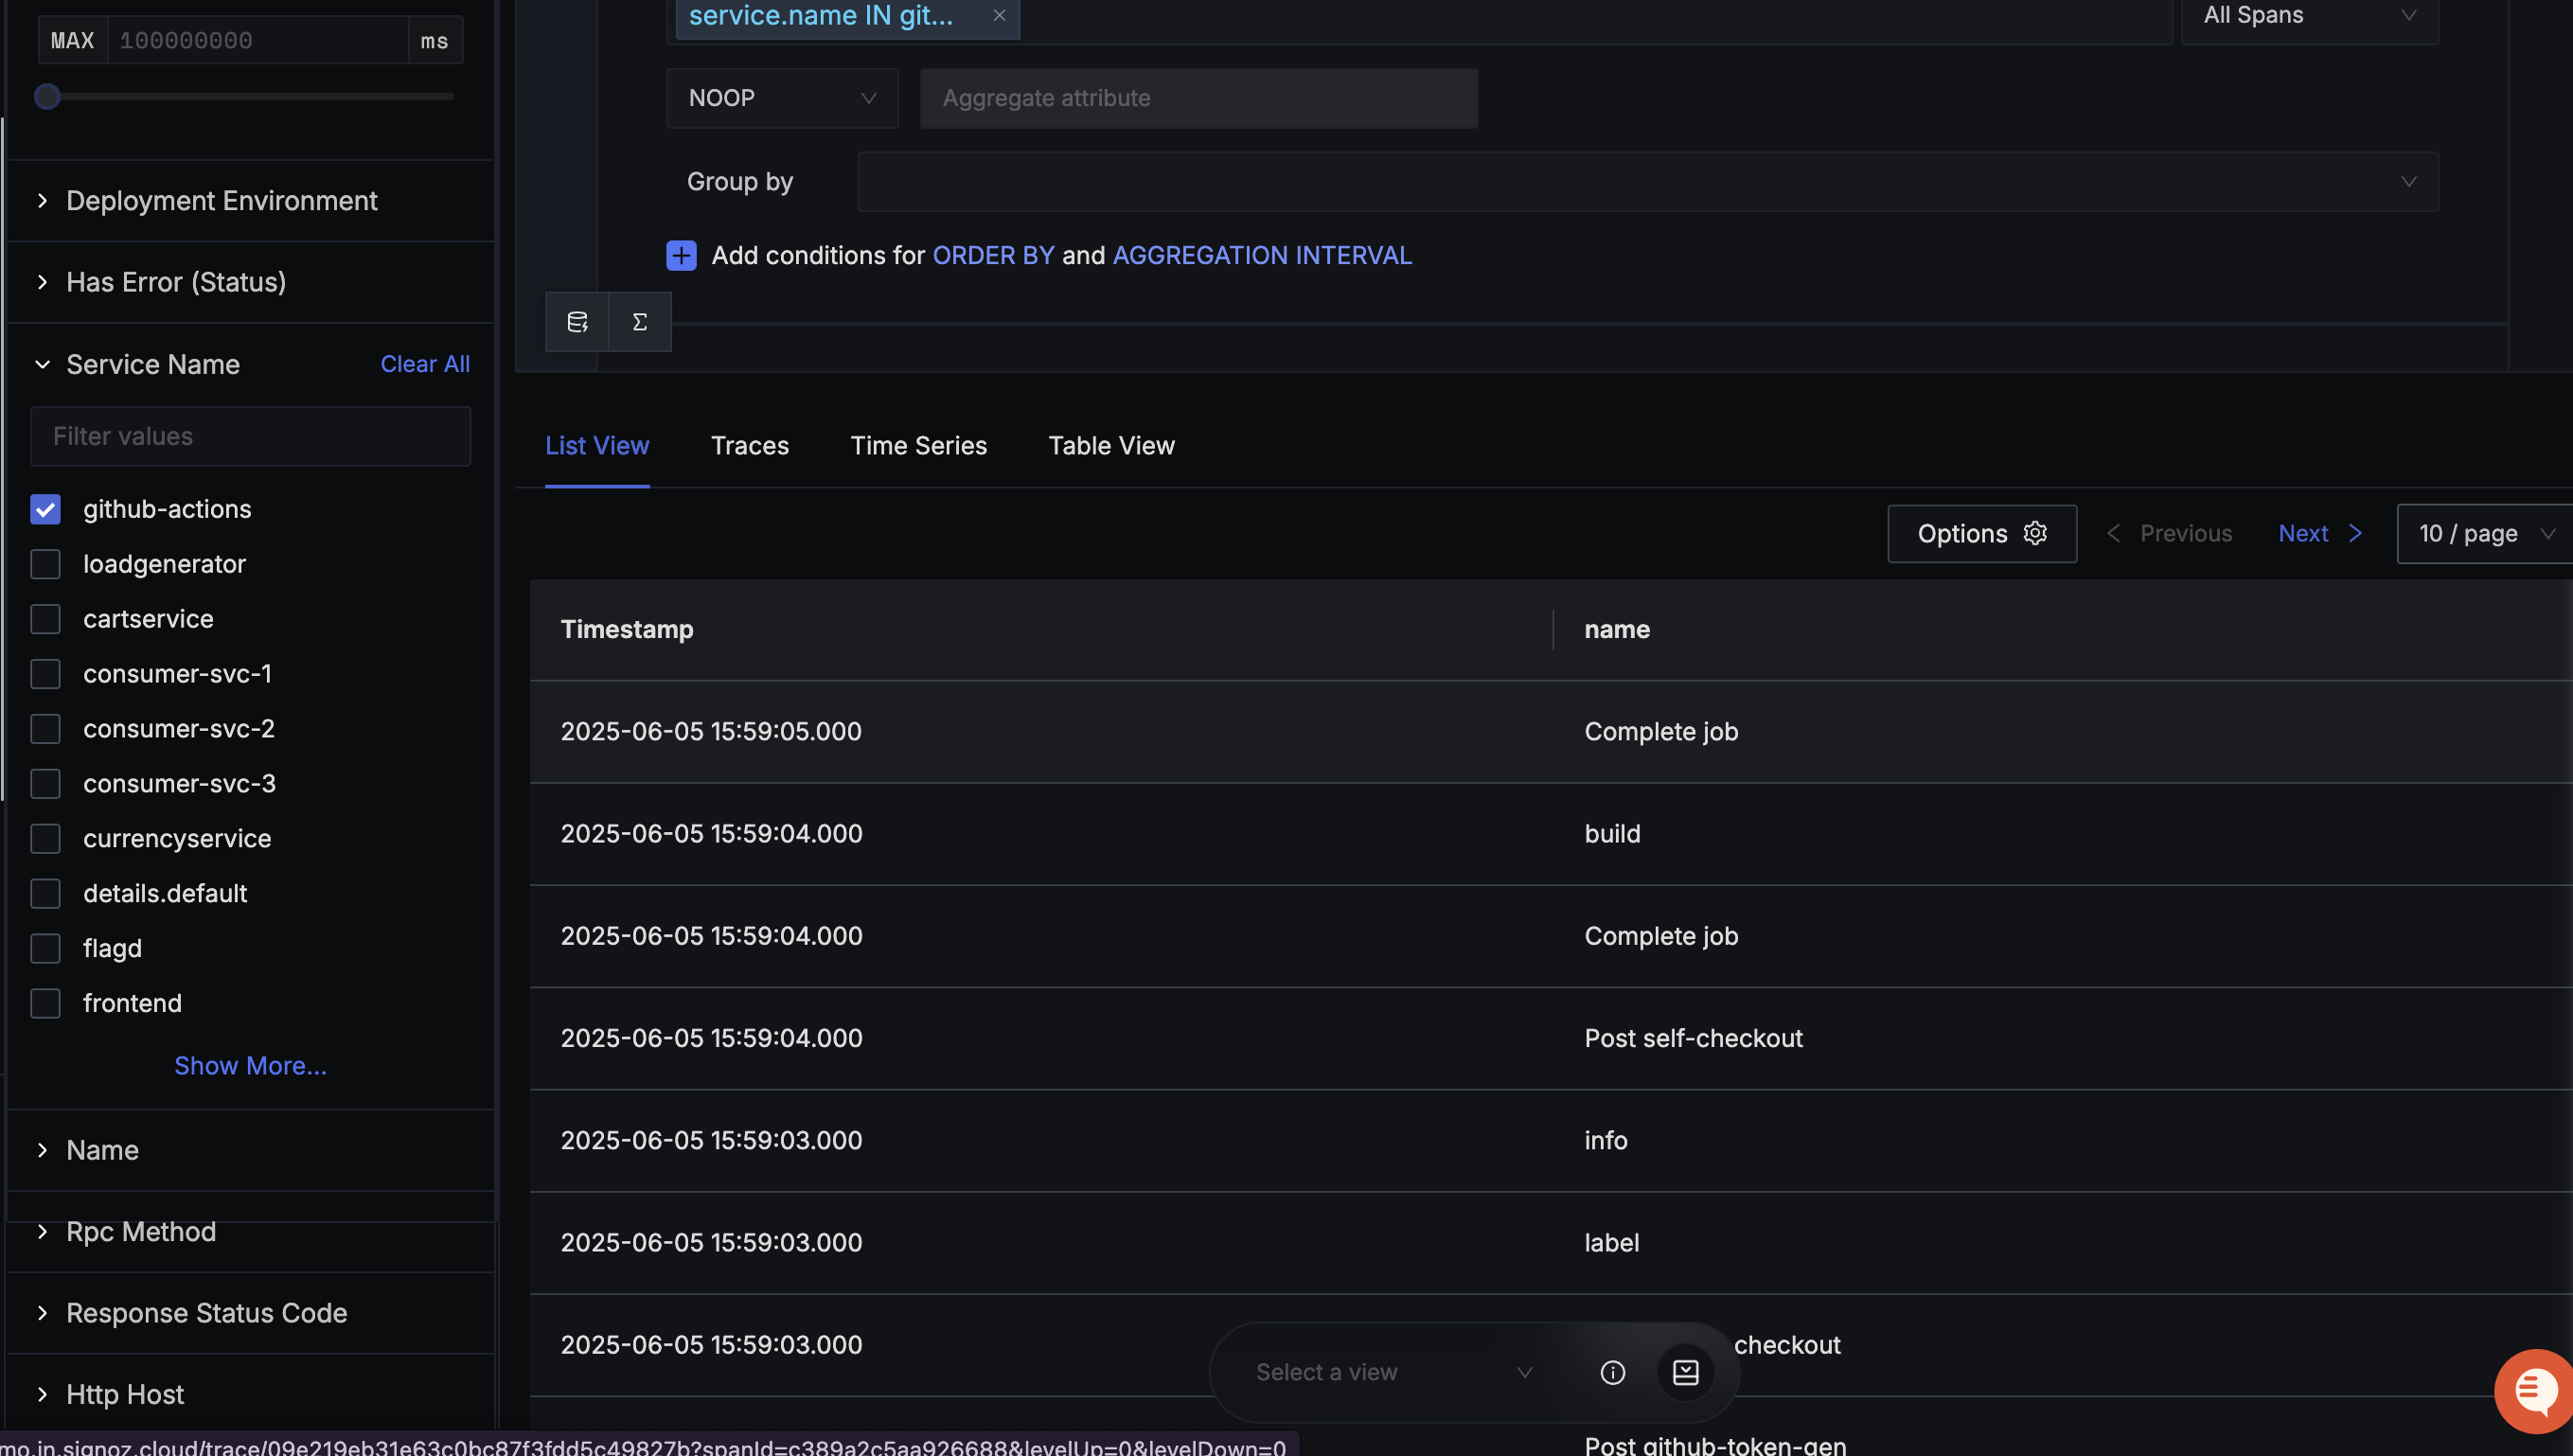
In SigNoz, you can view traces from your GitHub repository after filtering with the service names we mentioned earlier.

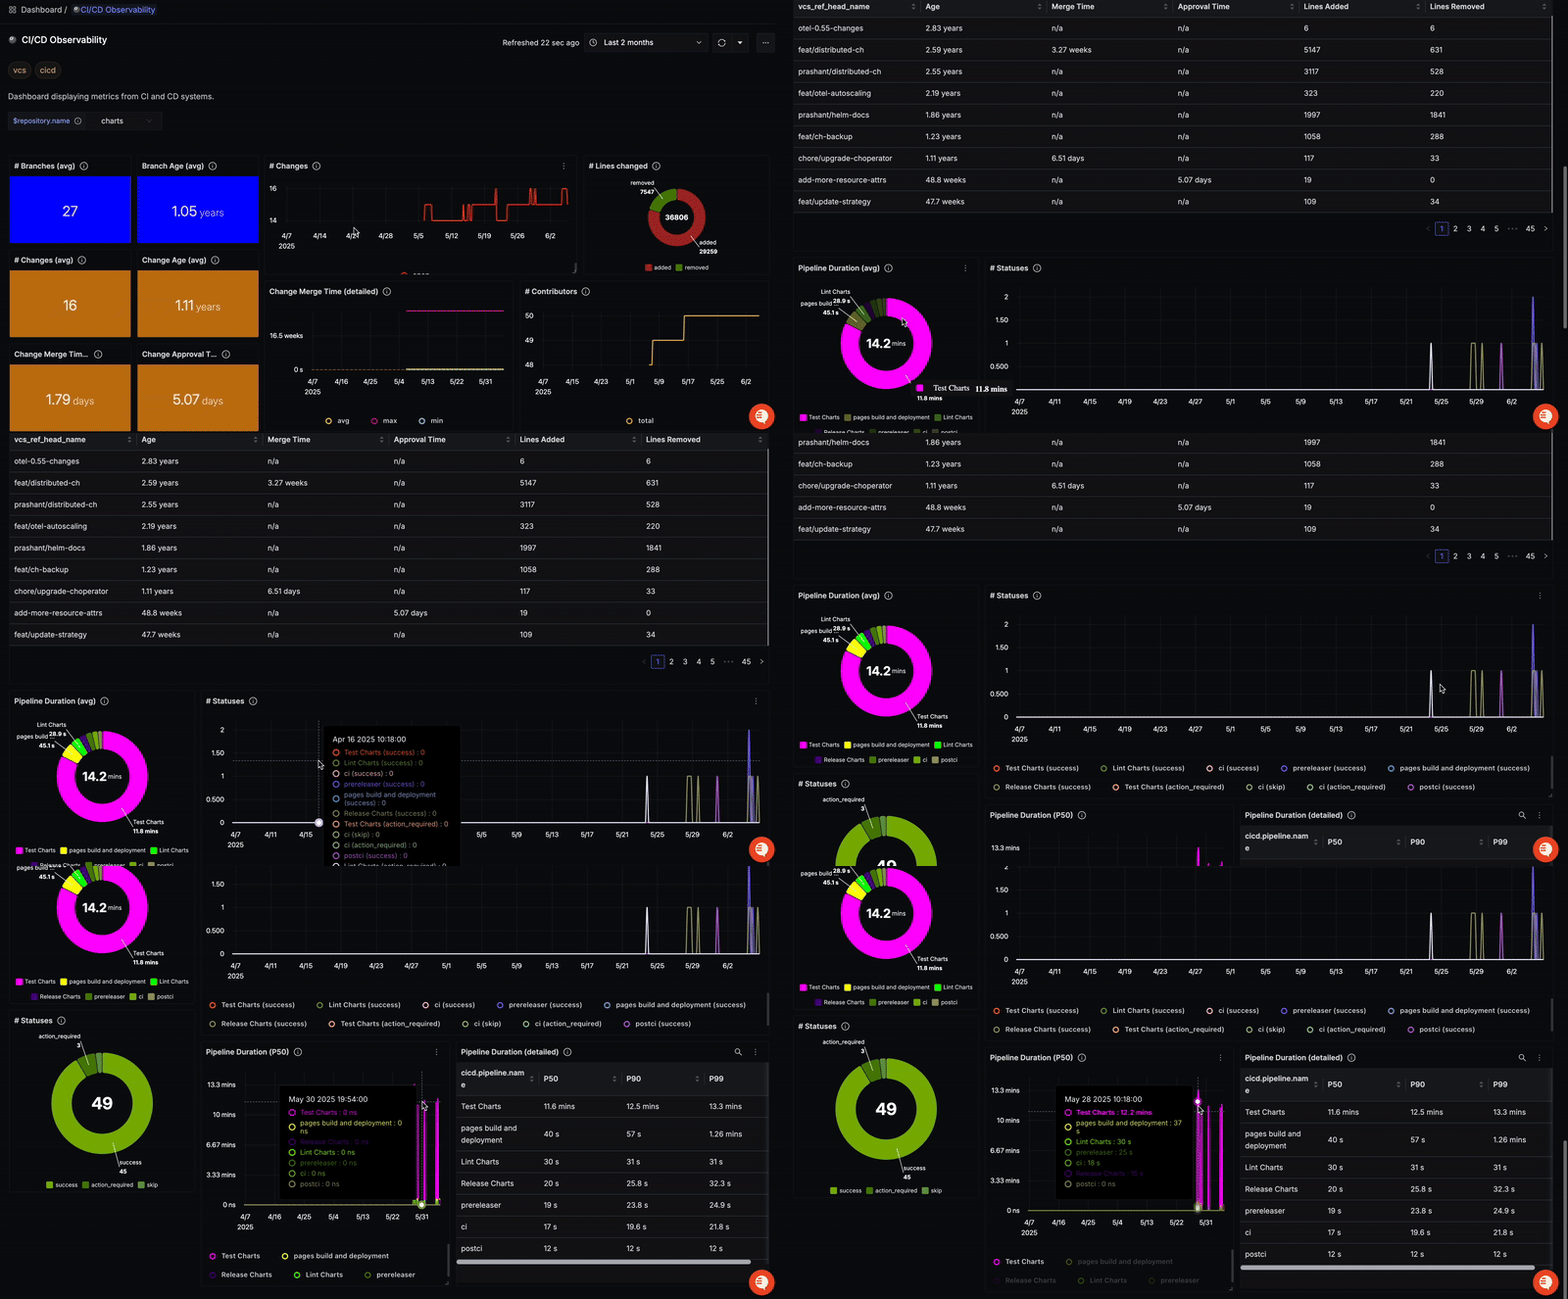
To view metrics in SigNoz, you can use this dashboard.

Conclusion
On that note, our CI/CD pipelines deserve just as much visibility as our production systems. They're the heartbeat of shipping software, and yet they're often left in the dark. With OpenTelemetry, bringing them into the light is easier than ever. So go ahead instrument your pipelines, trace your builds, and monitor what matters!
