The configuration of alerts for a monitoring target defines what the team perceives as a “problem” and should be managed as carefully as the application code. By defining SigNoz alerts as Terraform code, it becomes possible to manage changes to the alert settings.
Overview
SigNoz alerts notify you of changes in the state of your service. While you can set smart, effective alerts using SigNoz UI, the Terraform 'signoz' provider will assist you in managing SigNoz alerts as reviewable codes.
This document will guide you on how to:
- Configure the provider
- Create a new alert in SigNoz
- Start managing existing alerts using Terraform
Prerequisites
- Terraform
- SigNoz Instance (any of the following)
- SigNoz Enterprise
- SigNoz Cloud
- Self-hosted Community Edition (v0.85.0 or later)
Configure Terraform Provider
Step 1: Configure Terraform Environment
Create a .tf file with an arbitrary name (e.g., main.tf is commonly used) and add the following content:
terraform {
  required_version = ">= 0.13"
}
Step 2: Install Terraform signoz Provider
Add a specification block for the signoz provider as follows:
terraform {
  required_version = ">= 0.13"

+ required_providers {
+   signoz = {
+     source = "Signoz/signoz"
+     version = "~>0.0.4"
+   }
+ }
}
Run:
terraform init
This will create .terraform.lock.hcl file, which locks the provider version for consistent usage.
Step 3: Configure signoz Provider
Add the provider {} block to the .tf file as follows:
provider "signoz" {}
By setting the environment variables below, the signoz provider will automatically read these variables and authorize your SigNoz account:
SIGNOZ_ACCESS_TOKEN="your-api-key"
SIGNOZ_ENDPOINT="https://your-signoz-endpoint"
You can explicitly set these variables in the provider {} block as shown below, but avoid hardcoding your API key if you intend to commit your .tf files to an online version control system.
provider "signoz" {
  endpoint="https://your-signoz-endpoint"
  access_token = <api_key>  # Avoid typing your token directly when pushing code online
}
Create New Alert
Step 1: Define SigNoz Alert as Code
Define your alert by using the signoz_alert resource type as follows:
resource "signoz_alert" "new_alert_v2" {
  alert      = "new alert with v2 schema"
  alert_type = "LOGS_BASED_ALERT"
  severity   = "critical"

  condition = jsonencode({
    compositeQuery = {
      queries = [
        {
          type = "builder_query"
          spec = {
            name         = "A"
            stepInterval = 0
            signal       = "logs"
            source       = ""
            aggregations = [
              {
                expression = "count()"
              }
            ]
            filter = {
              expression = ""
            }
            having = {
              expression = ""
            }
          }
        }
      ]
      panelType = "graph"
      queryType = "builder"
    }
    selectedQueryName = "A"
    thresholds = {
      kind = "basic"
      spec = [
        {
          name           = "critical"
          target         = 100
          targetUnit     = ""
          recoveryTarget = null
          matchType      = "1"
          op             = "1"
          channels       = ["alert-test-terraform"]
        },
        {
          name           = "warning"
          target         = 50
          targetUnit     = ""
          recoveryTarget = null
          matchType      = "1"
          op             = "1"
          channels       = ["alert-test-terraform"]
        }
      ]
    }
  })

  description      = "This alert is fired when log count crosses the threshold (current: {{$value}}, threshold: {{$threshold}})"
  summary          = "Log count alert triggered"
  eval_window      = "5m0s"
  frequency        = "1m0s"
  broadcast_to_all = false
  disabled         = false
  rule_type        = "threshold_rule"
  version          = "v5"

  schema_version = "v2alpha1"

  evaluation = jsonencode({
    kind = "rolling"
    spec = {
      evalWindow = "35m0s"
      frequency  = "1m0s"
    }
  })

  notification_settings = {
    renotify = {
      interval     = "25m0s"
      alert_states = ["nodata", "firing"]
      enabled      = true
    },
    group_by   = ["container.id"]
    use_policy = true
  }

  labels = {
    "team" = "platform"
  }
}
This configuration defines:
- condition: Trigger alerts if
k8s_node_memory_rssis missing for 10 seconds. - metric: Aggregates the average value of the
k8s_node_memory_rssmetric, grouped by the Kubernetes node name. - interval: Evaluates the metric every 1 minute with a 5-minute evaluation window.
- notification_settings: Notification settings for the alerts.
- renotify: Renotification settings for the alerts
- evaluation: Evaluation settings for the alerts
Step 2: Check Correctness of Definition
After defining your alert, validate its syntax by running the validate command:
terraform validate
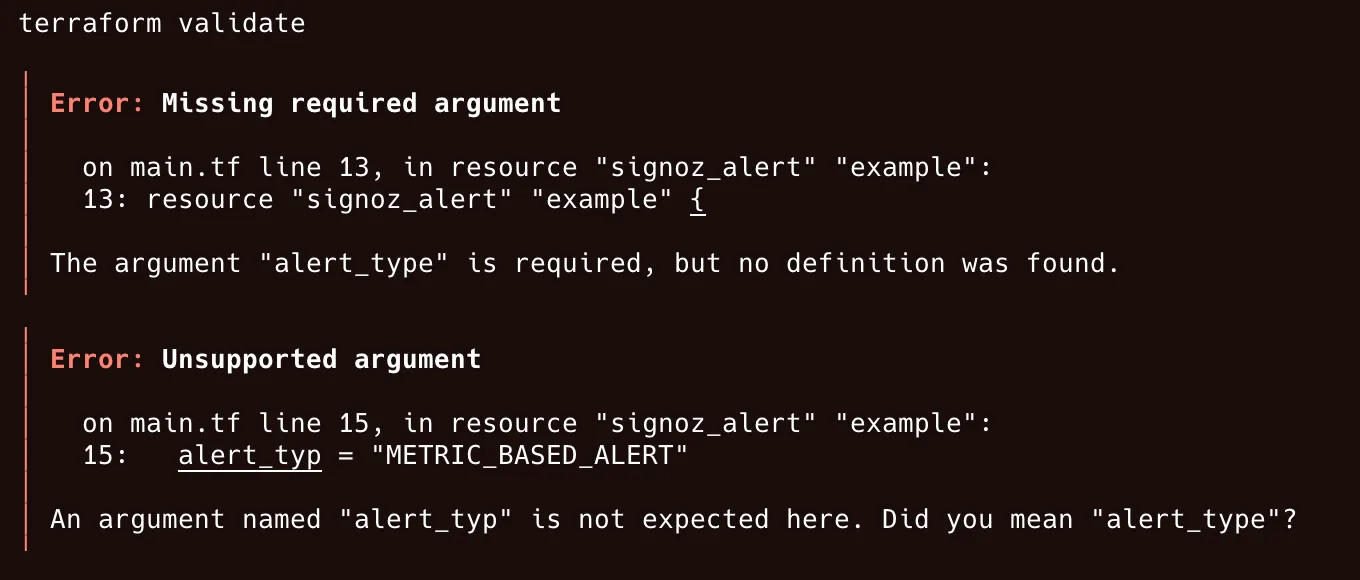
If the resource is defined correctly, you will see the message: Success! The configuration is valid.
In case you encounter any errors, fix your definition by referencing the console output:

The error indicates that:
- the required argument
alert_typewas not found. - an unexpected argument
alert_typwas passed.
Fix the typo that caused this error:
 resource "signoz_alert" "example" {
   alert      = "Example alert"
-  alert_typ = "METRIC_BASED_ALERT"
+  alert_type = "METRIC_BASED_ALERT"
   condition = jsonencode(
     {
       "absentFor" : 10,
Step 3: Provision SigNoz Alert to SigNoz
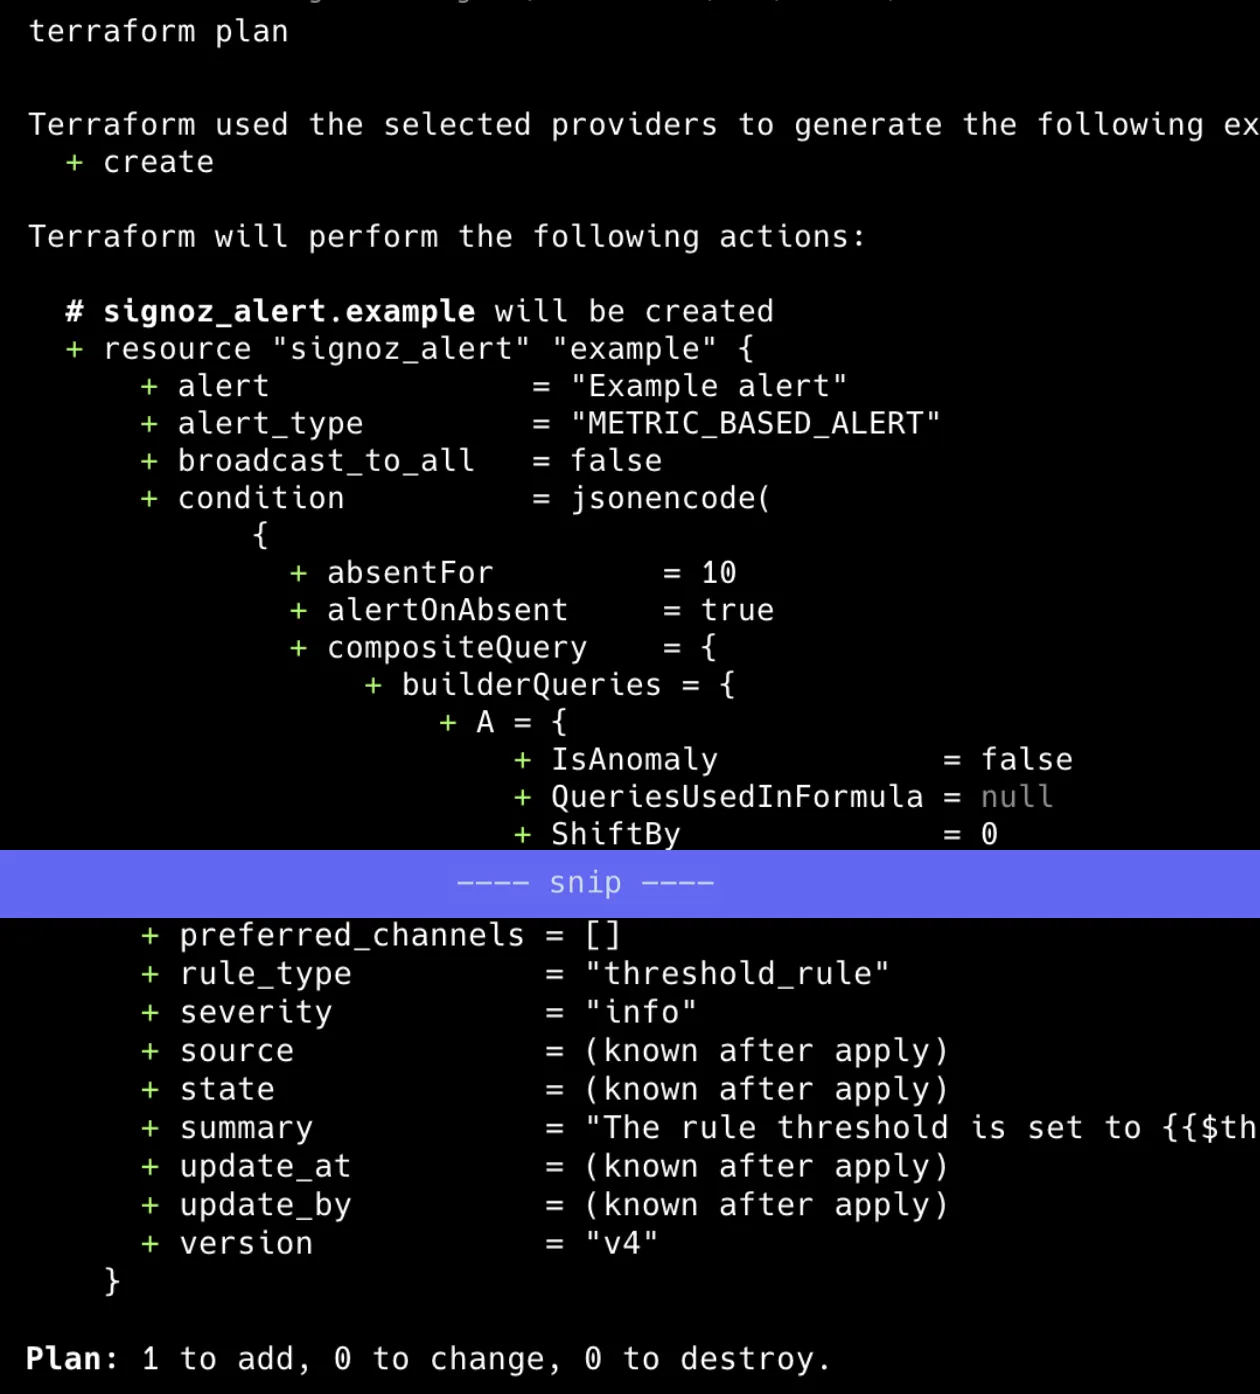
When you're ready, plan your Terraform module to check the differences between your code and the resources on the remote (SigNoz):
terraform plan

The output indicates that it plans to create a new resource (signoz_alert) with specified attributes like alert, alert_type, and version. The plan shows 1 resource to add, with no changes or deletions.
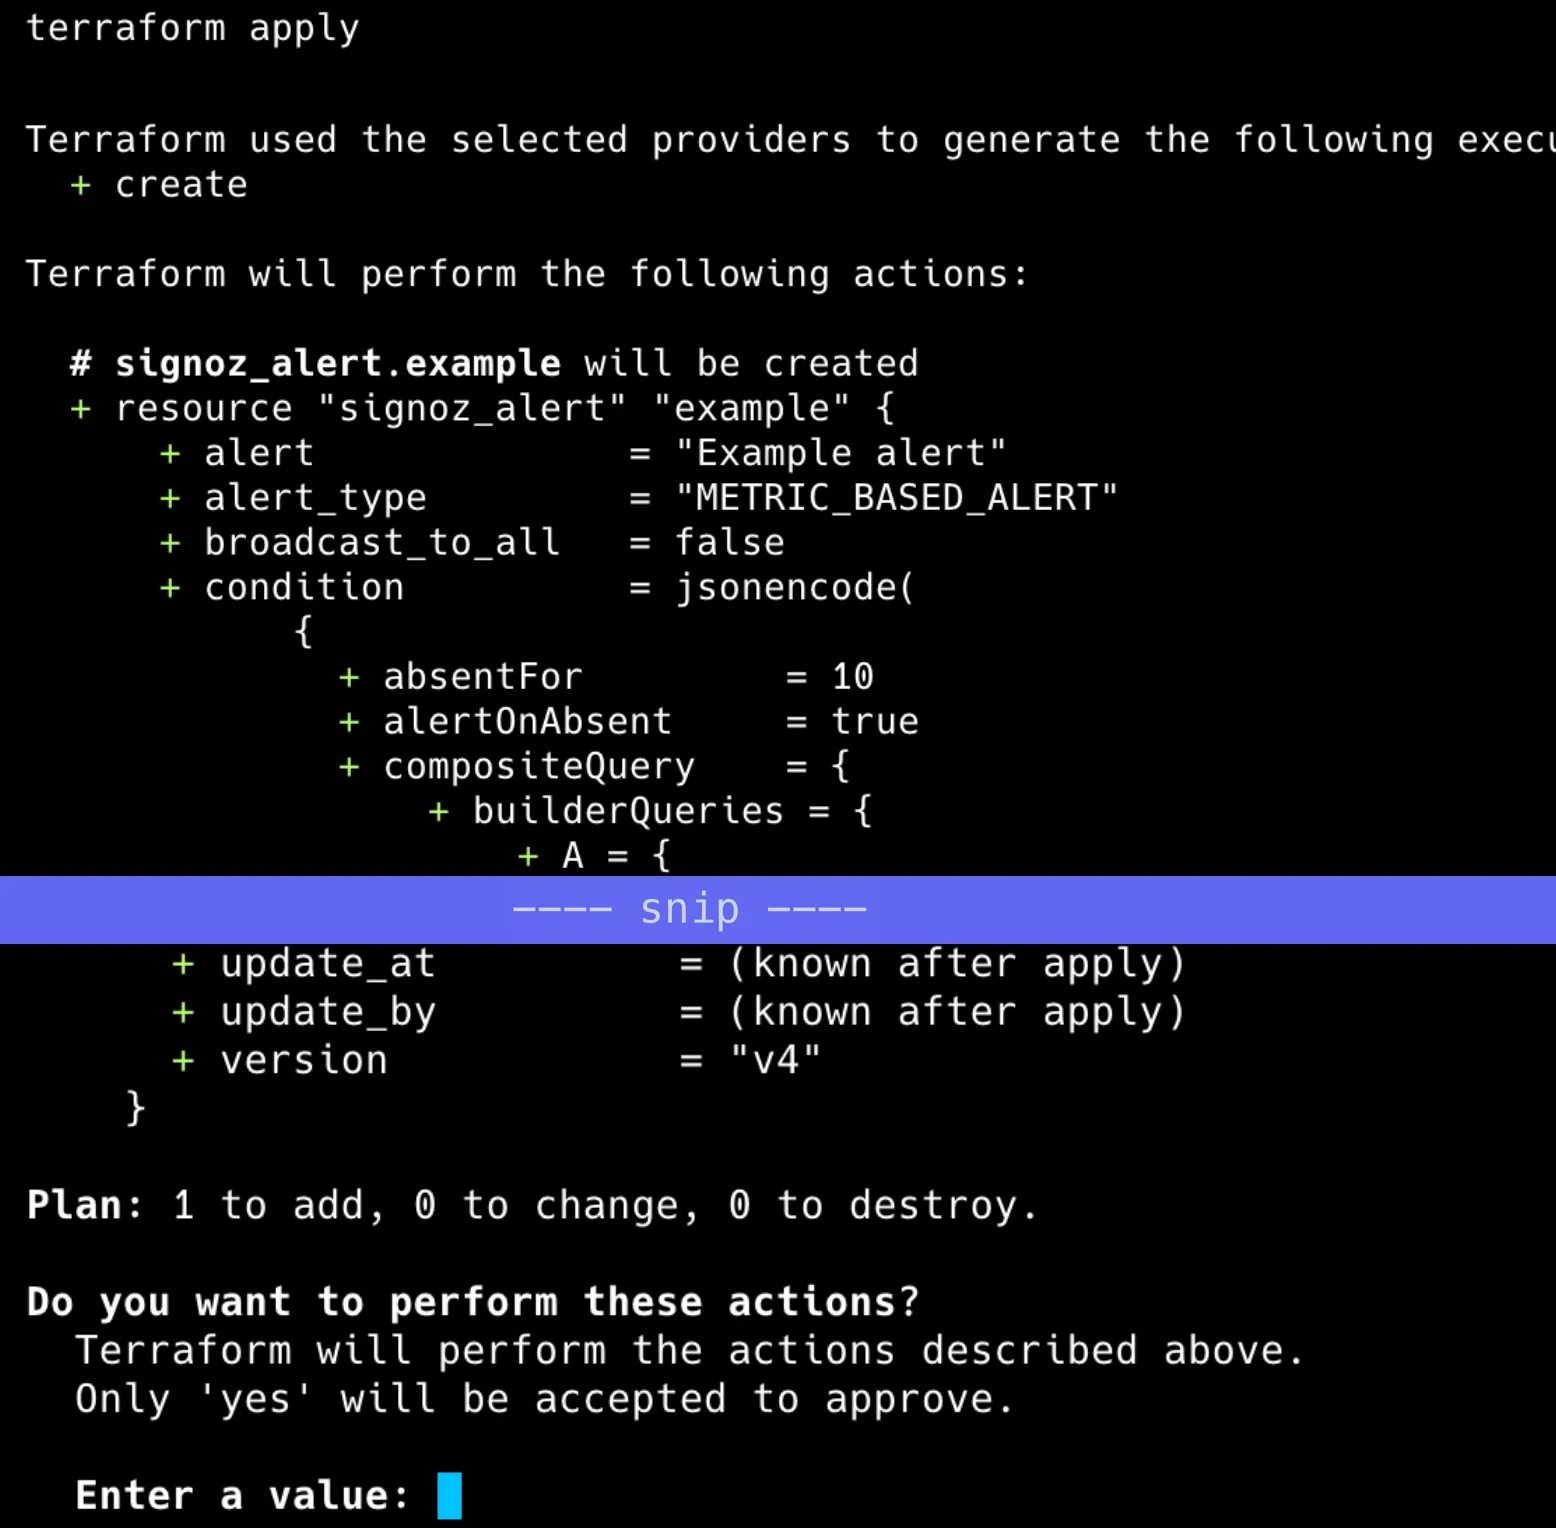
Once you're satisfied that the diffs are as intended, apply your code for provisioning:
terraform apply

Terraform will wait for your confirmation before applying the change to the remote.
Review the diffs on the console again and type yes to confirm:

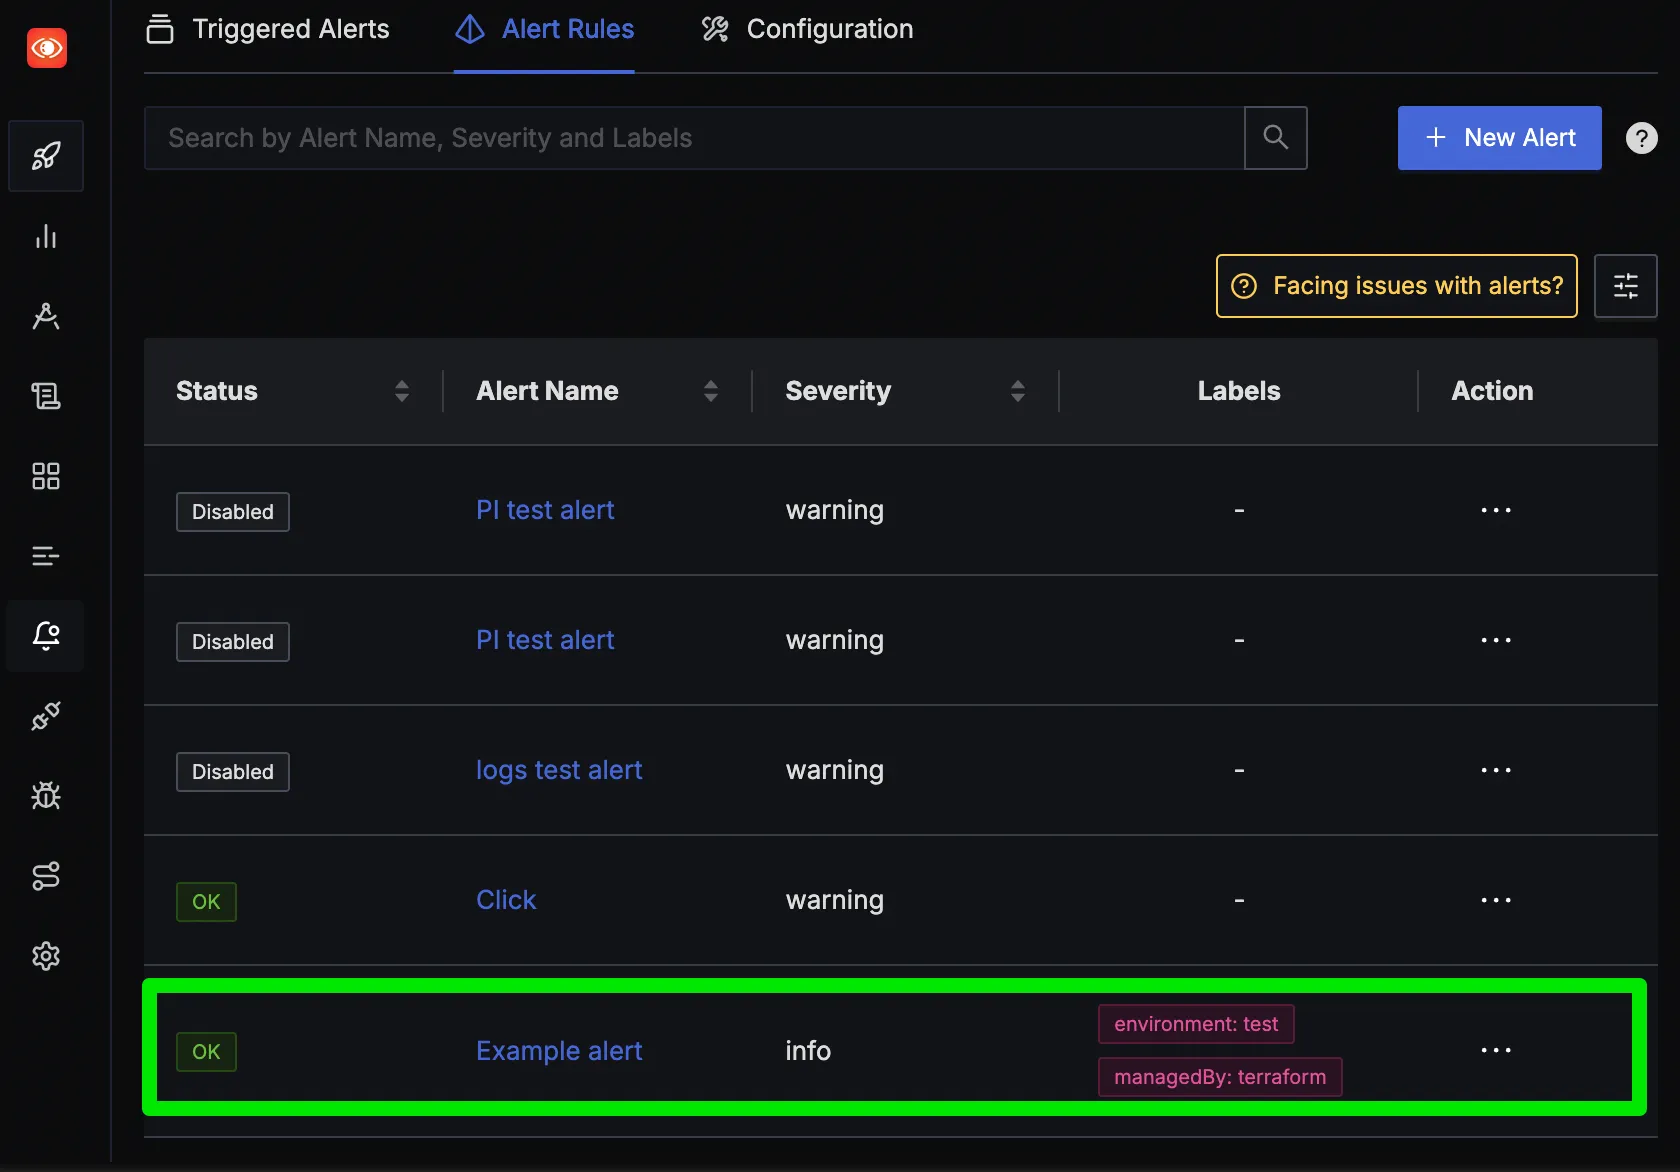
After seeing the success message on the console, you'll find the alert provisioned on the remote:

Manage Preexistent Alert as Terraform Resource
In Terraform v1.5.0 and later, you can use an import {} block to import a preexistent SigNoz alert.
Define the target alert as a Terraform resource as explained in the previous section, and relate it to the resource on remote.
Specify the id of the target alert in the id field:
import {
  to = signoz_alert.example
  id = "123"
}
You can do the same with the command:
terraform import signoz_alert.example 123
Conclusion
Using Terraform, you can manage both new and existing SigNoz alerts as code. The IaC practice enables you to introduce change management processes for SigNoz alerts and helps improve the operational processes of your service.
