Overview
This documentation provides a detailed walkthrough on how to set up Google App Engine to send the traces directly to SigNoz.
Prerequisites
- Google Cloud account with administrative privilege or App Engine Admin privilege.
- Access to a project in GCP
- Cloud Build API is enabled
Get started with App Engine Configuration
Create the App Engine service using the following steps:
Step 1: Install the Google Cloud CLI.
Step 2: To initialize the gcloud CLI, run the following command:
gcloud init
Step 3: Run the following gcloud command to enable App Engine and create the associated application resources. Note that the location you select cannot be changed later.
gcloud app create
Step 4: In this example, we will be building the NodeJS application. For this,
Create a folder for your NodeJS service, say
my-nodejs-service, and navigate to that folder in your terminal. Create the NodeJS project in this folder using the commandnpm init.Install the requried dependencies, express and opentelemetry dependencies, using the following commands
npm install --save express
npm install --save @opentelemetry/api@^1.7.0
npm install --save @opentelemetry/sdk-node@^0.45.1
npm install --save @opentelemetry/auto-instrumentations-node@^0.39.4
npm install --save @opentelemetry/exporter-trace-otlp-http@^0.45.1
Note that this step is only required in case you want to try running the application locally.
- In the service folder, create
server.jsfile with the following contents:
const express = require('express');
const app = express();

app.get('/', (req, res) => {
  res.send('Hello from App Engine!');
});

// Listen to the App Engine-specified port, or 8080 otherwise
const PORT = process.env.PORT || 8080;
app.listen(PORT, () => {
  console.log(`Server listening on port ${PORT}...`);
});
This file contains the actual application logic. Here, we have created a very simple application that opens a GET endpoint at / which sends out a statement "Hello from App Engine!" in the response.
- Next, let us create another file
tracing.jsthat contains the instrumentation code to send out traces to SigNoz.
You need to configure the endpoint for SigNoz Cloud in this file. You can find your ingestion key from SigNoz Cloud account details sent on your email.
// tracing.js
'use strict'

const process = require('process')
const opentelemetry = require('@opentelemetry/sdk-node')
const { getNodeAutoInstrumentations } = require('@opentelemetry/auto-instrumentations-node')
const { OTLPTraceExporter } = require('@opentelemetry/exporter-trace-otlp-http')
const { Resource } = require('@opentelemetry/resources')
const { SemanticResourceAttributes } = require('@opentelemetry/semantic-conventions')

// do not set headers in exporterOptions, the OTel spec recommends setting headers through ENV variables
// https://github.com/open-telemetry/opentelemetry-specification/blob/main/specification/protocol/exporter.md#specifying-headers-via-environment-variables

// highlight-start
const exporterOptions = {
  url: 'https://ingest.{region}.signoz.cloud:443/v1/traces',
}
// highlight-end

const traceExporter = new OTLPTraceExporter(exporterOptions)
const sdk = new opentelemetry.NodeSDK({
  traceExporter,
  instrumentations: [getNodeAutoInstrumentations()],
  resource: new Resource({
    // highlight-next-line
    [SemanticResourceAttributes.SERVICE_NAME]: 'appengine_nodejs_app',
  }),
})

// initialize the SDK and register with the OpenTelemetry API
// this enables the API to record telemetry
sdk.start()

// gracefully shut down the SDK on process exit
process.on('SIGTERM', () => {
  sdk
    .shutdown()
    .then(() => console.log('Tracing terminated'))
    .catch((error) => console.log('Error terminating tracing', error))
    .finally(() => process.exit(0))
})
In this example, we have used appengine_nodejs_app as the service name. You can feel free to change it appropriately as per your use-case.
Depending on the choice of your region for SigNoz cloud, the ingest endpoint will vary according to this table.
| Region | Endpoint |
|---|---|
| US | ingest.us.signoz.cloud:443 |
| IN | ingest.in.signoz.cloud:443 |
| EU | ingest.eu.signoz.cloud:443 |
- Modify the
package.jsonfile with the following contents in thescriptsanddependenciessection.
{
  "name": "my-nodejs-service",
  "version": "1.0.0",
  "main": "server.js",
  "scripts": {
    "start": "node -r ./tracing.js server.js",
    "test": "echo \"Error: no test specified\" && exit 1"
  },
  "author": "",
  "license": "ISC",
  "description": "",
  "dependencies": {
    "@opentelemetry/api": "^1.7.0",
    "@opentelemetry/auto-instrumentations-node": "^0.39.4",
    "@opentelemetry/exporter-trace-otlp-http": "^0.45.1",
    "@opentelemetry/sdk-node": "^0.45.1",
    "express": "^4.19.2"
  }
}
With these changes, the start script for the application is node -r ./tracing.js server.js, and all the dependencies are now part of package.json. You can optionally try to run the script locally using the command node server.js to check if the application is running as expected.
- Create the
app.yamlfile with the following contents:
runtime: nodejs20

env_variables:
  OTEL_EXPORTER_OTLP_HEADERS: "signoz-ingestion-key=<your-ingestion-key>"
Put the appropriate SIGNOZ_INGESTION_KEY. It is the API token provided by SigNoz. You can find your ingestion key from SigNoz cloud account details sent on your email.
With this the NodeJS application is ready to be deployed to App Engine.
Step 5: When on this folder which contains app.yaml, you can deploy your service using the command:
gcloud app deploy
Step 6: On running the above command, the service will get deployed on the App Engine, and you will get the logs containing the endpoint which can be used to trigger the deployed service (highlighted in red in the screenshot).
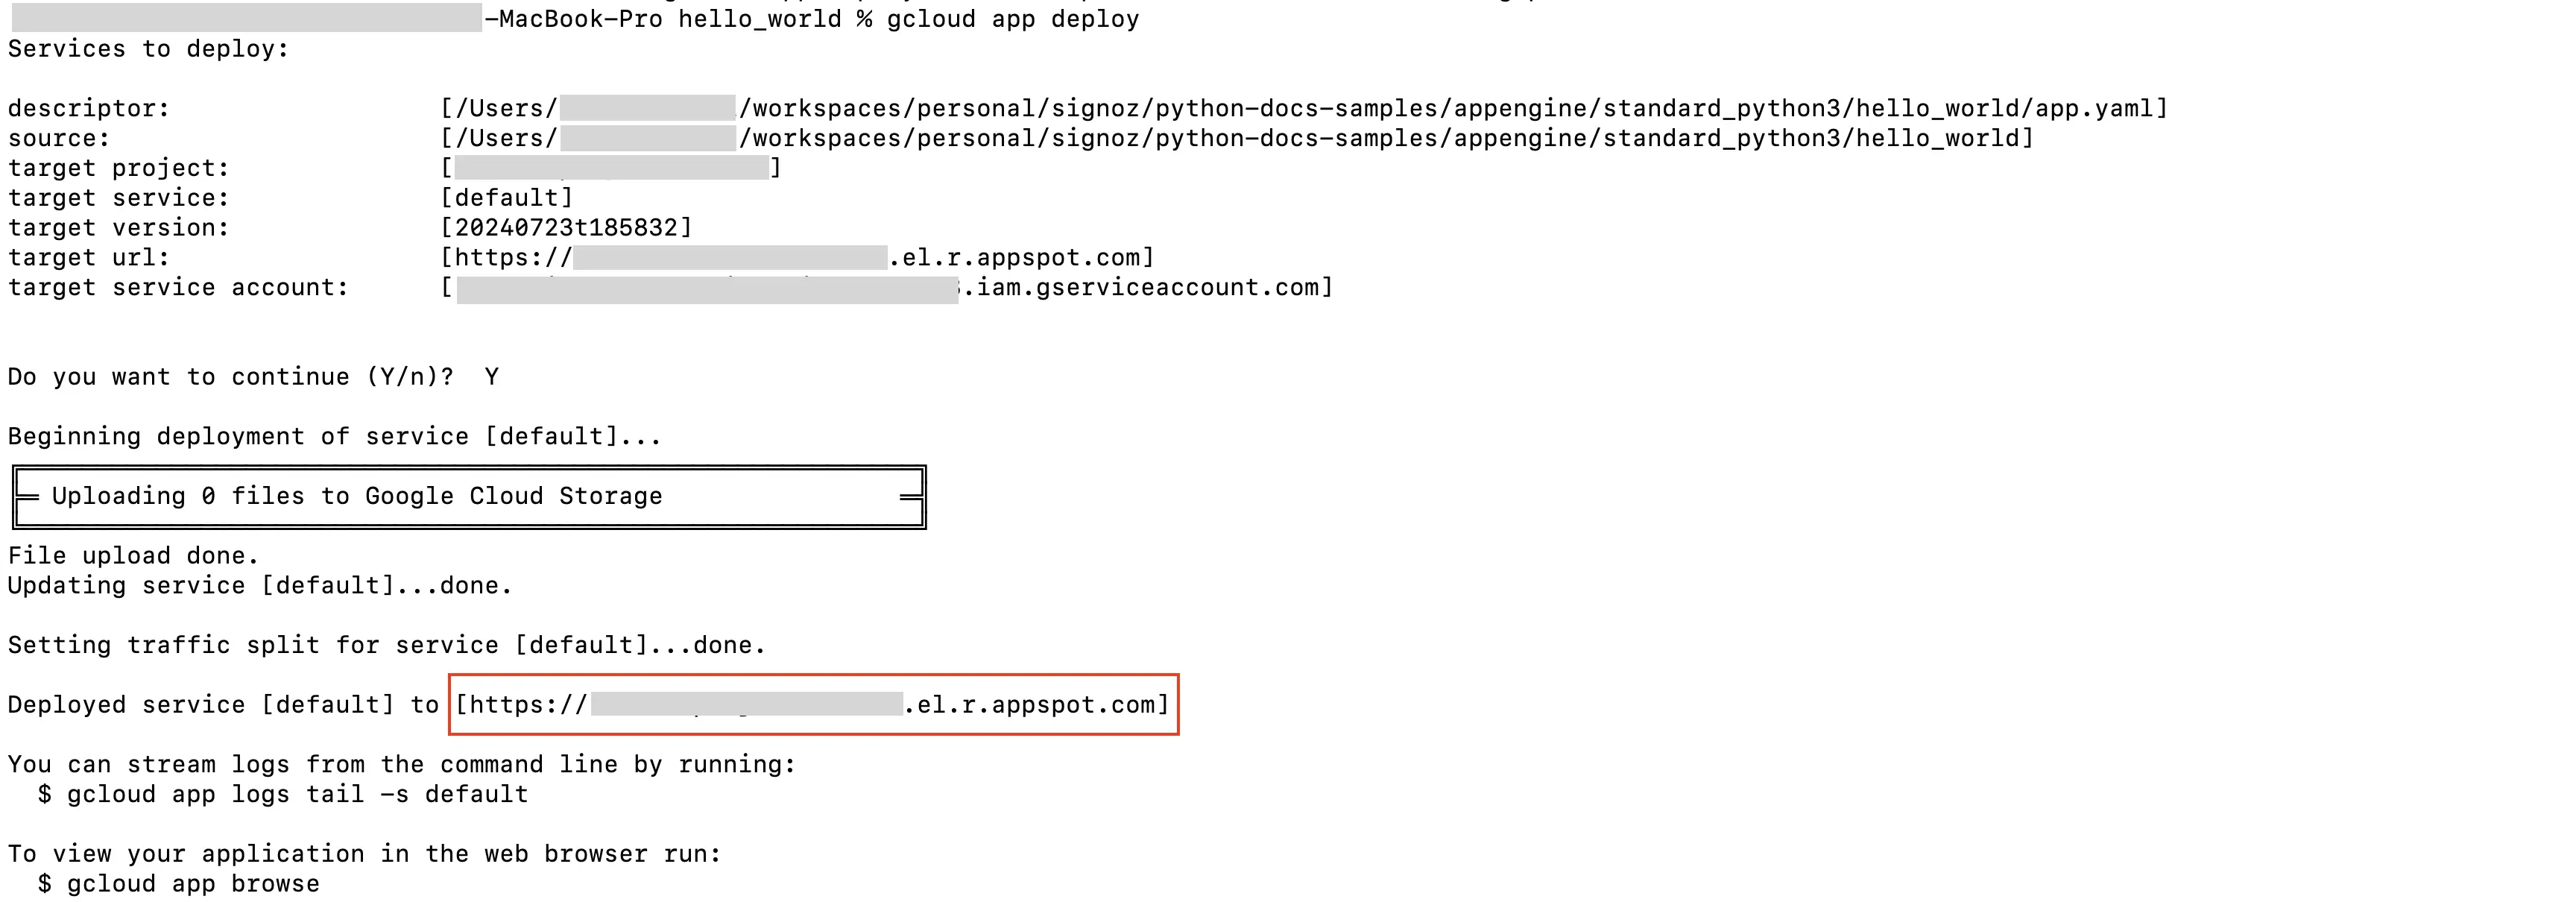
App Engine Deploy Logs
Open the URL in the new browser which will invoke the service. You will receive "Hello from App Engine!" as the response in your browser.
The opening of the URL in the browser has triggered the App Engine service, and it will result in the traces which would now also start appearing in the SigNoz Cloud as we have instrumented the tracing.
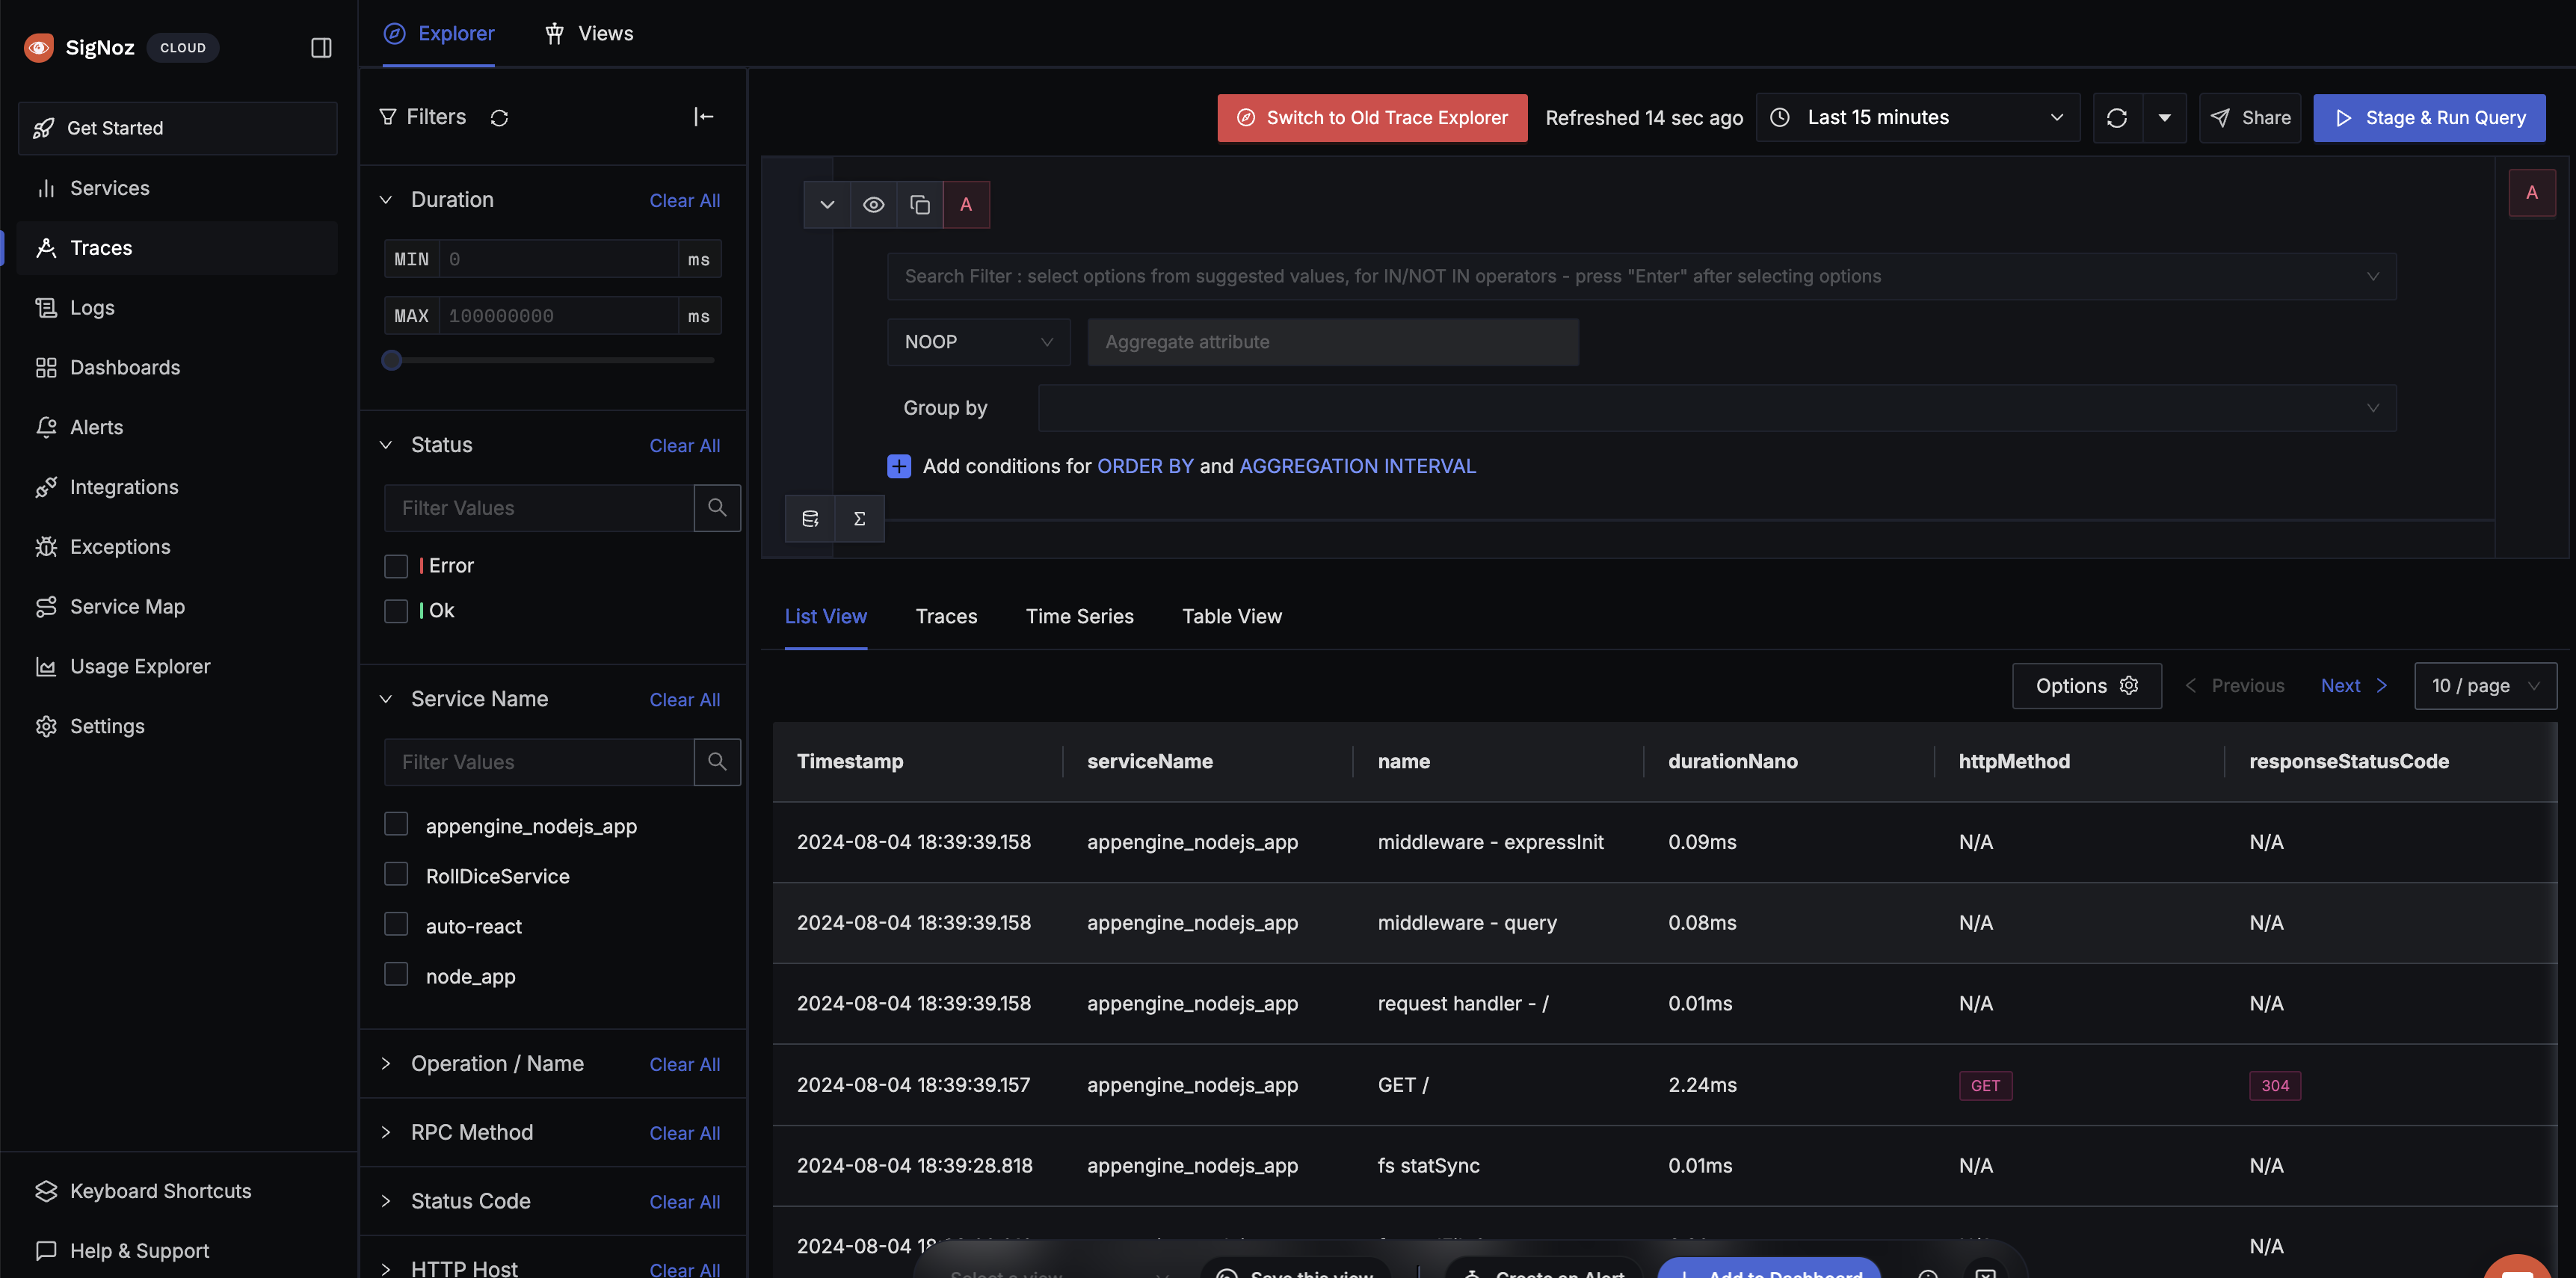
App Engine Traces in SigNoz Cloud
Prerequisites
- Google Cloud account with administrative privilege or App Engine Admin privilege
- Access to a project in GCP
- Cloud Build API is enabled
For more details on how to configure Self-Hosted SigNoz for Logs, check official documentation by Self-Hosted SigNoz and navigate to the "Send Logs to Self-Hosted SigNoz" section.
Get started with App Engine Configuration
Create the App Engine service using the following steps:
Step 1: Install the Google Cloud CLI.
Step 2: To initialize the gcloud CLI, run the following command:
gcloud init
Step 3: Run the following gcloud command to enable App Engine and create the associated application resources. Note that the location you select cannot be changed later.
gcloud app create
Step 4: In this example, we will be building the NodeJS application. For this,
Create a folder for your NodeJS service, say
my-nodejs-service, and navigate to that folder in your terminal. Create the NodeJS project in this folder using the commandnpm init.Install the requried dependencies, express and opentelemetry dependencies, using the following commands
npm install --save express
npm install --save @opentelemetry/api@^1.7.0
npm install --save @opentelemetry/sdk-node@^0.45.1
npm install --save @opentelemetry/auto-instrumentations-node@^0.39.4
npm install --save @opentelemetry/exporter-trace-otlp-http@^0.45.1
Note that this step is only required in case you want to try running the application locally.
- In the service folder, create
server.jsfile with the following contents:
const express = require('express');
const app = express();

app.get('/', (req, res) => {
  res.send('Hello from App Engine!');
});

// Listen to the App Engine-specified port, or 8080 otherwise
const PORT = process.env.PORT || 8080;
app.listen(PORT, () => {
  console.log(`Server listening on port ${PORT}...`);
});
This file contains the actual application logic. Here, we have created a very simple application that opens a GET endpoint at / which sends out a statement "Hello from App Engine!" in the response.
- Next, let us create another file
tracing.jsthat contains the instrumentation code to send out traces to SigNoz.
You need to configure the endpoint for SigNoz Cloud in this file. You can find your ingestion key from SigNoz Cloud account details sent on your email.
// tracing.js
'use strict'

const process = require('process')
const opentelemetry = require('@opentelemetry/sdk-node')
const { getNodeAutoInstrumentations } = require('@opentelemetry/auto-instrumentations-node')
const { OTLPTraceExporter } = require('@opentelemetry/exporter-trace-otlp-http')
const { Resource } = require('@opentelemetry/resources')
const { SemanticResourceAttributes } = require('@opentelemetry/semantic-conventions')

// do not set headers in exporterOptions, the OTel spec recommends setting headers through ENV variables
// https://github.com/open-telemetry/opentelemetry-specification/blob/main/specification/protocol/exporter.md#specifying-headers-via-environment-variables

// highlight-start
const exporterOptions = {
  url: 'http://localhost:4318/v1/traces',
}
// highlight-end

const traceExporter = new OTLPTraceExporter(exporterOptions)
const sdk = new opentelemetry.NodeSDK({
  traceExporter,
  instrumentations: [getNodeAutoInstrumentations()],
  resource: new Resource({
    // highlight-next-line
    [SemanticResourceAttributes.SERVICE_NAME]: 'appengine_nodejs_app',
  }),
})

// initialize the SDK and register with the OpenTelemetry API
// this enables the API to record telemetry
sdk.start()

// gracefully shut down the SDK on process exit
process.on('SIGTERM', () => {
  sdk
    .shutdown()
    .then(() => console.log('Tracing terminated'))
    .catch((error) => console.log('Error terminating tracing', error))
    .finally(() => process.exit(0))
})
In this example, we have used appengine_nodejs_app as the service name. You can feel free to change it appropriately as per your use-case.
http://localhost:4318/v1/traces is the default url for sending your tracing data. We are assuming you have installed SigNoz on your localhost. Based on your environment, you can update it accordingly. It should be in the following format:
http://<IP of SigNoz backend>:4318/v1/traces
- Modify the
package.jsonfile with the following contents in thescriptsanddependenciessection.
{
  "name": "my-nodejs-service",
  "version": "1.0.0",
  "main": "server.js",
  "scripts": {
    "start": "node -r ./tracing.js server.js",
    "test": "echo \"Error: no test specified\" && exit 1"
  },
  "author": "",
  "license": "ISC",
  "description": "",
  "dependencies": {
    "@opentelemetry/api": "^1.7.0",
    "@opentelemetry/auto-instrumentations-node": "^0.39.4",
    "@opentelemetry/exporter-trace-otlp-http": "^0.45.1",
    "@opentelemetry/sdk-node": "^0.45.1",
    "express": "^4.19.2"
  }
}
With these changes, the start script for the application is node -r ./tracing.js server.js, and all the dependencies are now part of package.json. You can optionally try to run the script locally using the command node server.js to check if the application is running as expected.
- Create the
app.yamlfile with the following contents:
runtime: nodejs20
With this the NodeJS application is ready to be deployed to App Engine.
Step 5: When on this folder which contains app.yaml, you can deploy your service using the command:
gcloud app deploy
Step 6: On running the above command, the service will get deployed on the App Engine, and you will get the logs containing the endpoint which can be used to trigger the deployed service (highlighted in red in the screenshot).
App Engine Deploy Logs
Open the URL in the new browser which will invoke the service. You will receive "Hello from App Engine!" as the response in your browser.
The opening of the URL in the browser has triggered the App Engine service, and it will result in the traces which would now also start appearing in SigNoz as we have instrumented the tracing.
