Overview
This documentation provides a detailed walkthrough on how to set up a Google Cloud Function to send the custom metrics to SigNoz.
Prerequisites
- Google Cloud account with administrative privilege or Cloud Functions Admin privilege.
- Access to a project in GCP
- Google Cloud Functions APIs enabled (follow this guide to see how to enable an API in Google Cloud)
Setup
Get started with Cloud Function Configuration
Follow these steps to create the Cloud Function:
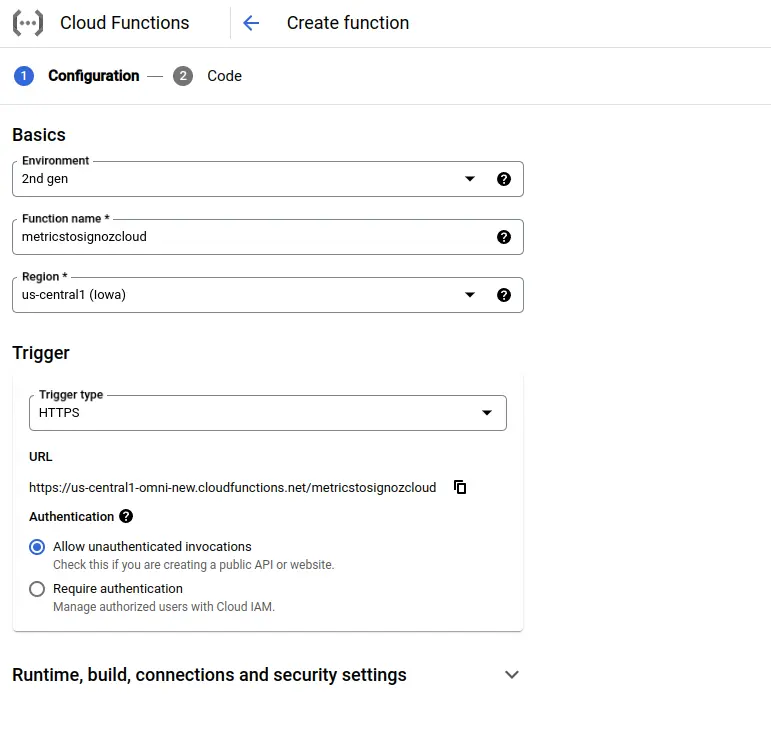
Step 1: Go to your GCP console, search for Cloud Functions, go to Functions, and click on CREATE FUNCTION.

Create Cloud Functions
Step 2: Fill in the following details to create a Cloud Function:
- Environment: 2nd gen
- Function name: Name for the Cloud Function
- Region: Takes the default region of the GCP account
- Trigger: Defines how to trigger the Cloud Function
- Trigger Type: HTTPS - this allows us to trigger the Cloud Function using a URL
- Authentication: Choose whether you need authenticated or unauthenticated invocations. We have chosen an unauthenticated invocation for this demonstration.
Configure Cloud Function
Step 3: Expand the Runtime, build, connections, and security settings section, and under Runtime environment variables:
Add OTEL_EXPORTER_OTLP_HEADERS and OTEL_EXPORTER_OTLP_ENDPOINT with Ingestion Key and Ingestion URL, respectively.

Set Cloud Function Runtime Environment Variables
Step 4: Click on the NEXT button to bring You to the page where you can add your code.
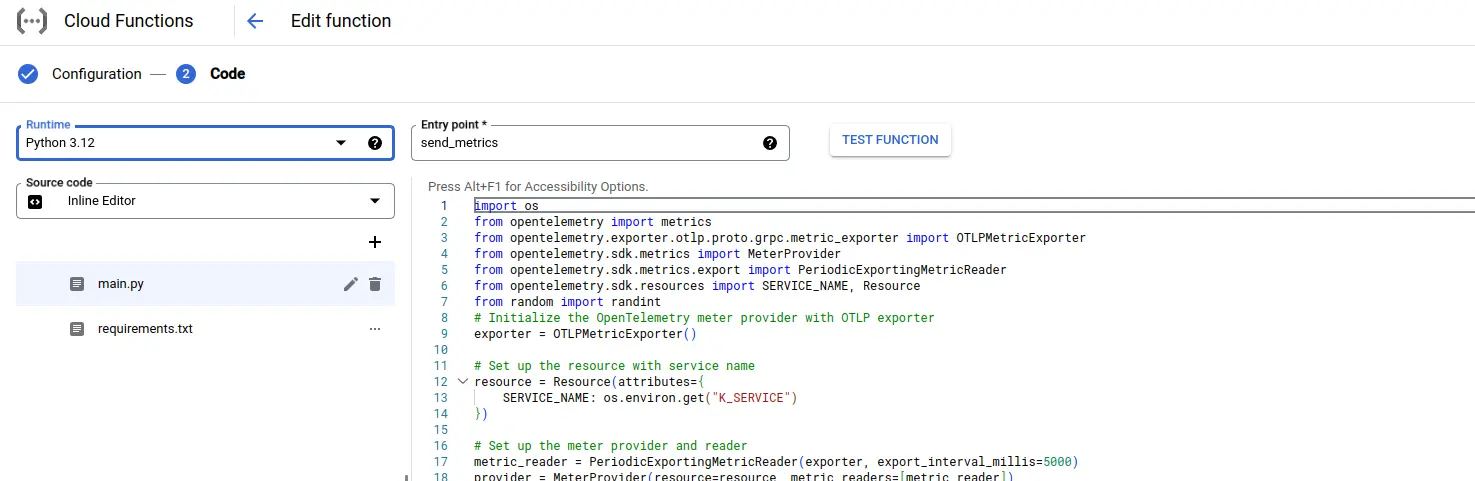
Set entrypoint and source code
Add code to the Google Cloud Function
For this demonstration, we will be using Python 3.12
Below is the comprehensive code of the main.py file, followed by a high-level overview of what the code is doing.
import os
from opentelemetry import metrics
from opentelemetry.exporter.otlp.proto.grpc.metric_exporter import OTLPMetricExporter
from opentelemetry.sdk.metrics import MeterProvider
from opentelemetry.sdk.metrics.export import PeriodicExportingMetricReader
from opentelemetry.sdk.resources import SERVICE_NAME, Resource
from random import randint
# Initialize the OpenTelemetry meter provider with OTLP exporter
exporter = OTLPMetricExporter()

# Set up the resource with service name
resource = Resource(attributes={
   SERVICE_NAME: os.environ.get("K_SERVICE")
})

# Set up the meter provider and reader
metric_reader = PeriodicExportingMetricReader(exporter, export_interval_millis=5000)
provider = MeterProvider(resource=resource, metric_readers=[metric_reader])
metrics.set_meter_provider(provider)

# Create a meter
meter = metrics.get_meter(__name__)

# Create a counter metric
request_counter = meter.create_counter(
   name="requests",
   description="Number of requests",
   unit="1"
)

random_counter = meter.create_up_down_counter(
   name="random_count",
   description="some random number between 50 and 100",
   unit="1"

)

def send_metrics(request):
   """
   Google Cloud Function to send metrics to SigNoz.
   """
   # Simulate a metric update (e.g., increment the counter)
   request_counter.add(1, {"environment": "production"})
   random_counter.add(randint(50,100))
   return "Metrics sent!", 200

# Ensure the exporter flushes before the function terminates
def finalize():
   metric_reader.shutdown()
   exporter.shutdown()

   print("shutdown!")

import atexit
atexit.register(finalize)
Below is a high-level overview of the above code snippet:
- Service Name: Configures the OpenTelemetry resource with the service name from the environment variable K_SERVICE.
- Metric Exporting: Sends metrics to SigNoz using OTLP with a 5-second export interval.
- Counter Metrics: Tracks the number of requests with a counter and generates random numbers between 50 and 100 with an up-down counter.
- Metric Updates: Simulates metric updates each time the send_metrics function is called.
- Graceful Shutdown: Cleans up and flushes metrics data before the application exits to ensure all data is sent.
To install the required packages, add a requirements.txt file to the source with the following content:
functions-framework==3.*
opentelemetry-sdk
opentelemetry-exporter-otlp-proto-grpc
The requirements.txt file should contain all the packages that your Cloud Function depends upon. Google Cloud Function uses this file to create an environment with all the required packages.
Once you’ve finished writing your code, locate the DEPLOY button. After clicking the DEPLOY button, Google Cloud Function initiates deployment, starts provisioning the function according to the specified configuration, initializes the environment, handles dependencies, and makes the function ready to handle incoming requests.
Testing your cloud function
Step 1: After completing the deployment, navigate to the TRIGGER section to obtain the URL to invoke the function.
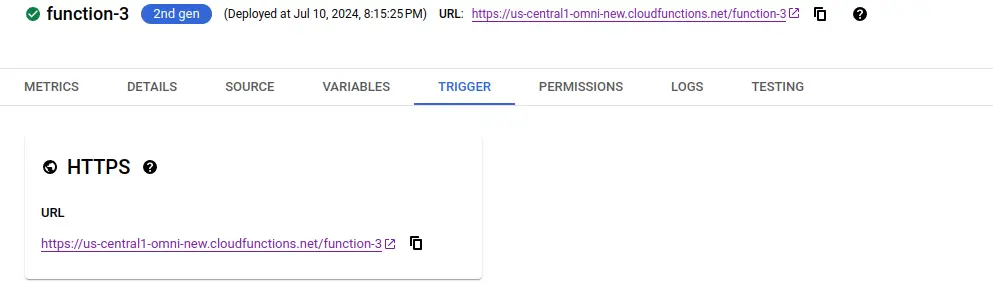
Deploying Cloud Function
Step 2: Hit the URL that you have obtained, and you will see the function output.

Trigger Cloud function.
Step 3: Click on the logs section in your Cloud Function to view the logs, indicating that the custom metrics have been sent to SigNoz successfully.
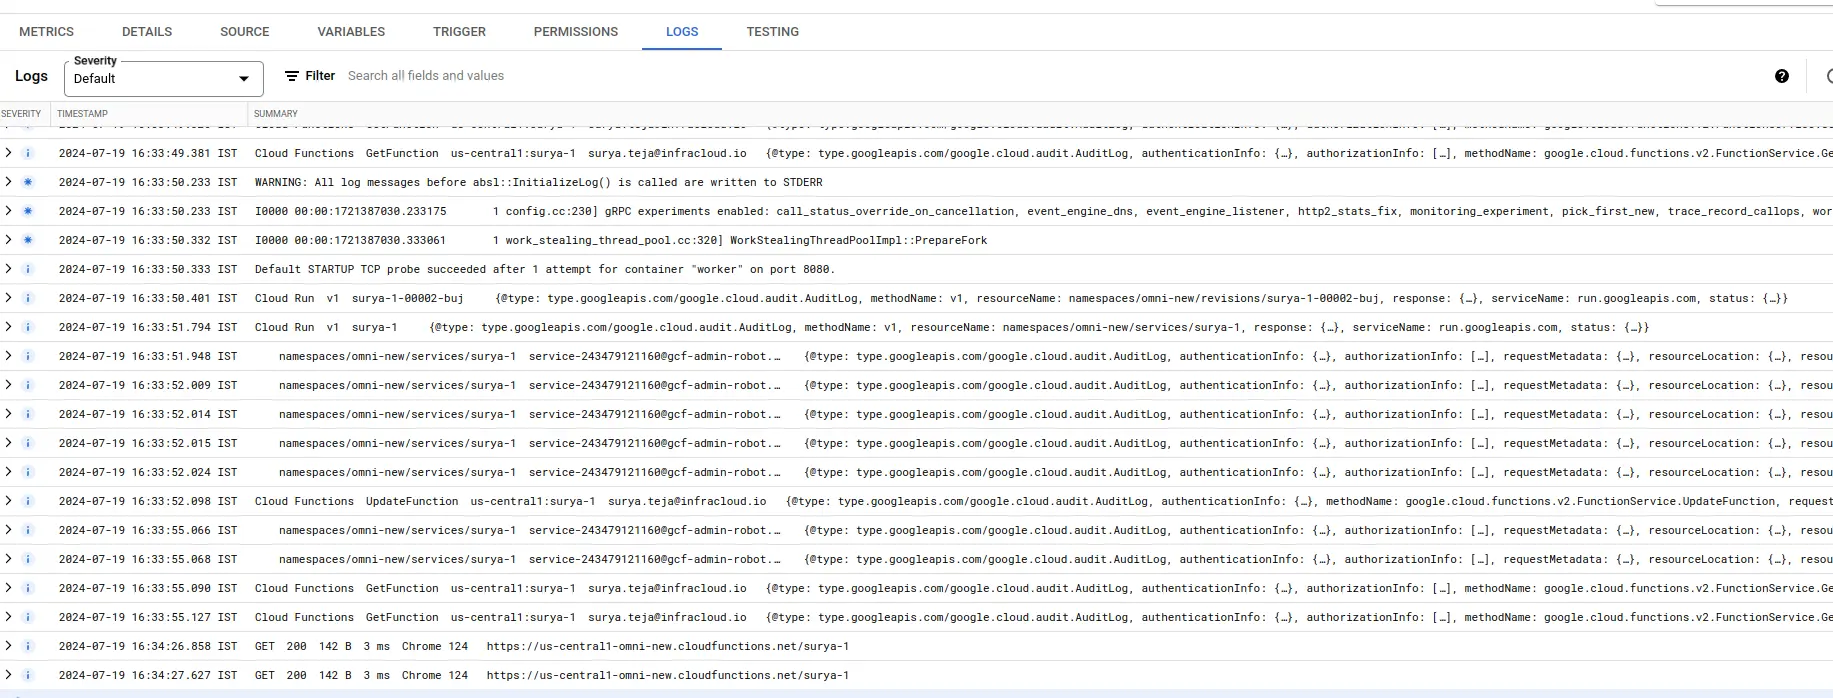
Viewing Cloud Function Logs to verify successful execution of cloud function.
Visualize the custom metrics in SigNoz Cloud
- Log in to your SigNoz cloud account.
- Navigate to the Dashboards, and add a dashboard
- Add a Timeseries Panel
- In Metrics, select random_count and _AVG By _selecting tag location
- In Filter say name = mention service name (EX. K_SERVICE)
- Hit “Save Changes” You now have the random count of your Cloud Function in a Dashboard for reporting and alerting
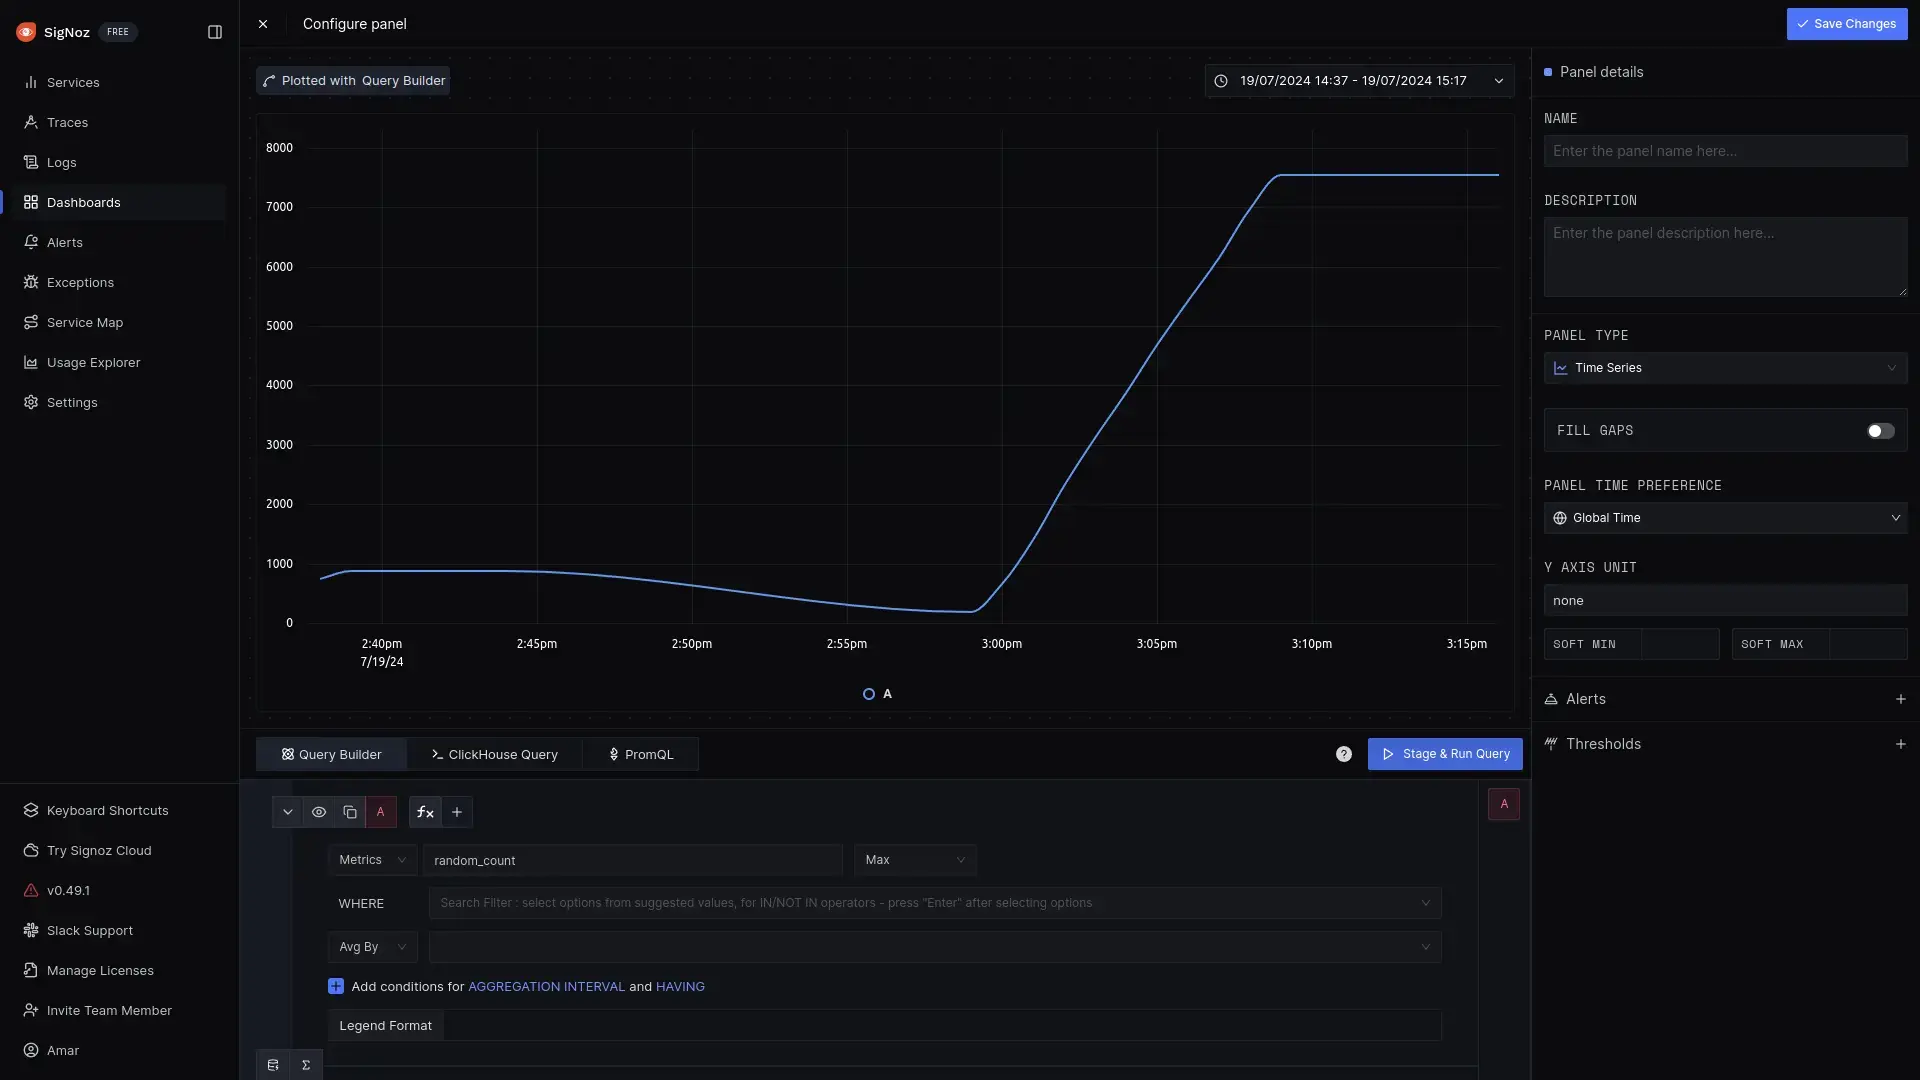
Creating new panel in dashboard
That's it! You have successfully set up monitoring for your Cloud Function's custom metrics with SigNoz Cloud.
Troubleshooting
If you encounter any issues while setting up monitoring for your Cloud Function's custom metrics with SigNoz, here are a few troubleshooting steps you can try:
- Verify that your Cloud Function instance is running and accessible.
- Ensure that you have the necessary permissions to access the custom metrics in your function.
- If you are using a SigNoz Cloud Account, check and mention the correct URL of the SigNoz Cloud account and the Ingestion(token) key.
By following this guide. You can easily send the custom metrics of your Google Cloud Funtion to SigNoz and gain valuable insights in case there is an issue.
Prerequisites
- Google Cloud account with administrative privilege or Cloud Functions Admin privilege.
- Access to a project in GCP
- Google Cloud Functions APIs enabled (follow this guide to see how to enable an API in Google Cloud)
Setup
Get started with Cloud Function Configuration
Follow these steps to create the Cloud Function:
Step 1: Go to your GCP console and search for Cloud Functions, go to Functions and click on CREATE FUNCTION.
Create Cloud Functions
Step 2: Fill in the following details to create a Cloud Function:
- Environment: 2nd gen
- Function name: Name for the Cloud Function
- Region: Takes the default region of the GCP account
- Trigger: Defines how to trigger the Cloud Function
- Trigger Type: HTTPS - this allows us to trigger the Cloud Function using a URL
- Authentication: Choose whether you need authenticated or unauthenticated invocations. We have chosen an unauthenticated invocation for this demonstration.
Configure Cloud Function
Step 3: Expand the Runtime, build, connections, and security settings section, and under Runtime environment variables:
Add the self-hosted SigNoz endpoint that would be http://<Self-Hosted-SigNoz-Host-IP>:4317.

Set Cloud Function Runtime Environment Variables
Step 4: Click on the NEXT button to bring you to the page where you can add your code.
Set entrypoint and source code
Add code to the Google Cloud Function
For this demonstration, we will be using Python 3.12.
Below is the comprehensive code of the main.py file, followed by a high-level overview of what the code is doing.
import os
from opentelemetry import metrics
from opentelemetry.exporter.otlp.proto.grpc.metric_exporter import OTLPMetricExporter
from opentelemetry.sdk.metrics import MeterProvider
from opentelemetry.sdk.metrics.export import PeriodicExportingMetricReader
from opentelemetry.sdk.resources import SERVICE_NAME, Resource
from random import randint
# Initialize the OpenTelemetry meter provider with OTLP exporter
exporter = OTLPMetricExporter()

# Set up the resource with service name
resource = Resource(attributes={
   SERVICE_NAME: os.environ.get("K_SERVICE")
})

# Set up the meter provider and reader
metric_reader = PeriodicExportingMetricReader(exporter, export_interval_millis=5000)
provider = MeterProvider(resource=resource, metric_readers=[metric_reader])
metrics.set_meter_provider(provider)

# Create a meter
meter = metrics.get_meter(__name__)

# Create a counter metric
request_counter = meter.create_counter(
   name="requests",
   description="Number of requests",
   unit="1"
)

random_counter = meter.create_up_down_counter(
   name="random_count",
   description="some random number between 50 and 100",
   unit="1"

)

def send_metrics(request):
   """
   Google Cloud Function to send metrics to SigNoz.
   """
   # Simulate a metric update (e.g., increment the counter)
   request_counter.add(1, {"environment": "production"})
   random_counter.add(randint(50,100))
   return "Metrics sent!", 200

# Ensure the exporter flushes before the function terminates
def finalize():
   metric_reader.shutdown()
   exporter.shutdown()

   print("shutdown!")

import atexit
atexit.register(finalize)
Below is a high-level overview of the above code snippet:
- Service Name: Configures the OpenTelemetry resource with the service name from the environment variable K_SERVICE.
- Metric Exporting: Sends metrics to SigNoz using OTLP with a 5-second export interval.
- Counter Metrics: Tracks the number of requests with a counter and generates random numbers between 50 and 100 with an up-down counter.
- Metric Updates: Simulates metric updates each time the send_metrics function is called.
- Graceful Shutdown: Cleans up and flushes metrics data before application exits to ensure all data is sent.
To install the required packages, add a requirements.txt file to the source with the following content:
functions-framework==3.*
opentelemetry-sdk
opentelemetry-exporter-otlp-proto-grpc
The requirements.txt file should contain all the packages that your Cloud Function depends upon. Google Cloud Funtion uses this file to create an environment with all the required packages.
Once you’ve finished writing your code, locate the DEPLOY button. After clicking the DEPLOY button, Google Cloud Function initiates deployment, starts provisioning the function according to the specified configuration, initializes the environment, handles dependencies, and makes the function ready to handle incoming requests.
Testing your cloud function
Step 1: After completing the deployment, navigate to the TRIGGER section to obtain the URL to invoke the function.
Deploying Cloud Function
Step 2: Hit the URL that you have obtained, you will see the function output.
Trigger Cloud function.
Step 3: Click on the logs section in your Cloud Function to view the logs, indicating that the custom metrics have been sent to Self-Hosted SigNoz successfully.
Viewing Cloud Function Logs to verify successful execution of cloud function.
Visualize the custom metrics in SigNoz Cloud
- Log in to your Self-Hosted SigNoz account.
- Navigate to the Dashboards, and add a dashboard
- Add a Timeseries Panel
- In Metrics, select random_count and Avg By selecting tag location
- In Filter say name = mention service name (EX. K_SERVICE)
- Hit “Save Changes” You now have the random_count of your Cloud Function in a Dashboard for reporting and alerting
Creating new panel in dashboard
That's it! You have successfully set up monitoring for your Cloud Function's custom metrics with Self-Hosted SigNoz.
Troubleshooting
If you encounter any issues while setting up monitoring for your Cloud Function's custom metrics with Self-Hosted SigNoz, here are a few troubleshooting steps you can try:
- Verify that your Cloud Function instance is running and accessible.
- Ensure that you have the necessary permissions to access the custom metrics in your function.
- Check and mention the correct
OTEL_EXPORTER_OTLP_ENDPOINTof the Self-Hosted SigNoz, OTEL configuration, and routing.
By following this guide, you can easily send the custom metrics of your Google Cloud Functions to Self-Hosted SigNoz and gain valuable insights in case there is an issue.
