Overview
This documentation provides a detailed walkthrough on how to set up a Google Cloud Function to send the logs directly to SigNoz.
Prerequisites
- Google Cloud account with administrative privilege or Cloud Functions Admin privilege.
- Access to a project in GCP
- Google Cloud Functions APIs enabled (follow this guide to see how to enable an API in Google Cloud)
Get started with Cloud Function Configuration
Follow these steps to create the Cloud Function:
Step 1: Go to your GCP console and search for Cloud Functions, go to Functions and click on CREATE FUNCTION.
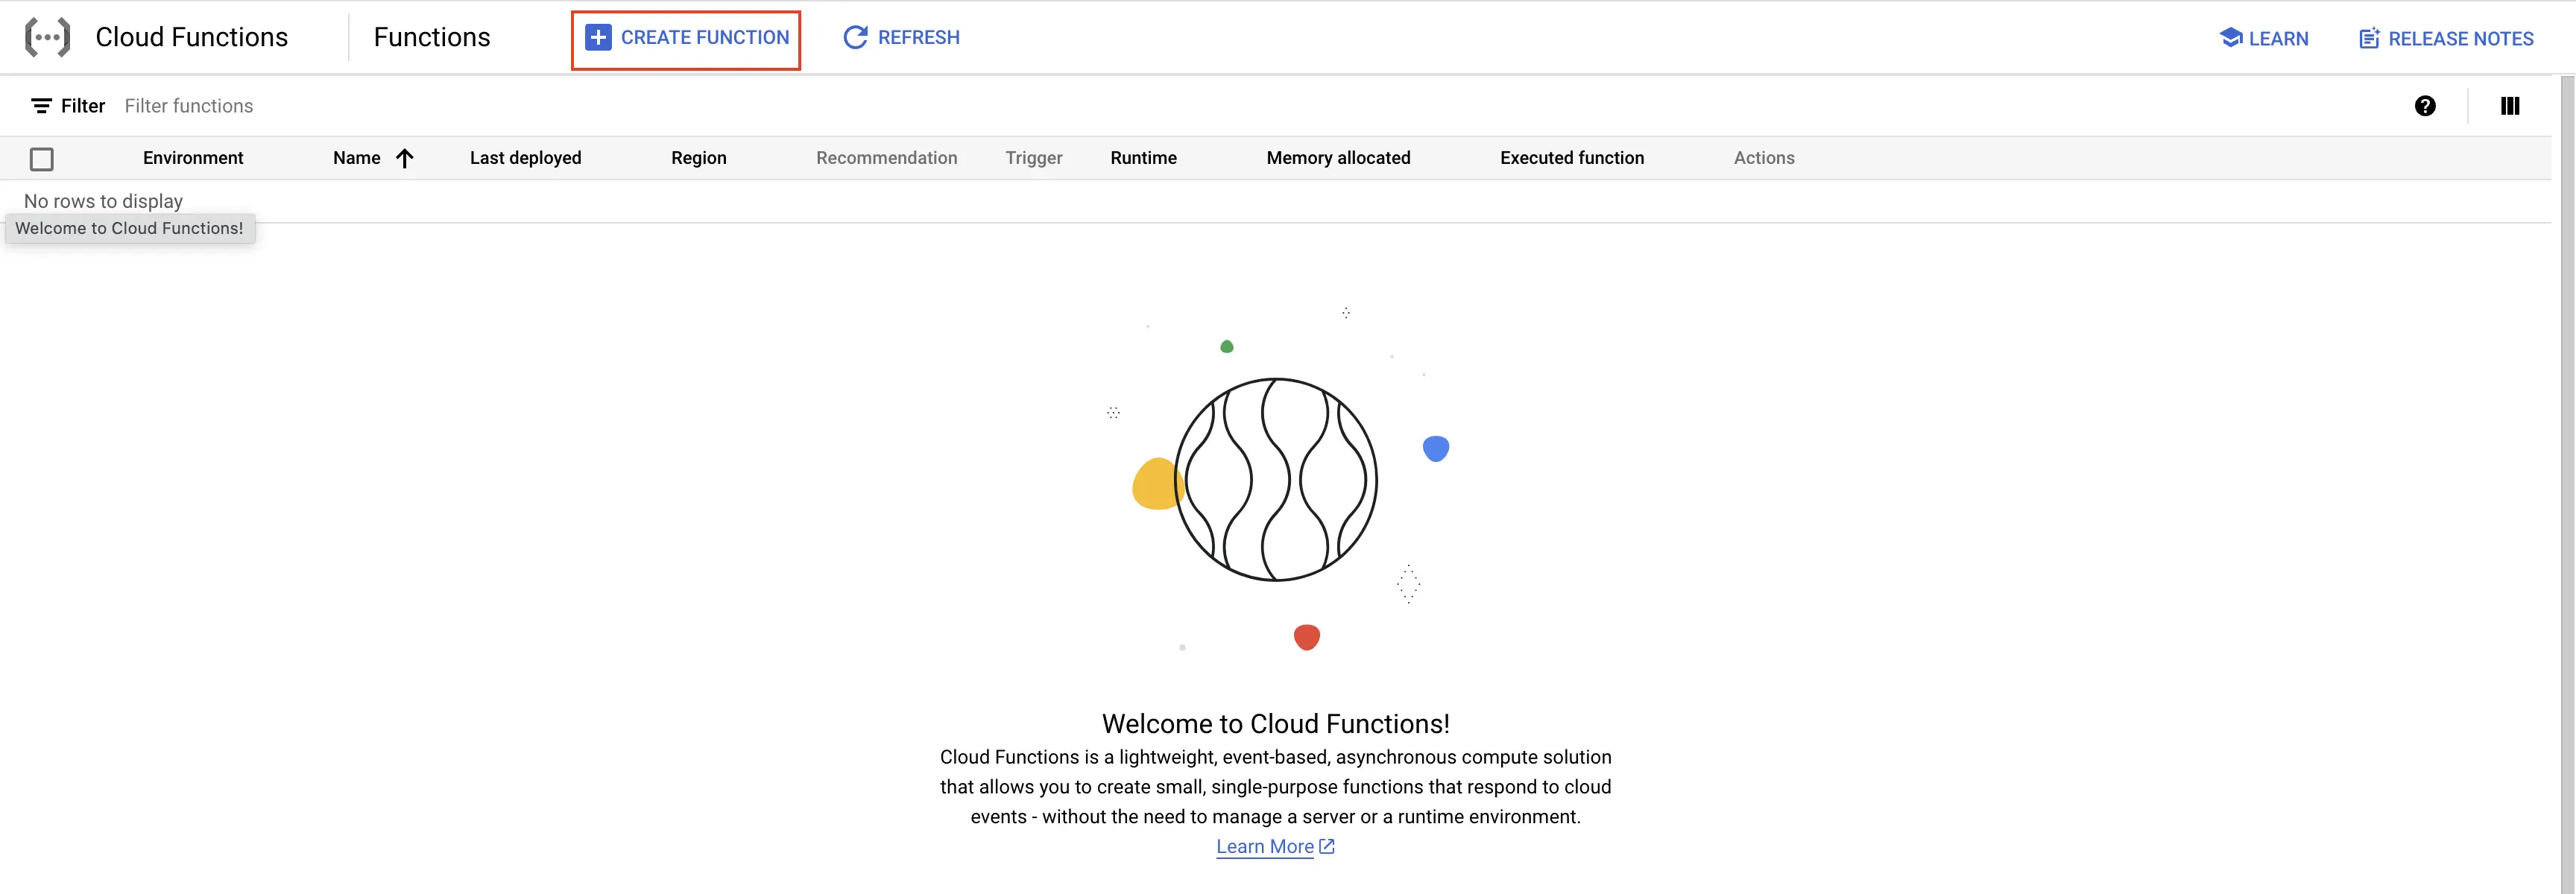
GCP Cloud Functions
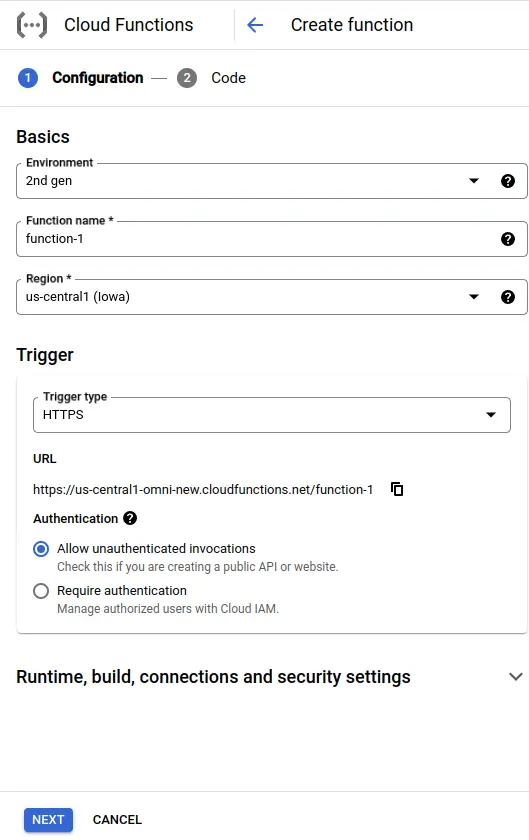
Step 2: Fill in the following details to create a Cloud Function:
- Environment: 2nd gen
- Function name: Name for the Cloud Function
- Region: Takes the default region of the GCP account
- Trigger: Defines how to trigger the Cloud Function
- Trigger Type: HTTPS - this allows us to trigger the Cloud Function using a URL
- Authentication: Choose whether you need authenticated or unauthenticated invocations. We have chosen unauthenticated invocation for this demonstration.
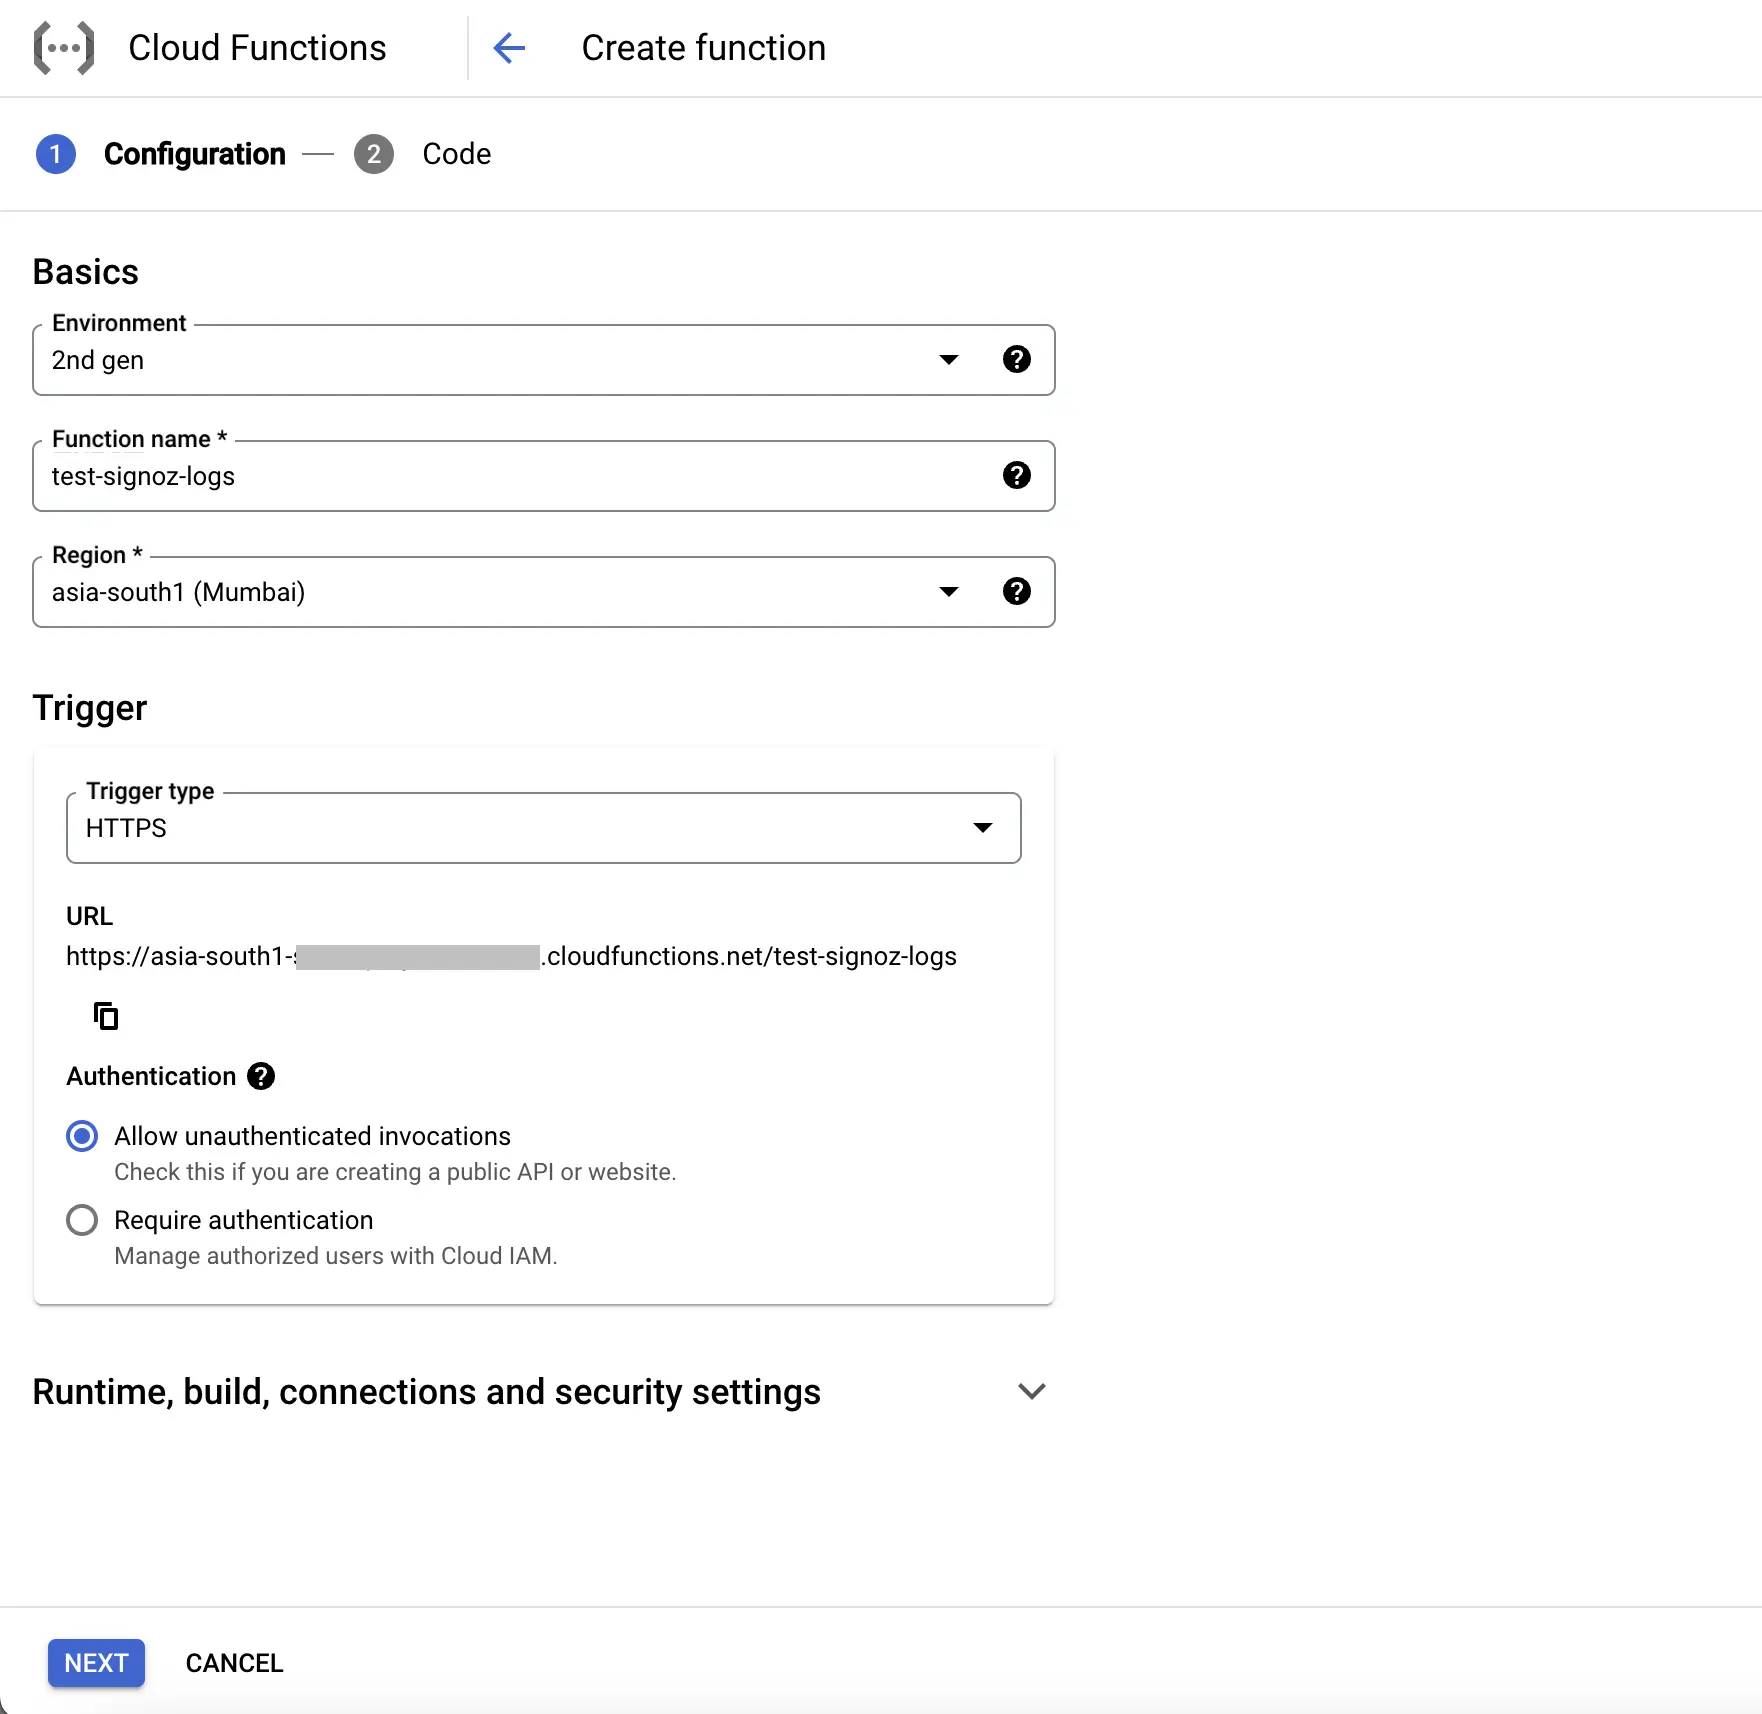
Create Cloud Function
Step 3: Click on the NEXT button, which will bring us to the page where we can add our code.
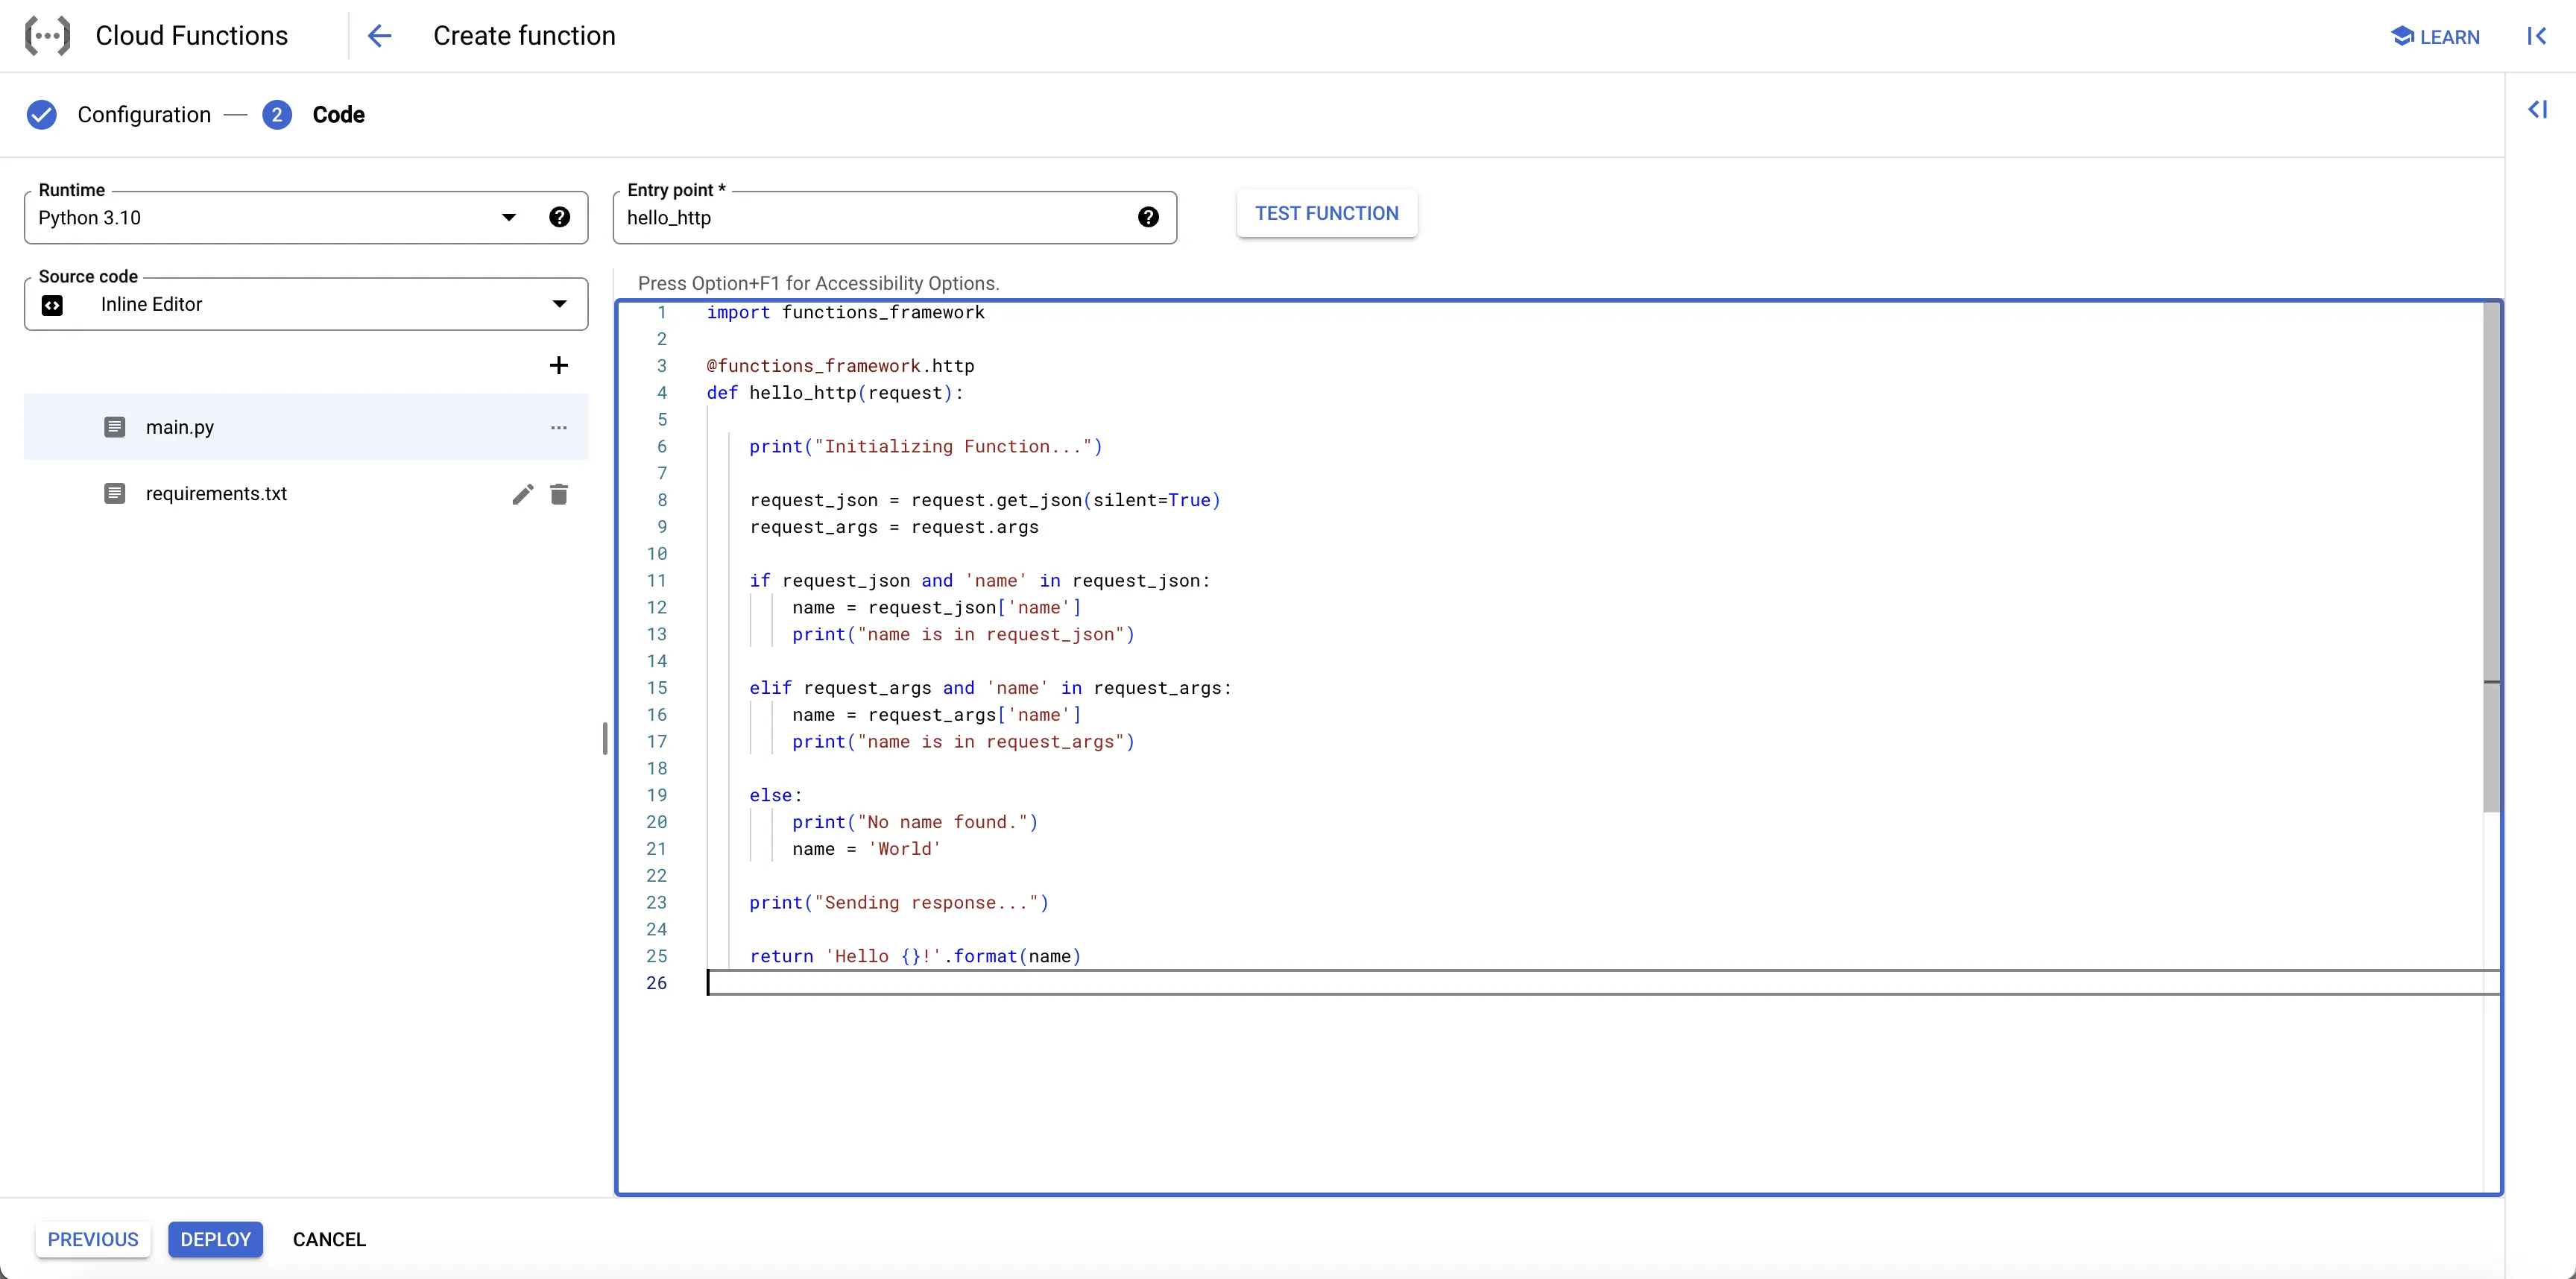
Select Runtime as Python 3.10.
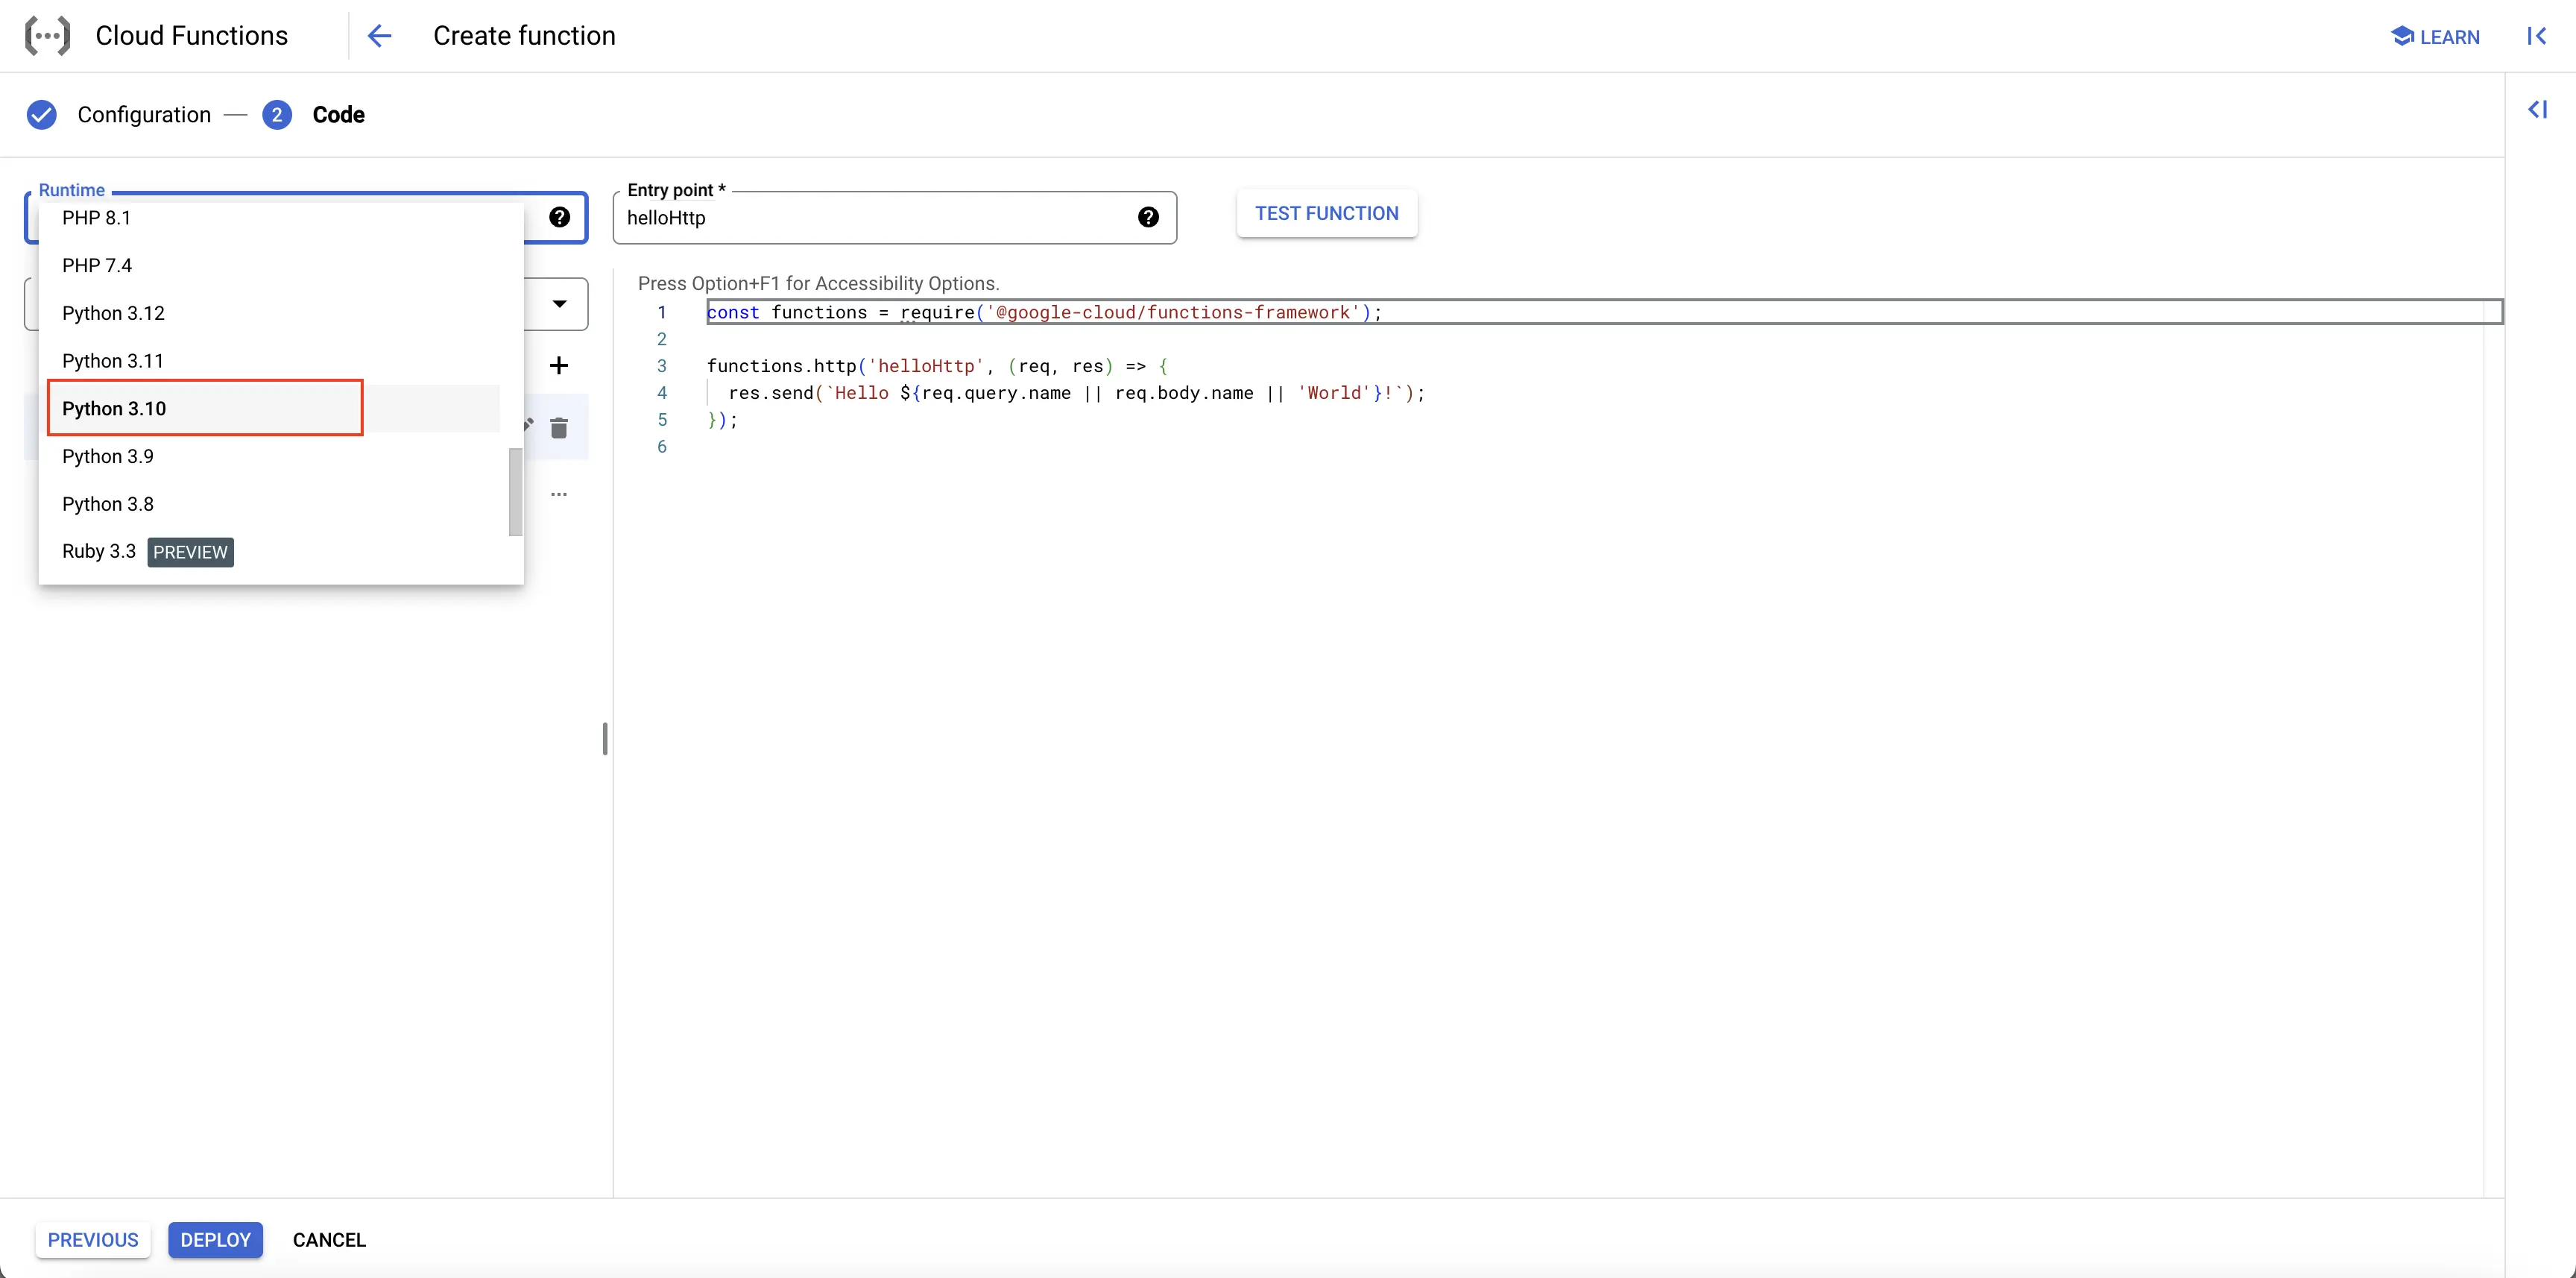
Set entrypoint and source code
Add code to the Google Cloud Function
Below is the comprehensive code of the main.py file, followed by a high level overview of what the code is doing.
import functions_framework

@functions_framework.http
def hello_http(request):

    print("Initializing Function...")

    request_json = request.get_json(silent=True)
    request_args = request.args

    if request_json and 'name' in request_json:
        name = request_json['name']
        print("name is in request_json")

    elif request_args and 'name' in request_args:
        name = request_args['name']
        print("name is in request_args")

    else:
        print("No name found.")
        name = 'World'

    print("Sending response...")

    return 'Hello {}!'.format(name)
Below is a high-level overview of the above code snippet:
- hello_http(request): Handles incoming HTTP requests, extracts 'name' from the request, and logs various stages of execution.
- @funtions_framework.http: Decorator that defines
hello_httpas an HTTP handler for Google Cloud Functions. - The code print out different messages for log entries and returns a greeting message.
There are no changes to requirements.txt file.
Once you’ve finished writing your code, locate the DEPLOY button. After clicking the DEPLOY button, Google Cloud Function initiates deployment, starts provisioning the function according to the specified configuration, initializes the environment, handles dependencies, and makes the function ready to handle incoming requests.
Complete Cloud Function Code
Test your Cloud Function
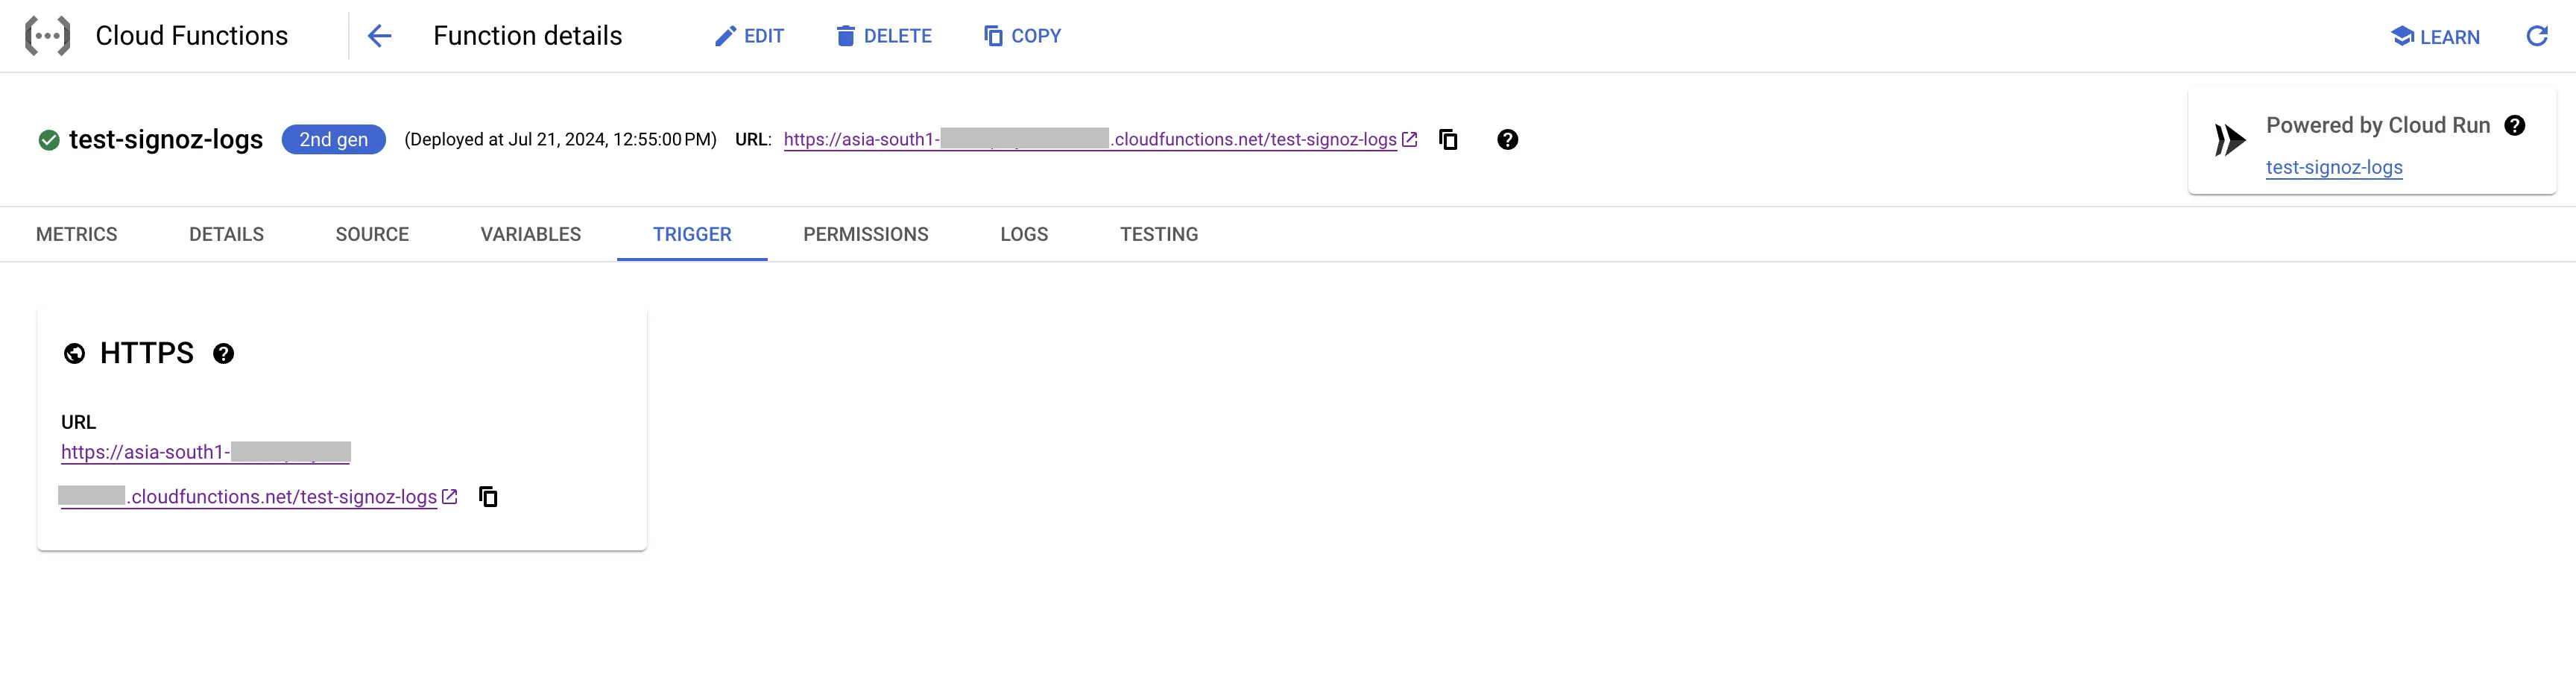
Step 1: After completing the deployment, navigate to the TRIGGER section to obtain the URL to invoke the function.
Navigate to Trigger
Step 2: Hit the URL that you have obtained, you will see the function output.
Cloud Function URL
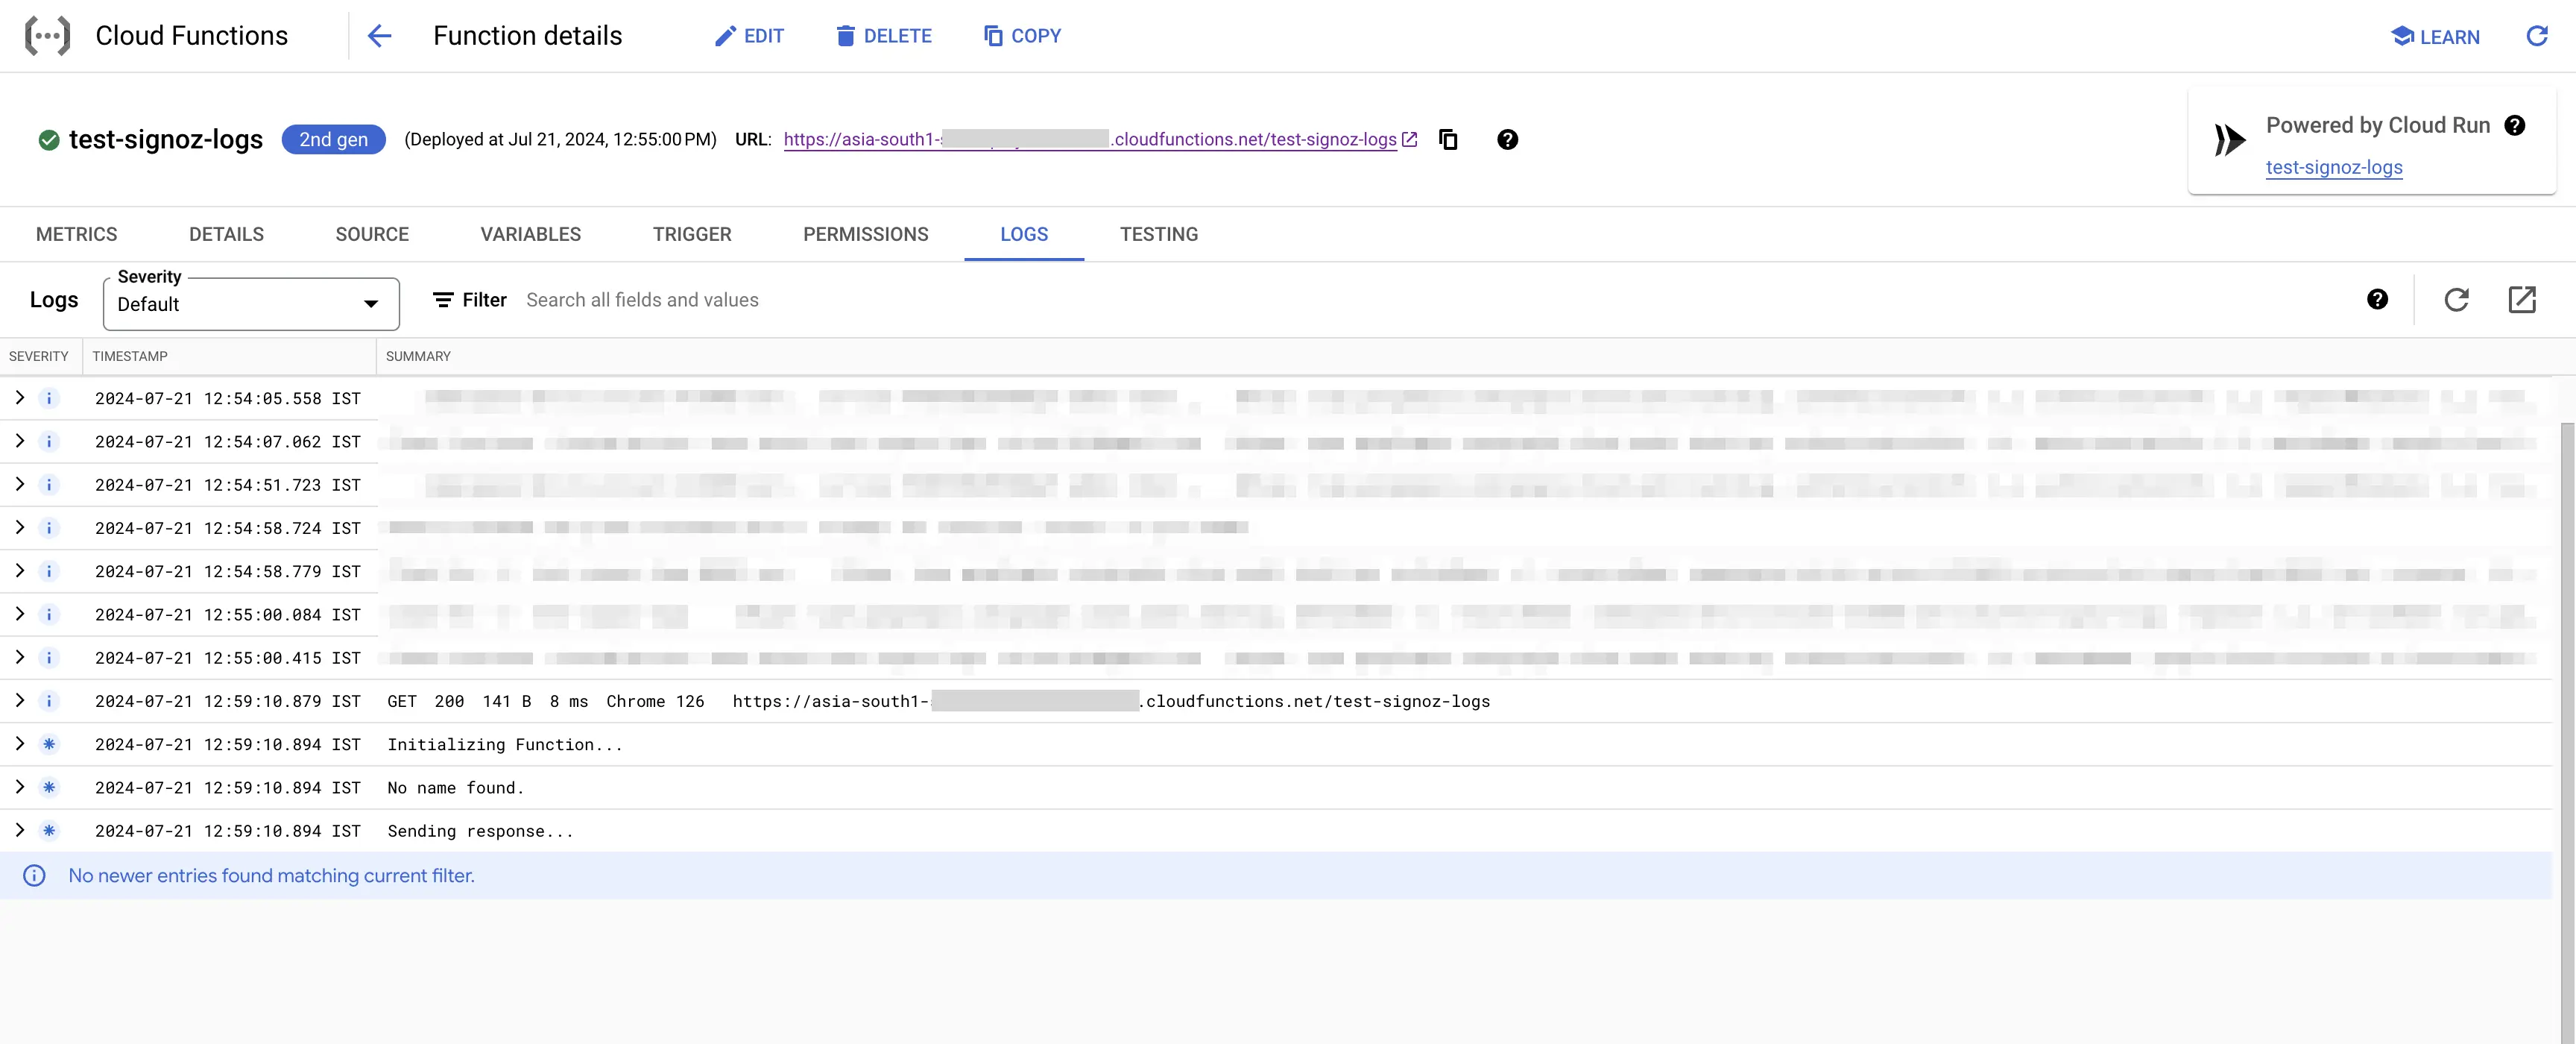
Step 3: Click on the LOGS section in your Cloud Function to view the logs, which will indicate that the log has been sent to SigNoz successfully.
Viewing Cloud Function Logs
Create Pub/Sub topic
Follow the steps mentioned in the Creating Pub/Sub Topic document to create the Pub/Sub topic.
Setup Log Router to Pub/Sub Topic
Follow the steps mentioned in the Log Router Setup document to create the Log Router.
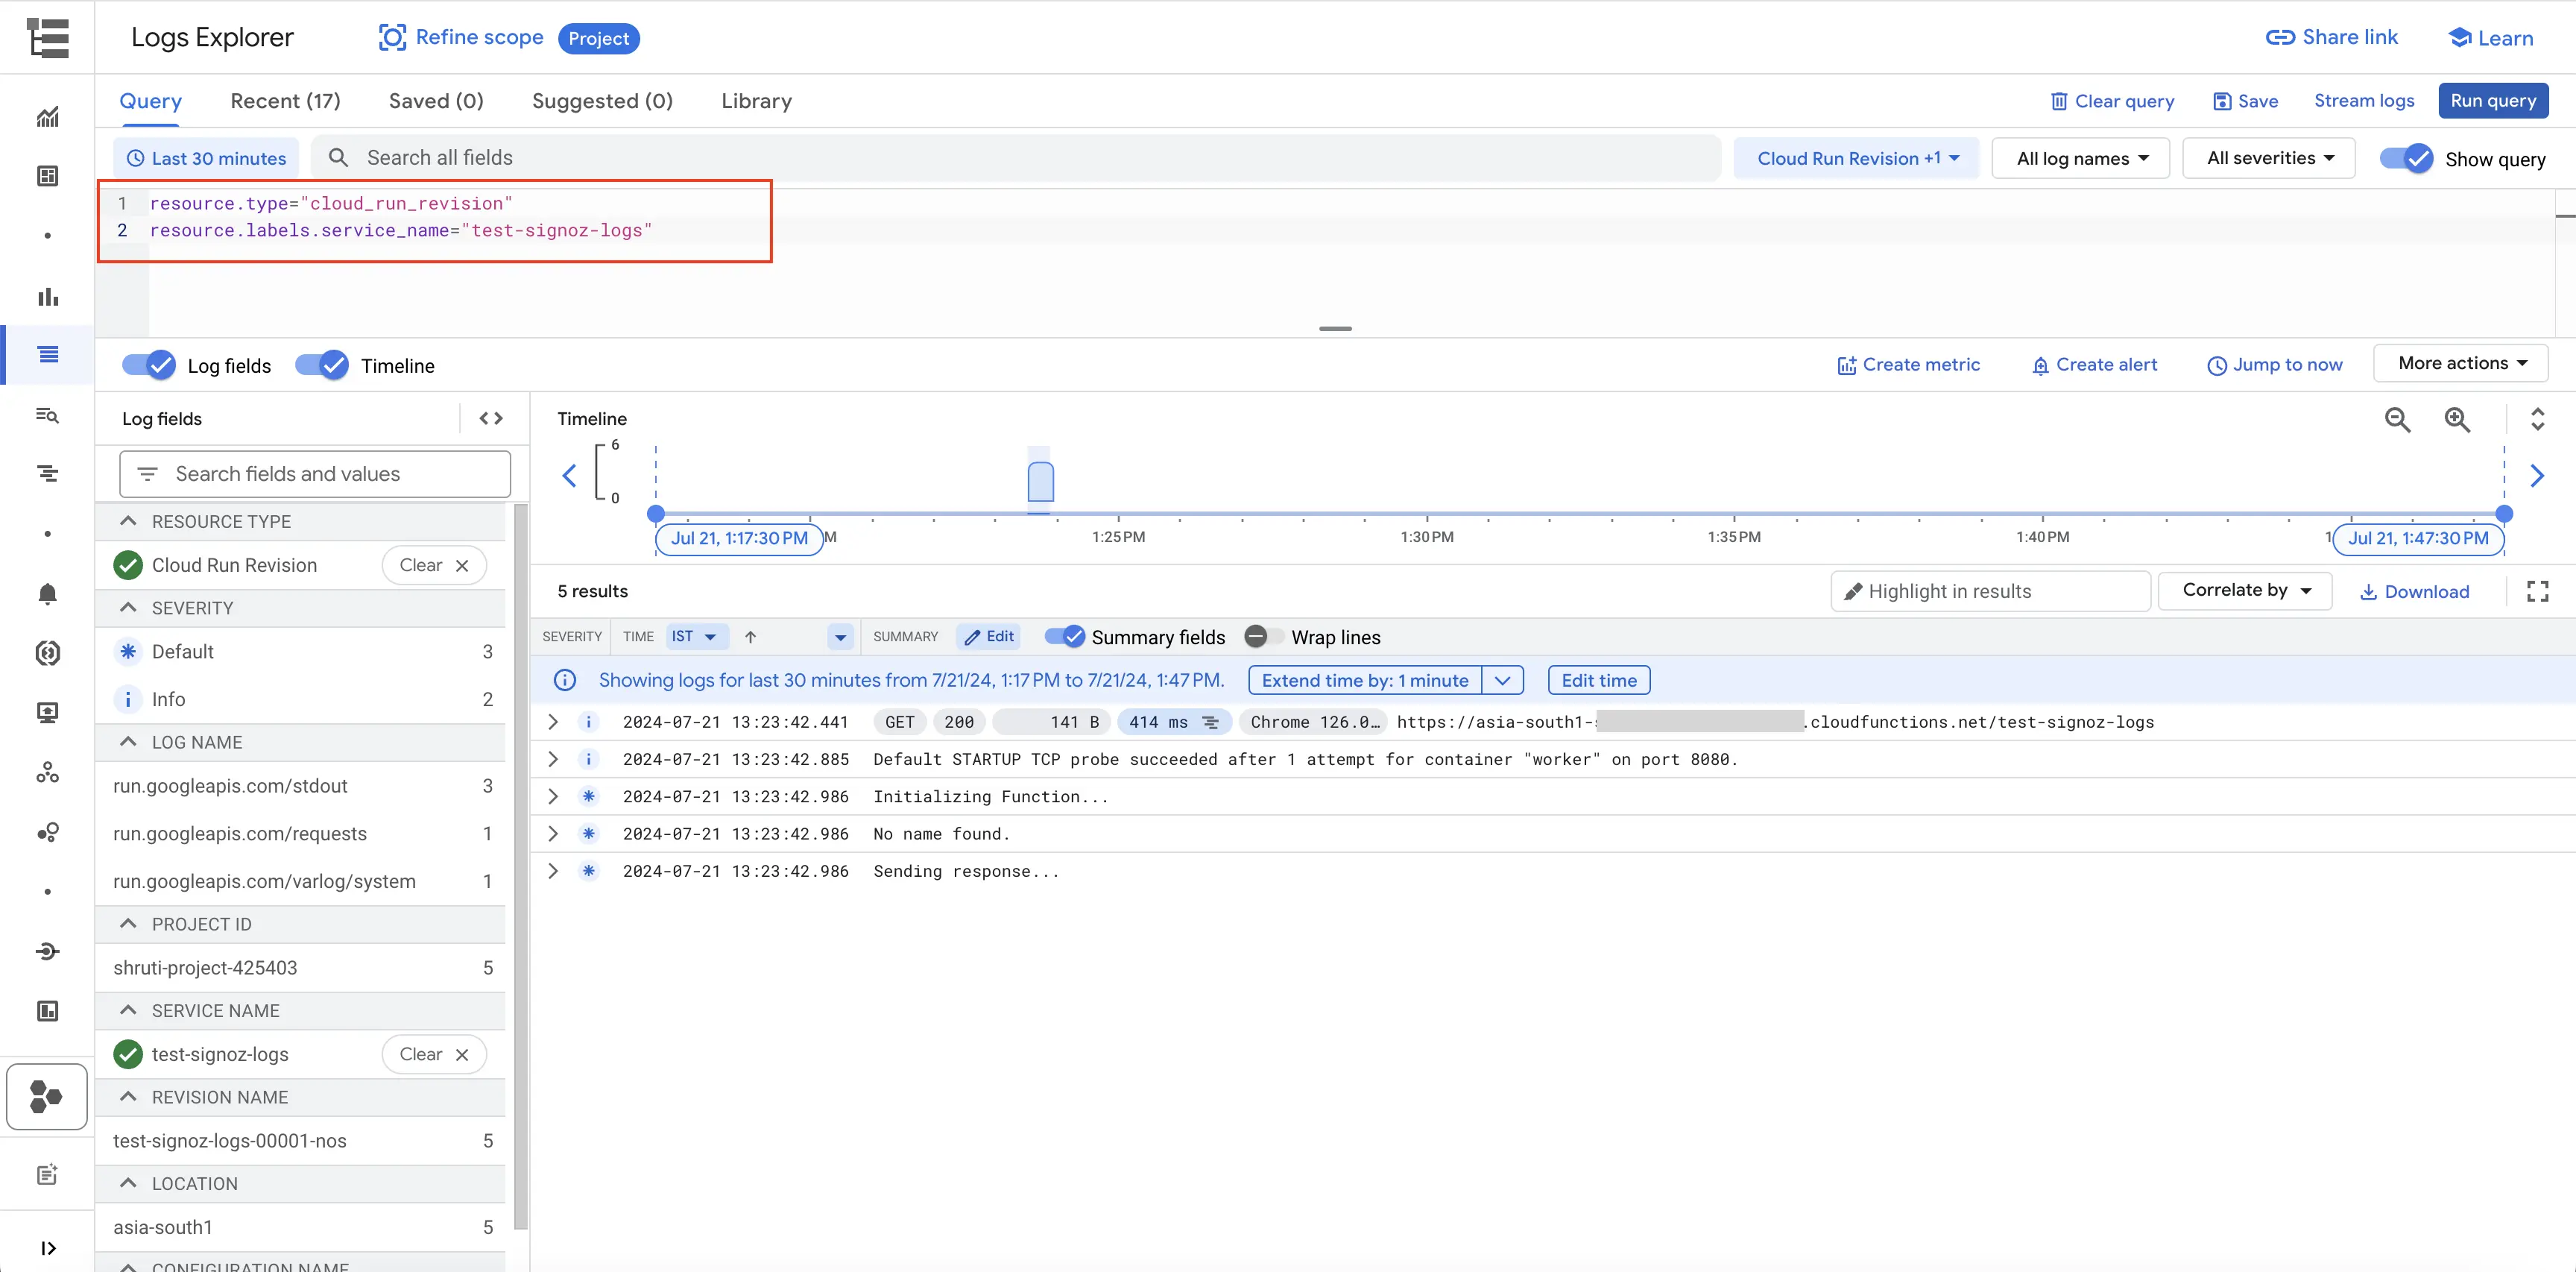
To ensure you filter out only the Cloud Function logs, use the following filter conditions:
resource.type="cloud_run_revision"
In case you want the logs only from a particular Cloud Function, you can add the following filter conditions in the Query text box:
resource.type="cloud_run_revision"
resource.labels.service_name="<function-name>"
Filter Cloud Functions Logs
Setup OTel Collector
Follow the steps mentioned in the Creating Compute Engine document to create the Compute Engine instance.
Install OTel Collector as agent
Firstly, we will establish the authentication using the following commands:
- Initialize
gcloud:
gcloud init
- Authenticate into GCP:
gcloud auth application-default login
Let us now proceed to the OTel Collector installation:
Step 1: Download otel-collector tar.gz for your architecture
wget https://github.com/open-telemetry/opentelemetry-collector-releases/releases/download/v0.135.0/otelcol-contrib_0.135.0_linux_amd64.tar.gz
Step 2: Extract otel-collector tar.gz to the otelcol-contrib folder
mkdir otelcol-contrib && tar xvzf otelcol-contrib_0.135.0_linux_amd64.tar.gz -C otelcol-contrib
Step 3: Create config.yaml in the folder otelcol-contrib with the below content in it. Replace <region> with the appropriate SigNoz Cloud region. Replace SIGNOZ_INGESTION_KEY with what is provided by SigNoz:
Note: The googlecloudpubsub receiver’s encoding was updated from the deprecated raw_text to text_encoding. This configuration has been tested and works with otelcol-contrib v0.135.0.
extensions:
  text_encoding:
    encoding: utf-8
receivers:
  otlp:
    protocols:
      grpc:
        endpoint: 0.0.0.0:4317
      http:
        endpoint: 0.0.0.0:4318
  googlecloudpubsub:
    project: <gcp-project-id>
    subscription: projects/<gcp-project-id>/subscriptions/<pubsub-topic's-subscription>
    encoding: text_encoding
processors:
  batch: {}
  resource/env:
    attributes:
    - key: deployment.environment
      value: prod
      action: upsert
exporters:
  otlp:
    endpoint: "ingest.<region>.signoz.cloud:443"
    tls:
      insecure: false
    headers:
      "signoz-ingestion-key": "<SigNoz-Key>"
service:
  extensions: [text_encoding]
  pipelines:
    traces:
      receivers: [otlp]
      processors: [batch]
      exporters: [otlp]
    metrics:
      receivers: [otlp]
      processors: [batch]
      exporters: [otlp]
    logs:
      receivers: [otlp, googlecloudpubsub]
      processors: [batch, resource/env]
      exporters: [otlp]
Step 4: Once we are done with the above configurations, we can now run the collector service with the following command:
From the otelcol-contrib, run the following command:
./otelcol-contrib --config ./config.yaml
Run in background
If you want to run OTel Collector process in the background:
./otelcol-contrib --config ./config.yaml &> otelcol-output.log & echo "$!" > otel-pid
The above command sends the output of the otel-collector to otelcol-output.log file and prints the process id of the background running OTel Collector process to the otel-pid file.
If you want to see the output of the logs you’ve just set up for the background process, you may look it up with:
tail -f -n 50 otelcol-output.log
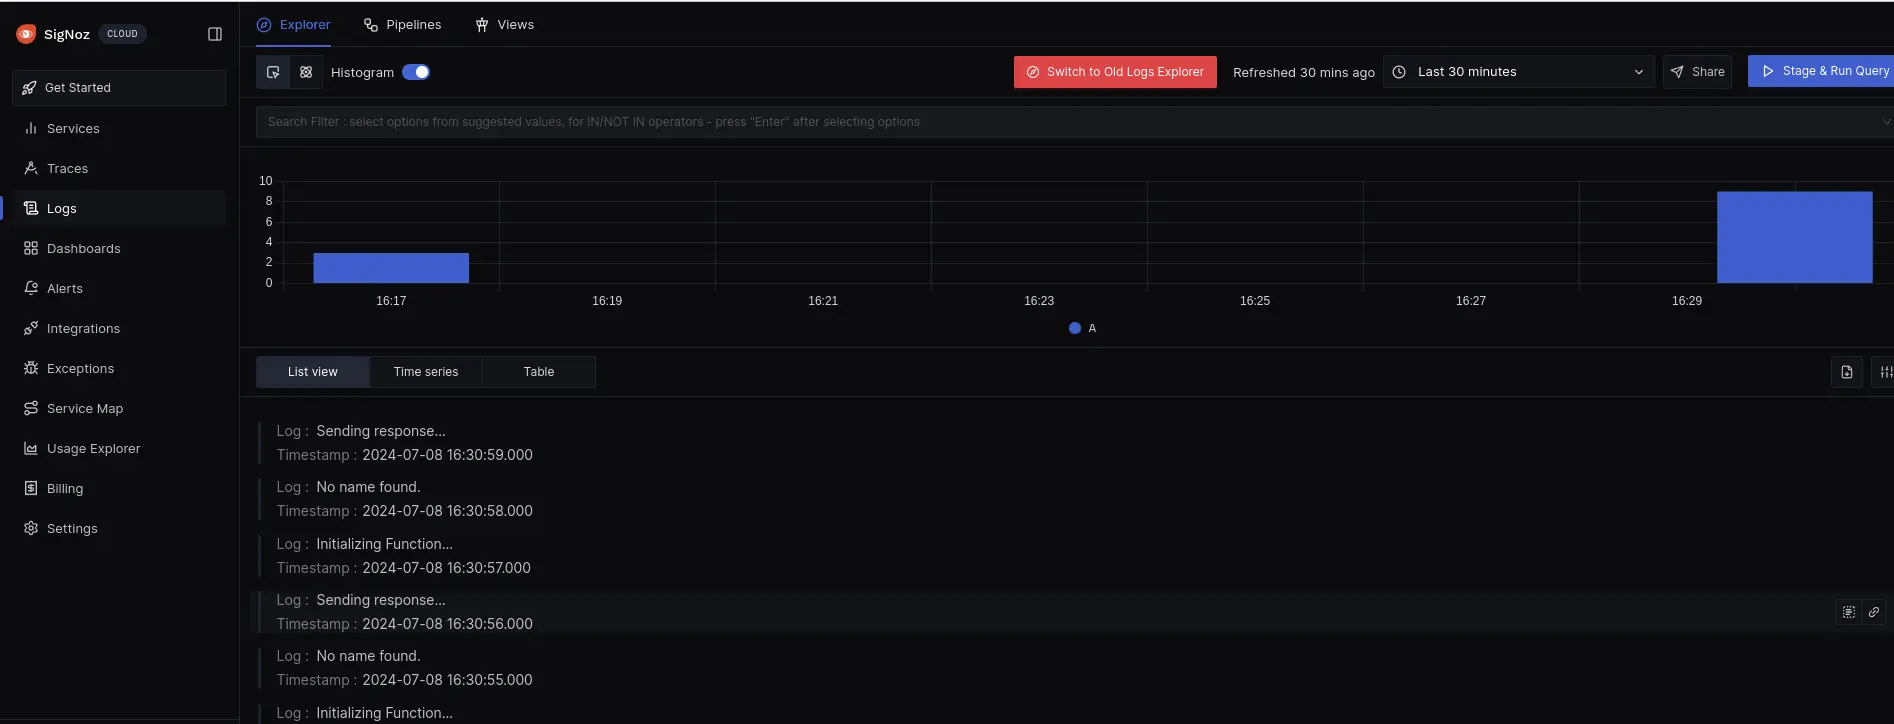
You can now trigger the Cloud Function a few times, and see the logs from the GCP Cloud Functions on SigNoz.

Functions Logs in SigNoz Cloud
Prerequisites
- Google Cloud account with administrative privilege or Cloud Functions Admin privilege.
- Access to a project in GCP
- Google Cloud Functions APIs enabled (follow this guide to see how to enable an API in Google Cloud)
Setup
Get started with Cloud Function Configuration
Follow these steps to create the Cloud Function:
Step 1: Go to your GCP console and search for Cloud Functions, go to Functions and click on CREATE FUNCTION.

GCP Cloud Functions
Step 2: Fill in the following details to create a Cloud Function:
- Environment: 2nd gen
- Function name: Name for the Cloud Function
- Region: Takes the default region of the GCP account
- Trigger: Defines how to trigger the Cloud Function
- Trigger Type: HTTPS - this allows us to trigger the Cloud Function using a URL
- Authentication: Choose whether you need authenticated or unauthenticated invocations. We have chosen unauthenticated invocation for this demonstration.

Create Cloud Function
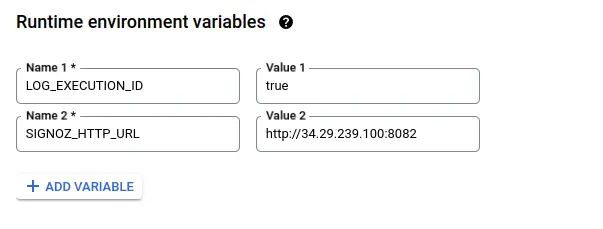
Step 3: Expand the Runtime, build, connections, and security settings section, and under Runtime environment variables:
Add SIGNOZ_INGESTION_KEY and SIGNOZ_HTTP_URL with Ingestion Key and Ingestion URL (as https://ingest.<region>.signoz.cloud/logs/json) respectively. You can get Ingestion Key and Ingestion URL.

Set Cloud Function Runtime Environment Variables
Step 4: Click on the NEXT button, which will bring us to the page where we can add our code.

Set entrypoint and source code
Add code to the Google Cloud Function
For this demonstration, we will be using Python 3.10.
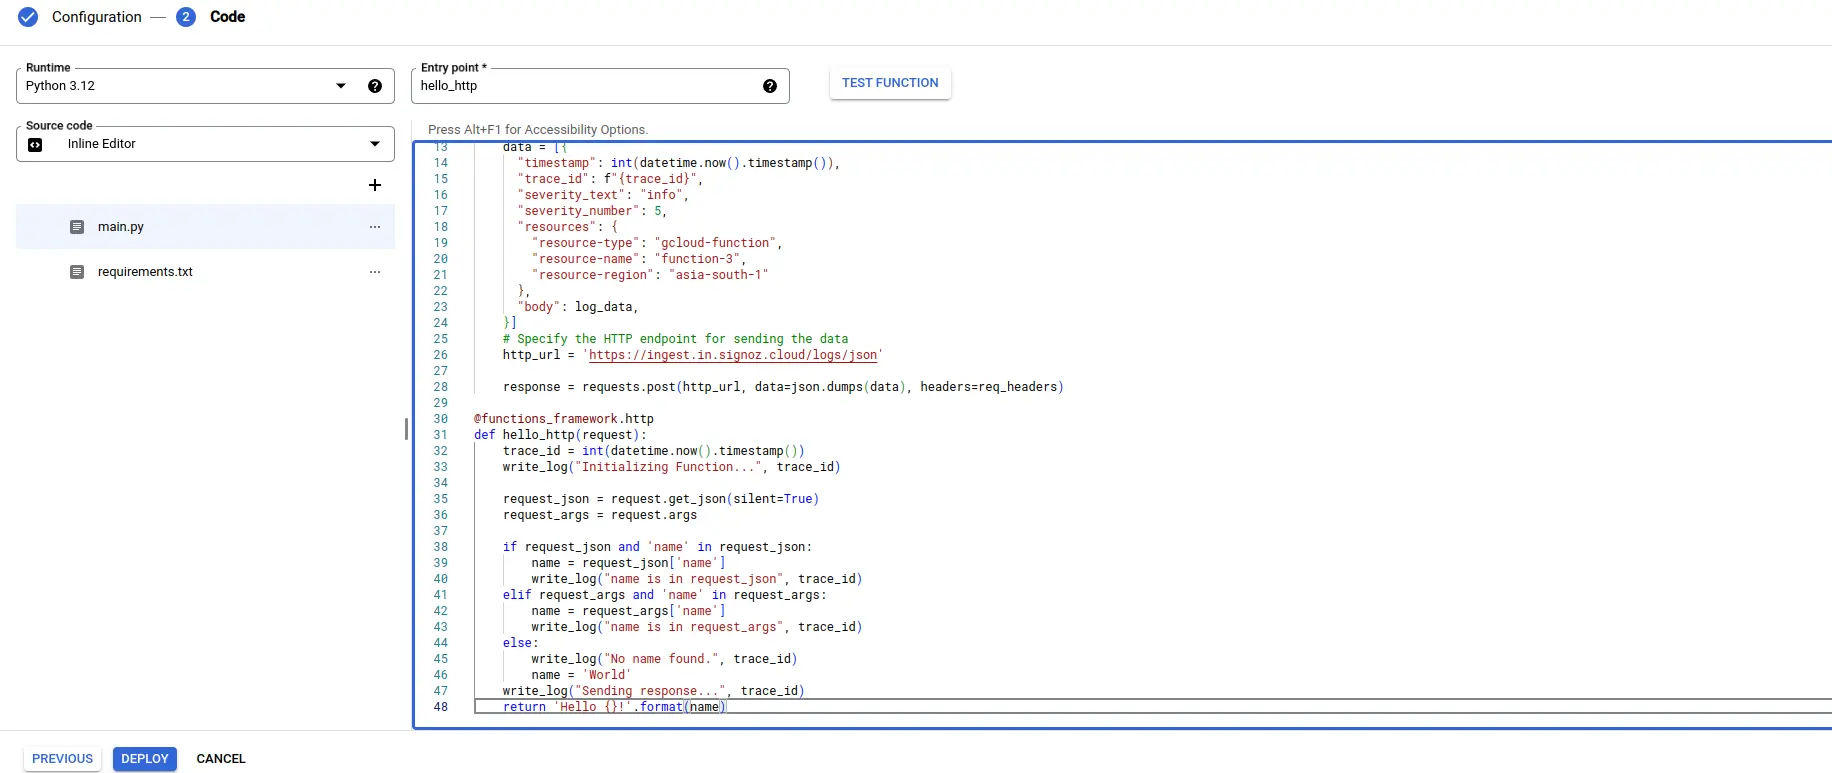
Below is the comprehensive code of the main.py file, followed by a high level overview of what the code is doing.
import functions_framework
from os import environ
import requests
import json
from datetime import datetime
import random
from time import sleep

def write_log(log_data, trace_id):

    sleep(1)

    print("Sending the log to SigNoz...")
    print(f"log_data: {log_data}")

    req_headers = {

         'signoz-ingestion-key': environ.get('SIGNOZ_INGESTION_KEY'),
         'Content-Type': 'application/json'

    }

    data = [{

      "timestamp": int(datetime.now().timestamp()),
      "trace_id": f"{trace_id}",
      "severity_text": "info",
      "severity_number": 5,
      "resources": {

        "resource-type": "gcloud-function",
        "resource-name": "function-3",
        "resource-region": "asia-south-1"

      },

      "body": log_data,

    }]

    # Specify the HTTP endpoint for sending the data

    http_url = environ.get('SIGNOZ_HTTP_URL')
    response = requests.post(http_url, data=json.dumps(data), headers=req_headers)

    if not response.status_code == 200:

        print("Failed to send the log to SigNoz.")
        print(response.text)

    else:
        print("Sent the log to SigNoz successfully.")

@functions_framework.http

def hello_http(request):

    epoch_string = f"{int(datetime.now().timestamp())}"

    if len(epoch_string)%2 == 0:
        random_hex_string = ''.join(random.choices('0123456789abcdef', k=8))

    else:
        random_hex_string = ''.join(random.choices('0123456789abcdef', k=7))

    trace_id = f"{epoch_string}{random_hex_string}"

    write_log("Initializing Function...", trace_id)


    request_json = request.get_json(silent=True)
    request_args = request.args

    if request_json and 'name' in request_json:
        name = request_json['name']
        write_log("name is in request_json", trace_id)

    elif request_args and 'name' in request_args:
        name = request_args['name']
        write_log("name is in request_args", trace_id)

    else:
        write_log("No name found.", trace_id)
        name = 'World'

    write_log("Sending response...", trace_id)

    return 'Hello {}!'.format(name)
Below is a high-level overview of the above code snippet:
- hello_http(request): Handles incoming HTTP requests, extracts 'name' from the request, and logs various stages of execution.
- @funtions_framework.http: Decorator that defines
hello_httpas an HTTP handler for Google Cloud Functions. - write_log(log_data, trace_id): Sends log data to SigNoz using an HTTP POST request with appropriate headers and log structure.
- The code creates an even length string consisting of the current timestamp followed by a hex string at the beginning and uses it as a unique
trace_idfor log entries and returns a greeting message.
To install the required packages, add a requirements.txt file to the source with the following content:
functions-framework==3.*
requests
The requirements.txt file should contain all the external Python libraries and packages that your Cloud Function depends upon. This file is used by Google Cloud Function to create an environment with all the required packages.
Once you’ve finished writing your code, locate the DEPLOY button. After clicking the DEPLOY button, Google Cloud Function initiates deployment, starts provisioning the function according to the specified configuration, initializes the environment, handles dependencies, and makes the function ready to handle incoming requests.
Test your Cloud Function
Step 1: After completing the deployment, navigate to the TRIGGER section to obtain the URL to invoke the function.
Deploying Cloud Function
Step 2: Hit the URL that you have obtained, you will see the function output.

Cloud function URL.
Step 3: Click on the LOGS section in your Cloud Function to view the logs, which will indicate that the log has been sent to SigNoz successfully.
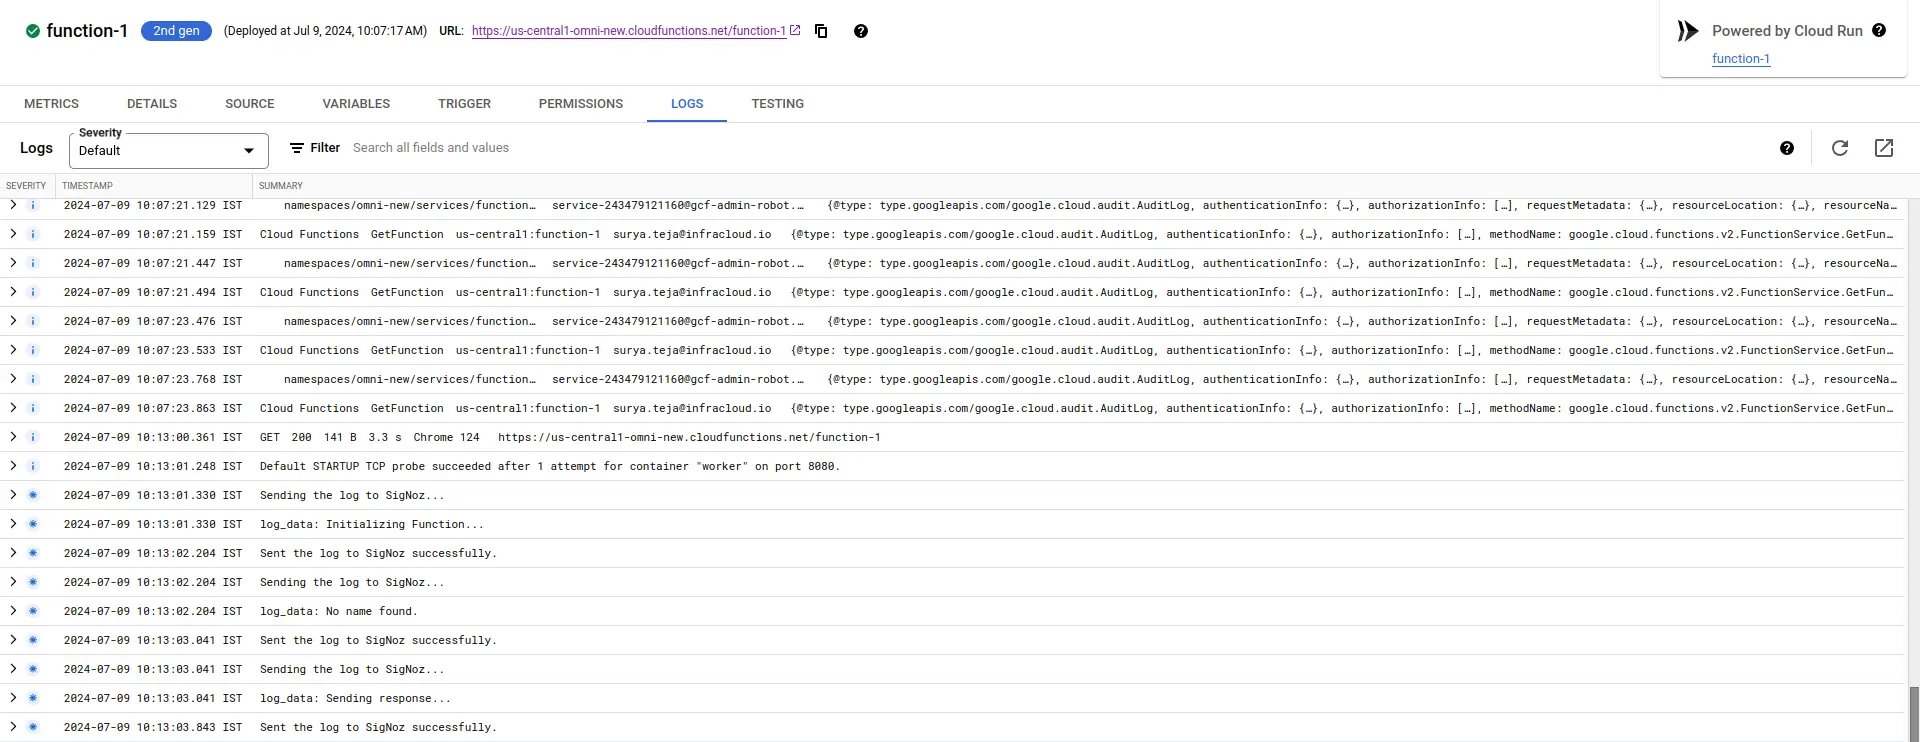
Viewing Cloud Function Logs
Visualize the logs in SigNoz Cloud
Go to your SigNoz UI, and navigate to the SigNoz dashboard. Click on the Logs section to view the logs.
Note: If you have multiple applications already sending logs to SigNoz, you can check by adding resource-type, resource-name, and resource-region filters in the Search filters field. Put the values that we used in the payload in the write_log function of our Cloud Function.

SigNoz Dashboard
That's it! You have successfully set up monitoring for your Cloud Function's logs with SigNoz Cloud.
Troubleshooting
If you encounter any issues while setting up monitoring for your Cloud Function's logs with SigNoz, here are a few troubleshooting steps you can try:
- Verify that your Cloud Function instance is running and accessible.
- Ensure that you have the necessary permissions to access the logs in your function.
- Check and mention the correct URL of the SigNoz Cloud account and the Ingestion(token) key.
By following this guide, you should be able to easily send the logs of your Google Cloud Function's system to SigNoz and gain valuable insights in case there is some issue.
Prerequisites
- Google Cloud account with administrative privilege or Cloud Functions Admin privilege.
- Access to a project in GCP
- Google Cloud Functions APIs enabled (follow this guide to see how to enable an API in Google Cloud)
For more details on how to configure Self-Hosted SigNoz for Logs, check official documentation by Self-Hosted SigNoz and navigate to the "Send Logs to Self-Hosted SigNoz" section
Get started with Cloud Function Configuration
Follow these steps to create the Cloud Function:
Step 1: Go to your GCP console and search for Cloud Functions, go to Functions and click on CREATE FUNCTION.
GCP Cloud Functions
Step 2: Fill in the following details to create a Cloud Function:
- Environment: 2nd gen
- Function name: Name for the Cloud Function
- Region: Takes the default region of the GCP account
- Trigger: Defines how to trigger the Cloud Function
- Trigger Type: HTTPS - this allows us to trigger the Cloud Function using a URL
- Authentication: Choose whether you need authenticated or unauthenticated invocations. We have chosen unauthenticated invocation for this demonstration.
Create Cloud Function
Step 3: Click on the NEXT button, which will bring us to the page where we can add our code.
Select Runtime as Python 3.10.
Set entrypoint and source code
Add code to the Google Cloud Function
Below is the comprehensive code of the main.py file, followed by a high level overview of what the code is doing.
import functions_framework

@functions_framework.http
def hello_http(request):

    print("Initializing Function...")

    request_json = request.get_json(silent=True)
    request_args = request.args

    if request_json and 'name' in request_json:
        name = request_json['name']
        print("name is in request_json")

    elif request_args and 'name' in request_args:
        name = request_args['name']
        print("name is in request_args")

    else:
        print("No name found.")
        name = 'World'

    print("Sending response...")

    return 'Hello {}!'.format(name)
Below is a high-level overview of the above code snippet:
- hello_http(request): Handles incoming HTTP requests, extracts 'name' from the request, and logs various stages of execution.
- @funtions_framework.http: Decorator that defines
hello_httpas an HTTP handler for Google Cloud Functions. - The code print out different messages for log entries and returns a greeting message.
There are no changes to requirements.txt file.
Once you’ve finished writing your code, locate the DEPLOY button. After clicking the DEPLOY button, Google Cloud Function initiates deployment, starts provisioning the function according to the specified configuration, initializes the environment, handles dependencies, and makes the function ready to handle incoming requests.
Complete Cloud Function Code
Test your Cloud Function
Step 1: After completing the deployment, navigate to the TRIGGER section to obtain the URL to invoke the function.
Navigate to Trigger
Step 2: Hit the URL that you have obtained, you will see the function output.
Cloud Function URL
Step 3: Click on the LOGS section in your Cloud Function to view the logs, which will indicate that the log has been sent to SigNoz successfully.
Viewing Cloud Function Logs
Create Pub/Sub topic
Follow the steps mentioned in the Creating Pub/Sub Topic document to create the Pub/Sub topic.
Setup Log Router to Pub/Sub Topic
Follow the steps mentioned in the Log Router Setup document to create the Log Router.
To ensure you filter out only the Cloud Function logs, use the following filter conditions:
resource.type="cloud_run_revision"
In case you want the logs only from a particular Cloud Function, you can add the following filter conditions in the Query text box:
resource.type="cloud_run_revision"
resource.labels.service_name="<function-name>"
Filter Cloud Functions Logs
Setup OTel Collector
Follow the steps mentioned in the Creating Compute Engine document to create the Compute Engine instance.
Install OTel Collector as agent
Firstly, we will establish the authentication using the following commands. These commands need to be run on the same host where you would be running the OTel Collector agent.
- Initialize
gcloud:
gcloud init
- Authenticate into GCP:
gcloud auth application-default login
Let us now proceed to the OTel Collector installation:
Step 1: Download otel-collector tar.gz for your architecture
wget https://github.com/open-telemetry/opentelemetry-collector-releases/releases/download/v0.135.0/otelcol-contrib_0.135.0_linux_amd64.tar.gz
Step 2: Extract otel-collector tar.gz to the otelcol-contrib folder
mkdir otelcol-contrib && tar xvzf otelcol-contrib_0.135.0_linux_amd64.tar.gz -C otelcol-contrib
Step 3: Create config.yaml in the folder otelcol-contrib with the below content in it. We are using the clickhouselogsexporter in this case.
Note: The googlecloudpubsub receiver’s encoding was updated from the deprecated raw_text to text_encoding. This configuration has been tested and works with otelcol-contrib v0.135.0.
extensions:
  text_encoding:
    encoding: utf-8
receivers:
  otlp:
    protocols:
      grpc:
        endpoint: 0.0.0.0:4317
      http:
        endpoint: 0.0.0.0:4318
  googlecloudpubsub:
    project: <gcp-project-id>
    subscription: projects/<gcp-project-id>/subscriptions/<pubsub-topic's-subscription>
    encoding: text_encoding
processors:
  batch: {}
  resource/env:
    attributes:
    - key: deployment.environment
      value: prod
      action: upsert
exporters:
  clickhouselogsexporter:
    dsn: tcp://clickhouse:9000/
    timeout: 5s
    sending_queue:
      queue_size: 100
    retry_on_failure:
      enabled: true
      initial_interval: 5s
      max_interval: 30s
      max_elapsed_time: 300s
service:
  extensions: [text_encoding]
  pipelines:
    logs:
      receivers: [otlp, googlecloudpubsub]
      processors: [batch, resource/env]
      exporters: [clickhouselogsexporter]
Step 4: Once we are done with the above configurations, we can now run the collector service with the following command:
From the otelcol-contrib, run the following command:
./otelcol-contrib --config ./config.yaml
Run in background
If you want to run OTel Collector process in the background:
./otelcol-contrib --config ./config.yaml &> otelcol-output.log & echo "$!" > otel-pid
The above command sends the output of the otel-collector to otelcol-output.log file and prints the process id of the background running OTel Collector process to the otel-pid file.
If you want to see the output of the logs you’ve just set up for the background process, you may look it up with:
tail -f -n 50 otelcol-output.log
You can now trigger the Cloud Function a few times, and see the logs from the GCP Cloud Functions on SigNoz.
Prerequisites
- Google Cloud account with administrative privilege or Cloud Functions Admin privilege.
- Access to a project in GCP
- Google Cloud Functions APIs enabled (follow this guide to see how to enable an API in Google Cloud)
For more details on how to configure Self-Hosted SigNoz for Logs, check official documentation by Self-Hosted SigNoz and navigate to the "Send Logs to Self-Hosted SigNoz" section
Setup
Get started with Cloud Function Configuration
Follow these steps to create the Cloud Function:
Step 1: Go to your GCP console and search for Cloud Functions, go to Functions and click on CREATE FUNCTION.

GCP Cloud Functions
Step 2: Fill in the following details to create a Cloud Function:
- Environment: 2nd gen
- Function name: Name for the Cloud Function
- Region: Takes the default region of the GCP account
- Trigger: Defines how to trigger the Cloud Function
- Trigger Type: HTTPS - this allows us to trigger the Cloud Function using a URL
- Authentication: Choose whether you need authenticated or unauthenticated invocations. We have chosen unauthenticated invocation for this demonstration.
Create Cloud Function
Step 3: Expand the Runtime, build, connections, and security settings section, and under Runtime environment variables:
ADD Self-Hosted SIGNOZ_HTTP_URL The SigNoz endpoint would be http://<Self-Hosted SigNoz-host-ip>:8082 however, the URL can differ based on how you set up the infrastructure.
Set Cloud Function Runtime Environment Variables
Step 4: Click on the NEXT button, which will bring us to the page where we can add our code.

Set entrypoint and source code
Add code to the Google Cloud Function
For this demonstration, we will be using Python 3.10.
Below is the comprehensive code of the main.py file, followed by a high level overview of what the code is doing.
import functions_framework
from os import environ
import requests
import json
from datetime import datetime
import random

def write_log(log_data, trace_id):
   print("Sending the log to SigNoz...")
   print(f"log_data: {log_data}")

   req_headers = {
       'Content-Type': 'application/json'
   }

   data = [{
       "timestamp": int(datetime.now().timestamp()),
       "trace_id": f"{trace_id}",
       "severity_text": "info",
       "severity_number": 5,
       "resources": {
           "resource-type": "gcloud-function",
           "resource-name": "function-3",
           "resource-region": "asia-south-1"
       },
       "body": log_data,
   }]


   # Specify the HTTP endpoint for sending the data
   http_url = environ.get('SIGNOZ_HTTP_URL')
   print(f"HTTP URL: {http_url}")  # Debug statement to verify the URL


   response = requests.post(http_url, data=json.dumps(data), headers=req_headers)

   if response.status_code != 200:
       print("Failed to send the log to SigNoz.")
       print(f"Status Code: {response.status_code}")
       print(response.text)
   else:
       print("Sent the log to SigNoz successfully.")

@functions_framework.http
def hello_http(request):
   epoch_string = f"{int(datetime.now().timestamp())}"
   if len(epoch_string) % 2 == 0:
       random_hex_string = ''.join(random.choices('0123456789abcdef', k=8))
   else:
       random_hex_string = ''.join(random.choices('0123456789abcdef', k=7))
   trace_id = f"{epoch_string}{random_hex_string}"
   write_log("Initializing Function...", trace_id)


   request_json = request.get_json(silent=True)
   request_args = request.args

   if request_json and 'name' in request_json:
       name = request_json['name']
       write_log("name is in request_json", trace_id)
   elif request_args and 'name' in request_args:
       name = request_args['name']
       write_log("name is in request_args", trace_id)
   else:
       write_log("No name found.", trace_id)
       name = 'World'


   write_log("Sending response...", trace_id)
   return 'Hello {}!'.format(name)
Below is a high-level overview of the above code snippet:
- hello_http(request): Handles incoming HTTP requests, extracts 'name' from the request, and logs various stages of execution.
- @funtions_framework.http: Decorator that defines
hello_httpas an HTTP handler for Google Cloud Functions. - write_log(log_data, trace_id): Sends log data to Self-Hosted SigNoz using an HTTP POST request with appropriate headers and log structure.
- The code creates an even length string consisting of the current timestamp followed by a hex string at the beginning and uses it as a unique
trace_idfor log entries and returns a greeting message.
To install the required packages, add a requirements.txt file to the source with the following content:
functions-framework==3.*
requests
The requirements.txt file should contain all the external Python libraries and packages that your Cloud Function depends upon. This file is used by Google Cloud Function to create an environment with all the required packages.
Once you've finished writing your code, locate the DEPLOY button. After clicking the DEPLOY button, Google Cloud Function initiates deployment, starts provisioning the function according to the specified configuration, initializes the environment, handles dependencies, and makes the function ready to handle incoming requests.
Test your Cloud Function
Step 1: After completing the deployment, navigate to the TRIGGER section to obtain the URL to invoke the function.

Deploying Cloud Function
Step 2: Hit the URL that you have obtained, you will see the function output.

Cloud function URL.
Step 3: Click on the LOGS section in your Cloud Function to view the logs, which will indicate that the log has been sent to Self-Hosted SigNoz successfully.

Viewing Cloud Function Logs
Visualize the logs in Self-Hosted SigNoz
Go to your Self-Hosted SigNoz UI, and navigate to the Self-Hosted SigNoz dashboard. Click on the Logs section to view the logs. The default Self-Hosted SigNoz dashboard endpoint would be http://<Self-Hosted SigNoz-host-ip>:3301.
Note: If you have multiple applications already sending logs to Self-Hosted SigNoz, you can check by adding resource-type, resource-name, and resource-region filters in the Search filters field. Put the values that we used in the payload in the write_log function of our Cloud Function.
SigNoz Dashboard
That's it! You have successfully set up monitoring for your Cloud Function's logs with Self-Hosted SigNoz.
Troubleshooting
If you encounter any issues while setting up monitoring for your Cloud Function's logs with Self-Hosted SigNoz, here are a few troubleshooting steps you can try:
- Verify that your Cloud Function instance is running and accessible.
- Ensure that you have the necessary permissions to access the logs in your function.
- Check and mention the correct URL of the Self-Hosted SigNoz Self-Host, OTel configuration, and routing.
By following this guide, you should be able to easily send the logs of your Google Cloud Function's system to Self-Hosted SigNoz and gain valuable insights in case there is some issue.
