Azure Application Insights - How to Monitor
Azure Application Insights is a powerful monitoring service that helps you keep your applications running smoothly. It provides real-time insights into your application's performance, user behaviour, and potential issues. This comprehensive guide will walk you through the essentials of Azure App Insights, from setup to advanced usage.
What is Azure Application Insights?
Azure Application Insights is a comprehensive application performance management (APM) service that empowers developers and DevOps teams to monitor and optimize the performance and reliability of their applications. As part of the broader Azure Monitor ecosystem, it's designed to help you:
- Track application performance in real-time
- Analyze user behaviour and usage patterns
- Detect and diagnose issues quickly
- Make data-driven decisions for improvements
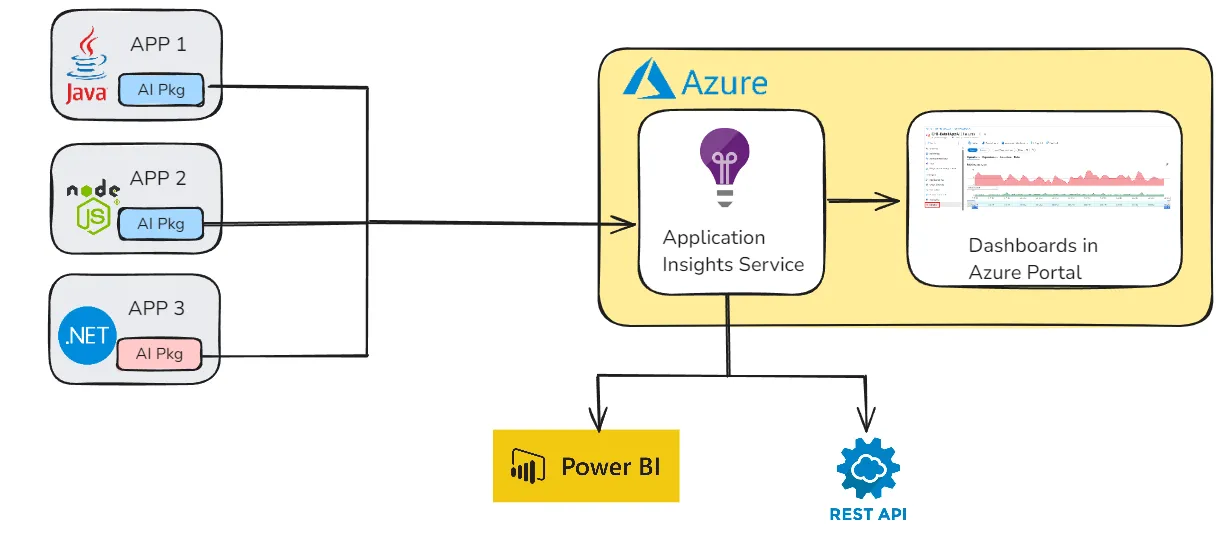
This service supports a wide range of web, mobile, desktop, and even IoT applications. It's part of the broader Azure Monitor platform, which provides a complete solution for collecting, analyzing, and acting on telemetry from your cloud and on-premises environments.
Why Use Azure Application Insights for Monitoring?
Application Insights offers several compelling reasons to make it your go-to monitoring solution:
- Real-time Performance Monitoring: Track response times, failure rates, and dependencies as they happen.
- User Behaviour Analysis: Understand how users interact with your application, including page views, user flows, and custom events.
- Proactive Alerts: Set up intelligent alerts that notify you of anomalies or performance issues before they impact users.
- DevOps Integration: Seamlessly integrate with Azure DevOps for efficient issue tracking and resolution.
How to Set Up Azure Application Insights
Setting up Application Insights is straightforward. Here's a step-by-step guide:
Creating an Application Insights Resource in Azure Portal
Log in to the Azure Portal: Go to the Azure Portal and sign in with your Azure account credentials.
Create a New Resource: In the Azure Portal, click on the “Create a resource” button in the left-hand menu.
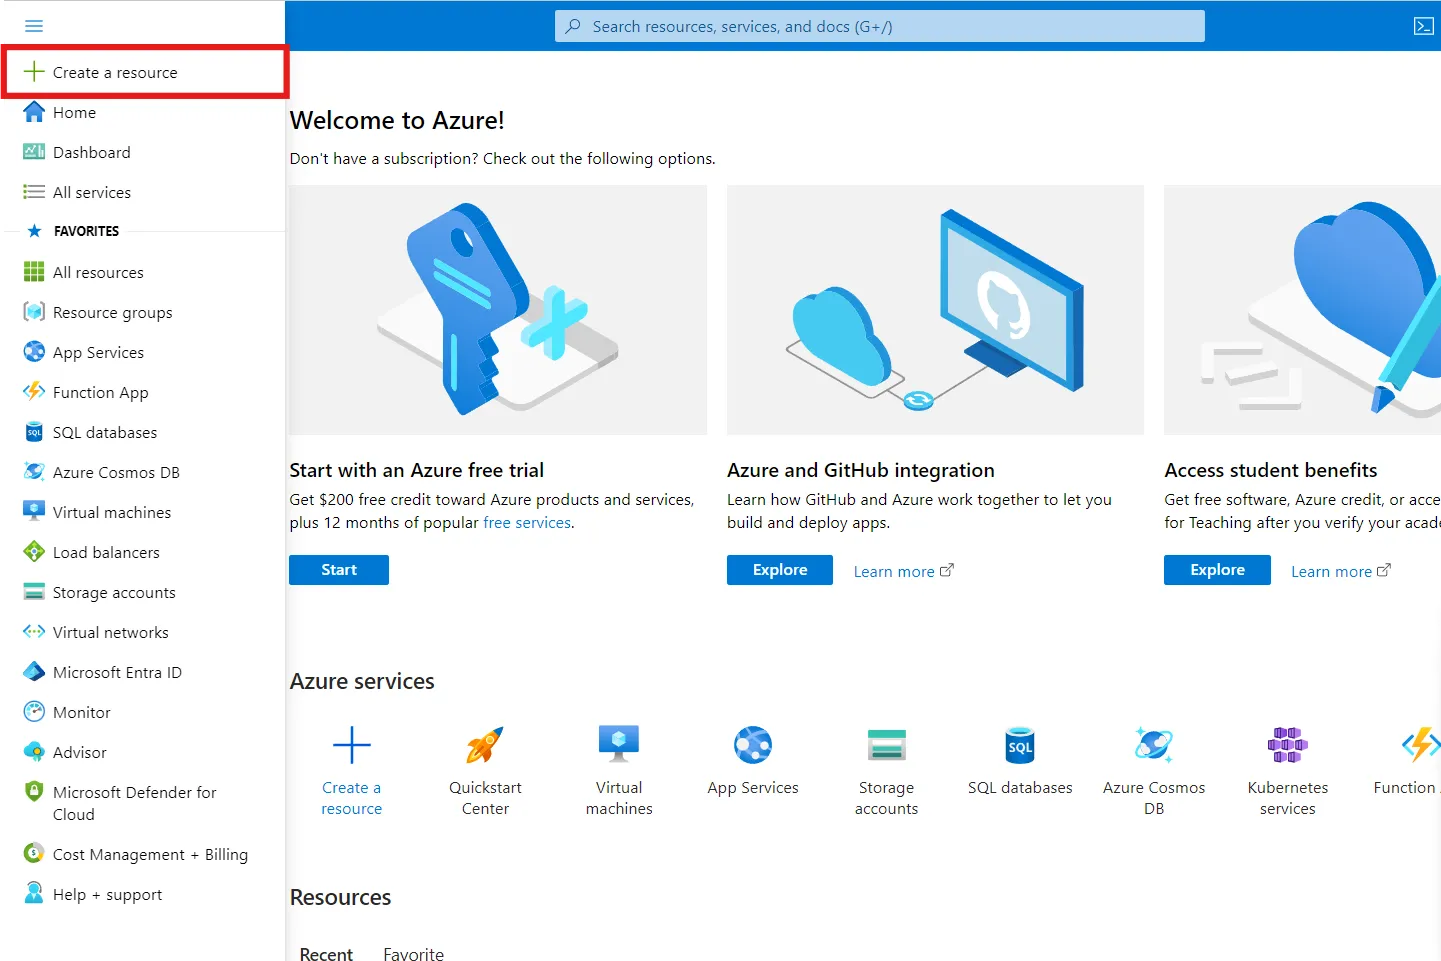
Creating a new Resource Search for Application Insights: In the search bar, type “Application Insights” and select it from the list.
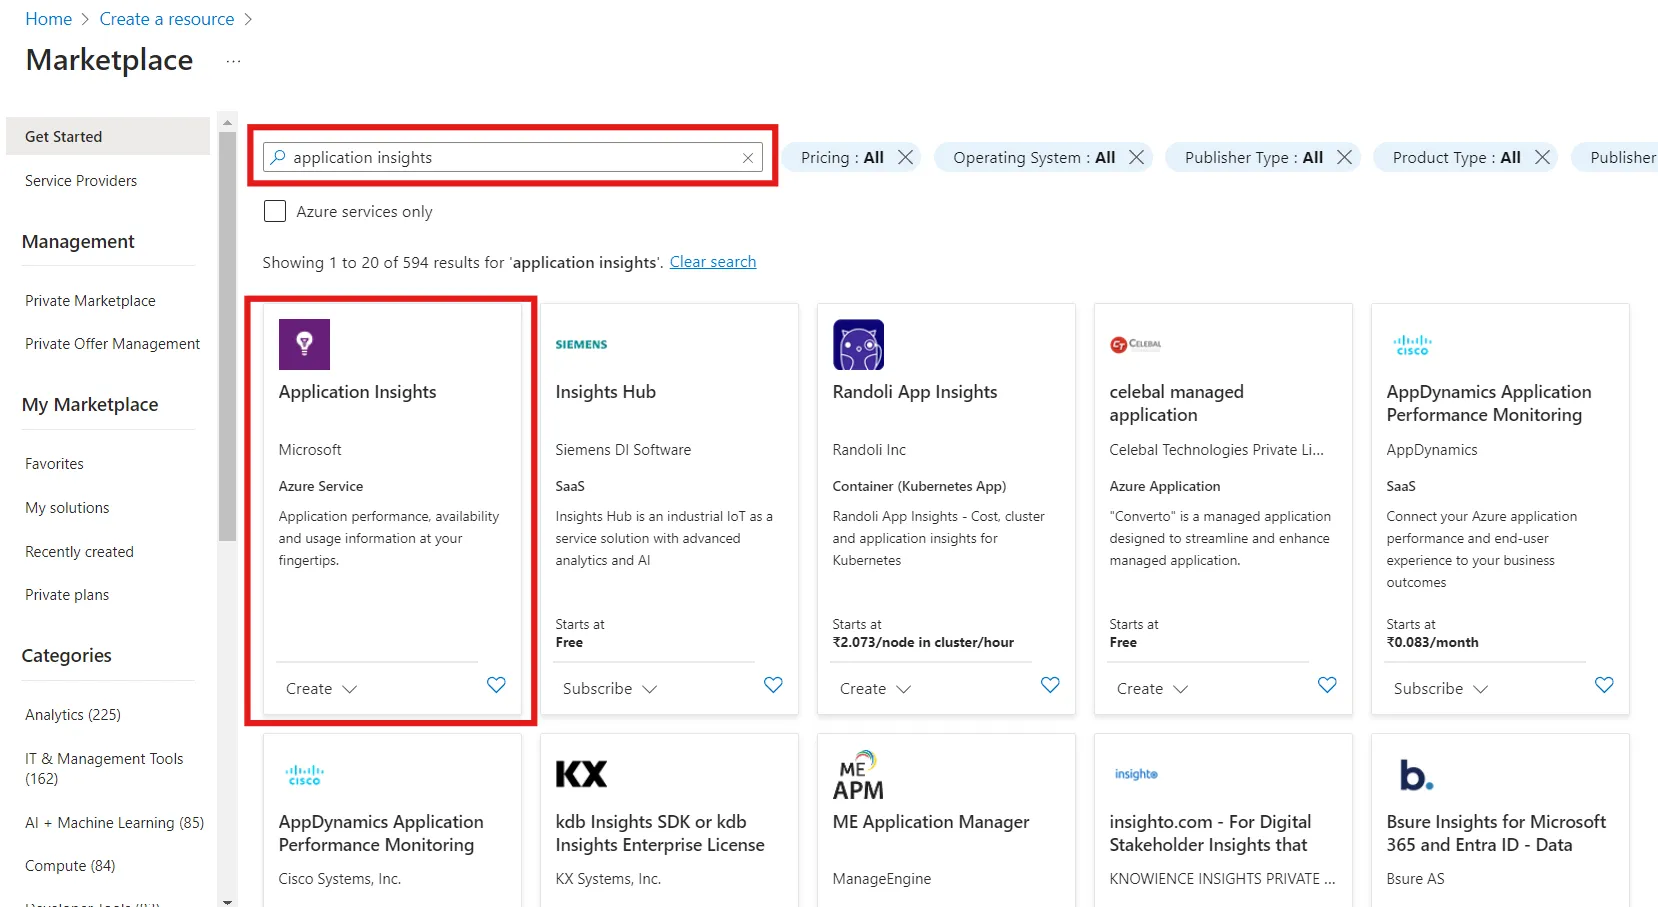
Search for Application Insights in Azure Portal Configure Your Resource: Click on “Create” and fill out the required details such as Subscription, Resource Group, and Name. You can also choose your preferred Region and the type of application you want to monitor.
Here's a brief summary of what to fill:
- Subscription: Choose the billing account.
- Resource Group: Select or create a logical container for related resources.
- Name: Enter a unique and descriptive resource name.
- Region: Pick a geographical location for the resource.
- Type of Application: Select the application type you want to monitor (e.g., web, mobile).
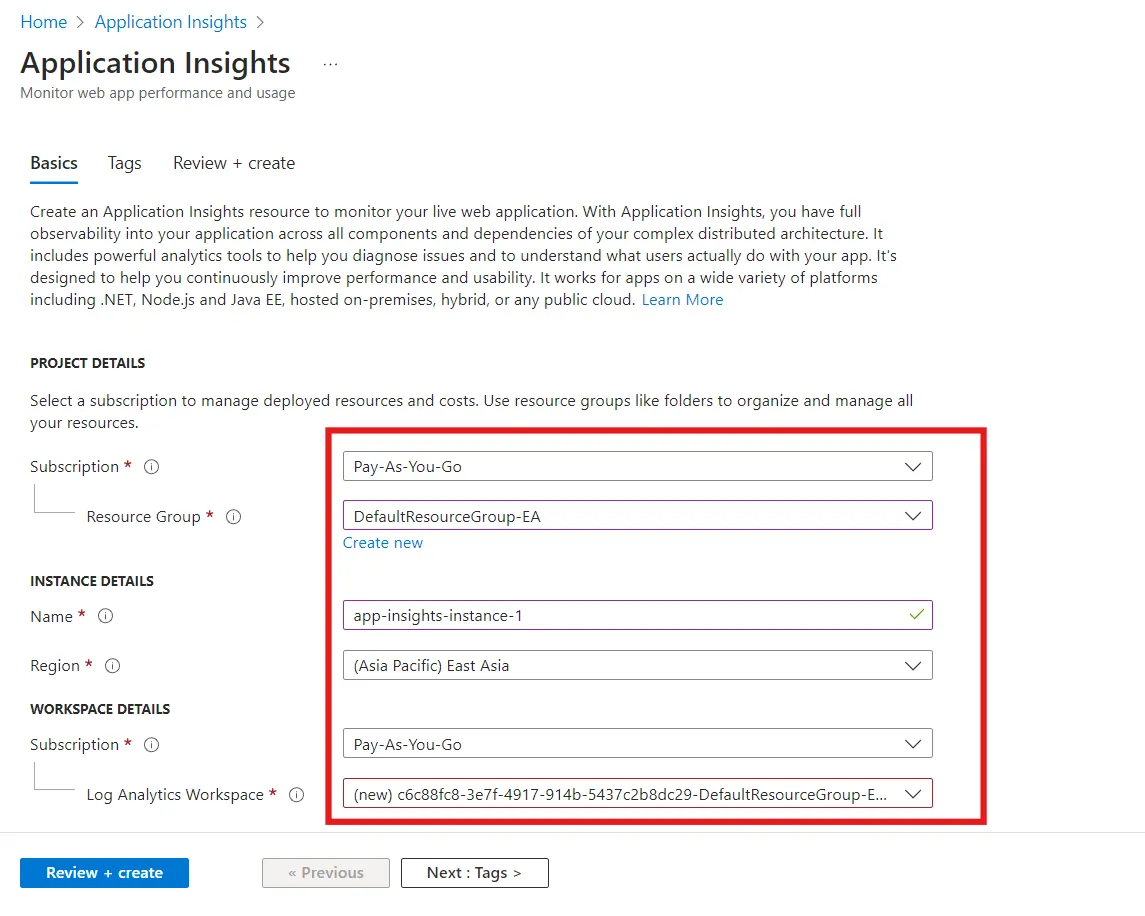
Creating an Application Insights in Azure Review and Create: Review your configuration and click “Create” to provision your Application Insights resource.
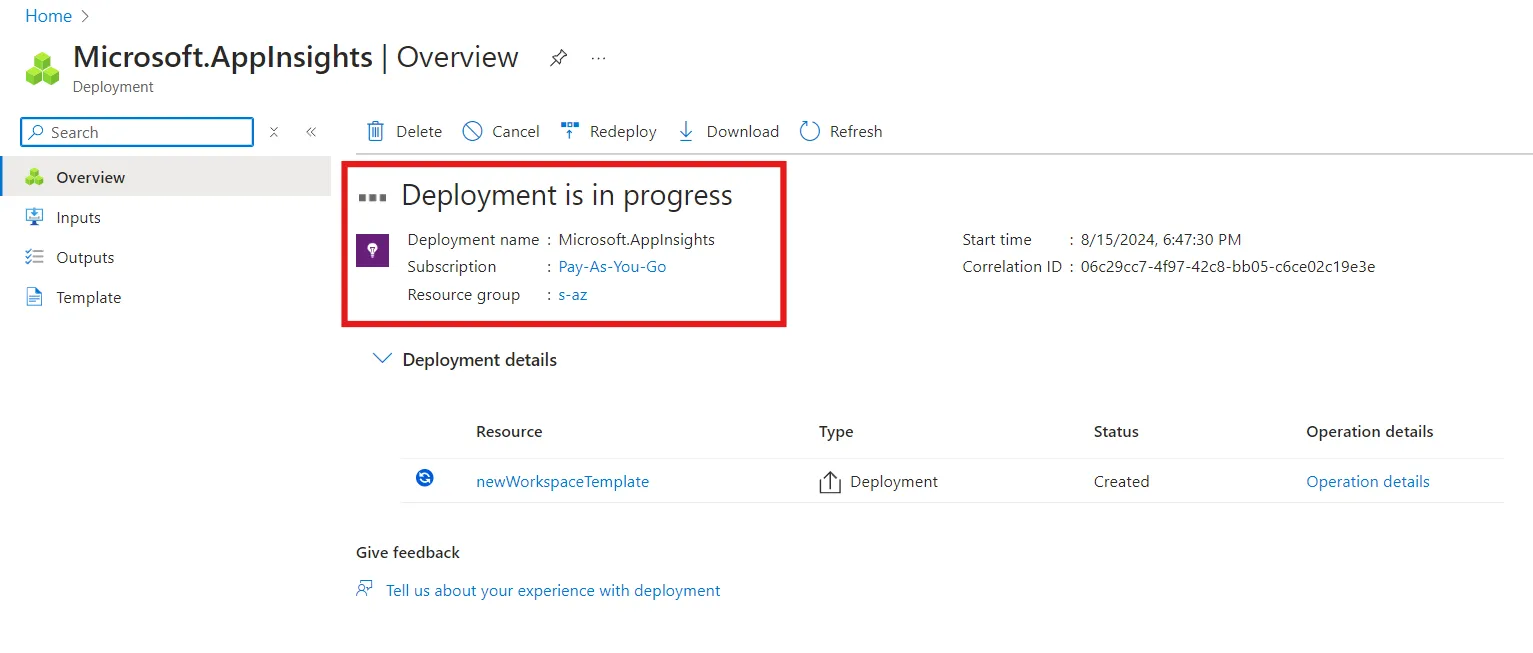
Azure Application Insights deployment in progress
Obtaining the Connection String
Navigate to Your Application Insights Resource: Once your resource is created, go to the resource overview page in the Azure Portal.
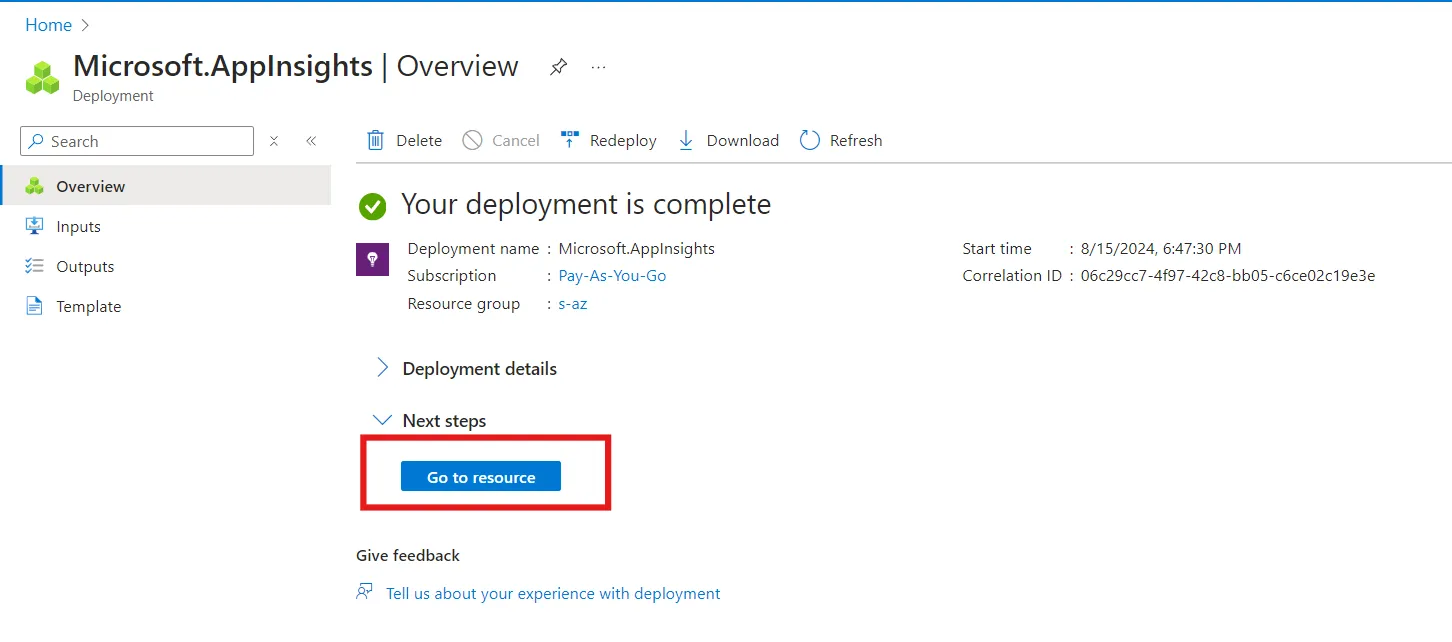
Navigating to Application Insights Resource Copy the Connection String: Under the “Overview” tab, you’ll find the Connection String. Copy this string as it will be needed to configure your application for telemetry data.
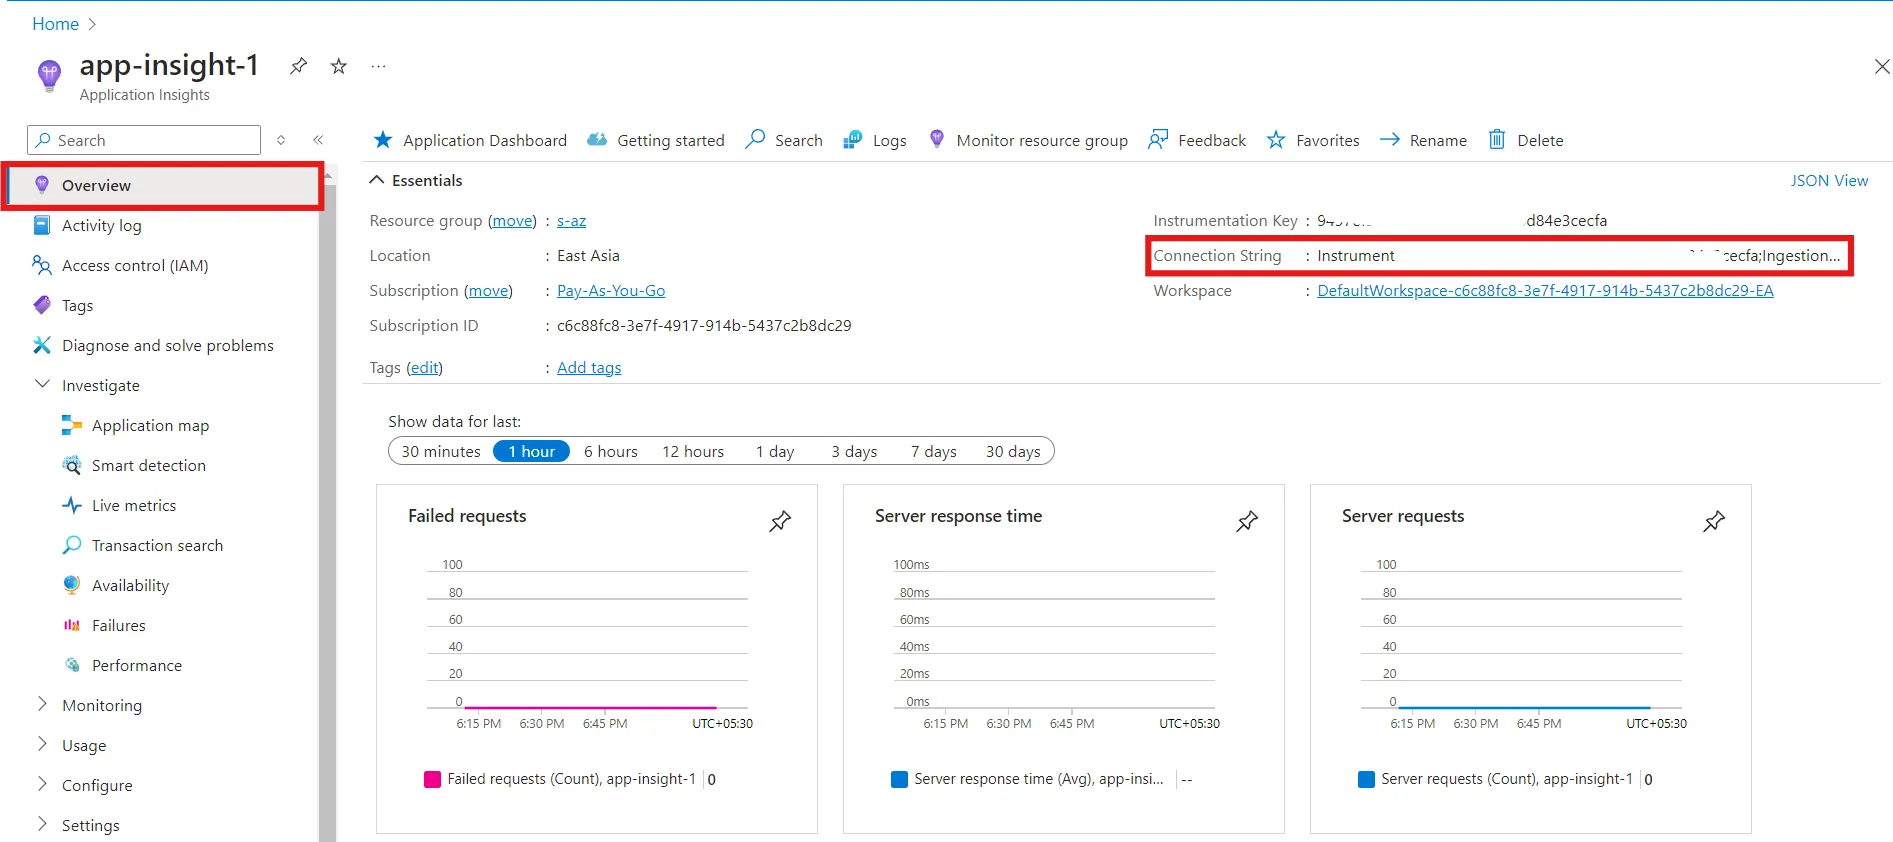
Fetching the Connection String
Integrating Application Insights SDK into Your Application
Add the SDK to Your Application: Depending on your application’s technology stack, install the appropriate Application Insights SDK. For example:
- .NET: Use NuGet to install
Microsoft.ApplicationInsights.AspNetCorepackage. - Java: Add
applicationinsights-coredependency in yourpom.xmlorbuild.gradle. - Node.js: Use npm to install the
applicationinsightspackage.
- .NET: Use NuGet to install
Initialize the SDK: In your application’s startup code, initialize the Application Insights SDK by providing the
Connection Stringyou obtained earlier. For example, in a Node.js application:- Before initializing application insights SDK:
const express = require('express'); const app = express(); const port = 3000; app.get('/', (req, res) => { res.send('Hello World!'); }); app.listen(port, () => { console.log(`App listening at http://localhost:${port}`); });- After initializing application insights SDK:
const express = require('express');
const app = express();
const port = 3000;
const appInsights = require('applicationinsights');

// Initialize Application Insights with your Instrumentation Key
appInsights.setup('YOUR_CONNECTION_STRING')
  .setAutoCollectConsole(true, true)
  .setAutoCollectExceptions(true)
  .setAutoCollectRequests(true)
  .start();

// Create a default client
const client = appInsights.defaultClient;

app.get('/', (req, res) => {
  client.trackEvent({ name: "Homepage accessed" }); // Track a custom event
  res.send('Hello World!');
});

app.listen(port, () => {
  console.log(`App listening at http://localhost:${port}`);
});
Verify the Integration: Start your application and ensure that the Application Insights SDK is correctly initialized and sending telemetry data to Azure.
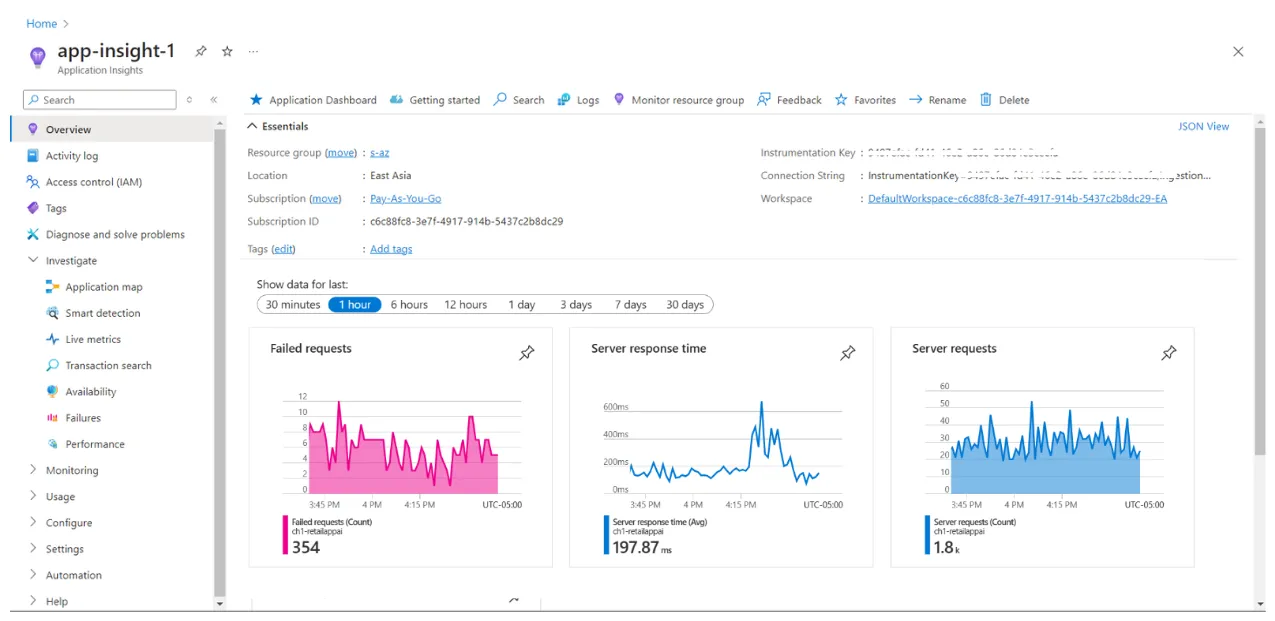
Visualizing Request trace data
Configuring Data Collection and Sampling Options
Access the Configuration Settings: In the Azure Portal, navigate to your Application Insights resource and go to the “Configure” section.
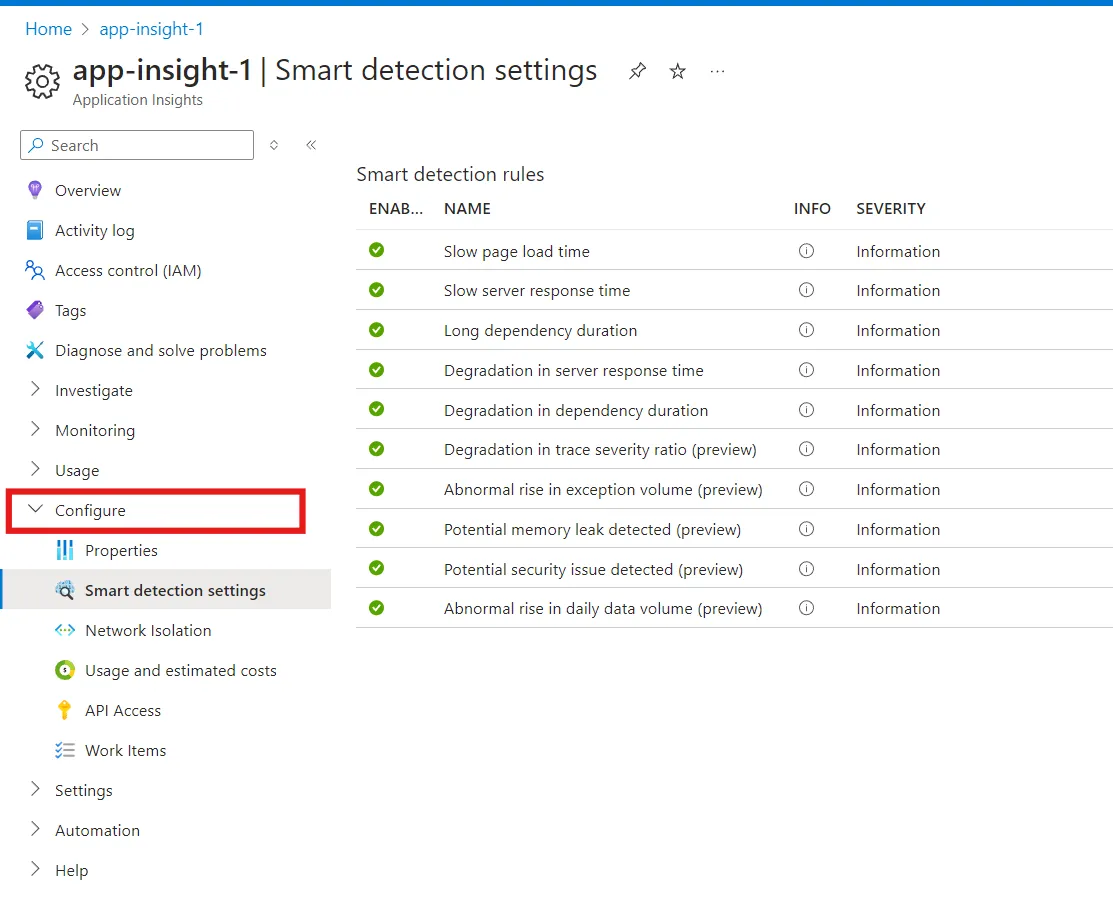
Configuring Data Collection and Sampling Options Adjust Sampling Settings: Configure sampling settings to control the volume of data sent to Application Insights. This helps in reducing data storage costs and avoiding noise from unimportant telemetry. To configure data sampling, under the Configure section go to
Usage and Estimated Costsclick onData Sampling, and adjust the data volume accordingly.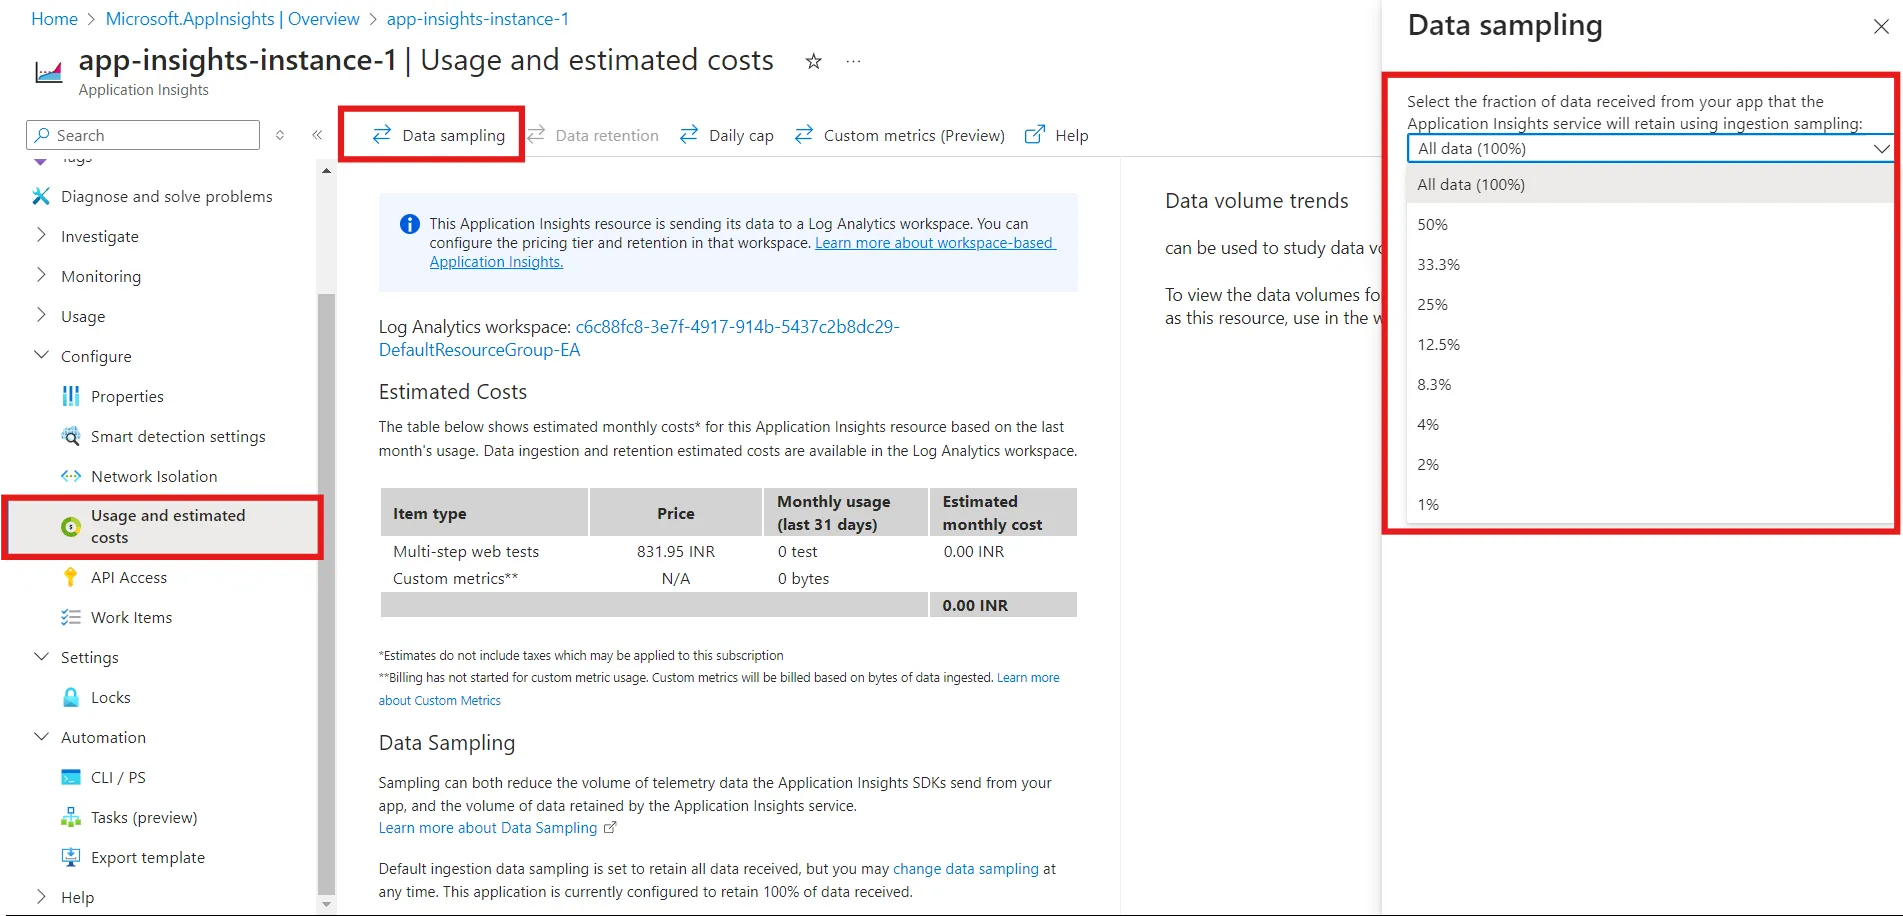
Data sampling in Azure app insights Set Up Data Collection:
Move to Monitoring section, under that select the
Diagnostic settingsand click on theAdd diagnostic settingoption.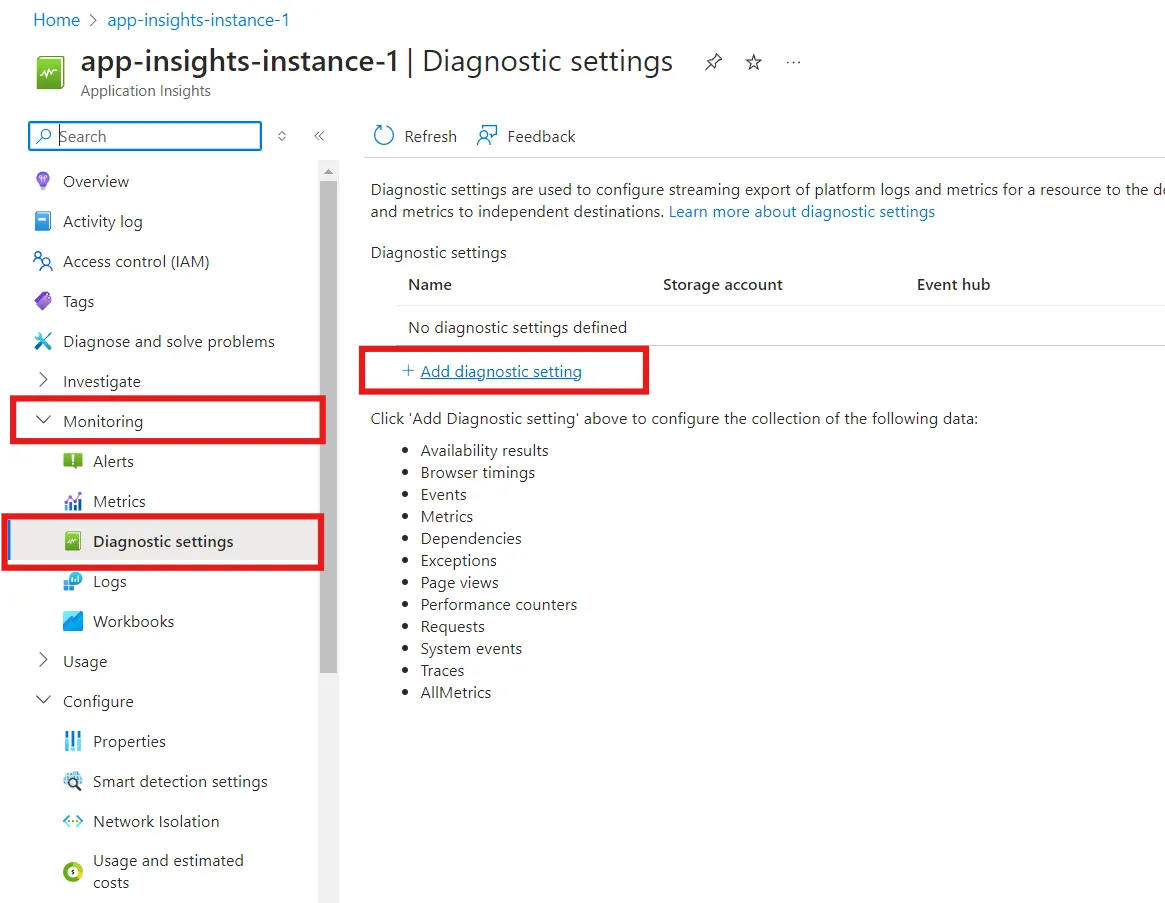
image.webp Here, you can choose what kind of telemetry you want to collect, such as requests, exceptions, traces, custom events, and metrics. If you want to collect all types of data, we can select
allLogscheckbox.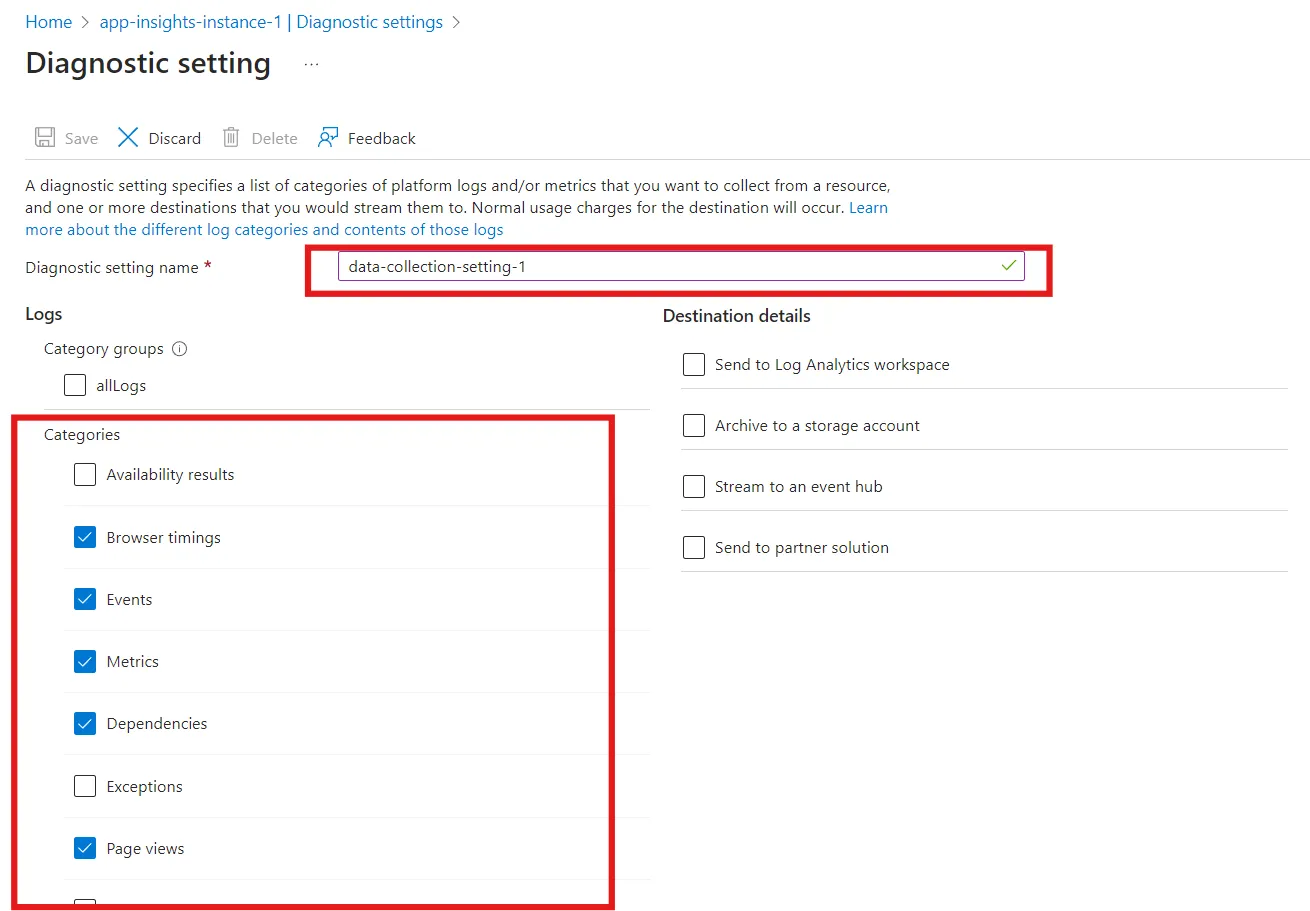
Data collection configuration in Azure application insights
Save and Apply Settings: Save your settings once you have configured the data collection and sampling options. Your application is now set up with Azure Application Insights, and you can start monitoring its performance and usage in real-time.
By following these steps, you can effectively set up Azure Application Insights to gain deep insights into your application’s health and usage, enabling you to make data-driven decisions to enhance performance and reliability.
Supported Languages and Platforms
Azure Application Insights provides comprehensive support for the following programming languages:
- .NET and .NET Core: For server-side and desktop applications.
- Java: Suitable for enterprise-level applications.
- Node.js: Popular for web and server-side applications.
- Python: Ideal for data science and web applications.
- JavaScript: Used in web applications, particularly for client-side monitoring.
- Ruby: Frequently used for web development.
It works with web, mobile, and desktop applications, and supports both cloud and on-premises deployments.
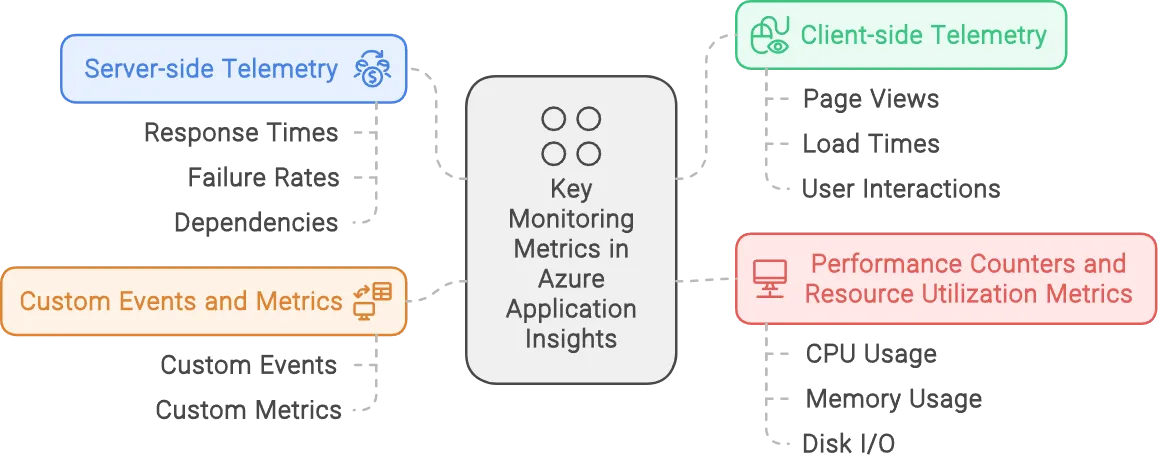
Key Monitoring Metrics in Azure Application Insights
Azure Application Insights is a powerful tool for monitoring the performance and usage of your applications. It provides a comprehensive set of metrics that help you understand how your application is performing and how users are interacting with it. Here are some key metrics to focus on:
Server-side Telemetry
Server-side telemetry focuses on the performance and reliability of your application's backend services. Key metrics include:
- Response Times: Measures the time taken to process requests. Monitoring response times helps identify slow-running operations and potential bottlenecks.
- Failure Rates: Tracks the number of failed requests. High failure rates can indicate issues with the application code, dependencies, or infrastructure.
- Dependencies: Monitors external services and databases that your application relies on. Tracking dependencies helps identify issues with third-party services that could impact your application's performance.
Client-side Telemetry
Client-side telemetry provides insights into how users interact with your application. Key metrics include:
- Page Views: Counts the number of times a page is viewed. This metric helps understand user engagement and popular content.
- Load Times: Measures the time taken for pages to load. Monitoring load times helps ensure a smooth user experience and identify performance issues.
- User Interactions: Tracks user actions such as clicks, form submissions, and navigation. Understanding user interactions helps improve the usability and functionality of your application.
Custom Events and Metrics
Custom events and metrics allow you to track business-specific data that is not covered by standard telemetry. Examples include:
- Custom Events: Log specific actions or occurrences within your application, such as user sign-ups, purchases, or feature usage.
- Custom Metrics: Track numerical data relevant to your business, such as revenue, conversion rates, or user retention.
Performance Counters and Resource Utilization Metrics
Performance counters and resource utilization metrics provide insights into the health and performance of your application's infrastructure. Key metrics include:
- CPU Usage: Monitors the percentage of CPU resources used by your application. High CPU usage can indicate performance issues or the need for scaling.
- Memory Usage: Tracks the amount of memory used by your application. Monitoring memory usage helps identify memory leaks and optimize resource allocation.
- Disk I/O: Measures the read and write operations on the disk. High disk I/O can impact application performance and indicate the need for optimization.
How to Use Application Insights for Troubleshooting
Application Insights shines when it comes to troubleshooting. Here's how to leverage its features:
- Analyze application logs and traces:
- Use the Logs feature to query your telemetry data.
- Look for patterns or anomalies in your logs.
- Example: If you notice a spike in specific error messages, it can indicate a recurring issue that needs addressing.
- Identify performance bottlenecks:
- Use the Performance blade to see end-to-end transaction details.
- Drill down into slow requests or dependencies.
- Example: If the Application Map shows a delay in a particular microservice, you can investigate that service’s performance and optimize its efficiency.
- Debug exceptions and failures:
- The Failures blade provides detailed stack traces for exceptions.
- Correlate failures with other metrics to understand root causes.
- Example: By analyzing a stack trace for an uncaught exception, you might find that an unexpected null reference caused the issue, leading to a code fix.
- Correlate issues across distributed systems:
- Correlation IDs: Implement correlation IDs to trace the flow of a request through different services.
- Neglecting to use correlation IDs, making it difficult to connect related logs and telemetry from different services.
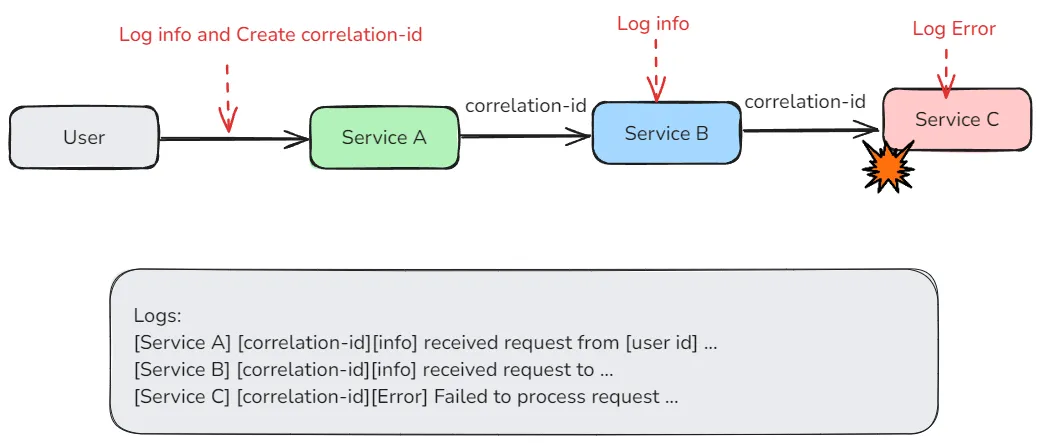
Using Correlation IDs
- Correlation IDs: Implement correlation IDs to trace the flow of a request through different services.
Best Practices for Azure Application Insights
Tips to Enhance Troubleshooting Experience:
Implementing Proper Sampling Techniques to Manage Data Volume: Sampling helps manage the volume of data collected and processed, preventing data overload and reducing costs while still capturing representative performance insights.
- Example: Set up dynamic sampling in Application Insights to collect data from 10% of high-traffic requests, ensuring you capture enough data to analyze performance trends without exceeding data limits.
Setting Up Meaningful Alerts and Action Groups: Alerts and action groups help you respond proactively to issues by notifying the right people and automating responses based on predefined conditions.
- Example: Configure an alert to trigger if the error rate exceeds 5% and send notifications to the on-call support team via SMS and email.
Using Application Map for Visualizing Application Dependencies: Application Map visually represents the relationships and dependencies between different components of your application, making it easier to identify issues and bottlenecks.
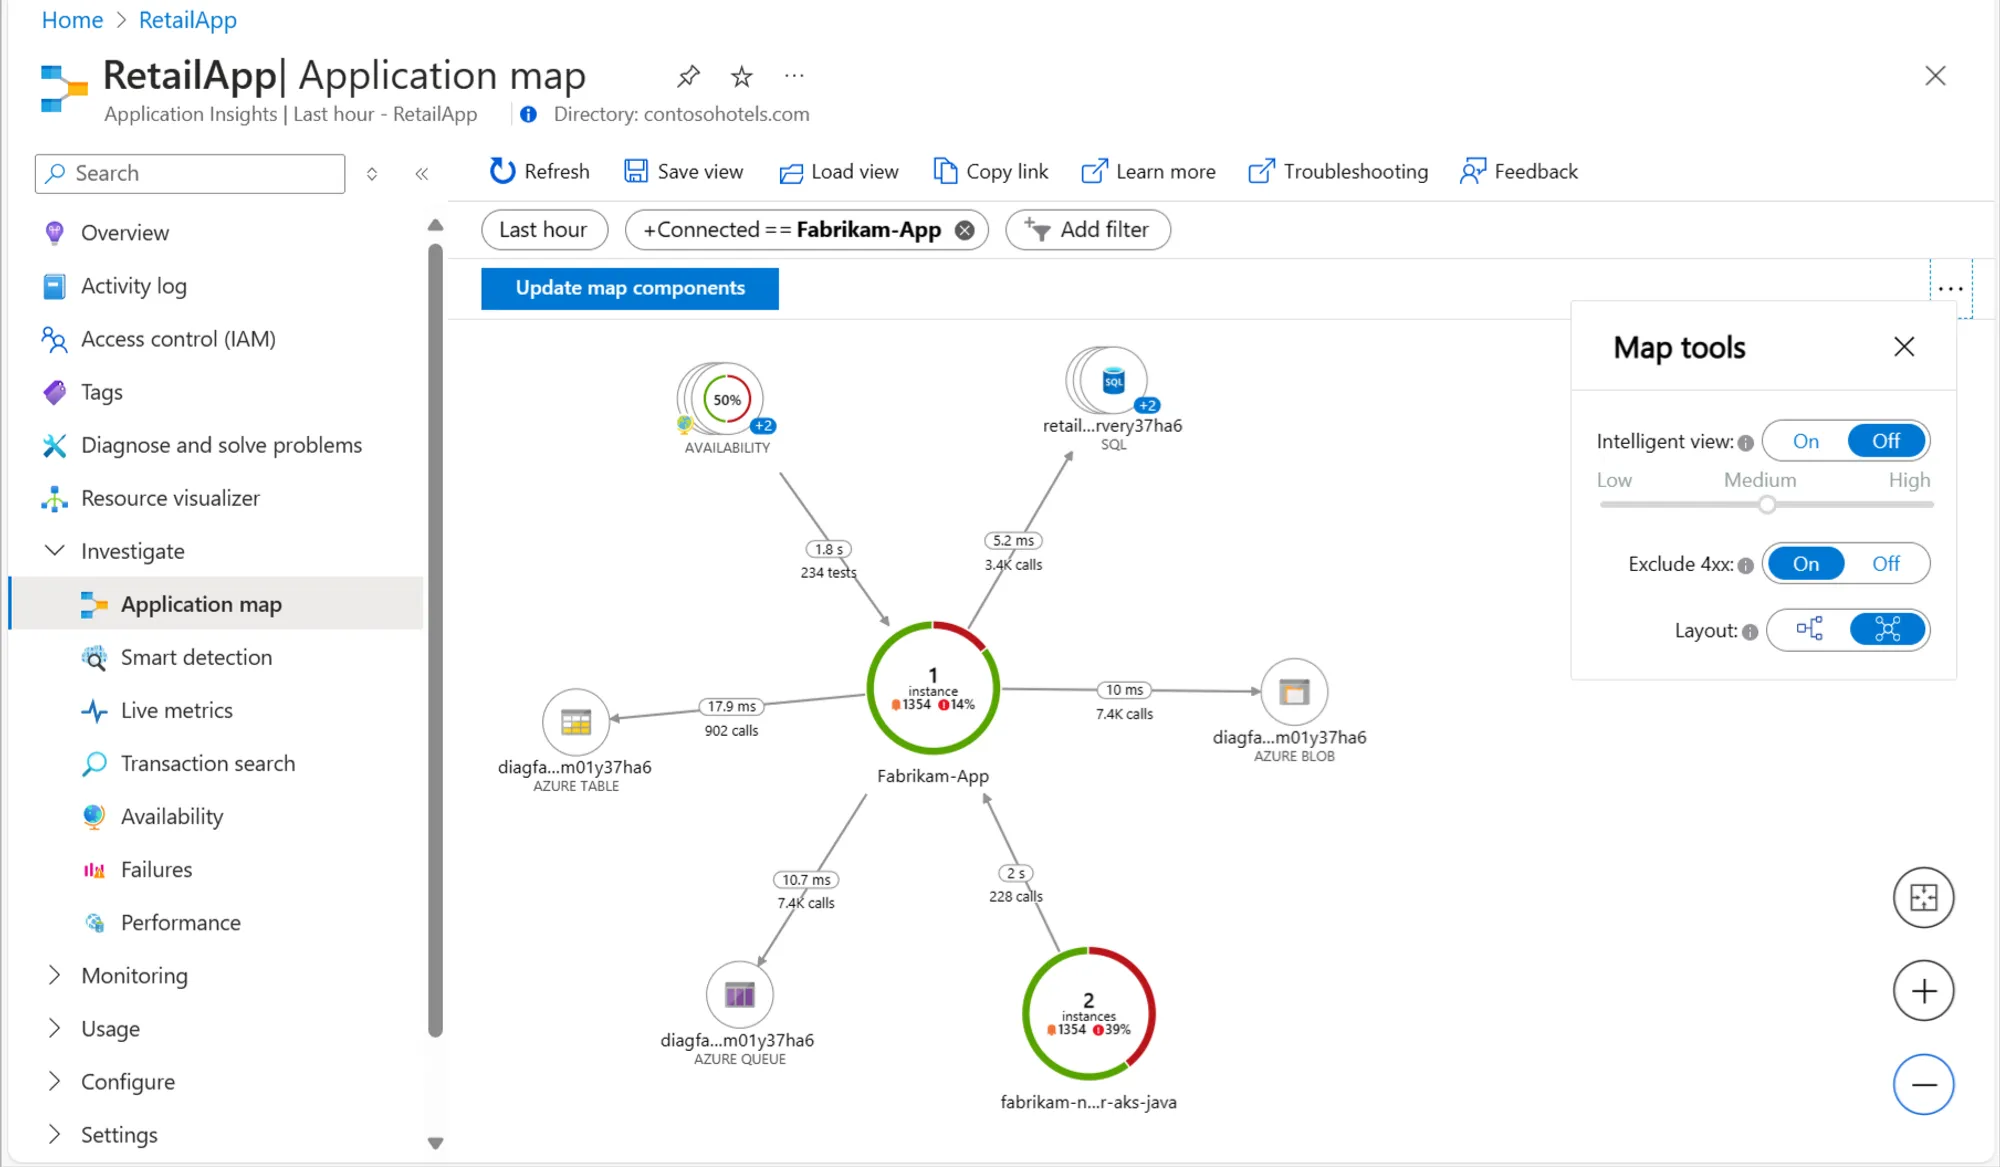
Using Application Map in Azure App Insights for Visualizing Application Dependencies Leverage Log Analytics with Kusto Query Language (KQL): KQL allows you to perform advanced querying on your telemetry data, providing deeper insights into application behavior and issues.
- Example: A KQL query might look like this:
requests
| where resultCode != "200"
| summarize count() by resultCode, bin(timestamp, 1h)
| order by count_ desc
This query counts failed requests by result code and shows trends over time.
Cost Optimization Strategies for Application Insights
While Application Insights is powerful, it's important to manage costs. Here are some strategies:
- Understand the pricing model:
- Costs are based on data ingestion and retention
- Plan your budget based on expected application usage
- Implement intelligent data sampling:
- Use adaptive sampling to automatically adjust sampling rates
- Configure fixed-rate sampling for consistent data reduction
- Utilize data retention policies:
- Set appropriate retention periods for your data
- Archive important data for long-term storage
- Monitor and adjust data caps:
- Set daily data volume caps to prevent unexpected charges
- Regularly review and adjust caps based on your needs
Limitations of Azure Application Insights
- Cost Issues: Azure Application Insights can become expensive, especially as your application scales and generates more telemetry data. Costs can quickly escalate if not carefully managed.
- Limited customization and flexibility: Azure Application Insights is a proprietary tool that offers limited customization. Users might need help to tailor the tool to their specific needs or integrate it with other open-source tools and platforms.
- Potential Feature Gaps for Specific Use Cases: While Azure Application Insights provides robust monitoring capabilities, it may lack certain advanced features or specific integrations that are crucial for some use cases, leading organizations to seek more specialized or versatile alternatives.
SigNoz: An alternative to Azure Application Insights
While Azure Application Insights is a robust solution, alternatives like SigNoz are worth considering.
SigNoz is an open-source observability platform that provides comprehensive monitoring and tracing capabilities. Unlike proprietary solutions, SigNoz offers flexibility and customization while being cost-effective. It supports distributed tracing, log management, and metrics collection, making it a viable alternative to commercial monitoring tools like Azure Application Insights.
Comparing SigNoz Cloud with Azure Application Insights
- Cost Efficiency: SigNoz, being open-source, is often more cost-effective than Azure Application Insights’ subscription model.
- Customization: SigNoz offers extensive customization for dashboards and visualizations, while Application Insights may have more fixed configurations.
- Integration: SigNoz supports diverse third-party integrations, whereas Application Insights integrates tightly with the Azure ecosystem.
- Data Ownership: SigNoz provides greater control over data, which can benefit privacy concerns, unlike Application Insights which manages data within Azure.
SigNoz Cloud is the easiest way to run SigNoz. Sign up for a free account and get 30 days of unlimited access to all features.
You can also install and self-host SigNoz yourself since it is open-source. With 24,000+ GitHub stars, open-source SigNoz is loved by developers. Find the instructions to self-host SigNoz.
SigNoz offers comprehensive application monitoring focusing on distributed tracing and open standards. Integrating SigNoz with your application can enhance your monitoring strategy, providing a more comprehensive view of your application's performance and potentially reducing costs.
Key Takeaways
- Azure Application Insights provides robust monitoring for web applications
- It offers real-time performance tracking, user behavior analysis, and proactive alerting
- Proper setup and configuration are crucial for effective monitoring
- Cost management is essential to optimize Application Insights usage
- Consider alternatives like SigNoz for open-source application monitoring
FAQs
What's the difference between Azure Monitor and Application Insights?
Azure Monitor is a broader platform that includes Application Insights. While Application Insights focuses on application-specific monitoring, Azure Monitor provides a more comprehensive view of your entire Azure environment.
How do I enable Azure Application Insights for my web application?
To enable Application Insights:
- Create an Application Insights resource in Azure Portal
- Add the Application Insights SDK to your application
- Configure your application with the Instrumentation Key
- Deploy your application and start monitoring
Can I use Application Insights for on-premises applications?
Yes, Application Insights supports on-premises applications. You must ensure your application can communicate with the Azure cloud to send telemetry data.
How can I reduce costs associated with Application Insights?
To reduce costs:
- Implement data sampling to reduce the volume
- Set appropriate data retention periods
- Use daily data caps to prevent unexpected charges
- Regularly review and optimize your usage
You can explore products like SigNoz for comprehensive yet cost effective approach to observability.
