Kubernetes CronJobs - How to Create and Monitor CronJobs in SigNoz
Kubernetes CronJobs are designed to schedule and automate repetitive tasks within your cluster. Whether you're managing routine system maintenance, orchestrating complex data pipelines, or handling application-specific operations, CronJobs provides a reliable and efficient way to streamline your workflows.

In this tutorial, we will discuss what Kubernetes CronJobs are, their lifecycle, and common use cases. We will also walk through how they can be created and monitored using SigNoz.
What is a Kubernetes CronJob?
A Kubernetes CronJob is a higher-level Kubernetes object that automates the execution of containerized tasks at specified times or any repetitive task that needs to be performed on a recurring schedule. However, it doesn't execute that task directly. Instead, whenever the specified schedule triggers, the CronJob creates a Job object to carry out the actual work.
Essentially, the CronJob holds the schedule and the template for the Job telling it to "Run this Job at these times.” while the Job contains the specific task to be done. It manages the creation of Pods (containers) based on the templates defined, where the actual code or commands are executed.
Difference between Kubernetes Jobs and CronJobs
Kubernetes Jobs are designed to run tasks that are completed and then terminated. These tasks are typically one-off or batch operations while Kubernetes CronJobs are designed for recurring tasks that must be performed regularly.
For example, if you want to run a script that cleans up old log files every day at midnight, you would use a CronJob. If you want to run a script that processes a large batch of images only once, you would use a Job.
The table below shows a rough outline of their differences:
| Feature | Job | CronJob |
|---|---|---|
| Execution | One-time execution | Repeating execution on a schedule |
| Use Cases | One-off tasks, batch processing | Periodic tasks, scheduled maintenance |
| Schedule | Not applicable | Defined using cron syntax |
| Termination | Automatically terminates after completion | Manages multiple executions over time |
How do CronJobs Work (Lifecycle)?
In this section, we will walk through the Lifecycle of CronJobs, from creation to completion:
YAML Definition: CronJobs are defined in YAML manifests. These manifests contain all the necessary details to define and run a job, including the schedule, job template, and other specifications.
Scheduling: Kubernetes uses the cron
schedulespecified in the CronJob manifest to determine when to create Job objects. The CronJob controller continuously monitors all CronJobs in your cluster and handles the lifecycle of CronJobs. When the specified schedule time matches the current time, the controller triggers the CronJob.Job Creation: Upon triggering, the CronJob controller creates a Job object based on the
jobTemplatespecified in the CronJob manifest. This Job object is a standard Kubernetes Job, which is responsible for managing the execution of your task within Pods (containers).If a previous Job triggered by the same CronJob is still running, the behavior depends on the
concurrencyPolicy:- Allow: A new Job will be created and run concurrently with the existing one.
- Forbid: The new Job will be skipped, and the schedule will be considered missed.
- Replace: The existing Job will be terminated, and a new one will be created in its place.
Pod Creation and Execution: The Job created by the CronJob then creates one or more Pods, depending on your Job's configuration (e.g. parallel execution). Inside these Pods, your specified Docker image is pulled from a registry, and the command you defined is executed. The Job controller manages the lifecycle of the Pods, including restarts if failures occur.
Completion and Cleanup: Once the Pods successfully complete the task or reach a specified termination condition, the Job is considered finished. By default, Kubernetes doesn't keep any history. The number of completed Jobs retained in history is configurable using
successfulJobsHistoryLimitandfailedJobsHistoryLimit.
Common Use Cases for CronJobs
Kubernetes CronJobs automate recurring tasks within Kubernetes clusters. Here are some common use cases where they are beneficial:
- Data Backups: Regularly backing up critical data ensures data integrity and prepares for disaster recovery. CronJobs can automate this process, scheduling backups at specific intervals to prevent data loss.
- Data Synchronization: Keeping data across different systems or databases synchronized is crucial for maintaining consistency and up-to-date information. CronJobs facilitate periodic synchronization, ensuring that data remains consistent across platforms.
- Periodic Maintenance: Routine maintenance tasks such as log rotation, database cleanup, or temporary file deletion can significantly optimize system performance and resource utilization. Automating these tasks with CronJobs helps maintain system health and efficiency.
- Scheduled Backups or Data Synchronization: Beyond just data backup, CronJobs can be used for scheduled data synchronization between different systems, ensuring that data is consistently updated across platforms.
Creating and Monitoring Kubernetes CronJobs
In this section, we will look at how CronJobs can be created in a cluster and monitored using a visualization tool.
Prerequisites
The following are necessary to have:
- A Kubernetes cluster
- A SigNoz cloud account
- A text editor
How to Create a Kubernetes CronJob
In your text editor, create a YAML file called cronjob.yaml. This file will describe the Kubernetes CronJob you want to create.
Paste the below configuration into the file:
apiVersion: batch/v1
kind: CronJob
metadata:
  name: my-cronjob
spec:
  successfulJobsHistoryLimit: 5
  schedule: "* * * * *"  # Run every minute
  jobTemplate:
    spec:
      template:
        spec:
          containers:
            - name: hello
              image: busybox
              command:
                - /bin/sh
                - -c
                - date; echo "Kubernetes cronjob completed"
          restartPolicy: OnFailure
Let's walk through what the configuration does:
apiVersionandkindspecify the object type (CronJob) and the Kubernetes API version to use.metadata.nameis the name you give to your CronJob.spec.schedule: This is a Cron expression that defines when the CronJob should run. In the provided example, it's set to "* * * * *" which means every minute. You can customize this to match your desired schedule.spec.successfulJobsHistoryLimit: This setting determines how many completed Jobs the CronJob will keep in its history for reference (defaults to 3).JobTemplate: This is the core of the CronJob. It acts as a blueprint for the Jobs that the CronJob creates each time the schedule triggers.spec.template.spec.containers: Defines the container(s) that will run within the Job's Pods. In this case, a busy box image that prints the current date/time and a completion message.spec.template.spec.restartPolicy: Determines how the Pod should behave if the container fails. "OnFailure" means the Pod will restart if the container exits with a non-zero status.
To create the CronJob, run the command:
kubectl apply -f cronjob.yaml
To view the details of the newly created CronJob:
kubectl get cronjob
Output:
NAME         SCHEDULE    SUSPEND   ACTIVE   LAST SCHEDULE   AGE
my-cronjob   * * * * *   False     0        57s             168m
Remember that CronJobs create individual jobs to carry out tasks. To see the individual Jobs triggered by your CronJob, use the following command:
kubectl get jobs
Output:
NAME                  COMPLETIONS   DURATION   AGE
my-cronjob-28638823   1/1           11s        4m30s
my-cronjob-28638824   1/1           8s         3m31s
my-cronjob-28638825   1/1           6s         2m31s
my-cronjob-28638826   1/1           10s        91s
my-cronjob-28638827   1/1           9s         31s
Monitoring Kubernetes CronJobs in SigNoz
Managing and monitoring the execution of CronJobs directly in your cluster can be tedious. Using a visualization tool like SigNoz simplifies the process by providing insights into the performance of your CronJobs, allowing you to monitor their execution efficiently.
In this section, we will walk through the steps for setting up CronJob monitoring in Signoz.
Create a Service Account
A Service Account is used for managing access controls and ensuring that only authorized processes can perform actions within the cluster. It allows application Pods, system components, and external entities to authenticate and interact with the Kubernetes API server.
In your text editor, create a file called serviceaccount.yaml and paste in the below configuration:
apiVersion: v1
kind: ServiceAccount
metadata:
  labels:
    app: otelcontribcol
  name: otelcontribcol
To create the Service Account, run the command:
kubectl apply -f serviceaccount.yaml
Create a ClusterRole
A ClusterRole is a Kubernetes resource that defines a set of permissions (verbs) that can be performed on specific Kubernetes resources (API objects) across the entire cluster. Unlike a Role, which applies permissions only within a specific namespace, a ClusterRole grants access at the cluster level.
In your text editor, create a file called clusterrole.yaml and paste in the below configuration:
apiVersion: rbac.authorization.k8s.io/v1
kind: ClusterRole
metadata:
  name: otelcontribcol
  labels:
    app: otelcontribcol
rules:
- apiGroups:
  - ""
  resources:
  - events
  - namespaces
  - namespaces/status
  - nodes
  - nodes/spec
  - pods
  - pods/status
  - replicationcontrollers
  - replicationcontrollers/status
  - resourcequotas
  - services
  verbs:
  - get
  - list
  - watch
- apiGroups:
  - apps
  resources:
  - daemonsets
  - deployments
  - replicasets
  - statefulsets
  verbs:
  - get
  - list
  - watch
- apiGroups:
  - extensions
  resources:
  - daemonsets
  - deployments
  - replicasets
  verbs:
  - get
  - list
  - watch
- apiGroups:
  - batch
  resources:
  - jobs
  - cronjobs
  verbs:
  - get
  - list
  - watch
- apiGroups:
  - autoscaling
  resources:
  - horizontalpodautoscalers
  verbs:
  - get
  - list
  - watch
- nonResourceURLs:
  - "/metrics"
  verbs:
  - get
The above ClusterRole, named "otelcontribcol," grants read-only access to a variety of resources across your entire Kubernetes cluster.
To create the ClusterRole:
kubectl apply -f clusterrole.yaml
Create a ClusterRoleBinding
A ClusterRoleBinding is a Kubernetes resource that associates a ClusterRole (a set of cluster-wide permissions) with one or more subjects (users, groups, or service accounts). It acts as the "glue" that connects the permissions defined in a ClusterRole with the entities that need those permissions to perform actions on resources within the Kubernetes cluster.
In your text editor, create a file called clusterrolebinding.yaml and paste in the below configuration:
apiVersion: rbac.authorization.k8s.io/v1
kind: ClusterRoleBinding
metadata:
  name: otelcontribcol
  labels:
    app: otelcontribcol
roleRef:
  apiGroup: rbac.authorization.k8s.io
  kind: ClusterRole
  name: otelcontribcol
subjects:
- kind: ServiceAccount
  name: otelcontribcol
  namespace: default
In the above configuration, the clusterRoleBinding links the previously created Service Account with the ClusterRole permissions, allowing pods running under that Service Account to collect metrics, logs, and traces from different Kubernetes resources across all namespaces.
To create the ClusterRoleBinding:
kubectl apply -f clusterrolebinding.yaml
Create a ConfigMap
A ConfigMap is a Kubernetes object used to store non-confidential configuration data in key-value pairs. This data can then be consumed by pods or other Kubernetes objects within your cluster.
In your text editor, create a file called configmap.yaml and paste in the below configuration:
apiVersion: v1
kind: ConfigMap
metadata:
  name: otelcontribcol
  labels:
    app: otelcontribcol
data:
  config.yaml: |
    receivers:
      k8s_events:
        namespaces: [default]
    exporters:
      otlp:
        endpoint: "ingest.{region}.signoz.cloud:443"
        tls:
          insecure: false
        timeout: 20s
        headers:
          signoz-ingestion-key: "<SIGNOZ-INGESTION-KEY>"
    service:
      pipelines:
        logs:
          receivers: [k8s_events]
          exporters: [otlp]
The ConfigMap provides the OpenTelemetry Collector Contrib with the necessary settings to collect Kubernetes events and send them to SigNoz for analysis and visualization.
From the above configuration;
The
k8s_eventsreceiver is configured to collect Kubernetes events only from thedefaultnamespace. You can modify this list to include other namespaces if needed.The
otlpexporter is set up to send the collected event data to SigNoz at the specified endpoint. Replace{region}with your selected region when creating your SigNoz cloud account and replace<SIGNOZ-INGESTION-KEY>with the ingestion key for your cloud account.To get your region and ingestion key, navigate to your SigNoz account URL > settings > ingestion settings and copy them.

To create the ConfigMap:
kubectl apply -f configmap.yaml
Create a Deployment
A Deployment is a Kubernetes object that allows you to manage the lifecycle of your applications in a reliable and scalable way.
In your text editor, create a file called deployment.yaml and paste the below configuration:
apiVersion: apps/v1
kind: Deployment
metadata:
  name: otelcontribcol
  labels:
    app: otelcontribcol
spec:
  replicas: 1
  selector:
    matchLabels:
      app: otelcontribcol
  template:
    metadata:
      labels:
        app: otelcontribcol
    spec:
      serviceAccountName: otelcontribcol
      containers:
        - name: otelcontribcol
          image: otel/opentelemetry-collector-contrib
          args: ["--config", "/etc/config/config.yaml"]
          volumeMounts:
            - name: config
              mountPath: /etc/config
          imagePullPolicy: IfNotPresent
      volumes:
        - name: config
          configMap:
            name: otelcontribcol
The above Deployment manifest deploys a single instance of a Pod (otelcontribcol) based on the otel/opentelemetry-collector-contrib Docker image. The Pod is configured to use a specific ConfigMap (otelcontribcol) to provide configuration files (config.yaml) mounted at /etc/config inside the container.
This setup ensures that the OpenTelemetry Collector Contrib component (otelcontribcol) runs with the specified configuration in a Kubernetes environment.
To create the Deployment:
kubectl apply -f deployment.yaml
To see the created Deployment:
kubectl get deployments
Deployments use ReplicaSets to create pods. To see the created pods:
kubectl get pods
Output:
NAME                                                     READY   STATUS      RESTARTS       AGE
my-cronjob-28638823-hb8w6                                1/1     Completed   0              4m30s
my-cronjob-28638824-grqzp                                1/1     Completed   0              3m31s
my-cronjob-28638825-t864k                                1/1     Completed   0              2m31s
my-cronjob-28638826-27srl                                1/1     Completed   0              91s
my-cronjob-28638827-nx228                                1/1     Completed   0              31s
my-release-k8s-infra-otel-agent-btbwm                    1/1     Running     5 (10h ago)    13d
my-release-k8s-infra-otel-deployment-85bc784966-lg6b4    1/1     Running     5 (10h ago)    13d
otelcontribcol-584ff6b55f-7gxqm                          1/1     Running     0              161m
To verify if the Otel Collector is correctly collecting telemetry data:
kubectl logs <otelcontribcol-pod-name>
Output:
2024-06-13T02:16:26.439Z        info    service@v0.101.0/service.go:102 Setting up own telemetry...
2024-06-13T02:16:26.439Z        info    service@v0.101.0/telemetry.go:103       Serving metrics {"address": ":8888", "level": "Normal"}
2024-06-13T02:16:26.445Z        info    service@v0.101.0/service.go:169 Starting otelcol-contrib...     {"Version": "0.101.0", "NumCPU": 8}
2024-06-13T02:16:26.445Z        info    extensions/extensions.go:34     Starting extensions...
2024-06-13T02:16:26.453Z        info    k8seventsreceiver@v0.101.0/receiver.go:67       starting to watch namespaces for the events.    {"kind": "receiver", "name": "k8s_events", "data_type": "logs"}
2024-06-13T02:16:26.453Z        info    service@v0.101.0/service.go:195 Everything is ready. Begin running and processing data.
2024-06-13T02:16:26.453Z        warn    localhostgate/featuregate.go:63 The default endpoints for all servers in components will change to use localhost instead of 0.0.0.0 in a future version. Use the feature gate to preview the new default.        {"feature gate ID": "component.UseLocalHostAsDefaultHost"}
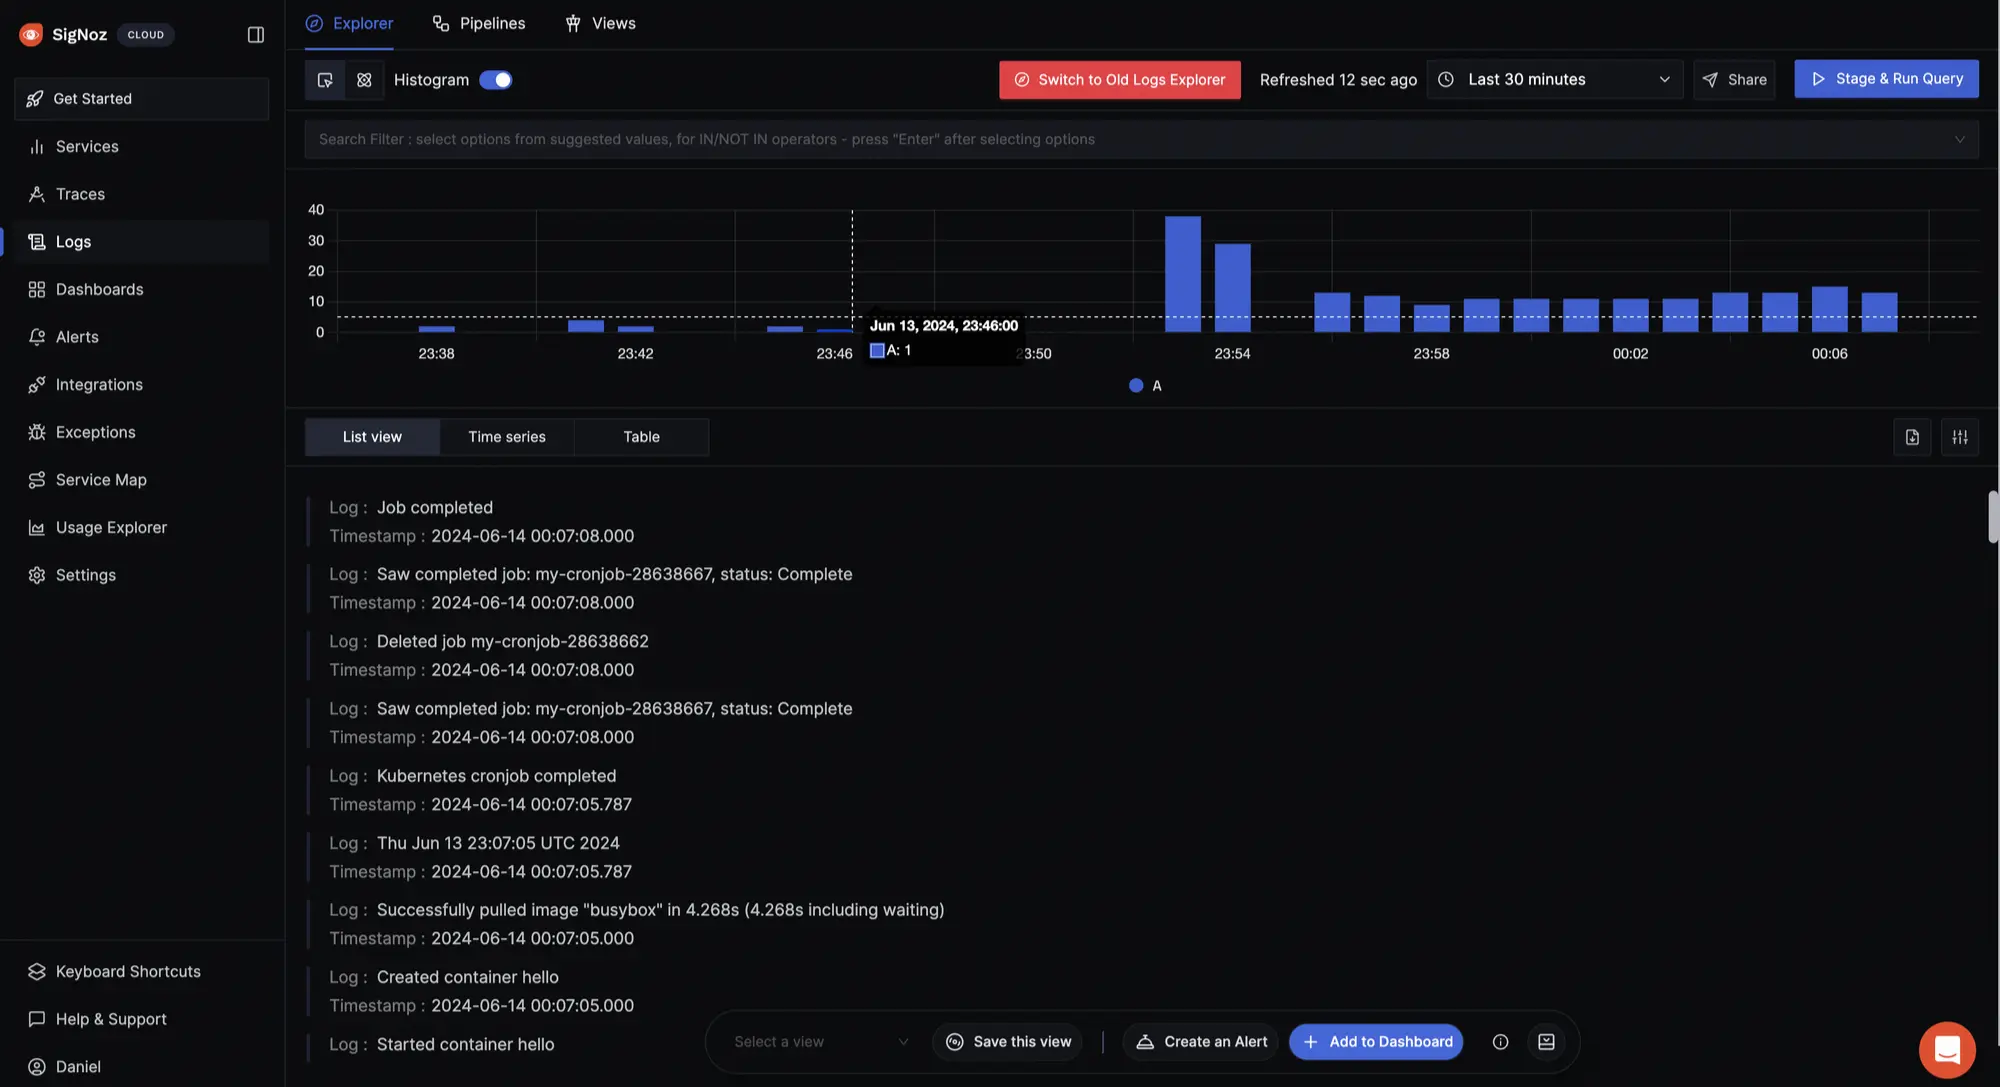
Navigate to your SigNoz cloud account to see the logs coming in from your cluster, most especially logs from the CronJobs.

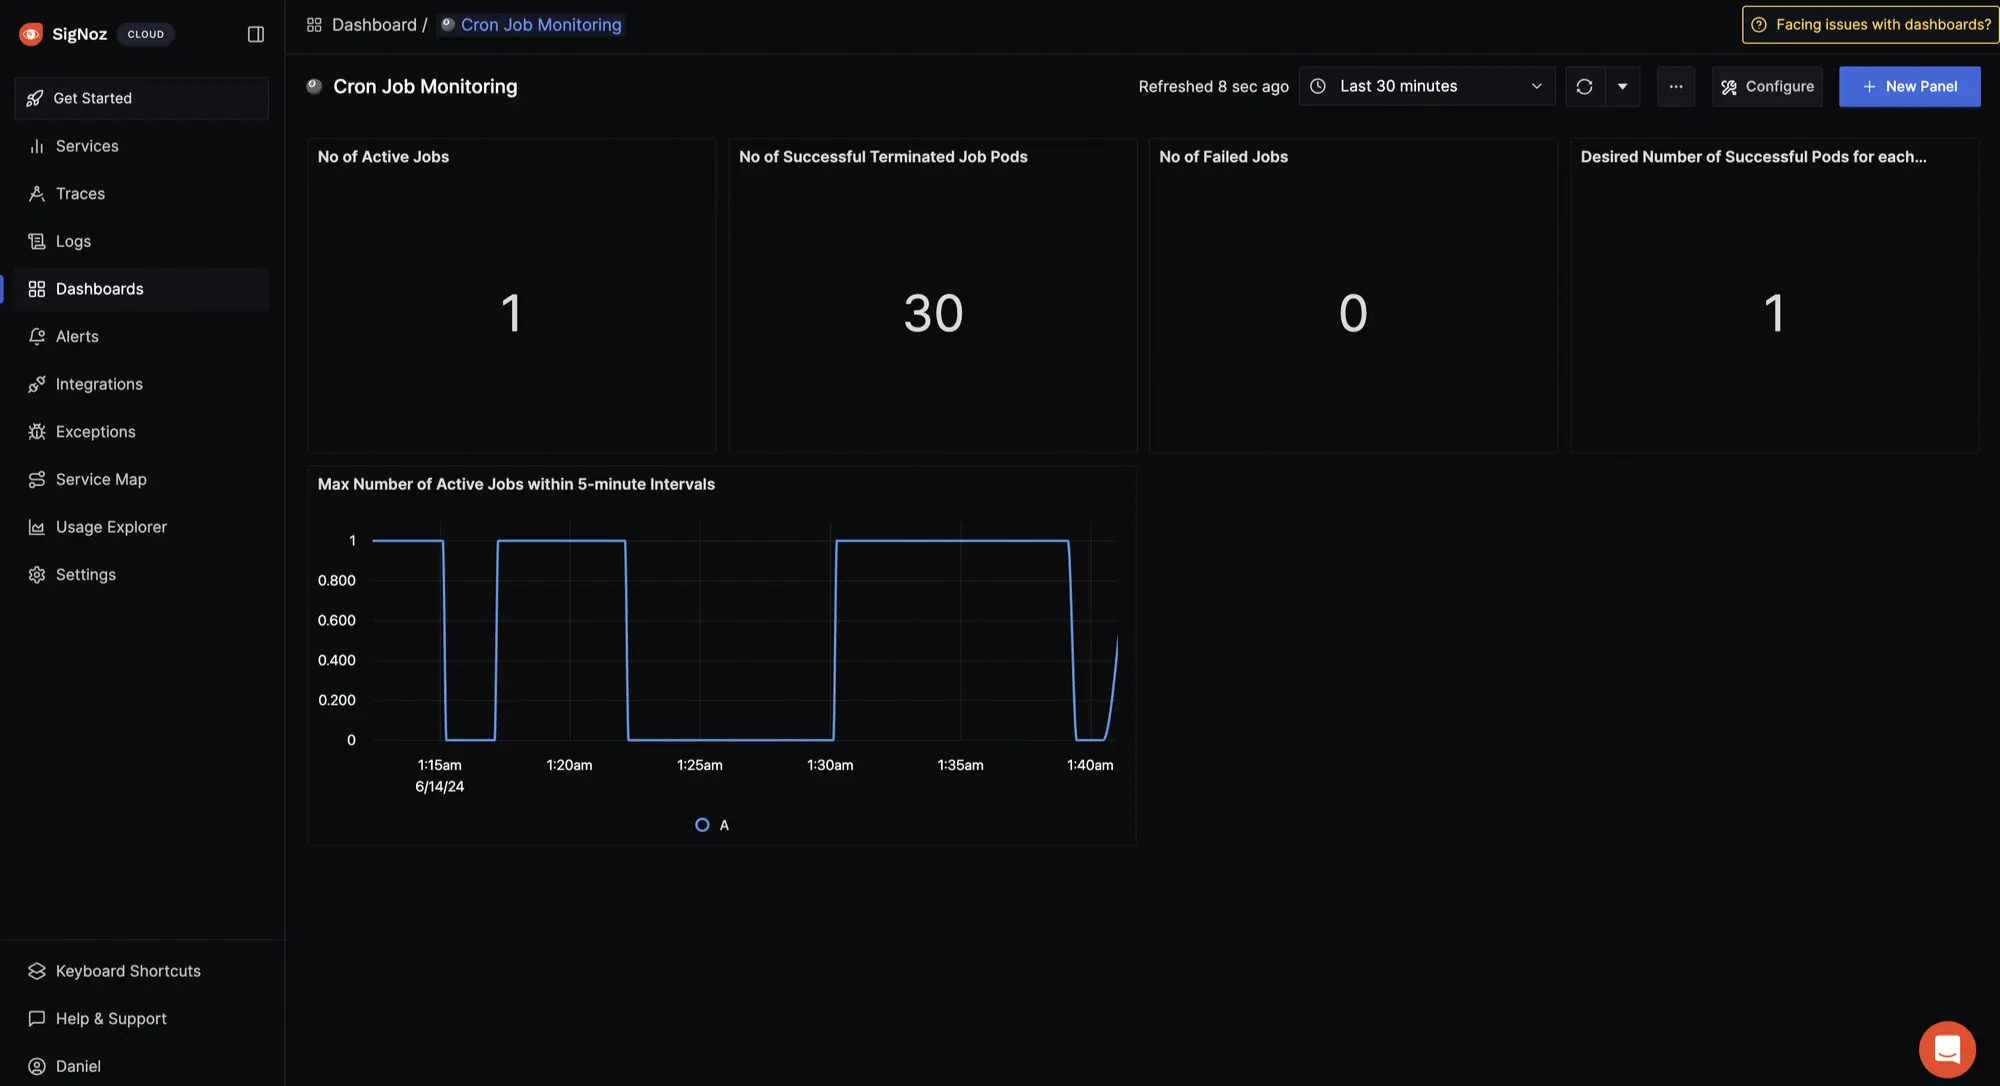
With SigNoz, you can create custom dashboards tailored to your specific monitoring and observability needs.
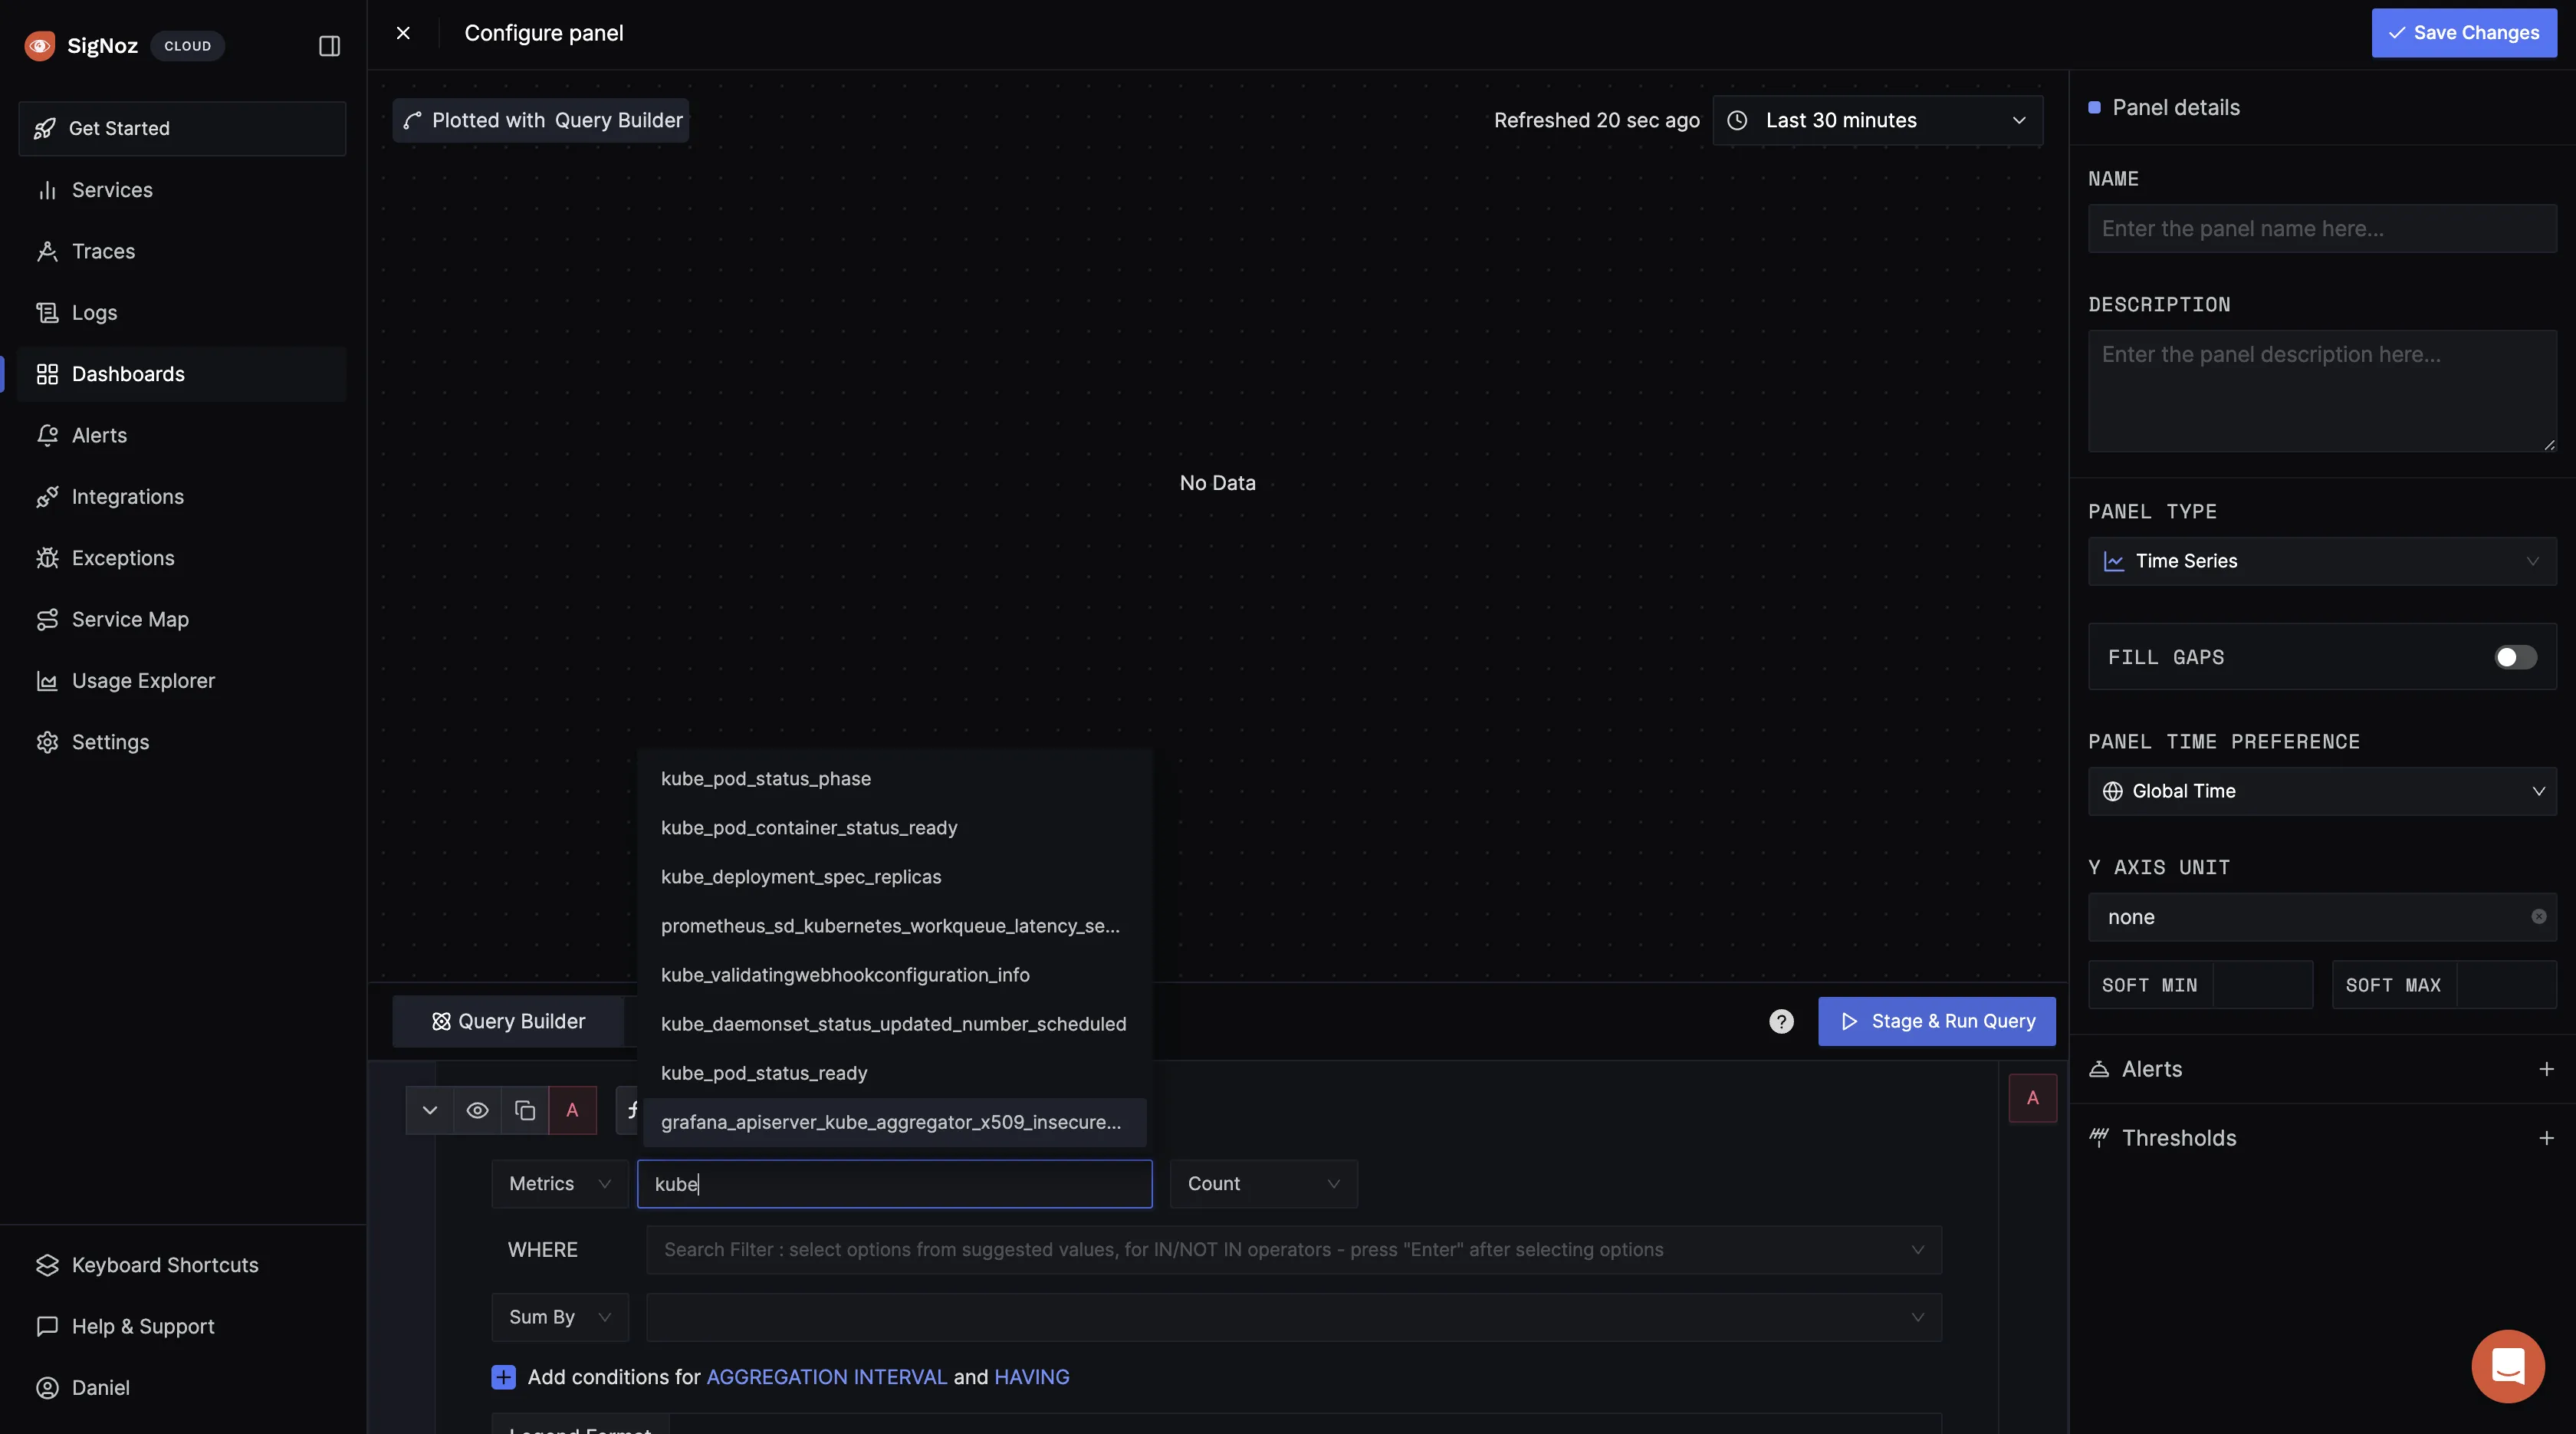
To create a custom dashboard for CronJob visualization, click on Dashboards > New Dashboard > Create Dashboard > Configure > Save > New Panel.
Here, you have the flexibility to choose the visualization type that best suits your needs, whether it's a time series graph, a simple value display, a bar chart for comparison, or even a table for detailed data presentation.
Within the query builder, craft and execute queries targeting your CronJobs to gain insights into their performance.

The above query
k8s_cronjob_active_jobs set to k8s_cronjob_name = my-cron-job returns the number of active jobs for the CronJob named "my-cronjob".
You can execute additional queries and create more visualization in your dashboard as needed.
Getting Started with SigNoz
SigNoz Cloud is the easiest way to run SigNoz. Sign up for a free account and get 30 days of unlimited access to all features.
You can also install and self-host SigNoz yourself since it is open-source. With 24,000+ GitHub stars, open-source SigNoz is loved by developers. Find the instructions to self-host SigNoz.
