Fixing Upstream Connect Errors (Docker, Kubernetes, Spring Boot & More)
What Are Upstream Connect Errors?
An upstream connect error occurs when a reverse proxy or load balancer cannot establish a TCP connection to the backend service it's trying to reach. Think of it like a postal service scenario: you hand your letter to the local post office (proxy), but they can't reach the destination post office (upstream server) to deliver it. The connection never even gets established.
These errors typically manifest as:
- 502 Bad Gateway: The proxy received an invalid response from the upstream server
- 503 Service Unavailable: The upstream service is temporarily unavailable
- Connection refused: The upstream service rejected the connection attempt
The error sits in the critical path of your request flow: Client → Reverse Proxy → [ERROR HERE] → Backend Service. Unlike timeout errors where a connection is established but the response is slow, upstream connect errors mean the TCP handshake never completes.
How Upstream Errors Manifest Across Platforms
Different platforms and technologies report upstream connect errors in unique ways. Understanding these error messages helps you quickly identify the issue.
Common Error Messages by Platform
Docker
nginx: [error] connect() failed (111: Connection refused) while connecting to upstream
Kubernetes with Istio
upstream connect error or disconnect/reset before headers. reset reason: connection failure, transport failure reason: delayed connect error: 111
AWS Application Load Balancer
502 Bad Gateway - The server was acting as a gateway or proxy and received an invalid response from the upstream server
Traditional Nginx
upstream timed out (110: Connection timed out) while connecting to upstream
no live upstreams while connecting to upstream
Spring Boot Applications
java.net.ConnectException: Connection refused (Connection refused)
org.springframework.web.client.ResourceAccessException: I/O error on GET request: Connection refused
feign.RetryableException: Connection refused executing GET http://service-name/endpoint
Each message provides clues about the underlying problem. "Connection refused" typically means the service isn't listening on the expected port, while "no live upstreams" indicates all backend servers failed health checks.
Root Causes by Platform
Understanding the common causes for your specific platform helps narrow down the troubleshooting process. Let's examine the most frequent issues for each environment.
Docker: Network Isolation Issues
Docker's containerized networking creates isolated namespaces that often confuse developers. The most common mistake involves using localhost or 127.0.0.1 in proxy configurations.
Here's what happens when you misconfigure localhost in Docker:
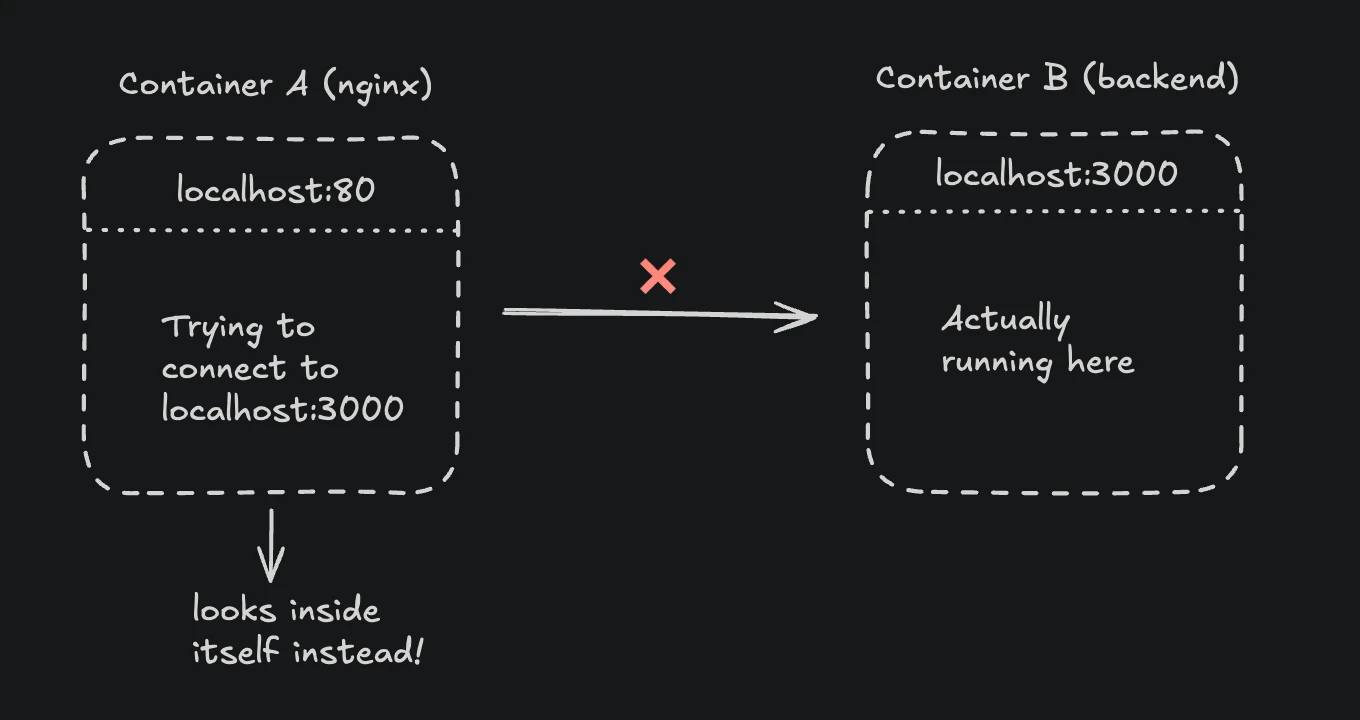
When nginx runs in a container and you configure it to connect to localhost:3000, it looks for port 3000 inside the nginx container itself, not on your host machine or in other containers. Each container has its own network namespace with its own localhost.
This is how Docker networking should work:
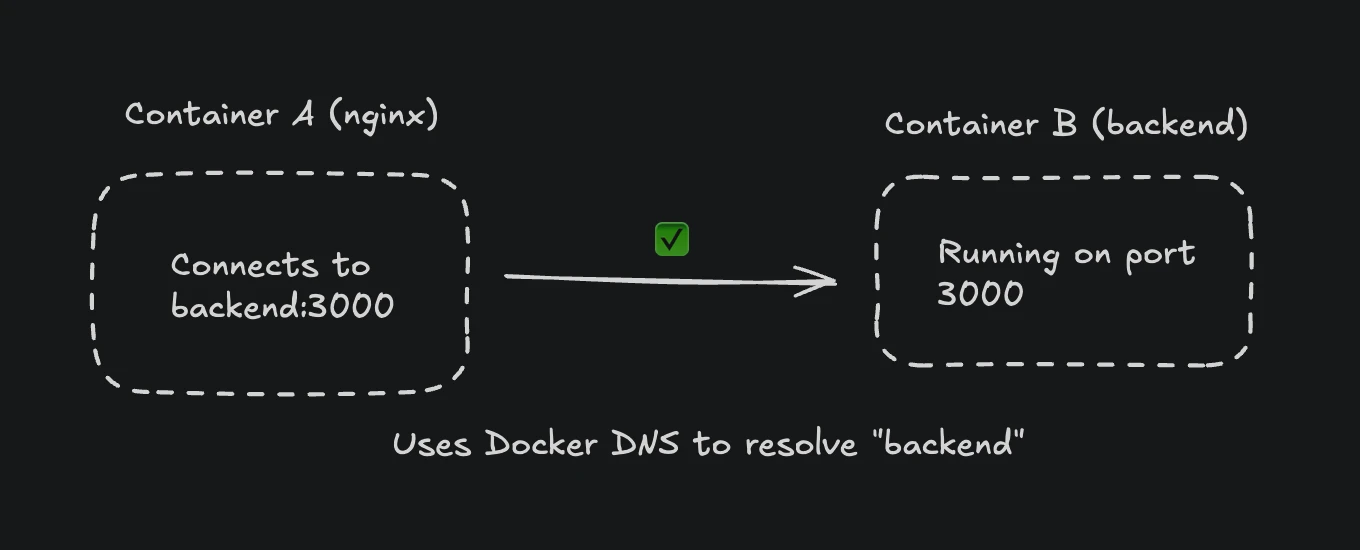
Docker's internal DNS automatically resolves container names to their IP addresses, enabling seamless communication between containers on the same network.
Other Docker-specific causes include:
- Containers running in different Docker networks that can't communicate
- Port mapping confusion between internal and external ports
- Container startup order issues where the proxy starts before the backend
- Resource limits causing containers to crash or become unresponsive
Kubernetes: Service Discovery Failures
Kubernetes abstracts networking through Services and Endpoints, which introduces additional failure points. The most common issue occurs when Service selectors don't match Pod labels, resulting in no Endpoints being created.
Kubernetes Service Discovery Flow
Here's how service discovery works in Kubernetes:
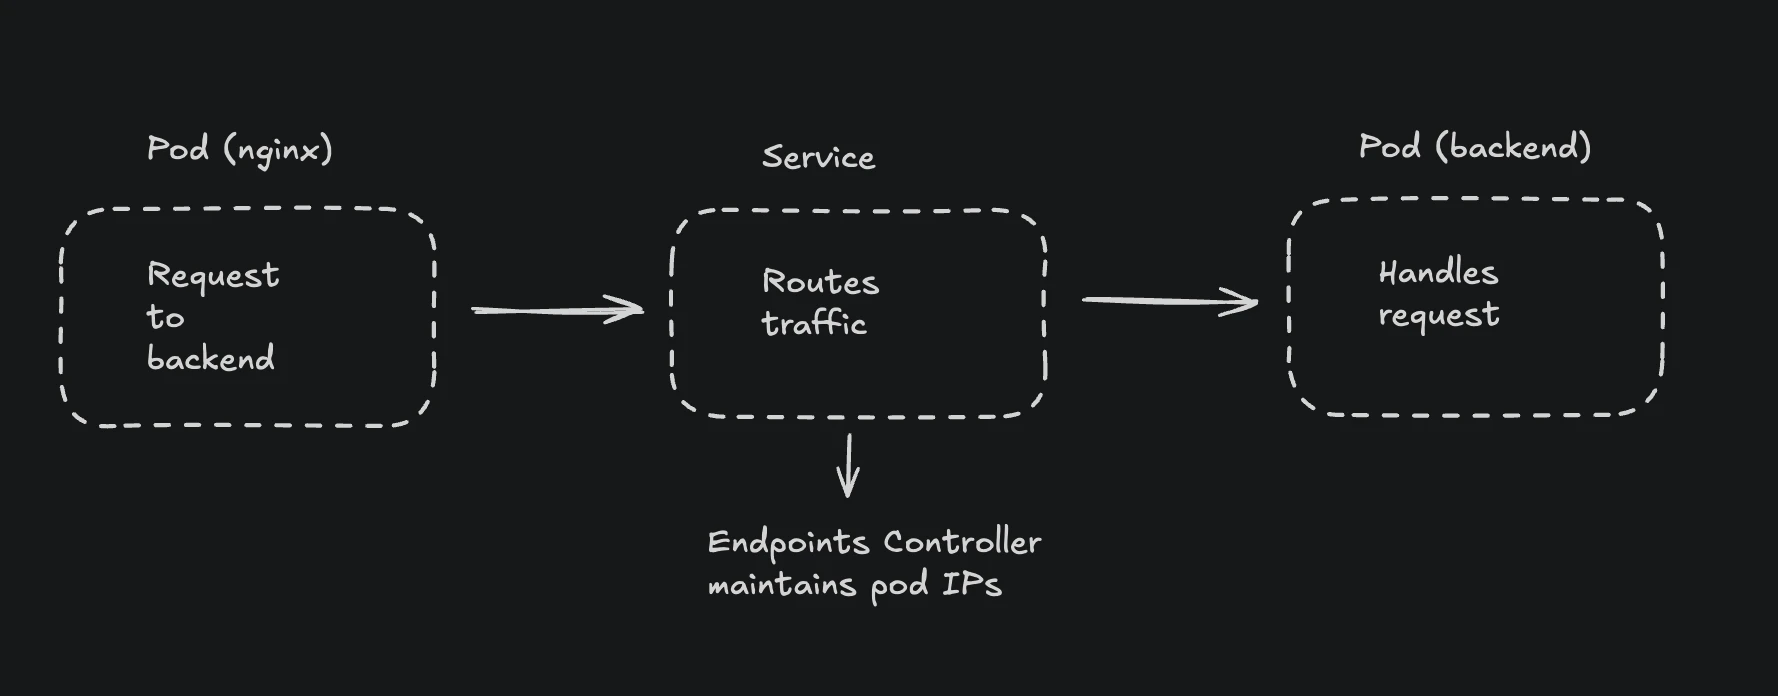
The service discovery flow works like this:
- Client Pod makes a request to a Service (ClusterIP)
- Service uses selectors to find matching Pods
- If no Pods match, no Endpoints are created
- Request fails with 503 Service Unavailable
Additional Kubernetes-specific causes:
- DNS resolution failures within the cluster
- Network policies blocking traffic between namespaces
- Readiness probes failing, removing Pods from service rotation
- Istio/Envoy sidecar proxy misconfiguration or mTLS issues
Cloud Load Balancers: Security and Health Checks
Cloud providers add their own layer of complexity through security groups, health checks, and target configurations.
Load Balancer Architecture
Here's how cloud load balancers manage traffic:
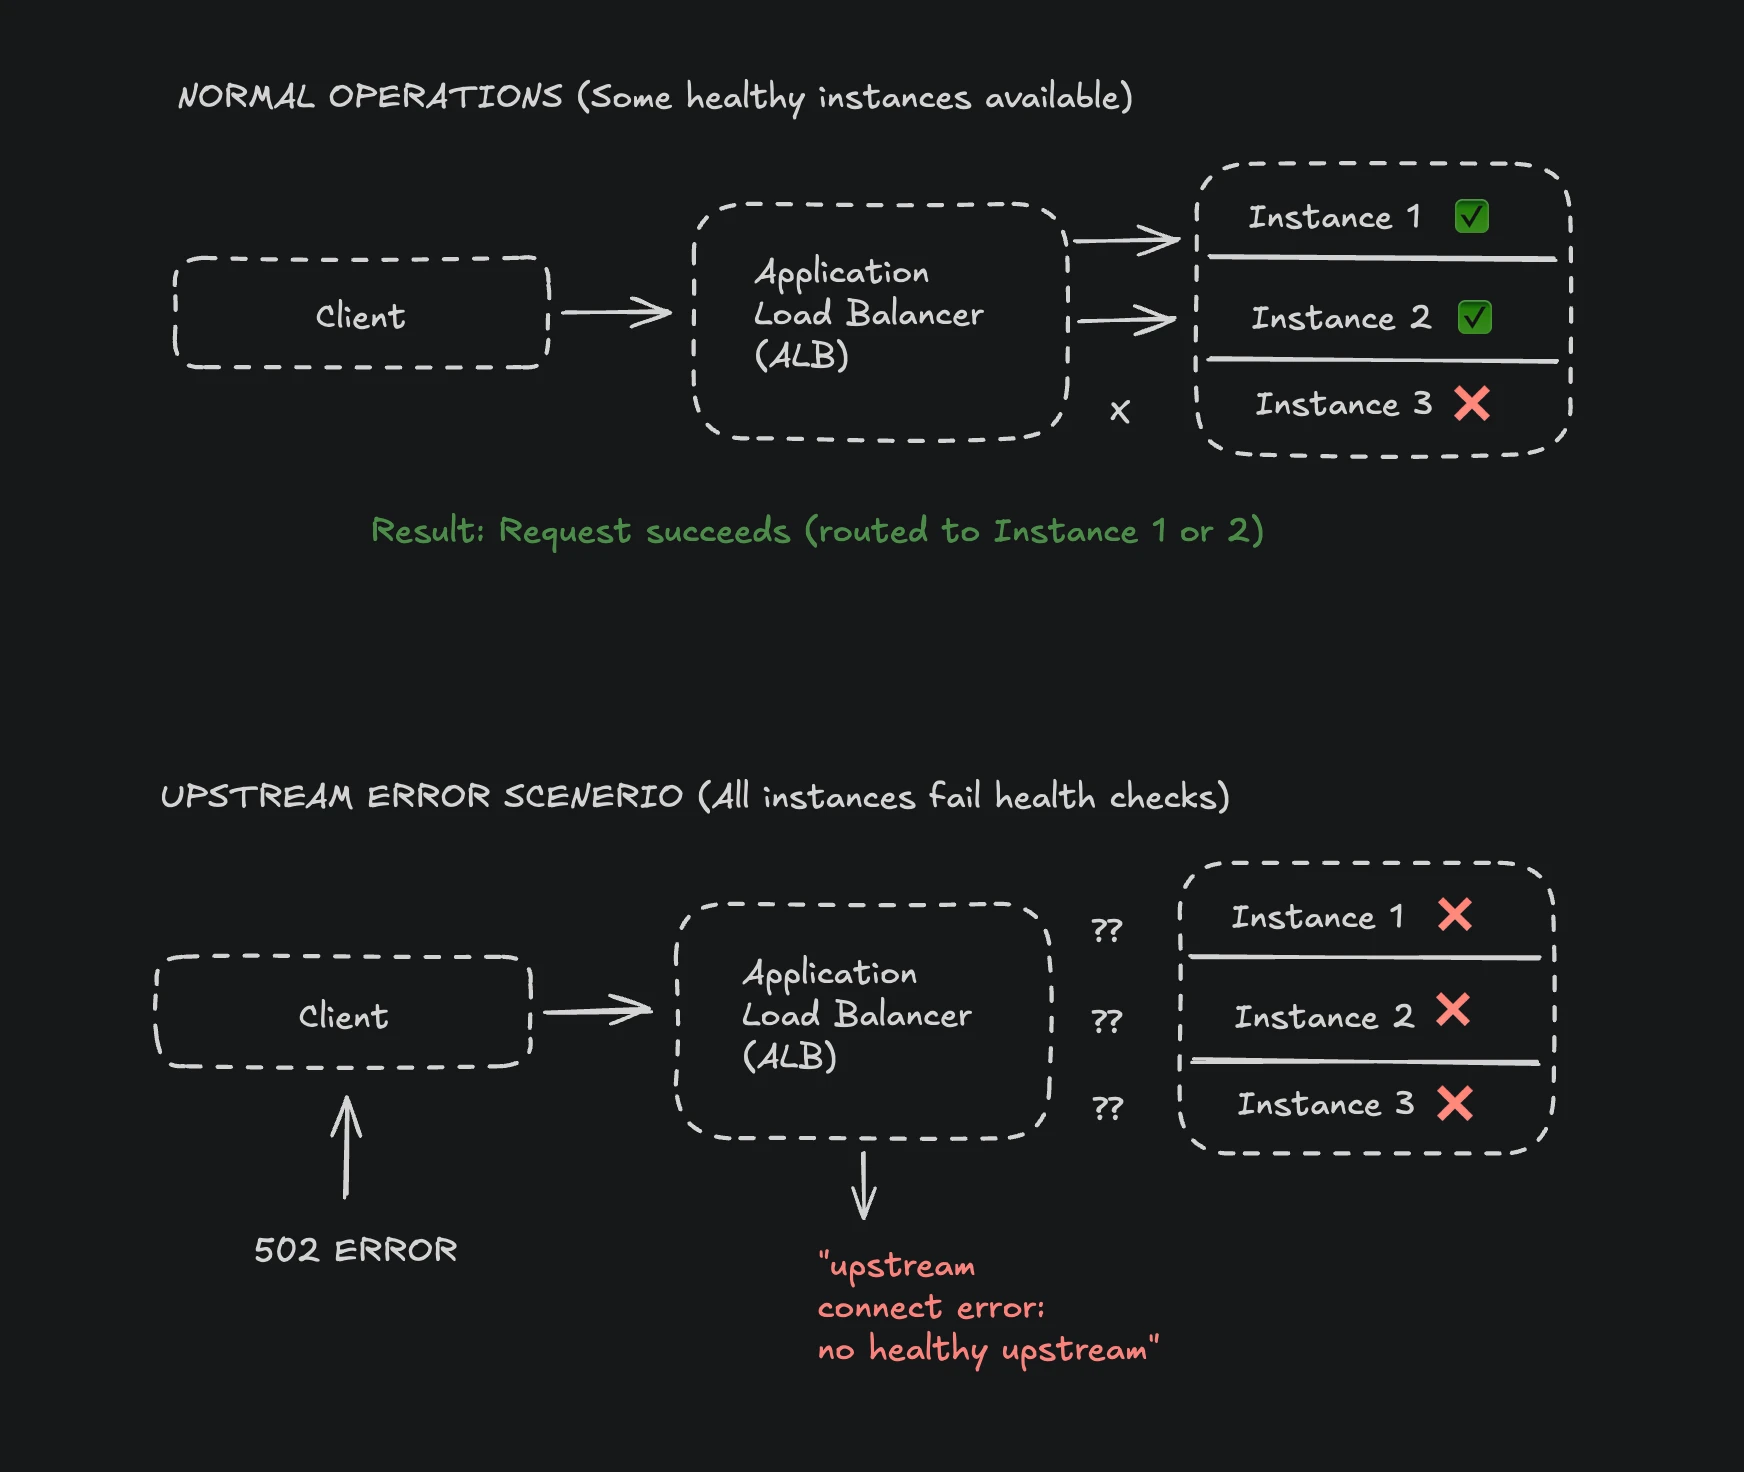
The load balancer continuously monitors target health and only routes traffic to healthy instances. When health checks fail, the load balancer removes instances from rotation. If ALL instances fail health checks (even if they're actually running), the load balancer has no upstream targets to connect to, causing upstream connect errors
Common issues include:
AWS ALB/NLB:
- Security groups not allowing traffic from the load balancer to targets
- Target health checks failing due to incorrect paths or expected status codes
- Timeout misalignment between ALB (default 60s) and backend services
- Wrong target type (instance vs IP vs Lambda)
Azure Application Gateway:
- Backend pool misconfiguration with incorrect IP addresses
- Health probe settings too aggressive, marking healthy instances as unhealthy
- NSG rules blocking traffic from the gateway subnet
Google Cloud Load Balancing:
- Firewall rules blocking health check IP ranges
- Backend service capacity settings too restrictive
- Connection draining timeout too short during deployments
Traditional Web Servers: Configuration and OS-Level Issues
Even in traditional deployments with nginx, Apache, or HAProxy, upstream errors occur due to:
- SELinux blocking network connections (especially on RHEL/CentOS)
- Firewall rules preventing proxy-to-backend communication
- Backend services binding to wrong network interfaces (only listening on localhost)
- File descriptor limits preventing new connections
- Connection pool exhaustion
Systematic Debugging Approach
Rather than randomly checking configurations, follow this systematic approach to identify and resolve upstream errors efficiently.
Quick Diagnosis Decision Tree
Start with this decision tree to quickly narrow down the issue:
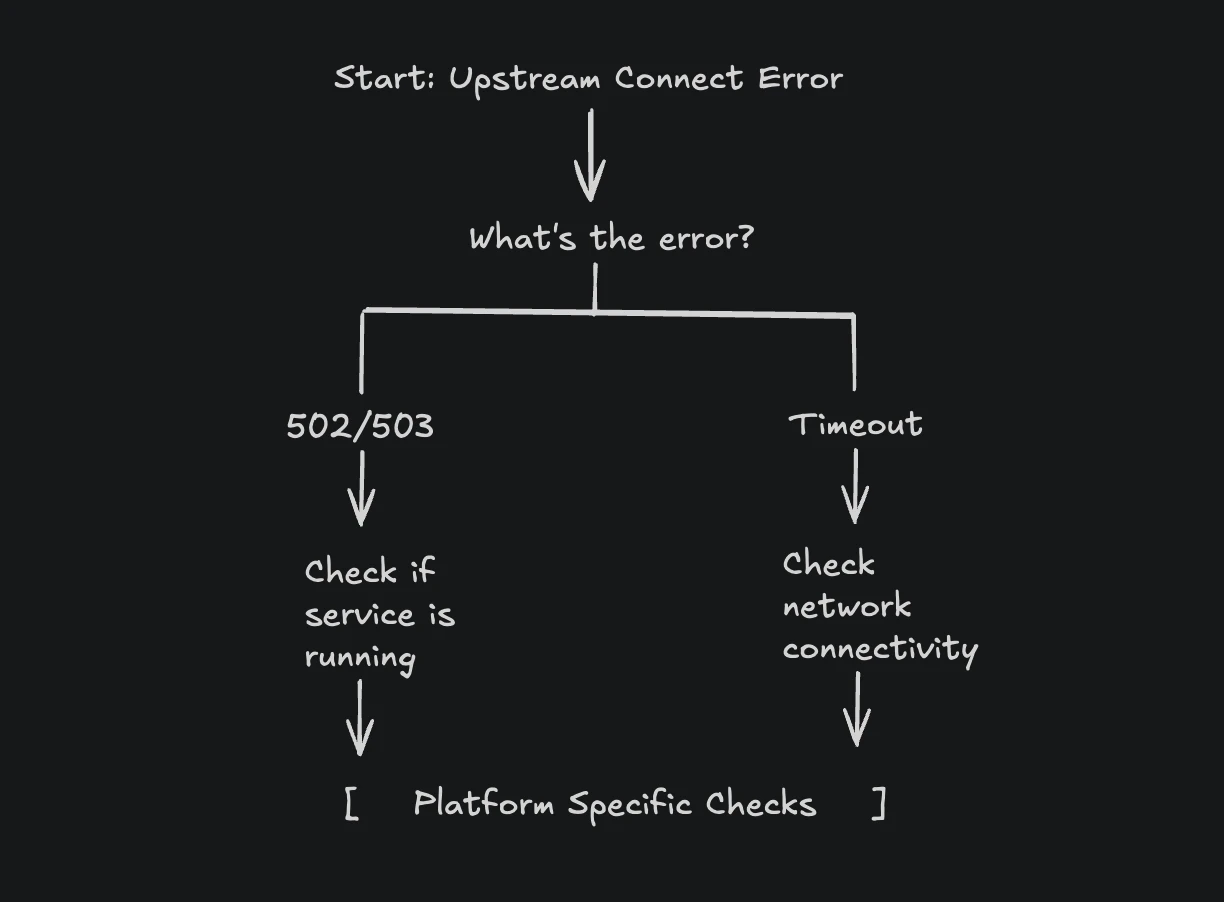
This decision tree helps you quickly identify whether you're dealing with a service availability issue (502/503) or a network connectivity problem (timeout), directing your troubleshooting efforts appropriately.
Step 1: Verify the Backend Service Is Running
Before diving into complex networking issues, confirm your backend service is actually running and accessible.
# Check if the service process is running
ps aux | grep [s]ervice-name
systemctl status backend-service

# For Docker containers
docker ps | grep backend
docker logs backend-container --tail 50

# For Kubernetes pods
kubectl get pods -l app=backend
kubectl logs -l app=backend --tail=50

# For Spring Boot applications
jps -l | grep jar
ps aux | grep java | grep your-application.jar
If the service isn't running, start it and check the logs for startup errors. A service that crashes immediately after starting will cause upstream errors.
Step 2: Test Direct Connectivity
Once you've confirmed the service is running, test if you can connect to it directly, bypassing the proxy. This isolates whether the problem is with the backend or the proxy configuration.
# Test HTTP endpoint directly
curl -v http://backend-host:3000/health

# If that fails, test basic TCP connectivity
telnet backend-host 3000
nc -zv backend-host 3000

# For services using a different interface
curl -v http://10.0.1.5:3000/health

# For Spring Boot actuator endpoints
curl -v http://backend-host:8080/actuator/health
The verbose output from curl (-v flag) shows the entire connection process, including DNS resolution, TCP connection, and HTTP response. If the direct connection works but the proxy connection doesn't, the issue is with proxy configuration or network routing.
Step 3: Verify DNS Resolution
Many upstream errors stem from DNS resolution failures, especially in containerized environments. The proxy might not be able to resolve the backend hostname.
# Check DNS resolution
nslookup backend-service
dig backend-service

# In Docker, check from within the proxy container
docker exec nginx-container nslookup backend-service

# In Kubernetes, check from within a pod
kubectl exec -it nginx-pod -- nslookup backend-service
If DNS resolution fails, check your /etc/resolv.conf or equivalent DNS configuration. In Kubernetes, ensure CoreDNS is running. In Docker, verify containers are on the same network.
Step 4: Examine Proxy Configuration
Review your proxy configuration for common mistakes. Each proxy has its own configuration syntax and requirements.
For nginx, test the configuration syntax:
nginx -t
# nginx: configuration file /etc/nginx/nginx.conf test is successful
Look for these common configuration issues:
- Using
localhostinstead of service names in containerized environments - Incorrect port numbers (using external ports instead of internal container ports)
- Missing timeout configurations causing premature connection drops
- Incorrect upstream server addresses
Step 5: Analyze Logs for Patterns
Logs provide crucial information about when and why connections fail. Check both proxy and backend logs, correlating timestamps to understand the failure sequence.
# Check proxy error logs
tail -f /var/log/nginx/error.log | grep upstream

# Check backend application logs
journalctl -u backend-service -f

# In Kubernetes, check both containers
kubectl logs nginx-pod -c nginx --tail=100
kubectl logs backend-pod --tail=100

# For Spring Boot applications
tail -f /var/log/myapp/application.log | grep -E "ERROR|WARN.*connection"
Look for patterns like:
- Errors occurring immediately vs after a delay (connection refused vs timeout)
- Errors affecting all requests vs intermittent failures
- Correlation with deployment times or traffic spikes
Platform-Specific Solutions
Now let's dive into detailed solutions for each platform, with explanations of why these configurations work.
Docker Solutions
Fixing the Localhost Problem
The most common Docker networking mistake is using localhost in proxy configurations. Here's why it fails and how to fix it:
Why it fails: Each Docker container has its own network namespace. When nginx container tries to connect to localhost:3000, it looks inside its own container, not at other containers or the host.
The solution: Use Docker's internal DNS to reference other containers by name.
# ❌ WRONG - Will cause upstream connect error
upstream backend {
    server localhost:3000;      # Looks inside nginx container
    server 127.0.0.1:3000;      # Same problem
}

# ✅ CORRECT - Use container names or service names
upstream backend {
    server backend-service:3000;  # Docker's DNS resolves this to the backend container
}

server {
    listen 80;

    location / {
        proxy_pass http://backend;

        # Important: Set appropriate timeouts to prevent premature connection drops
        proxy_connect_timeout 10s;   # Time to establish TCP connection
        proxy_send_timeout 60s;       # Time to send request to backend
        proxy_read_timeout 60s;       # Time to wait for backend response

        # Handle connection failures gracefully
        proxy_next_upstream error timeout invalid_header http_500 http_502 http_503;
        proxy_next_upstream_tries 3;
    }
}
The proxy_next_upstream directive automatically retries failed requests on different backend servers. Combined with appropriate timeouts, this prevents single-point failures from affecting users.
Docker Compose Networking
Docker Compose automatically creates a network for your services, making inter-container communication easier. Here's a complete working configuration:
# docker-compose.yml
version: '3.8'

services:
  nginx:
    image: nginx:alpine
    container_name: nginx-proxy
    ports:
      - "80:80"  # Map host port 80 to container port 80
    volumes:
      - ./nginx.conf:/etc/nginx/nginx.conf:ro
    depends_on:
      backend:
        condition: service_healthy  # Wait for backend to be healthy
    networks:
      - app-network

  backend:
    image: node:18-alpine
    container_name: backend-service
    working_dir: /app
    volumes:
      - ./app:/app
    command: node server.js
    expose:
      - "3000"  # Only exposed to other containers, not host
    networks:
      - app-network
    # Health check ensures the service is ready before nginx starts using it
    healthcheck:
      test: ["CMD", "curl", "-f", "http://localhost:3000/health"]
      interval: 30s
      timeout: 10s
      retries: 5
      start_period: 40s  # Give the app time to start

networks:
  app-network:
    driver: bridge
The depends_on with condition: service_healthy ensures nginx only starts after the backend is responding to health checks, preventing startup-order related upstream errors. The expose directive makes port 3000 available only to linked services, not to the host system, enhancing security.
Kubernetes Solutions
Service Discovery Configuration
Kubernetes uses Services to provide stable network endpoints for Pods. The most common upstream error occurs when Service selectors don't match Pod labels.
How Service discovery works:
- Service defines selectors (e.g.,
app: backend) - Kubernetes finds all Pods with matching labels
- These Pods become the Service's Endpoints
- kube-proxy routes traffic to these Endpoints
Here's a correct configuration:
# Deployment with properly labeled pods
apiVersion: apps/v1
kind: Deployment
metadata:
  name: backend
spec:
  replicas: 3
  selector:
    matchLabels:
      app: backend        # Deployment selector
      version: v1
  template:
    metadata:
      labels:
        app: backend      # Pod labels must match
        version: v1
    spec:
      containers:
      - name: backend
        image: myapp:latest
        ports:
        - containerPort: 3000  # Container listens on this port
        # Readiness probe prevents routing traffic to unready pods
        readinessProbe:
          httpGet:
            path: /health
            port: 3000
          initialDelaySeconds: 10
          periodSeconds: 5
          failureThreshold: 3
        # Liveness probe restarts unhealthy pods
        livenessProbe:
          httpGet:
            path: /health
            port: 3000
          initialDelaySeconds: 30
          periodSeconds: 10
          failureThreshold: 3

---
# Service that discovers pods using selectors
apiVersion: v1
kind: Service
metadata:
  name: backend-service
spec:
  selector:
    app: backend          # Must match pod labels exactly
    version: v1           # All selectors must match
  ports:
  - port: 80             # Service port (what other pods use)
    targetPort: 3000     # Pod port (must match containerPort)
    protocol: TCP
  type: ClusterIP
The readiness probe prevents traffic from reaching pods until they're ready to handle requests. The liveness probe restarts unhealthy pods automatically. This combination ensures only healthy pods receive traffic.
To verify the Service has discovered Pods:
# Check if Service has endpoints
kubectl get endpoints backend-service
# NAME              ENDPOINTS                          AGE
# backend-service   10.1.2.3:3000,10.1.2.4:3000       5m

# If ENDPOINTS is empty, no pods match the selector
# Debug by comparing labels
kubectl get pods --show-labels
kubectl describe service backend-service
The kubectl get endpoints command reveals whether Kubernetes has successfully matched pods to your service. Empty endpoints indicate a selector mismatch—the most common cause of upstream errors in Kubernetes.
Istio Service Mesh Issues
Istio adds mTLS and traffic management, which can cause upstream errors if misconfigured. The "UC" (Upstream Connection) error flag indicates connection failures at the Envoy proxy level.
Service Mesh Request Flow
Here's how requests flow through an Istio service mesh:

Each pod's sidecar proxy intercepts all network traffic, adding security and observability but also introducing potential failure points.
Common Istio problems and solutions:
- mTLS Misconfiguration: When some services have sidecars and others don't:
# Allow both mTLS and plain text during migration
apiVersion: security.istio.io/v1beta1
kind: PeerAuthentication
metadata:
  name: default
  namespace: production
spec:
  mtls:
    mode: PERMISSIVE  # Accepts both encrypted and plain text
PERMISSIVE mode allows gradual migration to mTLS. Services with sidecars communicate securely while legacy services without sidecars still work, preventing upstream errors during transition.
- DestinationRule for connection management:
apiVersion: networking.istio.io/v1beta1
kind: DestinationRule
metadata:
  name: backend-destination
spec:
  host: backend-service
  trafficPolicy:
    connectionPool:
      tcp:
        maxConnections: 100
      http:
        http1MaxPendingRequests: 100
        http2MaxRequests: 100
    # Circuit breaker configuration
    outlierDetection:
      consecutive5xxErrors: 5      # Errors before ejection
      interval: 30s                # Analysis interval
      baseEjectionTime: 30s        # How long to eject
      maxEjectionPercent: 50       # Max % of backends to eject
      minHealthPercent: 30         # Panic threshold
The outlier detection acts as a circuit breaker, automatically removing unhealthy instances from the load balancing pool. This prevents cascading failures when backend services become unreliable.
To debug Istio-related upstream errors:
# Check Envoy clusters and their health
kubectl exec $POD -c istio-proxy -- curl -s localhost:15000/clusters | grep backend

# View Envoy statistics
kubectl exec $POD -c istio-proxy -- curl -s localhost:15000/stats/prometheus | grep upstream_rq

# Check Envoy access logs for error flags
kubectl logs $POD -c istio-proxy | grep -E "UC|UF|UH"
# UC = Upstream Connection Error
# UF = Upstream Connection Failure
# UH = No Healthy Upstream
These Envoy-specific commands expose internal proxy metrics. The error flags (UC, UF, UH) pinpoint exactly why connections fail, whether it's network issues or health check failures.
Spring Boot & Java 11 Specific Considerations
Spring Boot applications, especially those running on Java 11, face unique challenges with upstream connections due to changes in the JVM networking stack and the complexity of microservices architectures.
How Java 11 Affects Upstream Connections
Java 11 introduced several networking changes that can impact upstream connectivity:
- HTTP Client Changes: The new HttpClient API in Java 11 supports HTTP/2 (can be enabled with .version(HttpClient.Version.HTTP_2))
- TLS 1.3 Default: Java 11 defaults to TLS 1.3, which may not be supported by older services
- DNS Caching: JVM DNS caching behavior can cause issues when services change IP addresses
- Connection Pool Behavior: Default connection pool settings may not be optimal for cloud environments
Note: Early Java 11 versions had HTTP/2 connection issues (JDK-8211806) fixed in 11.0.2 and later versions
Spring Boot Application Architecture Context
In a typical Spring Boot microservices architecture, upstream errors commonly occur at these points:
- RestTemplate or WebClient calls to other services
- Feign client interactions
- Database connection pools (HikariCP)
- Message broker connections (RabbitMQ, Kafka)
Spring Boot Debugging Approaches
When diagnosing upstream errors in Spring Boot applications, follow this systematic approach:
- Check Application Health:
curl http://localhost:8080/actuator/health | jq .
The health endpoint aggregates all component statuses. A DOWN status in any dependency (database, message broker) often causes upstream errors.
- Review Connection Pool Metrics:
curl http://localhost:8080/actuator/metrics/hikaricp.connections.active | jq .
Connection pool exhaustion is a common cause of upstream errors. If active connections equal max pool size, requests queue and eventually timeout.
- Analyze Thread Dump for Blocked Threads:
curl http://localhost:8080/actuator/threaddump | jq '.threads[] | select(.threadState == "BLOCKED")'
Blocked threads waiting for connections indicate pool exhaustion or deadlocks. Multiple blocked HTTP client threads suggest upstream services are slow or unresponsive.
- Check Circuit Breaker Status:
curl http://localhost:8080/actuator/metrics/resilience4j.circuitbreaker.state | jq .
An OPEN circuit breaker stops calling failing services, preventing upstream errors from cascading. Check if breakers are open unexpectedly.
- Enable HTTP Client Debug Logging:
# Add to application.properties
logging.level.org.apache.http.wire=DEBUG
logging.level.org.apache.http.headers=DEBUG
Wire-level logging reveals exactly what's happening during HTTP communication, including connection establishment, TLS handshakes, and request/response details.
- Monitor JVM Network Connections:
# Check established connections
netstat -an | grep ESTABLISHED | grep <port>

# Monitor connection states
watch -n 1 'netstat -an | grep <port> | awk "{print \$6}" | sort | uniq -c'
Real-time connection monitoring reveals patterns like connection leaks (growing ESTABLISHED count) or exhaustion (many TIME_WAIT states), helping identify the root cause of upstream errors.
Monitoring with SigNoz
While traditional monitoring can identify upstream errors after they occur, modern observability platforms like SigNoz help you understand the complete request flow and identify issues before they become critical.
Why Observability Matters for Upstream Errors
Upstream errors rarely occur in isolation. They're often symptoms of deeper issues like:
- Cascading failures from dependent services
- Resource exhaustion under load
- Network latency spikes
- Database connection pool exhaustion
SigNoz provides distributed tracing that shows you exactly where requests fail in your service mesh, making root cause analysis much faster.
Setting Up Upstream Error Monitoring
Configure your services to send telemetry data to SigNoz:
# Docker Compose with OpenTelemetry integration
services:
  backend:
    image: myapp:latest
    environment:
      - OTEL_EXPORTER_OTLP_ENDPOINT=http://signoz-otel-collector:4317
      - OTEL_SERVICE_NAME=backend-service
      - OTEL_TRACES_EXPORTER=otlp
      - OTEL_METRICS_EXPORTER=otlp

  spring-boot-app:
    image: spring-app:latest
    environment:
      - OTEL_EXPORTER_OTLP_ENDPOINT=http://signoz-otel-collector:4317
      - OTEL_SERVICE_NAME=spring-service
      - JAVA_OPTS=-javaagent:/opentelemetry-javaagent.jar
For Spring Boot applications, add OpenTelemetry integration:
<!-- pom.xml -->
<dependency>
    <groupId>io.opentelemetry</groupId>
    <artifactId>opentelemetry-api</artifactId>
    <version>1.35.0</version>
</dependency>
<dependency>
    <groupId>io.opentelemetry</groupId>
    <artifactId>opentelemetry-sdk</artifactId>
    <version>1.35.0</version>
</dependency>
With SigNoz, you can:
- Track error rates across all services in real-time
- View distributed traces showing exactly where connections fail
- Set up intelligent alerts based on error patterns
- Correlate upstream errors with resource metrics and logs
Creating Effective Dashboards
Build dashboards that show the health of your entire request pipeline:
- Service Map: Visualize dependencies and identify which services are experiencing upstream errors
- Error Rate Panel: Track 5xx errors across all services with drill-down capability
- P99 Latency: Identify performance degradation before it becomes an error
- Connection Pool Metrics: Monitor connection usage and exhaustion
- JVM Metrics: For Spring Boot apps, track heap usage, GC activity, and thread pools
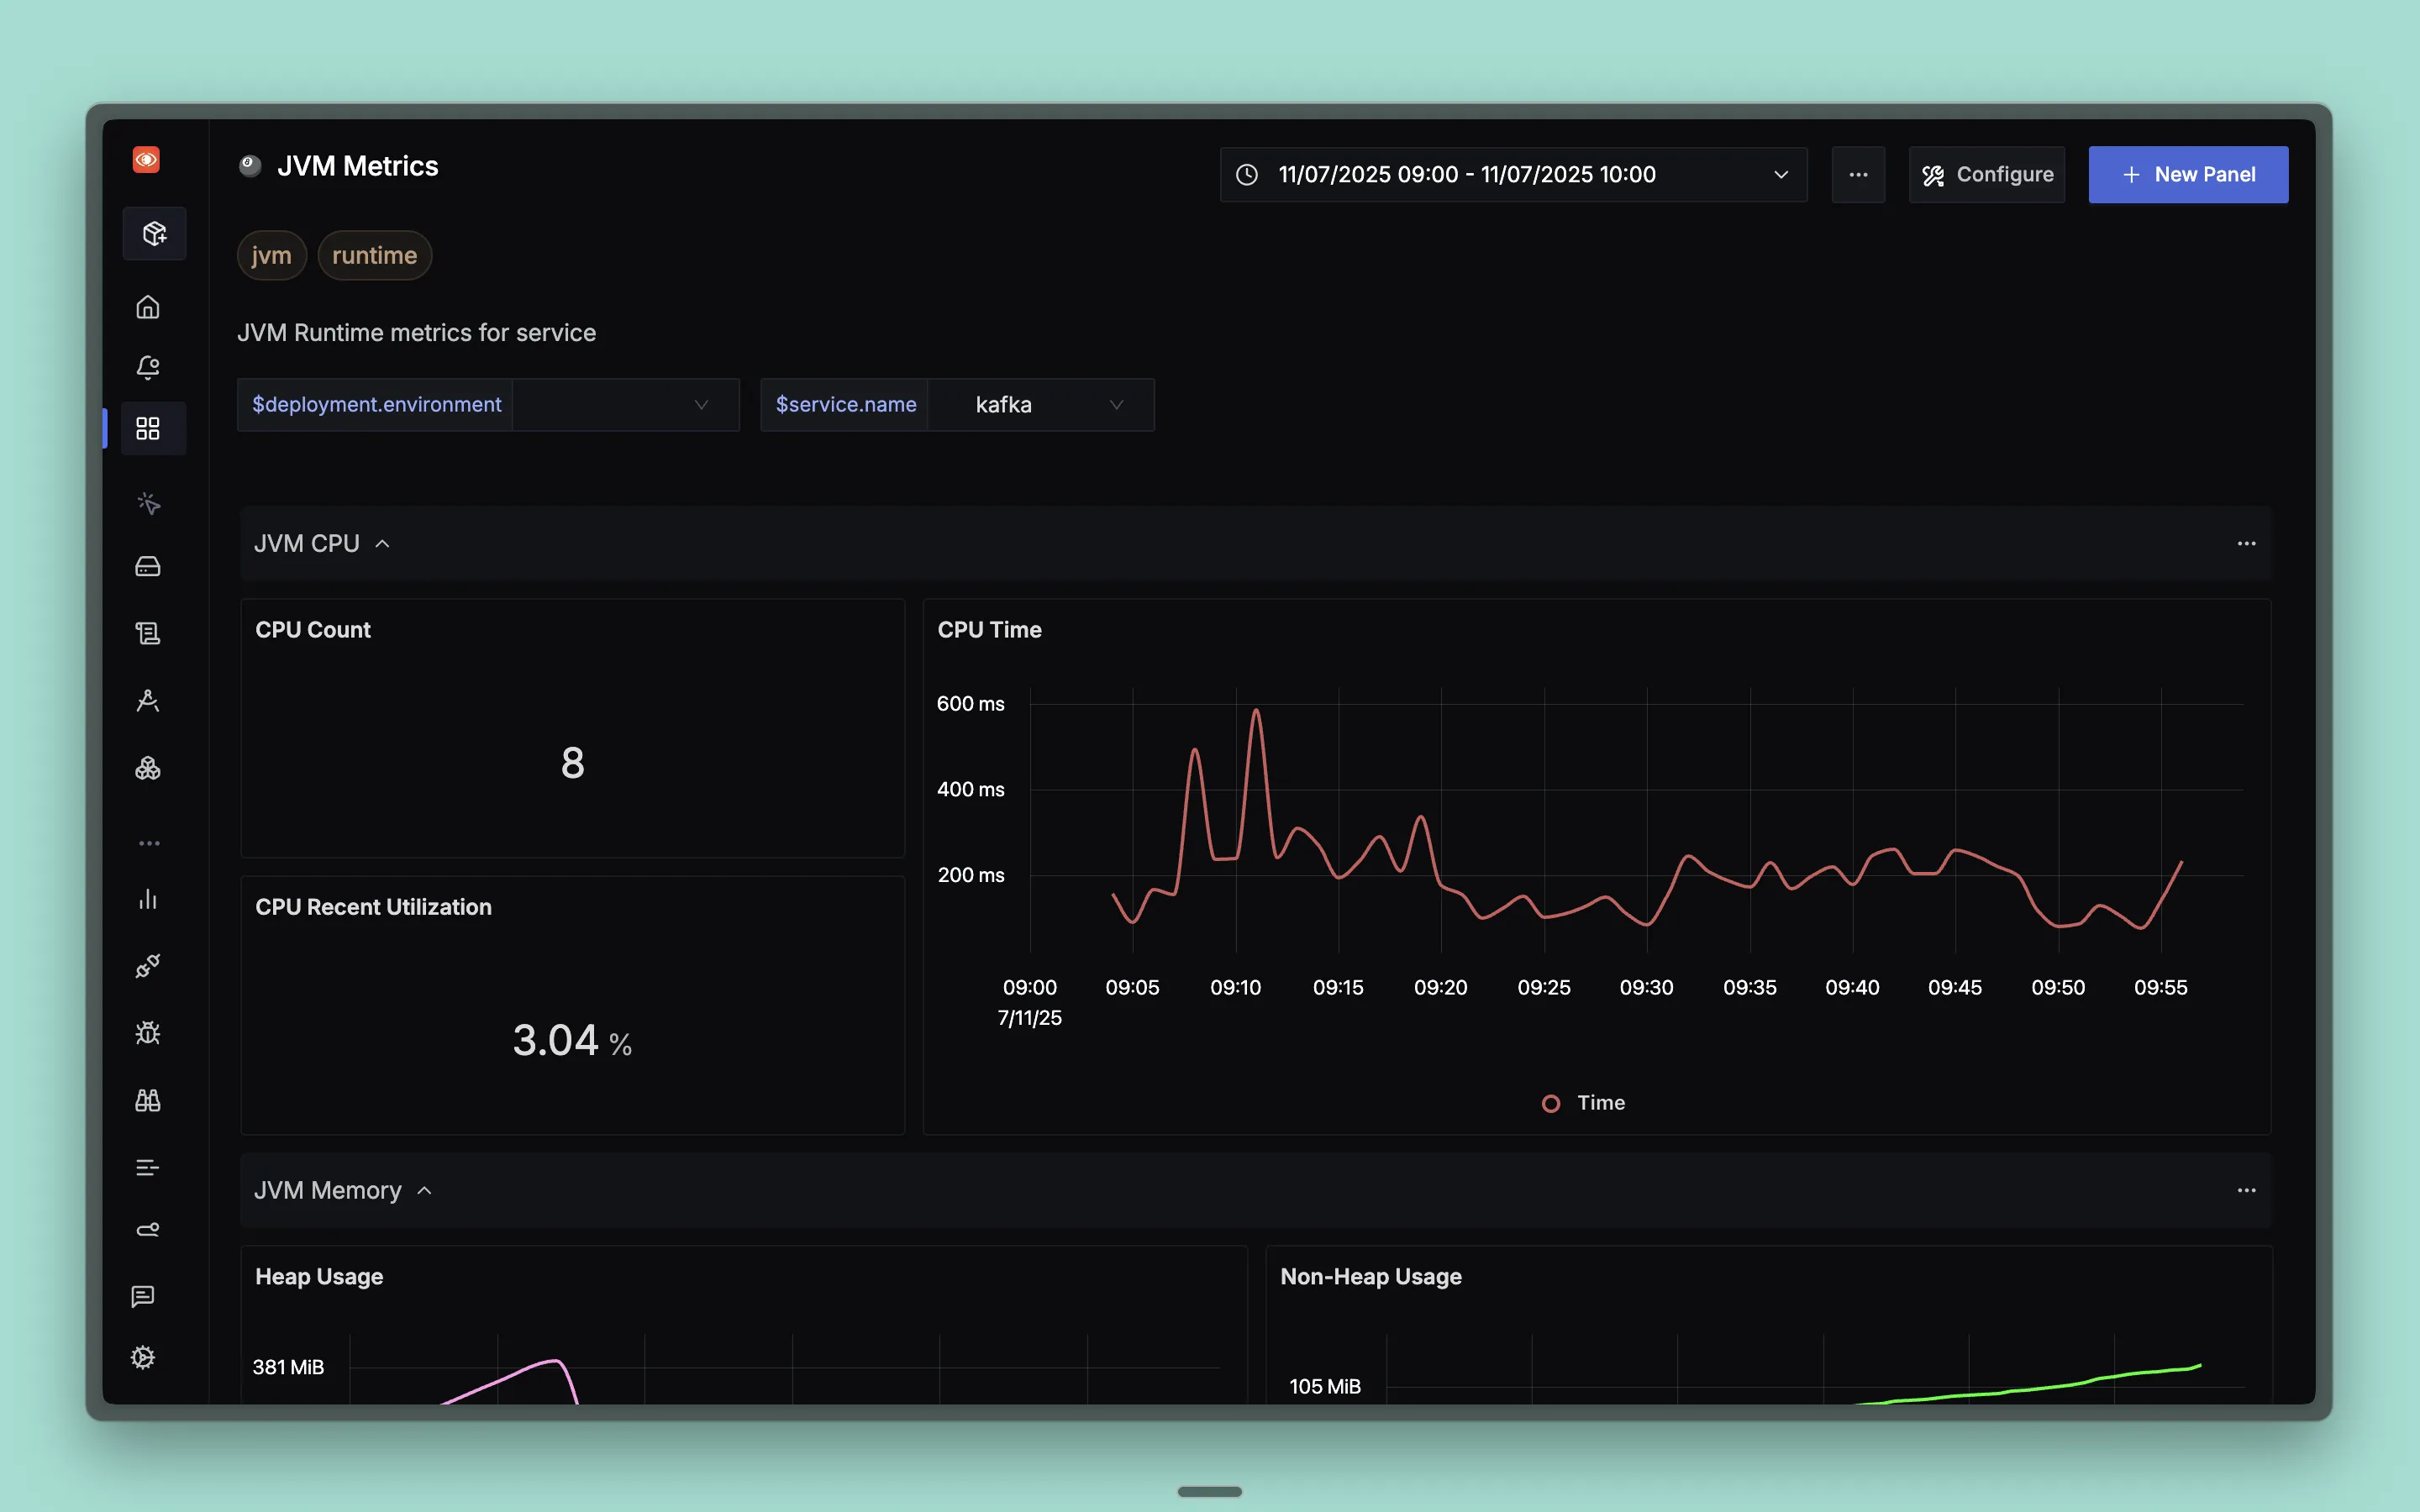
Get Started with SigNoz
You can choose between various deployment options in SigNoz. The easiest way to get started with SigNoz is SigNoz cloud. We offer a 30-day free trial account with access to all features.
Those who have data privacy concerns and can't send their data outside their infrastructure can sign up for either enterprise self-hosted or BYOC offering.
Those who have the expertise to manage SigNoz themselves or just want to start with a free self-hosted option can use our community edition.
Conclusion
Upstream connect errors are symptoms of connectivity issues between your proxy and backend services. While the error message itself is generic, the root causes follow predictable patterns based on your platform.
The key to quick resolution is understanding:
- Your platform's networking model - How Docker, Kubernetes, Spring Boot, or cloud providers handle network connections
- Common misconfiguration patterns - Like using localhost in containers, mismatched selectors in Kubernetes, or exhausted connection pools in Spring Boot
- Systematic debugging approach - Following a methodical process rather than random troubleshooting
Most upstream errors stem from simple misconfigurations that can be fixed quickly once identified. The challenge is knowing where to look and what to check.
Quick Reference Checklist
When facing an upstream error, check these items in order:
Immediate checks:
- Is the backend service actually running?
- Can you connect to the backend directly (bypassing the proxy)?
- Does DNS resolution work for the backend hostname?
- Are you using the correct hostname (not localhost in containers)?
- Do the ports match between proxy configuration and backend service?
Platform-specific checks:
- Docker: Are containers on the same network?
- Kubernetes: Do service selectors match pod labels?
- Cloud: Are security groups/firewall rules allowing traffic?
- Traditional: Is SELinux blocking connections?
- Spring Boot: Are connection pools exhausted?
- Java 11: Are there TLS or HTTP/2 compatibility issues?
Configuration checks:
- Are timeout values properly aligned across the stack?
- Do health checks use valid endpoints and expect correct responses?
- Is the proxy configuration syntax valid?
- Are circuit breakers and retry policies configured appropriately?
Remember that upstream errors often indicate broader system issues. Implementing proper monitoring and observability helps you catch these problems before they impact users.
Hope we answered all your questions regarding upstream connect errors. If you have more questions, feel free to use the SigNoz AI chatbot, or join our slack community.
You can also subscribe to our newsletter for insights from observability nerds at SigNoz, get open source, OpenTelemetry, and devtool building stories straight to your inbox.
