Deploying and Scaling OpenTelemetry in Production NextJS Apps
Once you’ve instrumented your Next.js app with OpenTelemetry, the next step is getting it into production. Whether you’re shipping via Vercel or running your own infra, the setup has some key differences worth noting.
Option 1: Deploying on Vercel
If you’re using Vercel, good news — OpenTelemetry just works.
As per the Next.js docs, no extra config is needed. Vercel supports OpenTelemetry natively for both Node and Edge runtimes.
Why Vercel works well:
- No setup headaches — just deploy and trace
- Handles scaling and cold starts for you
- Great for hybrid apps (Edge + Node)
- Built-in support for observability providers like SigNoz, Datadog, and more
Deploy flow:
vercel deploy
If your instrumentation.ts is set up locally, it’ll work in production too.
Env vars required:
OTEL_EXPORTER_OTLP_ENDPOINT=https://ingest.YOUR-REGION.signoz.cloud:443
OTEL_EXPORTER_OTLP_HEADERS=signoz-ingestion-key=<your-ingestion-key>
Option 2: Self-Hosting (Docker / K8s)
Prefer full control? Running your app on your own infra with Docker or Kubernetes gives you more power — but also more responsibility.
Why self-host:
- Total control over observability data and infra
- More flexibility in how you configure the collector
- Good for large-scale or compliance-sensitive workloads
What to watch out for:
- You’ll manage scaling and HA yourself
- Secure your telemetry data pipeline
- Set up alerting/monitoring for the collector itself
- Allocate ops time — especially if you’re pushing serious traffic
TL;DR
| Vercel | Self-Hosted | |
|---|---|---|
| Setup | ⚡ Super simple | 🛠️ Manual infra setup |
| Scale | 📈 Auto (serverless) | 📊 You manage it |
| Observability | 🔌 Built-in integrations | 🔧 Fully customizable |
| Best for | Fast-moving teams, hybrid apps | Teams needing full control or compliance |
Pick what fits your team’s speed, scale, and infra appetite. Either way, with OpenTelemetry and SigNoz in place, you’re set up to ship and debug confidently in production.
2. Collector vs Direct Exporter
Choosing between an OpenTelemetry Collector and a Direct Exporter setup is one of the most important architectural decisions you’ll make. It affects how flexible, scalable, and robust your observability pipeline is — especially in production.
Collector Approach (Recommended)
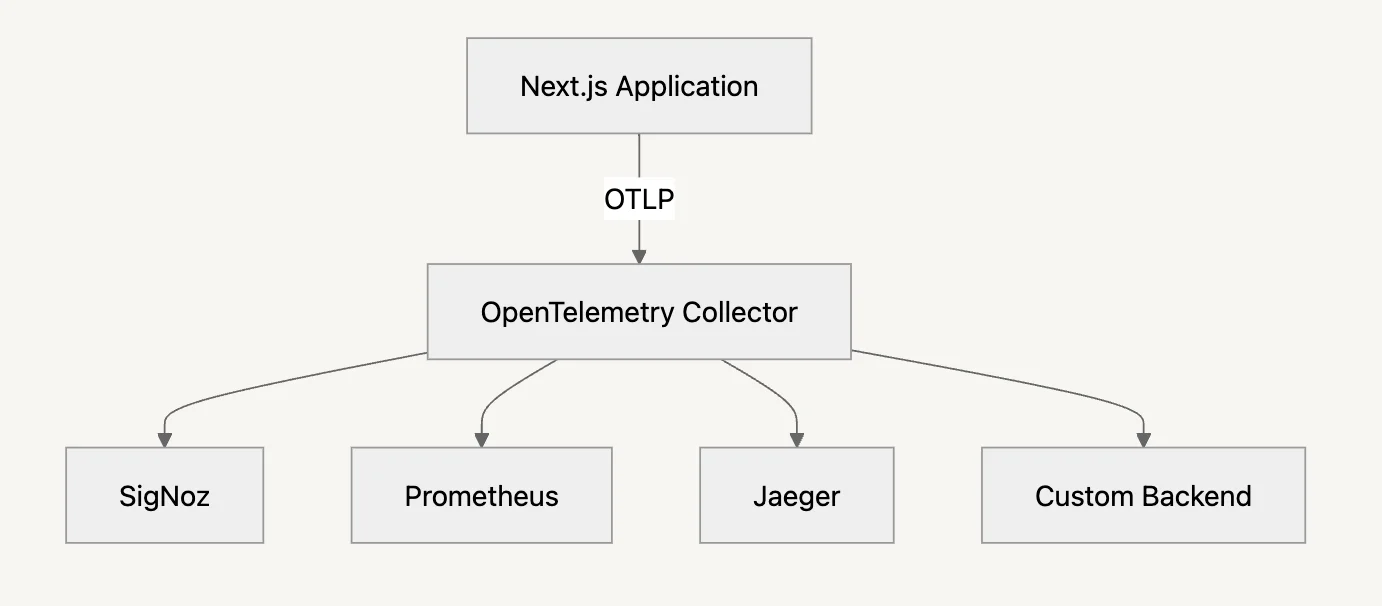
This is the most flexible and production-friendly setup. Instead of sending telemetry data straight to your observability backend, your app sends it to an OpenTelemetry Collector. The collector then processes, enriches, and routes it as needed.
Architecture:

Why use a Collector?
- Vendor-agnostic — Switch observability backends without touching app code
- Data processing — Add batching, filtering, sampling, enrichment
- Fan-out — Send data to multiple backends at once (e.g., SigNoz + Prometheus)
- Better performance — Reduces load on your app by buffering and batching
- Centralized auth — Manage credentials and scrub sensitive data in one place
- More reliable — Retry and buffer logic during backend downtime
Example Collector Config
receivers:
  otlp:
    protocols:
      grpc:
        endpoint: 0.0.0.0:4317
      http:
        endpoint: 0.0.0.0:4318

processors:
  batch:
    timeout: 1s
    send_batch_size: 1024
  attributes:
    actions:
      - key: environment
        value: production
        action: upsert
  filter:
    spans:
      exclude:
        match_type: regexp
        attributes:
          - key: http.target
            value: "/health.*"

exporters:
  otlp/signoz:
    endpoint: "ingest.YOUR-REGION.signoz.cloud:443"
    headers:
      signoz-ingestion-key: ${SIGNOZ_INGESTION_KEY}
  prometheus:
    endpoint: "0.0.0.0:8889"

service:
  pipelines:
    traces:
      receivers: [otlp]
      processors: [batch, attributes, filter]
      exporters: [otlp/signoz]
    metrics:
      receivers: [otlp]
      processors: [batch, attributes]
      exporters: [otlp/signoz, prometheus]
Your Next.js App Config (Collector Setup):
// instrumentation.ts
import { registerOTel } from '@vercel/otel'

export function register() {
  registerOTel({
    serviceName: 'nextjs-production-app',
    endpoint: process.env.OTEL_EXPORTER_OTLP_ENDPOINT || 'http://localhost:4318',
  })
}
Direct Exporter Approach
With this approach, your app sends telemetry data straight to your observability backend — no collector in between.
Architecture

Pros:
- Simpler to set up — fewer moving parts
- Lower latency — no intermediate hop
- Great for demos or smaller apps
Cons:
- No data enrichment, filtering, or custom processing
- Hard to route data to multiple platforms
- More resource usage inside your app
- No retry/buffering logic — dropped data on failure
🔧 Direct Exporter Example:
// instrumentation.ts
import { registerOTel } from '@vercel/otel'
import { OTLPHttpJsonTraceExporter } from '@vercel/otel'

export function register() {
  registerOTel({
    serviceName: 'nextjs-production-app',
    traceExporter: new OTLPHttpJsonTraceExporter({
      url: 'https://ingest.us.signoz.cloud:443/v1/traces',
      headers: {
        'signoz-ingestion-key': process.env.SIGNOZ_INGESTION_KEY || '',
      },
    }),
  })
}
TL;DR - Which One to Choose?
| Collector (Recommended) | Direct Exporter | |
|---|---|---|
| Vendor flexibility | High | ❌ Low |
| Reliability | Retry + buffer | ❌ Risk of drop |
| Processing | Batch, filter, enrich | ❌ None |
| Infra required | ⚠️ Needs extra setup | Minimal |
| Multi-backend output | Easy fan-out | ❌ Not supported |
| Best for | Prod, large apps | Dev, small projects |
In short: use a collector in production if you care about reliability, flexibility, or long-term maintainability. Use direct exporters only for quick setups or demos where speed > control.
Setting Up Alerts
Monitoring without alerts is like a smoke detector without a battery — it might know something’s wrong, but no one hears it.
With SigNoz, you can set up production-grade alerts on latency, errors, external APIs, database health, and more — all powered by auto-generated metrics from your OpenTelemetry traces.
Understanding SigNoz APM Metrics
SigNoz automatically generates structured metrics from your traces. No extra config needed.
Common Metrics You'll Use:
| Metric | Description |
|---|---|
signoz_calls_total | Total number of service calls |
signoz_latency_bucket | Latency histogram buckets (used for P99, P95, etc) |
signoz_latency_sum/count | Raw latency values |
signoz_db_latency_sum/count | Database call timings |
signoz_external_call_latency_sum/count | External API timings |
You can filter any of these by:
service_nameoperation(e.g.GET /api/login)http_status_codedeployment_environment
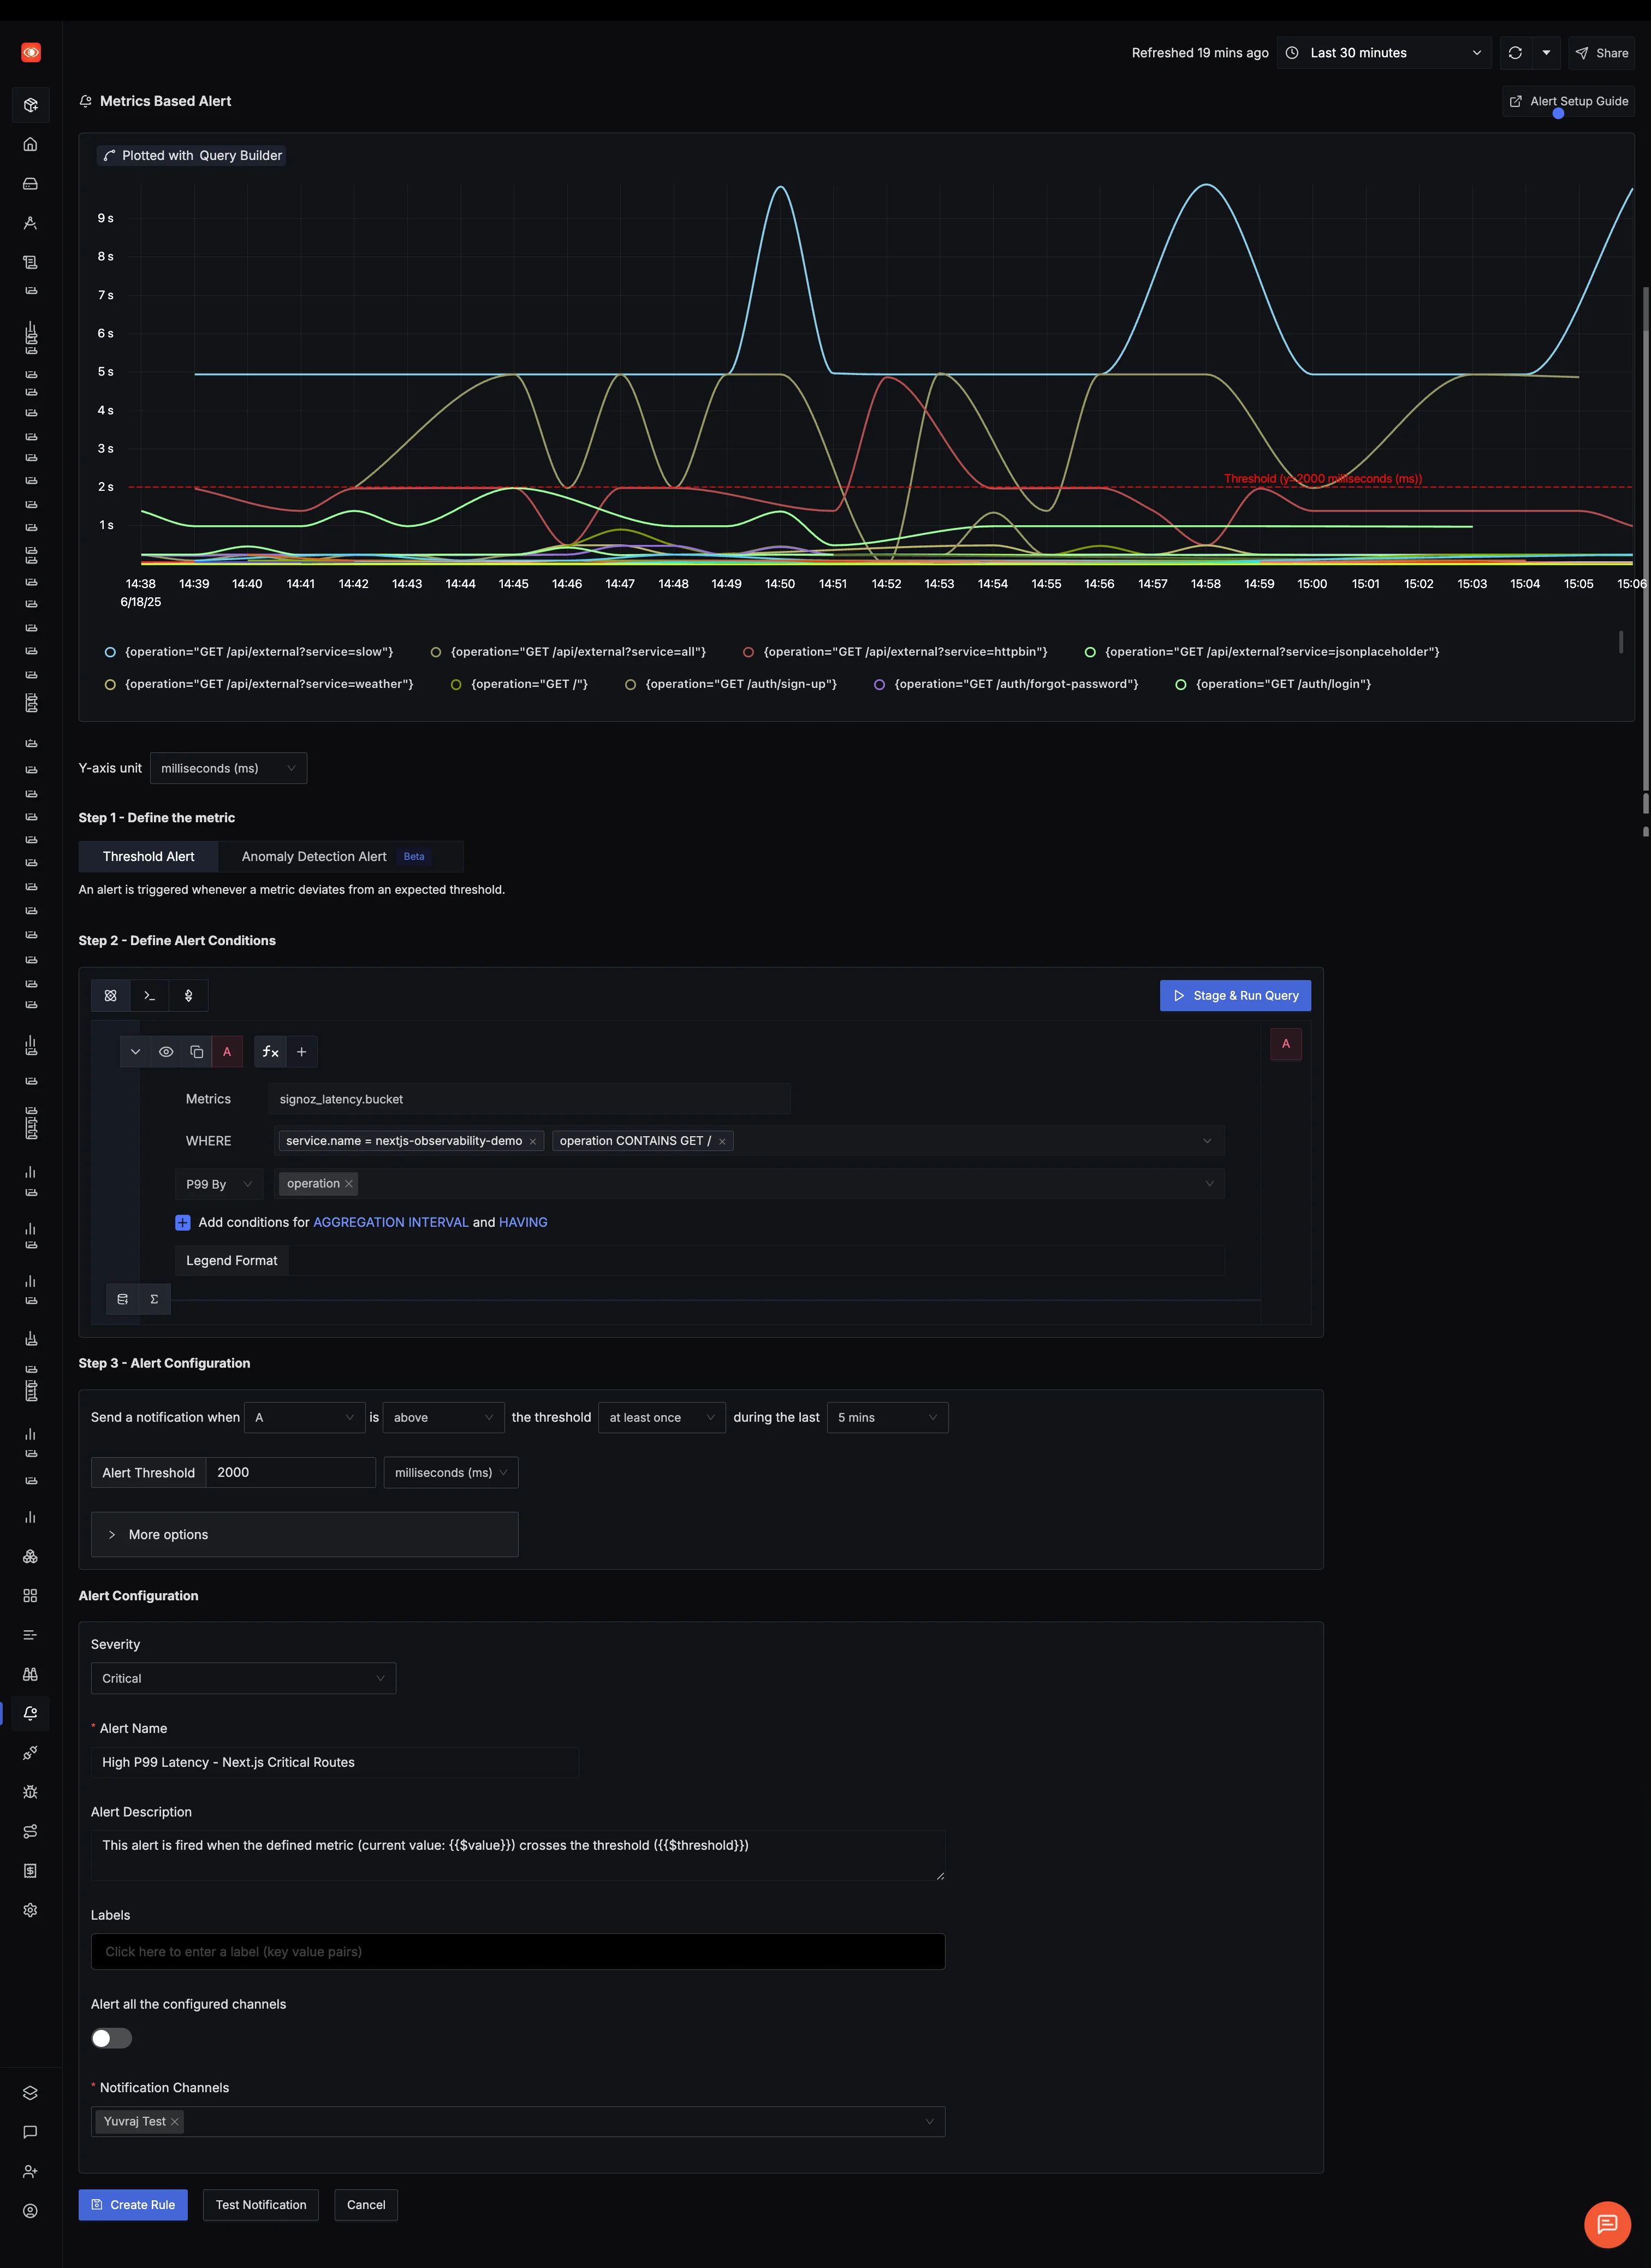
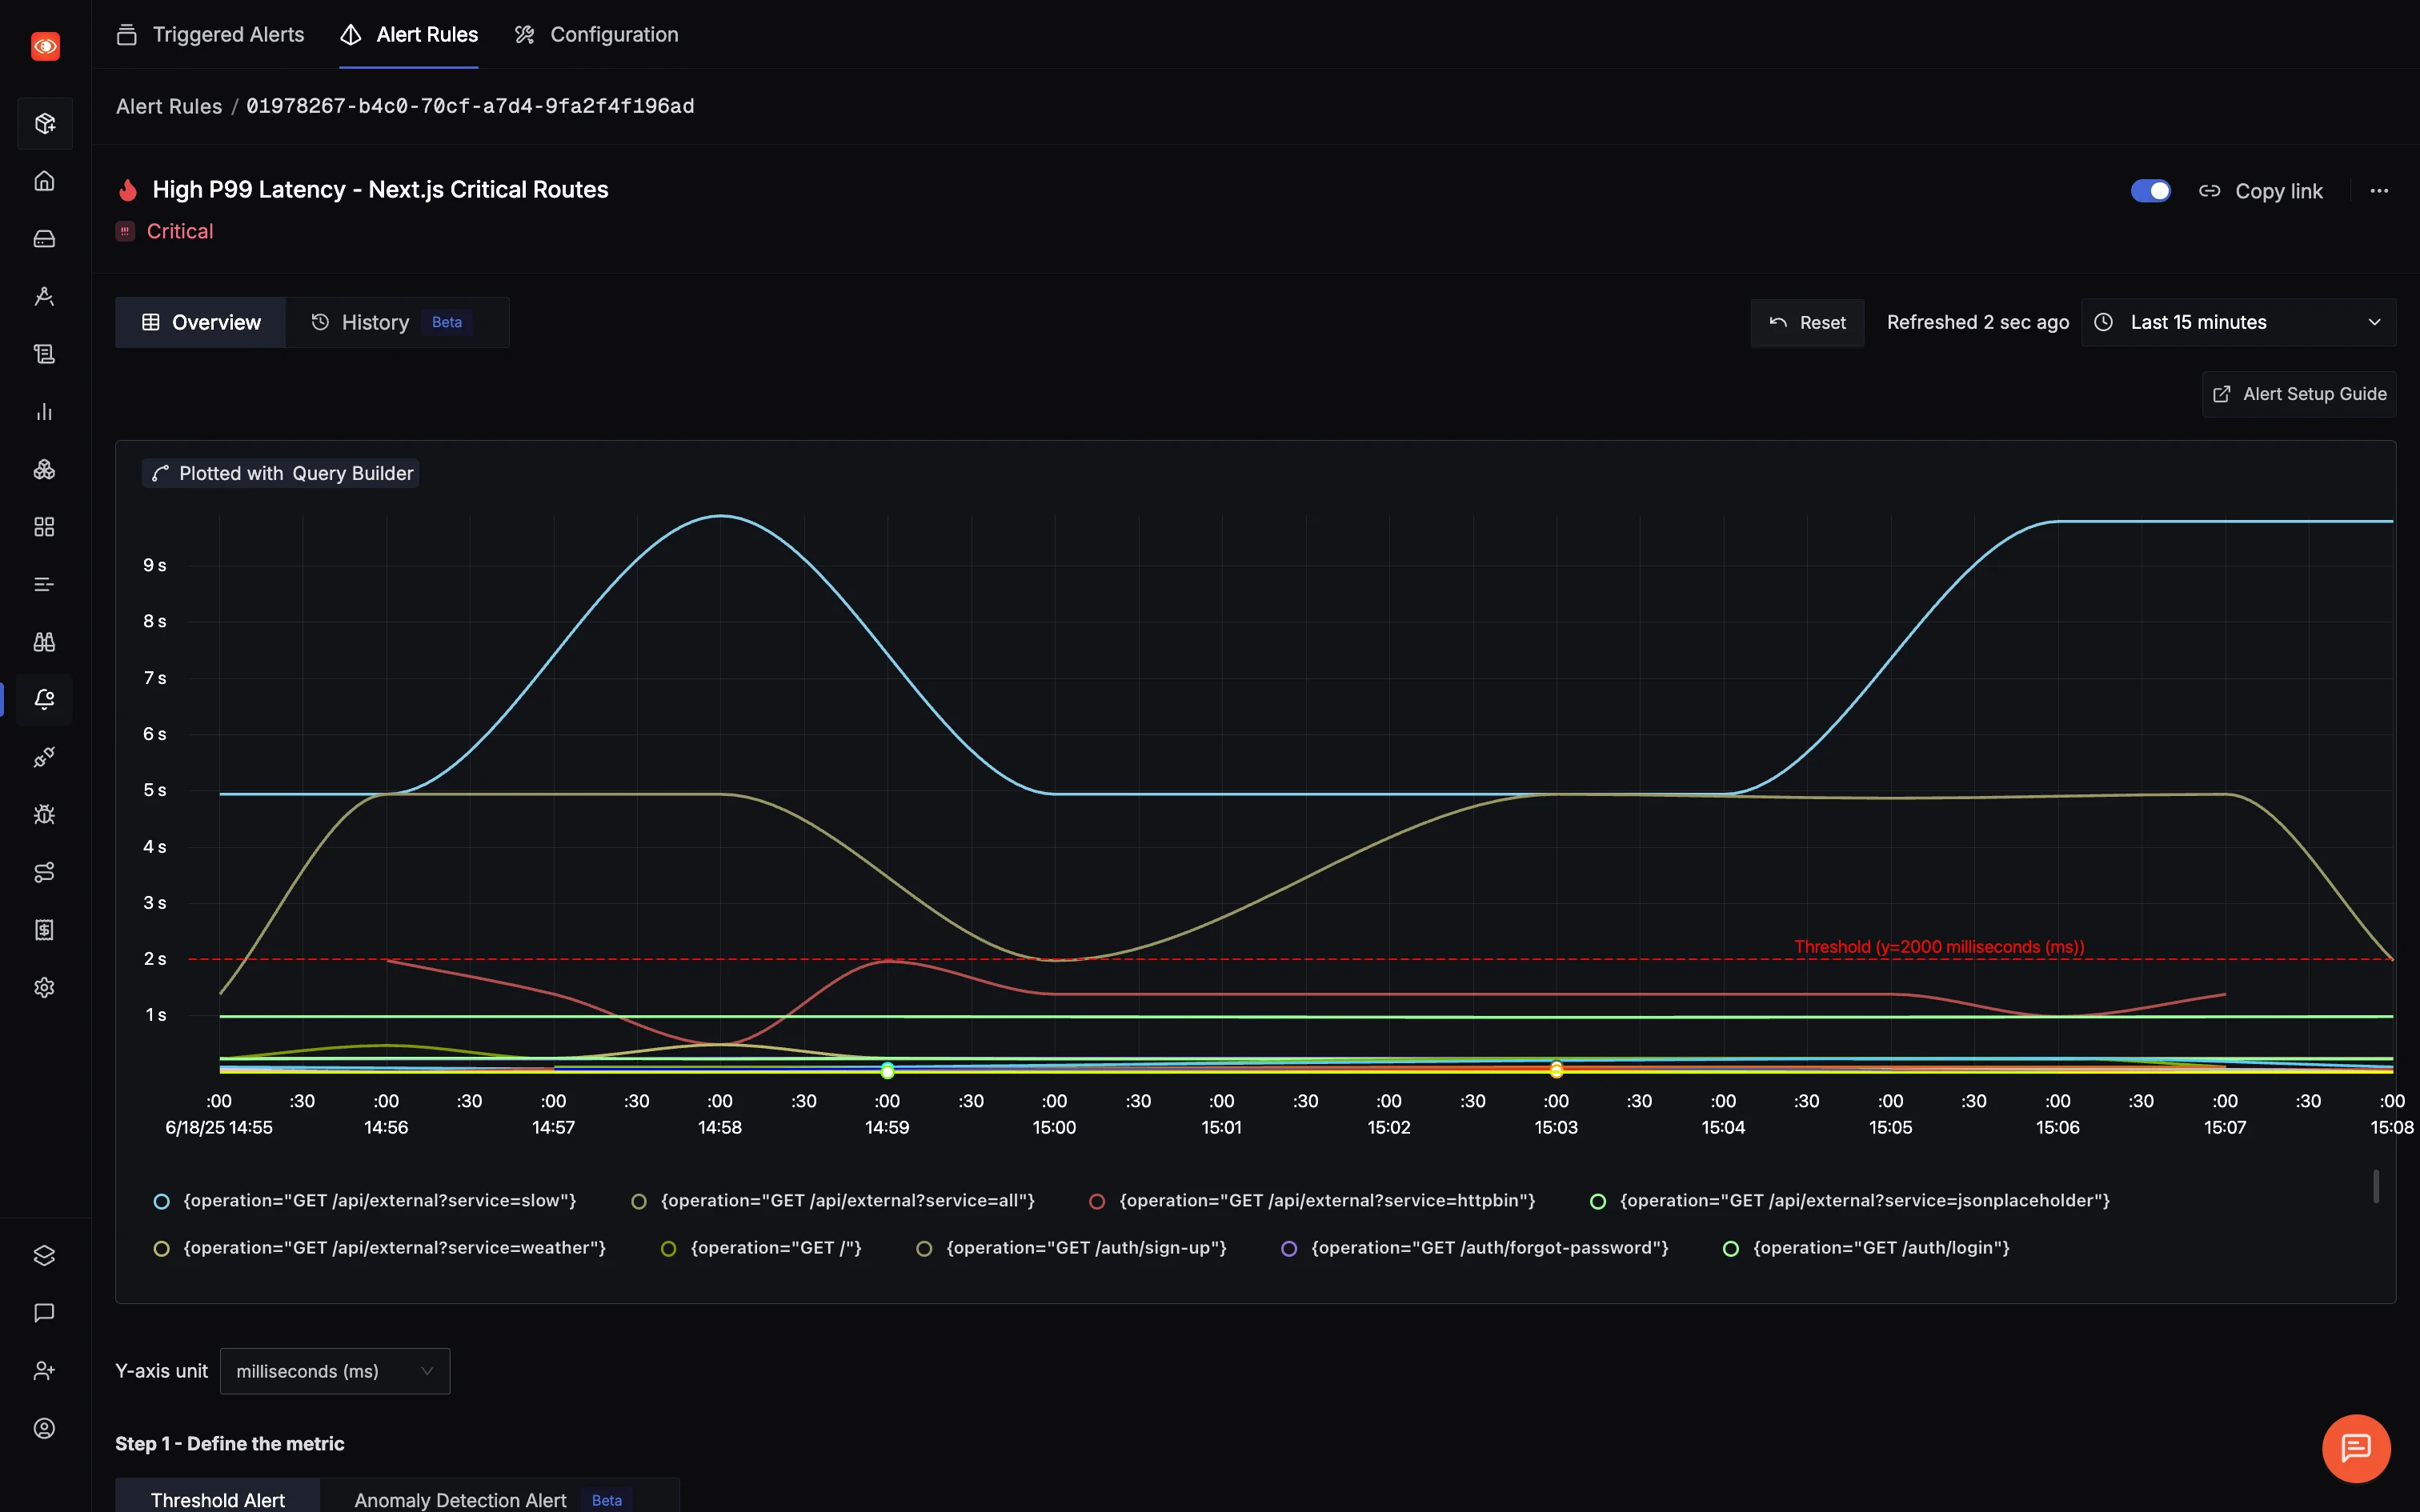
Alert Example: High P99 Latency
Track if any of your key endpoints cross the 2s P99 threshold — a common user experience red flag.
SigNoz UI Configuration:

- Metric:
signoz_latency_bucket - Aggregation: P99
- Filter:
service.name = nextjs-observability-demo - Group By:
operation - Threshold: Above 2000ms for 5 minutes
- Severity: Critical
This catches slow endpoints after deployments, during traffic spikes, or when a downstream service misbehaves.
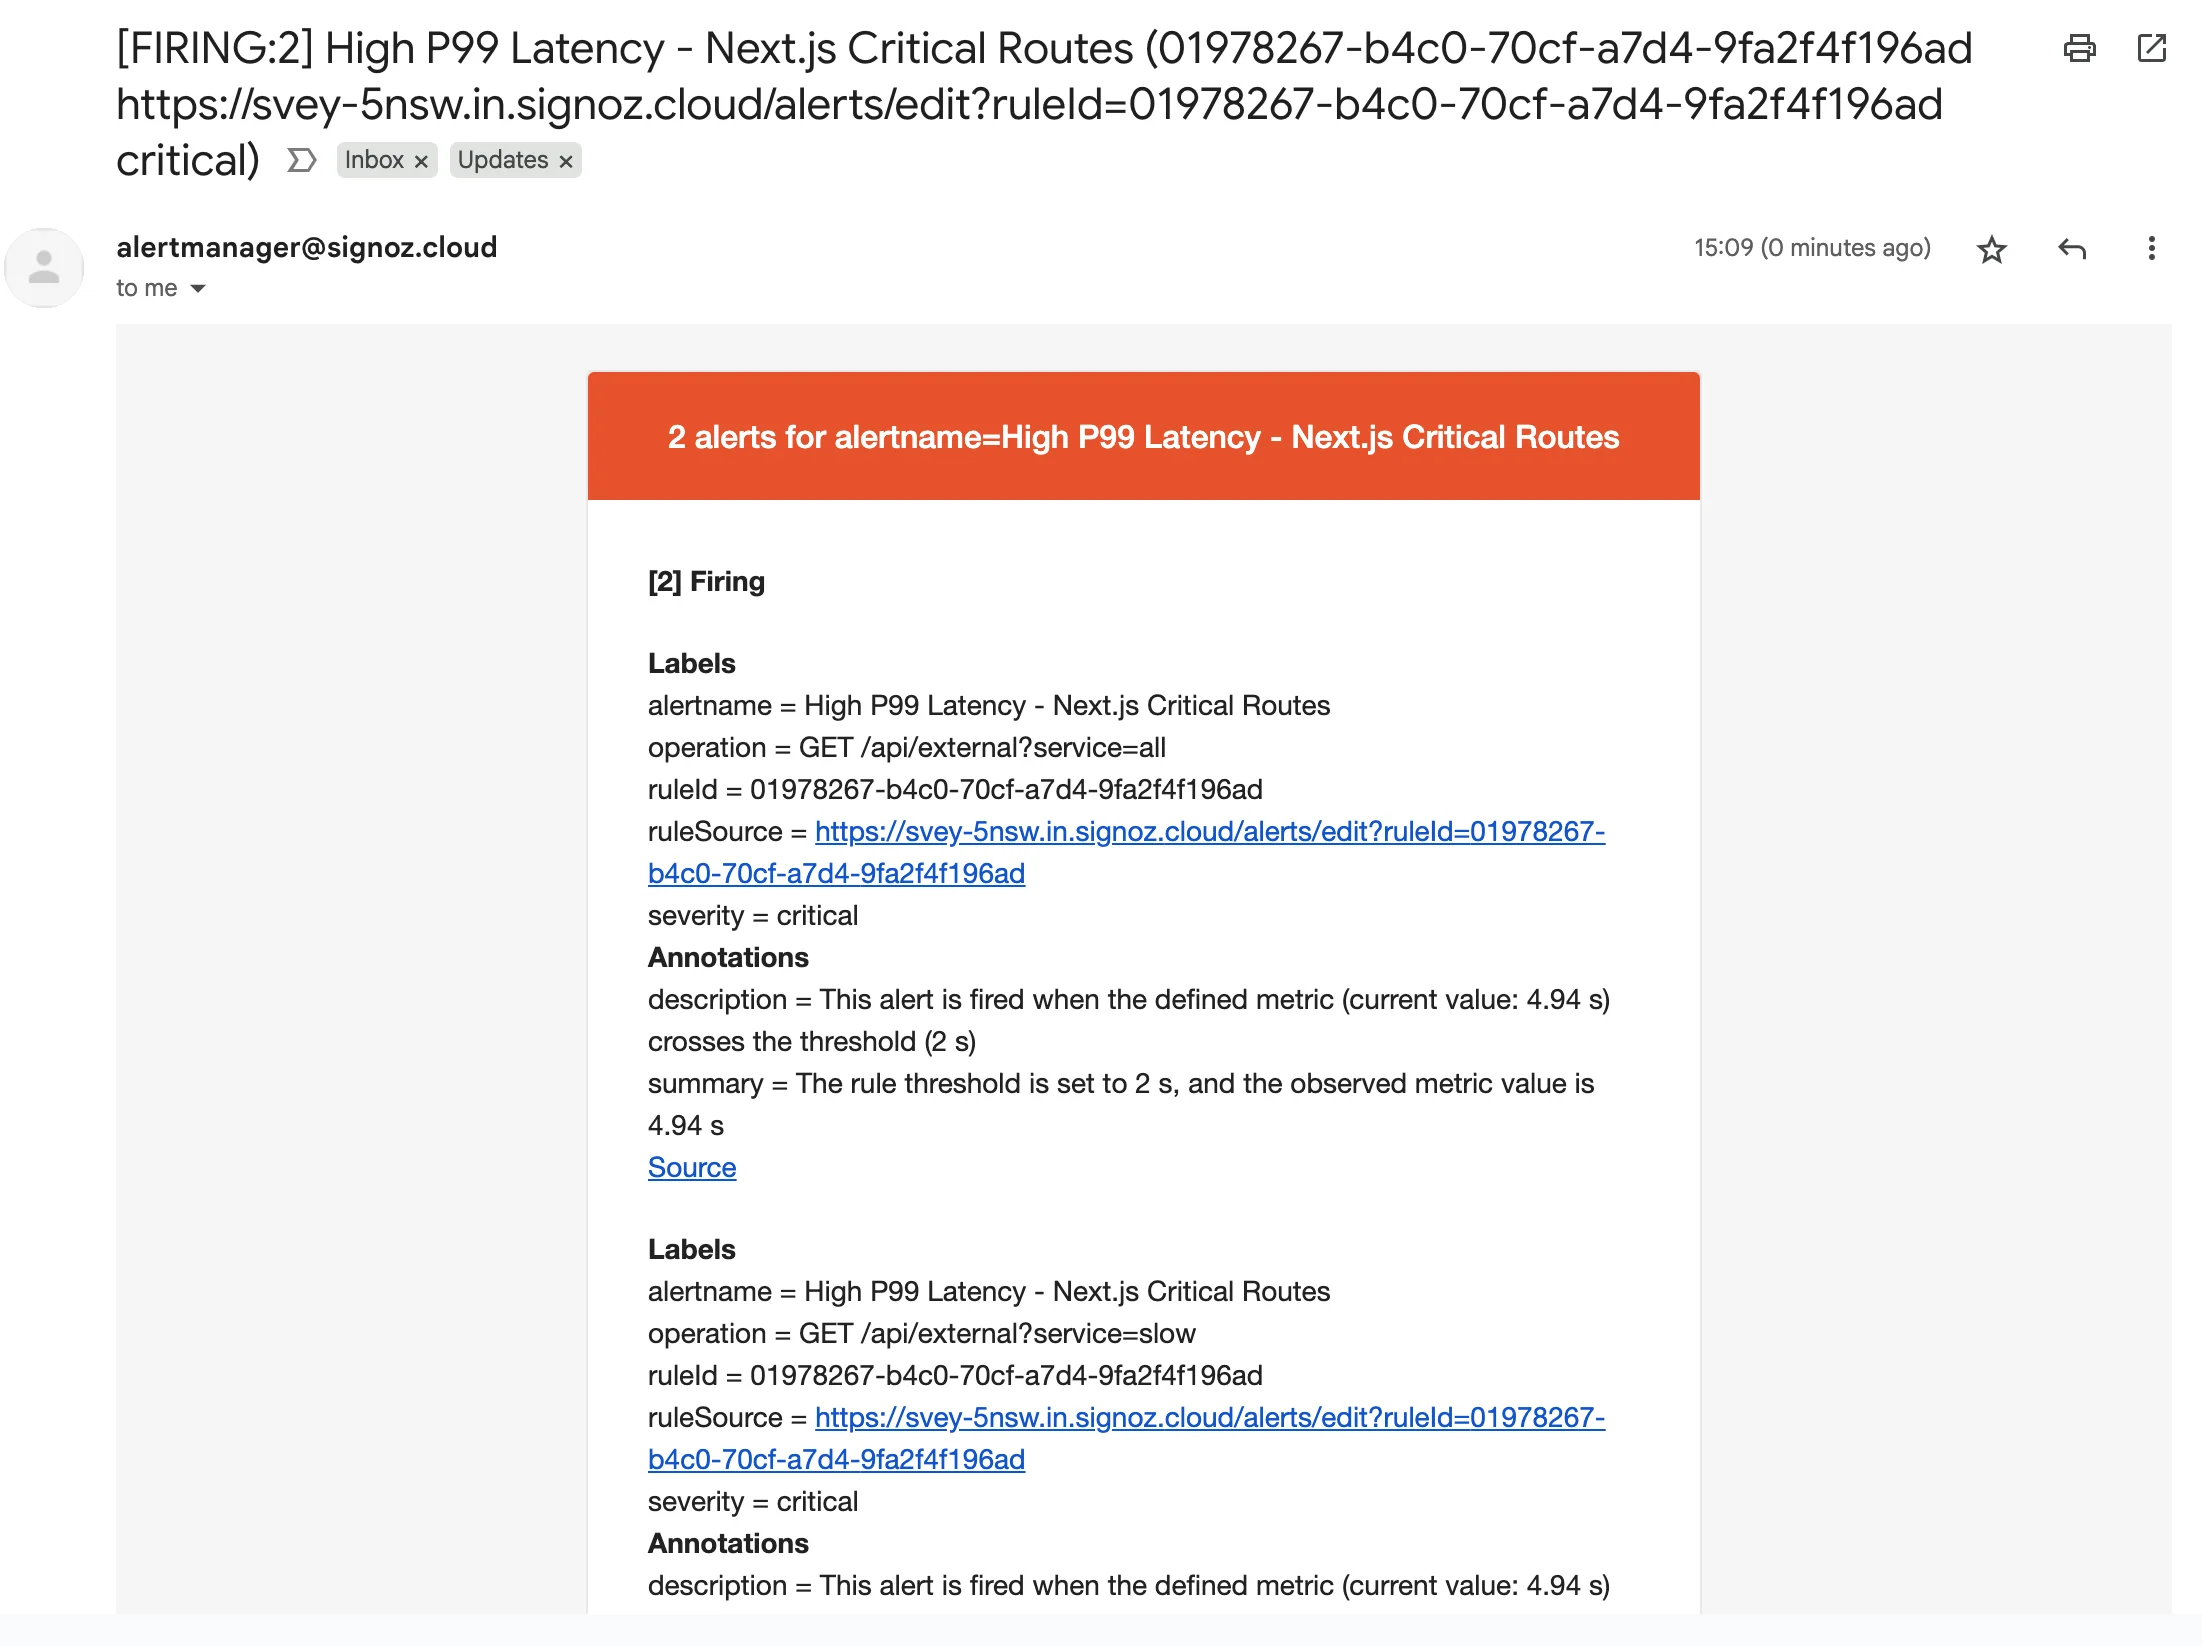
Testing the Alert
Generate alerts manually to verify setup:
# Simulate high latency
curl "http://localhost:3000/api/external?service=slow"

# Simulate 404 errors
for i in {1..20}; do curl -s -o /dev/null -w "%{http_code}\n" http://localhost:3000/not-found; done

# Simulate DB alert (example)
curl http://localhost:3000/api/heavy-database-query

Check:
- SigNoz → Alerts → Firing Alerts
- Notification channels (Slack, email, PagerDuty)
- Auto-resolve when things calm down

Maintaining Alert Hygiene
Set it and forget it? Nope. Keep alert fatigue away with regular tuning:
- Weekly: Review false positives
- Monthly: Adjust thresholds for seasonal traffic
- Quarterly: Review what you’re not monitoring
- After Incidents: Patch gaps based on what was missed
Tune it:
- Raise thresholds if too noisy
- Group by operation to reduce clutter
- Shorten time windows for fast-reacting alerts
A good alerting setup keeps you ahead of issues — not reacting to user complaints. By wiring up latency, errors, external dependencies, and DB performance, you’ve got a solid first line of defense.
Next time something breaks at 2AM, you’ll already know why.
Sampling Strategy for Production
Once you instrument your app with OpenTelemetry, you’ll quickly realize it can generate a lot of data. That’s where sampling comes in — it lets you retain visibility without flooding your backend (or your bill).
What Sampling Actually Means
Sampling means: “Don’t send every trace, just enough to get the full picture.”
- Sampled traces → Get processed and sent to your observability backend
- Unsampled traces → Dropped early to save on processing and storage
If you’re getting thousands of requests per second, you probably don’t need all of them to know how your app is doing.
Why You Should Care
- Lower costs — Send less data to SigNoz or any observability backend
- Less noise — Focus on what's actually interesting (e.g., errors)
- Better performance — Reduce tracing overhead on your app
- Representative insight — You still see meaningful patterns
When to Use Sampling
Use it if:
- You’re seeing 1,000+ traces/sec
- Most traffic is routine and low-value
- You want to prioritize important traces (errors, latency, critical flows)
Avoid it if:
- You have very low traffic
- Compliance requires full visibility
- You don’t have meaningful sampling rules yet
Head vs Tail Sampling
There are two main ways to decide what gets sampled:
Head Sampling
This makes the decision when the trace starts. Lightweight and works with @vercel/otel.
import { registerOTel } from '@vercel/otel';
import { TraceIdRatioBasedSampler } from '@opentelemetry/sdk-trace-base';

registerOTel({
  serviceName: 'nextjs-app',
  traceSampler: new TraceIdRatioBasedSampler(0.1), // sample 10%
});
Or use environment variables (recommended for production):
OTEL_TRACES_SAMPLER=probabilistic
OTEL_TRACES_SAMPLER_ARG=0.1
- Fast
- Low overhead
- Can’t see the whole trace (might miss errors late in the flow)
Tail Sampling
This happens after the full trace is collected — so it’s smarter, but heavier.
Set up in the OpenTelemetry Collector:
processors:
  tail_sampling:
    decision_wait: 10s
    policies:
      - name: errors
        type: status_code
        status_code: { status_codes: [ERROR] }

      - name: high_latency
        type: latency
        latency: { threshold_ms: 1000 }
        sampling_percentage: 50

      - name: normal_traffic
        type: probabilistic
        probabilistic: { sampling_percentage: 5 }
- Smarter decisions
- Always catch errors or slow traces
- Needs the collector and more infra
Start simple: head sampling via environment variables.
Grow later: add tail sampling when you need more precision.
Review regularly: don’t let old sampling rules hide new problems.
Observability ≠ “log everything” — it’s about getting the right signals. Sampling helps you do that without going broke.
Hiding Sensitive Data
Telemetry can accidentally capture sensitive stuff—emails, tokens, IPs, etc. You’re responsible for making sure that doesn’t happen.
What to Watch For
Common leaks in Next.js apps:
user.email = "john@example.com"
headers.authorization = "Bearer xyz"
http.url = "/reset?token=abc"
process.env.DATABASE_URL
Step 1: Don’t Collect It
registerOTel({
  attributes: {
    'deployment.environment': process.env.NODE_ENV,
    'service.version': process.env.npm_package_version,
    // ❌ Don’t include user emails or IDs
  },
  instrumentationConfig: {
    fetch: {
      ignoreUrls: [/token=/, /session=/],
      dontPropagateContextUrls: [/analytics\./],
      resourceNameTemplate: "{http.method} {http.host}"
    }
  }
})
Step 2: Scrub at the Collector
processors:
  attributes/sanitize:
    actions:
      - key: user.email
        action: delete
      - key: http.request.header.authorization
        action: delete
      - key: http.url.query
        action: delete
  redaction/allowlist:
    allowed_attributes:
      - http.method
      - http.status_code
      - http.route
      - service.name
      - duration
Step 3: Validate No Leaks
# Should return 0
count(rate(traces_total{user_email!=""}[5m]))

# No auth tokens
count(rate(traces_total{http_request_header_authorization!=""}[5m]))
OpenTelemetry unlocks powerful observability, but it’s not magic. You need to be aware of the tradeoffs and plan accordingly. Here’s what to watch out for in real-world Next.js apps.
1. Performance Overhead
OpenTelemetry does introduce overhead. You’re generating spans, propagating context, exporting data—it all costs CPU, memory, and network.
Optimization Strategy
- Reduce sampling on high-traffic, low-value routes (e.g.,
/api/health) - Batch and buffer span exports
- Focus tuning on external API routes where the cost is highest
const shouldSample = (route: string) => {
  if (route.includes('/external')) return Math.random() < 0.05;
  if (route.includes('/health')) return Math.random() < 0.01;
  return Math.random() < 0.2;
}
2. Cold Starts (Serverless + Edge)
Cold starts in Vercel functions or edge environments can be amplified by OTel initialization.
Mitigation Techniques
// Lazy init
let tracer = null;
function getTracer() {
  return tracer ??= trace.getTracer('next-app');
}

// HTTP exporter pooling
new OTLPTraceExporter({
  url: OTEL_COLLECTOR_URL,
  keepAlive: true,
});

// Flush before exit (Vercel)
process.on('beforeExit', async () => {
  await trace.getTracerProvider()?.forceFlush();
});
3. Missing Spans
Not everything gets traced automatically.
❌ Common Gaps
- Raw
fetch()calls (without context propagation) - Database queries using uninstrumented clients
- Background jobs (e.g.,
setTimeout) - Server Components in Next.js
- Third-party SDKs (e.g., Stripe, Firebase)
Solutions
Manually wrap spans where needed:
const span = tracer.startSpan('external-call');
try {
  const res = await fetch('https://api.example.com/data');
  span.setAttributes({ 'http.status_code': res.status });
} finally {
  span.end();
}
And ensure context sticks around in async flows:
const ctx = context.active();
setTimeout(() => {
  context.with(ctx, () => {
    processJob();
  });
}, 1000);
Detection Strategy
Add instrumentation coverage checks:
function detectMissingInstrumentation() {
  const span = tracer.startSpan('instrumentation-check');
  if (span.duration > 200 && childSpans.length === 0) {
    span.addEvent('Potential missing spans detected');
  }
}
Or patch key APIs like fetch():
const origFetch = global.fetch;
global.fetch = (...args) => {
  if (!trace.getActiveSpan()) console.warn('Uninstrumented fetch detected');
  return origFetch(...args);
};
Final Thoughts
Observability Changes How You Build
This guide wasn’t just about tracing code—it’s about building smarter systems. You’ve now got:
- Real-time visibility into backend and frontend performance
- Trace-to-log correlation for fast debugging
- Data-driven performance insights
- Alerting and dashboards that actually mean something
Mindset Shift
| Old World | Observability |
|---|---|
| Guess where it’s slow | Know where it’s slow |
| Logs in isolation | Logs + Traces + Metrics |
| Wait for user reports | Alerts fire first |
| React after deploy | Optimize before deploy |
Key Takeaways
Implementation
- Instrument from day one
- Use
@vercel/otelfor fast setup - Correlate logs + traces + metrics via OTel context
- Export to SigNoz for unified visibility
Optimization
- Smart sampling: 5–25% based on route value
- Avoid tracing health checks, bots, noise
- SSR routes = low overhead, keep them instrumented
- Focus span wrapping on DB, external APIs, and long-running ops
SigNoz Highlights
- Built for OpenTelemetry-native apps
- Trace + logs + metrics in one UI
- Works great for Next.js out of the box
- Open-source or managed - your call
Build better. Debug faster. Sleep deeper.
You've reached the end of the series!
Congratulations on completing "OpenTelemetry NextJS Tutorial".
