Kubernetes Deployments - A Comprehensive Guide
Managing the lifecycle of containerized applications across a distributed environment can be a complex, inconsistent and error-prone process due to the manual process of deploying, scaling, and updating applications across multiple nodes.
Kubernetes Deployments address this challenge by providing a declarative and automated approach to releasing, updating, and scaling applications, ensuring that the desired state of your system is consistently maintained.
In this article, we will discuss Kubernetes Deployments, how to create and manage them, Kubernetes Deployment strategies, and how to choose the right strategy.
What is a Kubernetes Deployment?
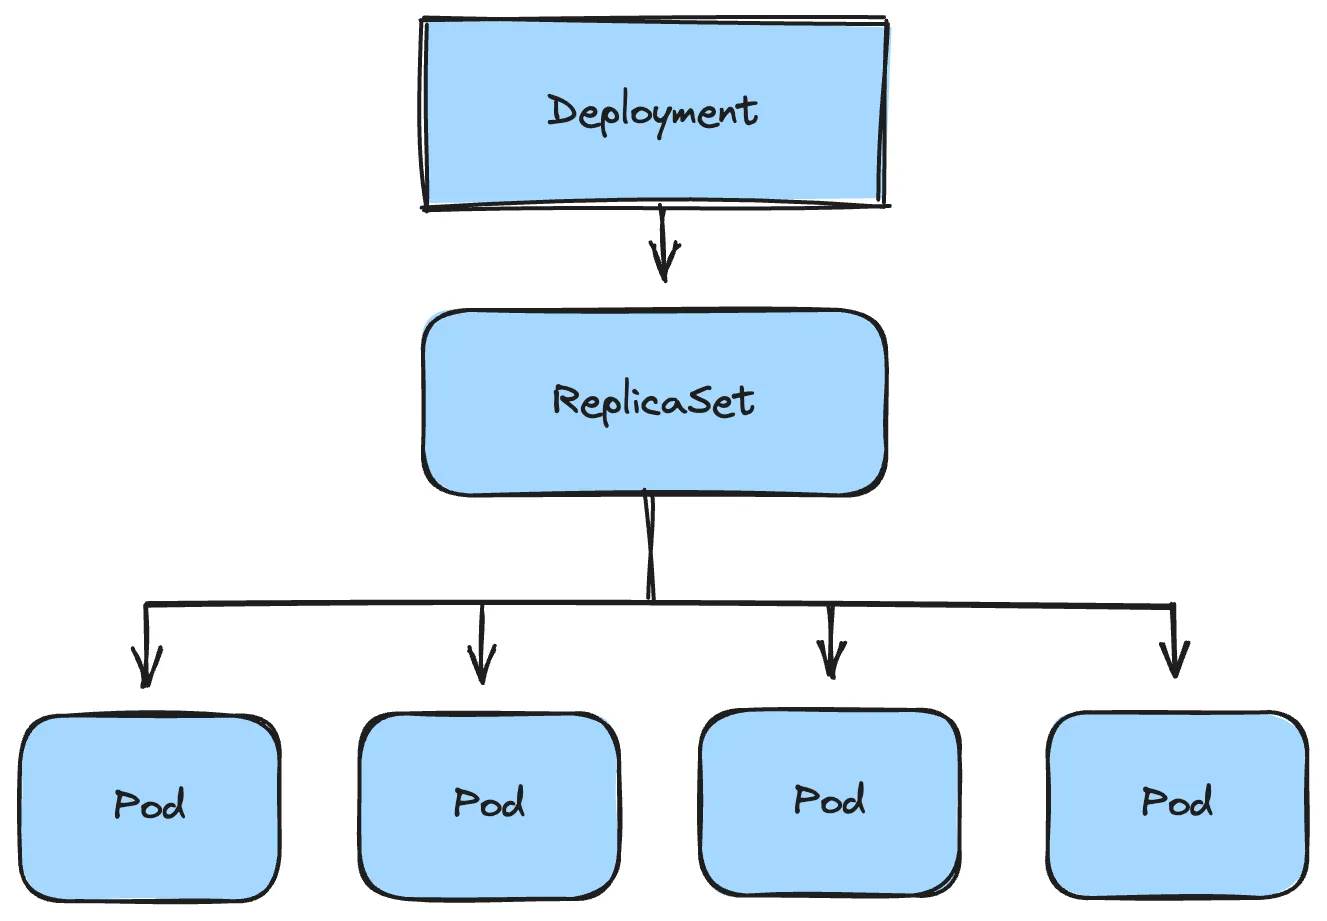
A Kubernetes Deployment is an API resource that manages the lifecycle of a set of identical pods, from creation and modification to scaling. Instead of manually managing pods, you simply tell Kubernetes what you want (desired state) through a Deployment. The built-in Deployment Controller actively monitors your cluster and automatically ensures that the actual state of your pods matches the desired state you defined.
Normally, when you create a pod, it creates a single instance of your application. If you want multiple instances of your application, you will need to manually create more pods, specifying the container image, resources, and other configurations. You will also need to manage them individually, monitoring their status and handling failures. This is time-consuming and not efficient, especially in a production environment.
Kubernetes Deployments manage the lifecycle of your applications within a cluster. For instance, if you want seven (7) instances of your application running, the Deployment will ensure that seven Pods are consistently running. In the event of a Pod failure or deletion, the Deployment automatically replaces that pod to maintain the desired Pod number declared. This self-healing mechanism ensures the high availability and resilience of your applications within the Kubernetes cluster.
A Kubernetes Deployment does not directly by itself create the desired number of pods you declared, it achieves this through the use of ReplicaSets. A ReplicaSet is a Kubernetes object that ensures a specified number of pod replicas are running at any given time. They can be used independently, but they are primarily utilized by Deployments to orchestrate the creation, deletion, and updates of Pods. Once a Deployment is created, the Deployment creates a ReplicaSet, and the ReplicaSet creates the Pods.
Benefits of Kubernetes Deployment
Kubernetes Deployments provides several benefits for managing and scaling your applications efficiently and reliably within a cluster. They include:
- Roll Backs: Kubernetes Deployments allow you to revert to a previous, stable version quickly and easily if issues arise with newly deployed pods. This ensures minimal downtime and disruption to your application.
- Image Version Upgrades: Kubernetes Deployments enable granular control over container image updates. You can update specific pods without affecting others, allowing targeted improvements or bug fixes while maintaining overall application stability.
- Zero-Downtime Upgrades (Gradual Rollouts): Deployments support strategies like rolling updates and canary deployments, enabling you to release new application versions without causing downtime. These gradual rollouts minimize the impact of potential issues during updates.
- Scalability: Kubernetes Deployments facilitate horizontal pod autoscaling. This means you can automatically increase or decrease the number of replicas (pods) running your application based on demand metrics like CPU usage or request rates.
- Self-Healing (Automatic Recovery from Failures): Deployments have built-in self-healing mechanisms. If a pod crashes, becomes unresponsive or fails a health check, Kubernetes automatically restarts or replaces it, ensuring your application remains available.
- Declarative Configuration: Kubernetes Deployments use a declarative approach, where you specify the desired state of your application in a configuration file (usually YAML). Kubernetes then works to maintain that state, making it easier to manage complex deployments.
Creating and Managing Kubernetes Deployments
In this section, we will explore the processes involved in creating and managing Kubernetes Deployments, including how to define the desired state, configure updates, and handle scaling and rollbacks.
How to Create Kubernetes Deployments
Two different approaches can be taken in creating Deployments. They are;
Imperative approach
Declarative approach
Imperative Approach
In the imperative approach, you use direct commands through the kubectl command-line tool to instruct Kubernetes on exactly how to create the Deployment and its associated resources.
Example:
kubectl create deployment my-app --image=nginx:latest --replicas=3
This command tells Kubernetes to create a Deployment named "my-app” using the nginx:latest container image and ensure that 3 instances (replicas) of the Pod are running at all times.
To see the created deployment, run kubectl get deployments :
NAME                                READY   UP-TO-DATE   AVAILABLE   AGE
my-app                              3/3     3            3           81s
Since Deployments create ReplicaSets as well, run kubectl get rs to see the created ReplicaSet:
NAME                                     DESIRED   CURRENT   READY   AGE
my-app-9696fd5cd                         3         3         3       4m2s
To see the pods created from the ReplicaSets, run kubectl get pods :
NAME                                   READY   STATUS    RESTARTS     AGE
my-app-9696fd5cd-bsf8p                 1/1     Running   0            4m50s
my-app-9696fd5cd-djc46                 1/1     Running   0            4m50s
my-app-9696fd5cd-hnjcz                 1/1     Running   0            4m50s
Pros of the imperative approach
- It is quick and easy for simple deployments.
- It is good for ad-hoc adjustments or personal learning.
Cons of the imperative approach
- It is less repeatable (you have to remember and re-type commands).
- It is not ideal for complex deployments with multiple resources.
- Declarative Approach
In the declarative approach, you define the desired state of your Deployment in a YAML (or JSON) file. You then apply this configuration to Kubernetes, and it figures out how to make the reality match your description.
Example:
Create a file named deployment.yamlor any name of your choice but it should end with the .yaml or .yml extension.
apiVersion: apps/v1
kind: Deployment
metadata:
  name: my-app
spec:
  replicas: 3
  selector:
    matchLabels:
      app: my-app
  template:
    metadata:
      labels:
        app: my-app
    spec:
      containers:
      - name: nginx
        image: nginx:latest
        ports:
        - containerPort: 80
The above is called a Kubernetes Manifest. A Kubernetes Manifest is a YAML or JSON file that describes the desired state of a Kubernetes object, in this case, the Deployment.
The written manifest defines a Deployment resource in Kubernetes, specifying that three replicas of the pod should be running, each containing one instance of the Nginx web server. The matchLabels field under selector ensures that the Deployment manages pods with the label app: my-app.
To create the Deployment, run the below command in the directory where the file resides:
kubectl apply -f deployment.yaml
Run the same commands as stated in the imperative approach to see the Deployment, ReplicaSet and Pods created.
Pros of the declarative approach
- It is highly repeatable (the YAML file allows you to consistently recreate and manage your desired system state).
- It is great for version control (track changes to your deployments).
- It is ideal for complex setups (define multiple resources in one file).
- Kubernetes will actively work to maintain the state described in your file.
Cons of the declarative approach
- It requires a bit more upfront learning of the YAML syntax.
- It might seem a bit more verbose than direct commands for very simple use cases.
How to Roll Back a Kubernetes Deployment
A rollback in Kubernetes refers to the process of reverting a deployment to a previous state. This is typically done when a recent deployment or update to your application introduces errors or issues that negatively impact its functionality.
To roll back a Deployment, identify the deployment you want to roll back:
kubectl get deployments
This command lists all available deployments in your cluster.
Let’s assume we have a deployment named my-app using the nginx:latest image, which is working fine. To simulate a scenario where you need to roll back, update the deployment image to a non-existent version:
kubectl set image deployment/my-app nginx=nginx:1.260
Annotate the deployment with a change-cause for tracking:
kubectl annotate deployment/my-app kubernetes.io/change-cause="my-app version changed from latest to 1.260"
Retrieve the rollout history to see the deployment revisions:
kubectl rollout history deployment/my-app
Expected output:
deployment.apps/my-app
REVISION  CHANGE-CAUSE
1         my-app version set as latest
2         my-app version changed from latest to 1.260
Check the status of the deployment to confirm if the new image has been applied successfully:
NAME                                   READY   UP-TO-DATE   AVAILABLE   AGE
my-app                                 3/4     2            3           6m6s
From the above, we have only three Deployments out of four available which means the update failed. Inspect the pods for further details:
kubectl get pods
Output showing failed pods due to the non-existent image:
my-app-56d8999d85-brzkf             1/1     Running            0       6m11s
my-app-56d8999d85-dv469             1/1     Running            0       5m36s
my-app-56d8999d85-xrlgs             1/1     Running            0       5m36s
my-app-fb5d5dc59-kg2vm              0/1     ImagePullBackOff   0       2m29s
my-app-fb5d5dc59-q48k8              0/1     ImagePullBackOff   0       2m28s
The image update was unsuccessful because the image version 1.260 does not exist.
To roll back to the previous version (revision 1):
kubectl rollout undo deployment/my-app --to-revision=1
This command reverts your deployment to revision 1, which uses the working nginx:latest image.
To verify that the rollback was successful:
kubectl rollout status deployment/my-app
Output:
deployment "my-app" successfully rolled out
How to Scale a Kubernetes Deployment
Before scaling a Deployment, make sure you know the exact name of the Deployment you want to modify. List all Deployments in your current namespace:
kubectl get deployments
To list Deployments in all available namespaces:
kubectl get deployments -A
Once you have gotten the name of the deployment, you can proceed to scale it.
Scaling Using the Imperative Approach
To scale a Kubernetes Deployment using the imperative approach, you make use the kubectl scale command. This command allows you to adjust the number of replicas (pods) that your Deployment manages.
Syntax:
kubectl scale deployment/<deployment-name> --replicas=<number-of-replicas>
For example, to scale a Deployment in your current namespace named my-web-app to 5 replicas, you would run:
kubectl scale deployment/my-web-app --replicas=5
This command adjusts the number of pods managed by the Deployment according to the specified number of replicas, allowing you to scale your application horizontally.
Scaling Using the Declarative Approach
To scale a Kubernetes Deployment declaratively, you modify the desired number of replicas within a Deployment manifest file (usually YAML).
Syntax:
kubectl edit deployment/<deployment-name>
If you already have a YAML file defining your Deployment, you can directly edit the replicas field within it to your desired number.
Once you have modified the number of replicas you want, run the below command:
kubectl apply -f deployment.yml
This will update the live Deployment on the cluster to match your new configuration.
If you don’t have an existing Deployment manifest, you can create one using the imperative approach and output it into a YAML file. This way the Deployment is declarative:
If you don't have an existing manifest, you will need to create a Deployment manifest:
kubectl create deployment my-app --image=nginx:latest --replicas=3 -o yaml
This command will automatically create a Deployment called my-app with three replicas and output the manifest in your terminal. To scale the number of replicas from 3 to 5, you need to edit the Deployment manifest:
kubectl edit deployment my-app
The manifest will be opened using a text editor in your terminal. After you modify the number of replicas from three(3) to five(5), save it and run kubectl get deployments to see the number of running pods.
NAME                              READY   UP-TO-DATE   AVAILABLE   AGE
my-app                            5/5     5            5           6m42s
The Deployment will automatically scale the pods as declared.
Kubernetes Deployment Strategies
Different deployment strategies can be employed for managing application deployment in Kubernetes clusters. These strategies are designed to facilitate the efficient management, scaling, and updating of applications within the Kubernetes ecosystem. Some common deployment strategies include:
Recreate
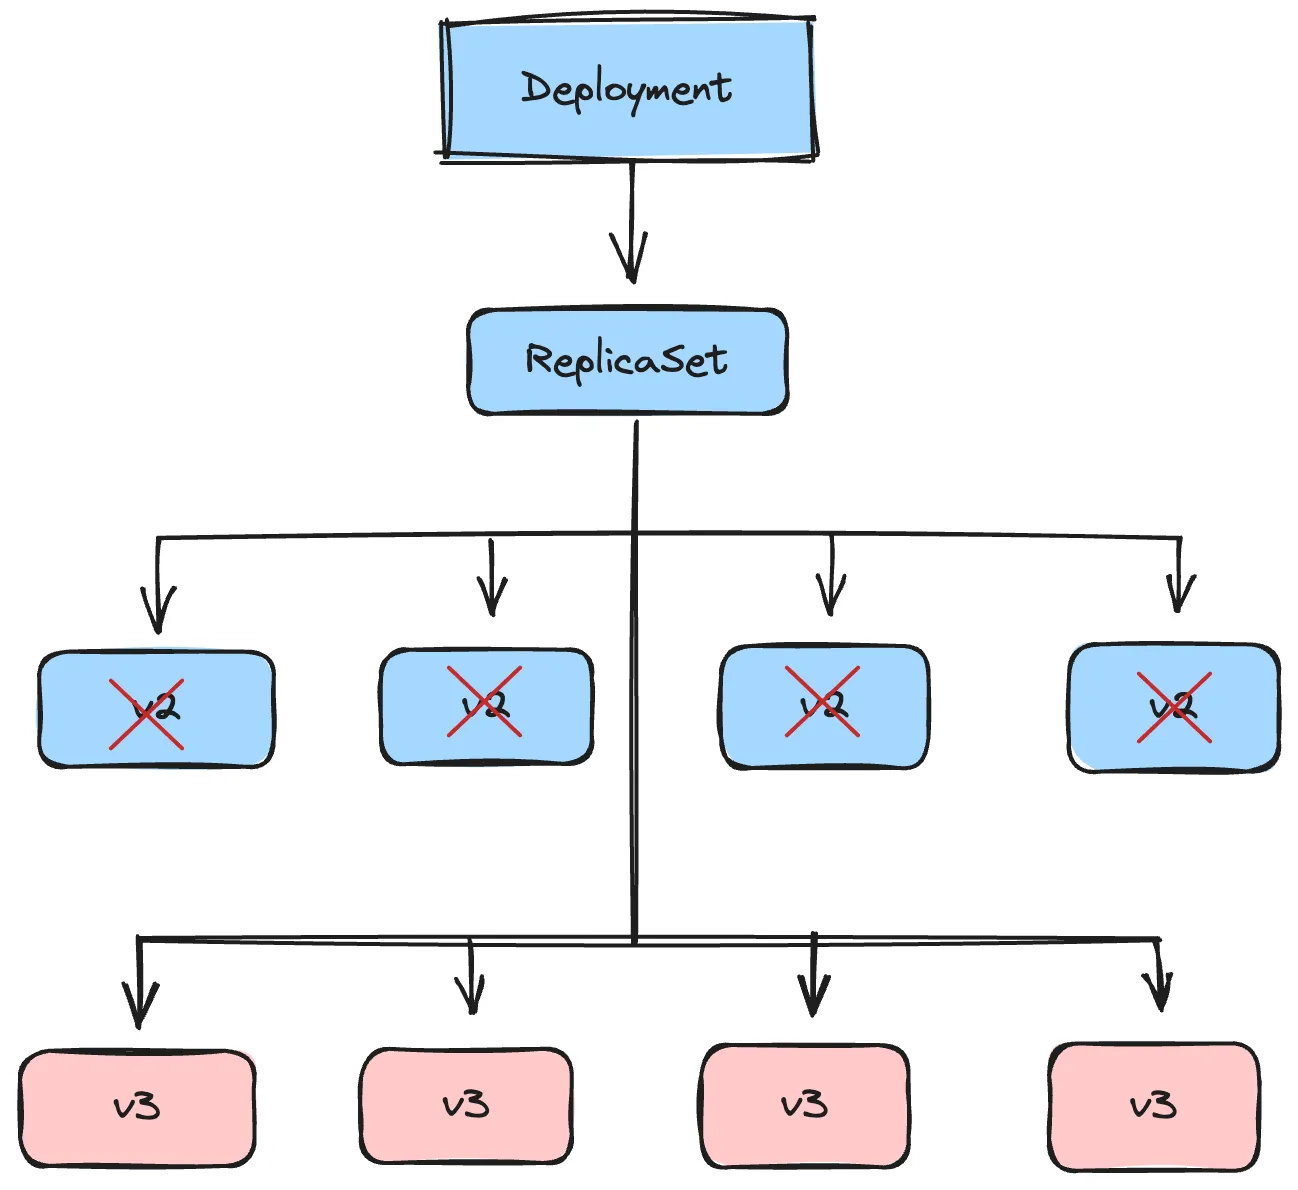
The Recreate deployment strategy is a method of updating applications running in a Kubernetes cluster. This approach is straightforward: it stops all the old versions of the application before starting the new ones. This causes downtime, once the upgrade is triggered, all existing pods will be immediately terminated and replaced by new pods with a new version. Recreate deployment strategy is provided out of the box in Kubernetes.
Example:
apiVersion: apps/v1
kind: Deployment
metadata:
  name: my-app
spec:
  replicas: 4
  strategy:
    type: Recreate
  selector:
    matchLabels:
      app: my-app
  template:
    metadata:
      labels:
        app: my-app
    spec:
      containers:
      - name: my-app
        image: my-app:v2 # Updated image version
        ports:
        - containerPort: 80
In the above configuration, the type: Recreate under the spec section explicitly sets the deployment strategy for the my-app deployment. When this deployment is updated, all existing pods with the previous container image version will be terminated and new pods with the current image version, v2, will be created.
When to Use the Recreate Deployment Strategy
- Suitable for non-production environments (development) where downtime is less critical.
- Significant configuration changes that necessitate a complete restart of the application, such as major database schema changes.
- When you need a simpler rollback mechanism, you can quickly revert to the previous version by deploying the old version again.
- When there are constraints on resources, it is impractical to run multiple versions of the application simultaneously.
When Not to Use the Recreate Deployment Strategy
- If your application requires continuous availability or cannot tolerate any downtime.
Rolling Update
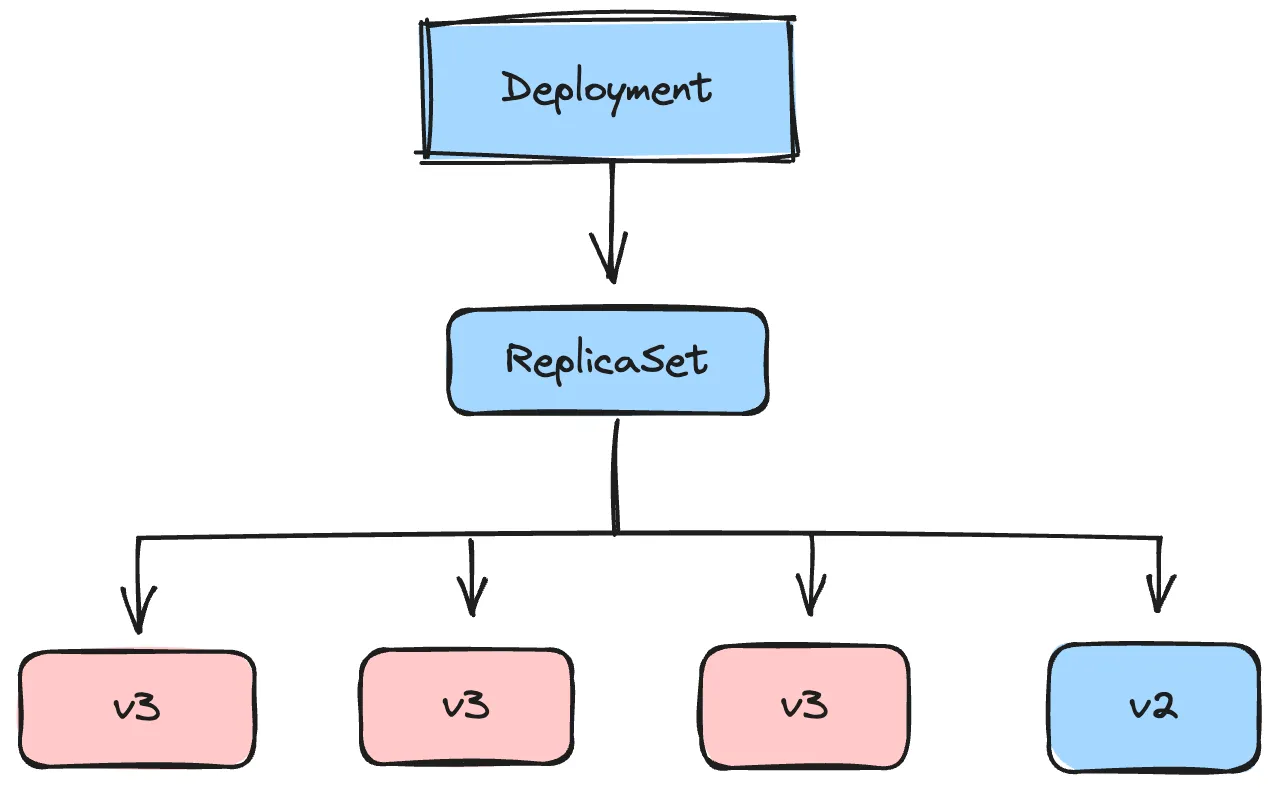
This is one of the most common deployment strategies that comes out of the box in Kubernetes. With the rolling update deployment strategy, Kubernetes gradually replaces pods of the old version with pods of the new version. This happens in a controlled manner, ensuring a minimum number of pods are available throughout the update (no downtime). Kubernetes also uses readiness probes (health checks) to verify that new pods are healthy and ready to serve traffic before terminating old pods. This helps maintain service availability during the update.
If issues arise during the rollout of the new pods, Kubernetes allows you to easily roll back to the previous version.
Example:
apiVersion: apps/v1
kind: Deployment
metadata:
  name: my-app-deployment
spec:
  replicas: 5
  strategy:
    type: RollingUpdate
    rollingUpdate:
      maxSurge: 2 # Allow two extra pods
      maxUnavailable: 1 # Allow only one pod to be unavailable
  template:
    metadata:
      labels:
        app: my-app
    spec:
      containers:
        - name: my-app-container
          image: my-app:v2
          ports:
            - containerPort: 80
          readinessProbe:
            httpGet:
              path: /health
              port: 80
From the above, during the initial creation, Kubernetes will create 5 pods of your application (specified by replicas: 5). When you update the Deployment (e.g., by changing the image tag to my-app:v3), Kubernetes will:
- Create one new pod with the updated image. Since
maxSurgeis 2, it could potentially create another new pod before terminating any old ones, leading to a maximum of 7 pods running simultaneously. - Wait for the new pod to pass the readiness probe by sending HTTP requests to
/health. - Terminate one of the old
my-app:v2pods. - Repeat this process until all 5 pods have been updated the new
my-app:v3image.
Note: If the strategy section is not configured for the Deployment object, Kubernetes uses the default settings for the deployment strategy which are;
- Deployment Strategy: RollingUpdate
- Kubernetes will replace the old pods with new ones in a rolling fashion, ensuring that the application remains available during the update process.
- MaxUnavailable: 25%
- By default, up to 25% of the desired number of pods can be unavailable during the update. This means if you have a deployment with 4 replicas, at most 1 pod can be unavailable during the rolling update.
- MaxSurge: 25%
- By default, up to 25% more than the desired number of pods can be created during the update process. This means if you have a deployment with 4 replicas, at most 1 additional pod can be created during the rolling update.
spec:
  replicas: 4
  selector:
    matchLabels:
      app: my-app
  strategy:
    type: RollingUpdate
    rollingUpdate:
      maxUnavailable: 25%
      maxSurge: 25%
During the rolling update, Kubernetes will first create a new pod, making the total number of pods 5 (4 original + 1 new). Then, one of the old pods will be terminated, bringing the total back to 4. This process repeats until all old pods are replaced by new ones.
When to use the Rolling Update Deployment Strategy
- When your application needs to remain available to users during the deployment process, minimizing downtime.
- When you want to test new features or changes in production with a subset of users before a full rollout. You can monitor the new version's performance and gather feedback before exposing it to all users.
- When backward compatibility is a requirement and you need both old and new versions to coexist temporarily, Rolling Update allows for a seamless transition.
- When you want to gradually roll out updates to a subset of instances, reducing the risk of widespread issues caused by new changes.
When Not to Use the Rolling Update Deployment Strategy
- If your application has complex dependencies or requires a specific startup sequence.
- If your environment has limited resources or resource constraints. Rolling Update requires additional resources to run both the old and new pods simultaneously.
Blue/Green Deployment
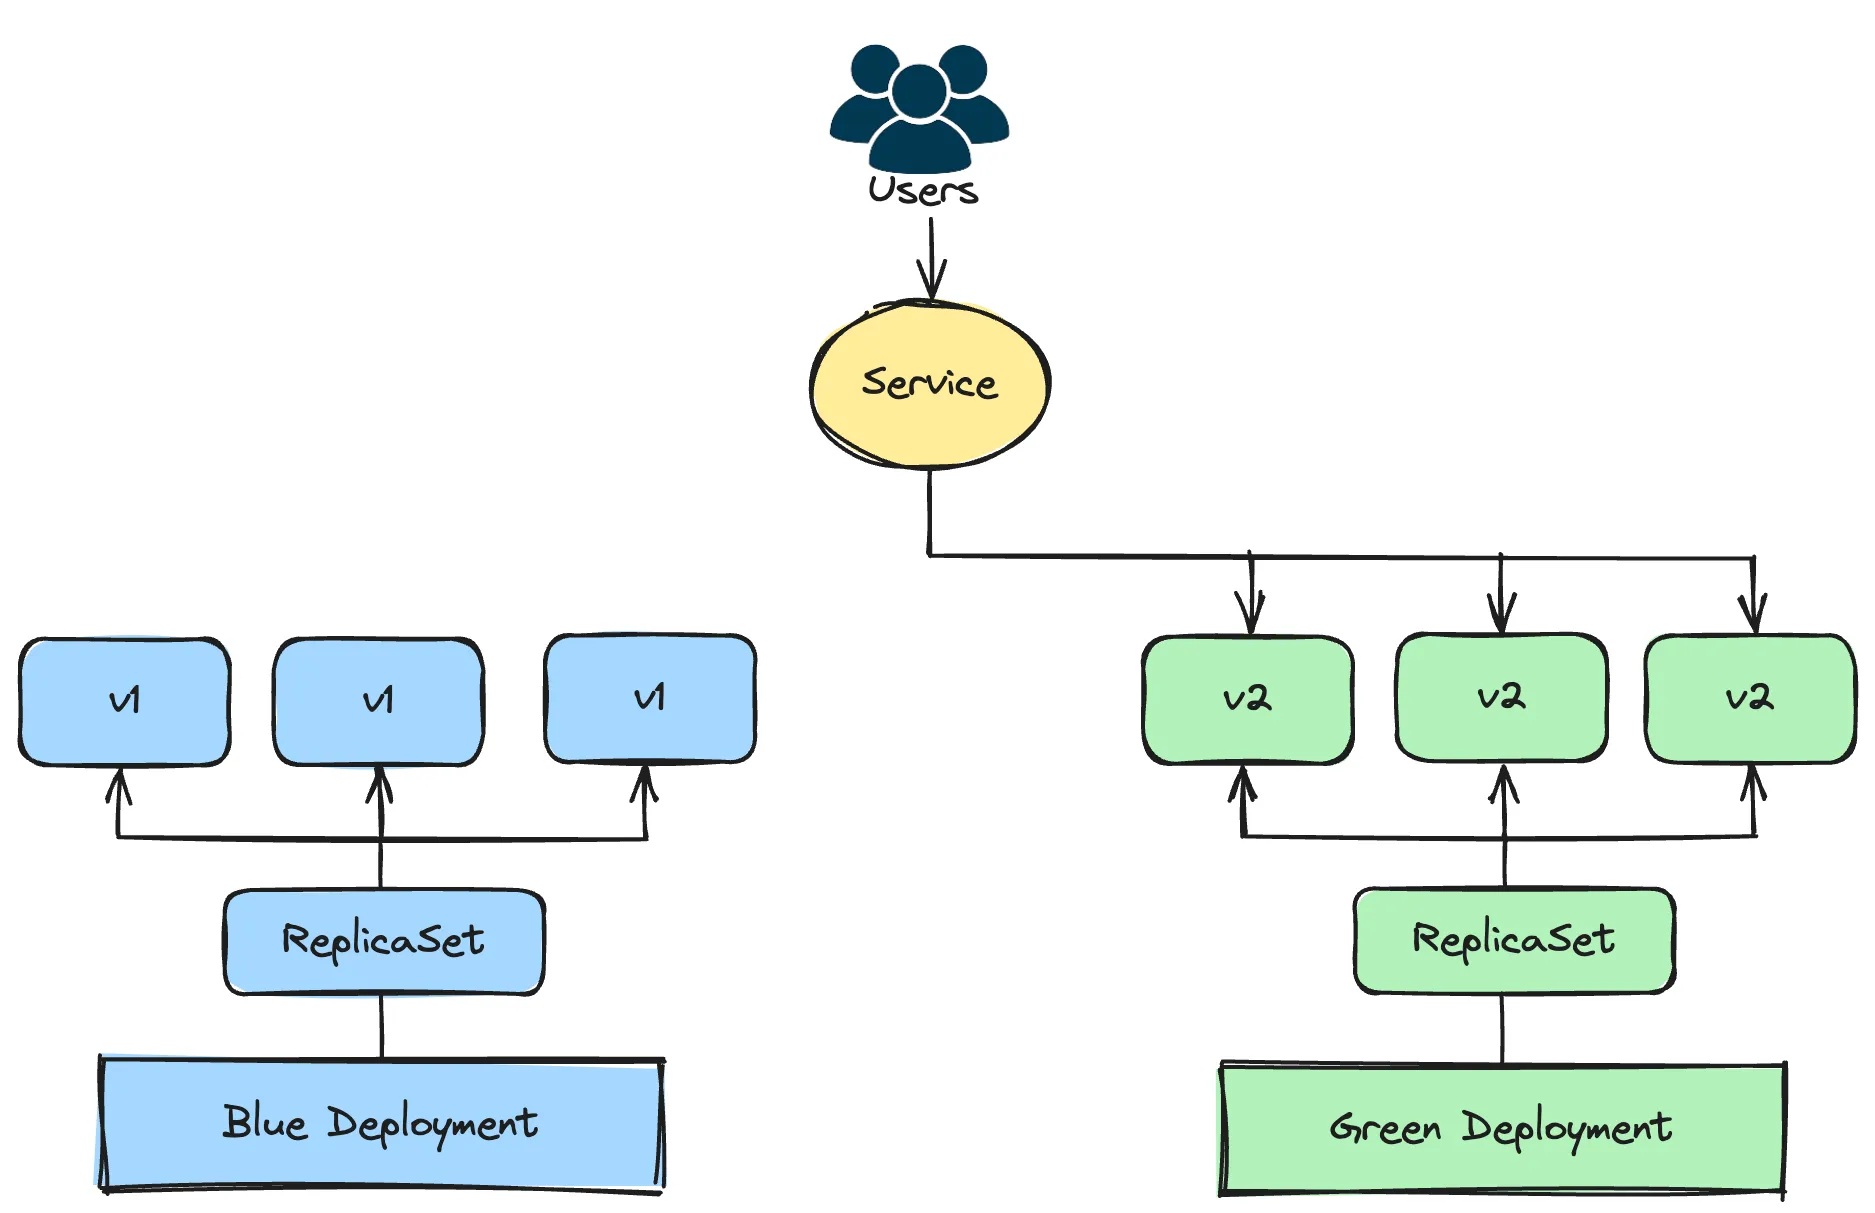
Blue/Green deployment is a release management strategy that reduces downtime and risk by running two identical production environments, referred to as Blue and Green. Only one of these environments serves live production traffic at a time.
- Blue Environment: The current production environment that handles all the live traffic.
- Green Environment: The new environment with the updated application version that is ready to replace the Blue environment.
In this deployment strategy, you deploy the new version of the application to the Green environment while the Blue environment continues to serve traffic. Once the Green environment is fully tested and confirmed to be stable, switch the traffic from the Blue environment to the Green environment. The Blue environment then becomes idle and can be kept as a backup or used for the next deployment.
Example:
You start by deploying the current version of your application (Blue).
apiVersion: apps/v1
kind: Deployment
metadata:
  name: blue-deployment
spec:
  replicas: 2
  selector:
    matchLabels:
      app: my-app
      environment: blue
  template:
    metadata:
      labels:
        app: my-app
        environment: blue
    spec:
      containers:
        - name: my-app
          image: myapp-171:v1  # Current application image
          ports:
	          - name: http
		          containerPort: 8080
Make the Blue deployment accessible through a Kubernetes Service:
apiVersion: v1
kind: Service
metadata:
  name: my-app-service
spec:
  selector:
    app: my-app
    environment: blue
  ports:
    - protocol: TCP
      port: 8080
      targetPort: http
Deploy the new version of your application with the updated image (Green):
apiVersion: apps/v1
kind: Deployment
metadata:
  name: green-deployment
spec:
  replicas: 2
  selector:
    matchLabels:
      app: my-app
      environment: green
  template:
    metadata:
      labels:
        app: my-app
        environment: green
    spec:
      containers:
        - name: my-app
          image: myapp:v2  # New application image
          ports:
			      - name: http
	            containerPort: 8080
Before making the Green deployment accessible to users, it should be tested properly and internally. Once tests are complete and the new environment is ready to be utilized, update the Kubernetes service to shift traffic from the blue environment to the green environment:
apiVersion: v1
kind: Service
metadata:
  name: my-app-service
spec:
  selector:
    app: my-app
    environment: green
  ports:
    - protocol: TCP
      port: 8080
      targetPort: http
When to Use the Blue/Green Deployment Strategy?
- When zero downtime is essential.
- When deploying significant updates, new features, or changes with the potential of introducing errors. If issues arise in the new version (Green), you can quickly revert to the old version (Blue) without affecting users.
- When you want to quickly roll back to a previous version.
When Not to Use the Blue/Green Deployments Strategy
- When you have resource constraints. Maintaining two identical environments can be resource-intensive and costly. If your application is very resource-heavy or you have budget constraints, this might not be feasible.
- For very simple applications with minimal risk of deployment issues, a simpler deployment strategy will be sufficient.
- If your infrastructure does not support easily creating and managing two identical environments.
Canary Deployment
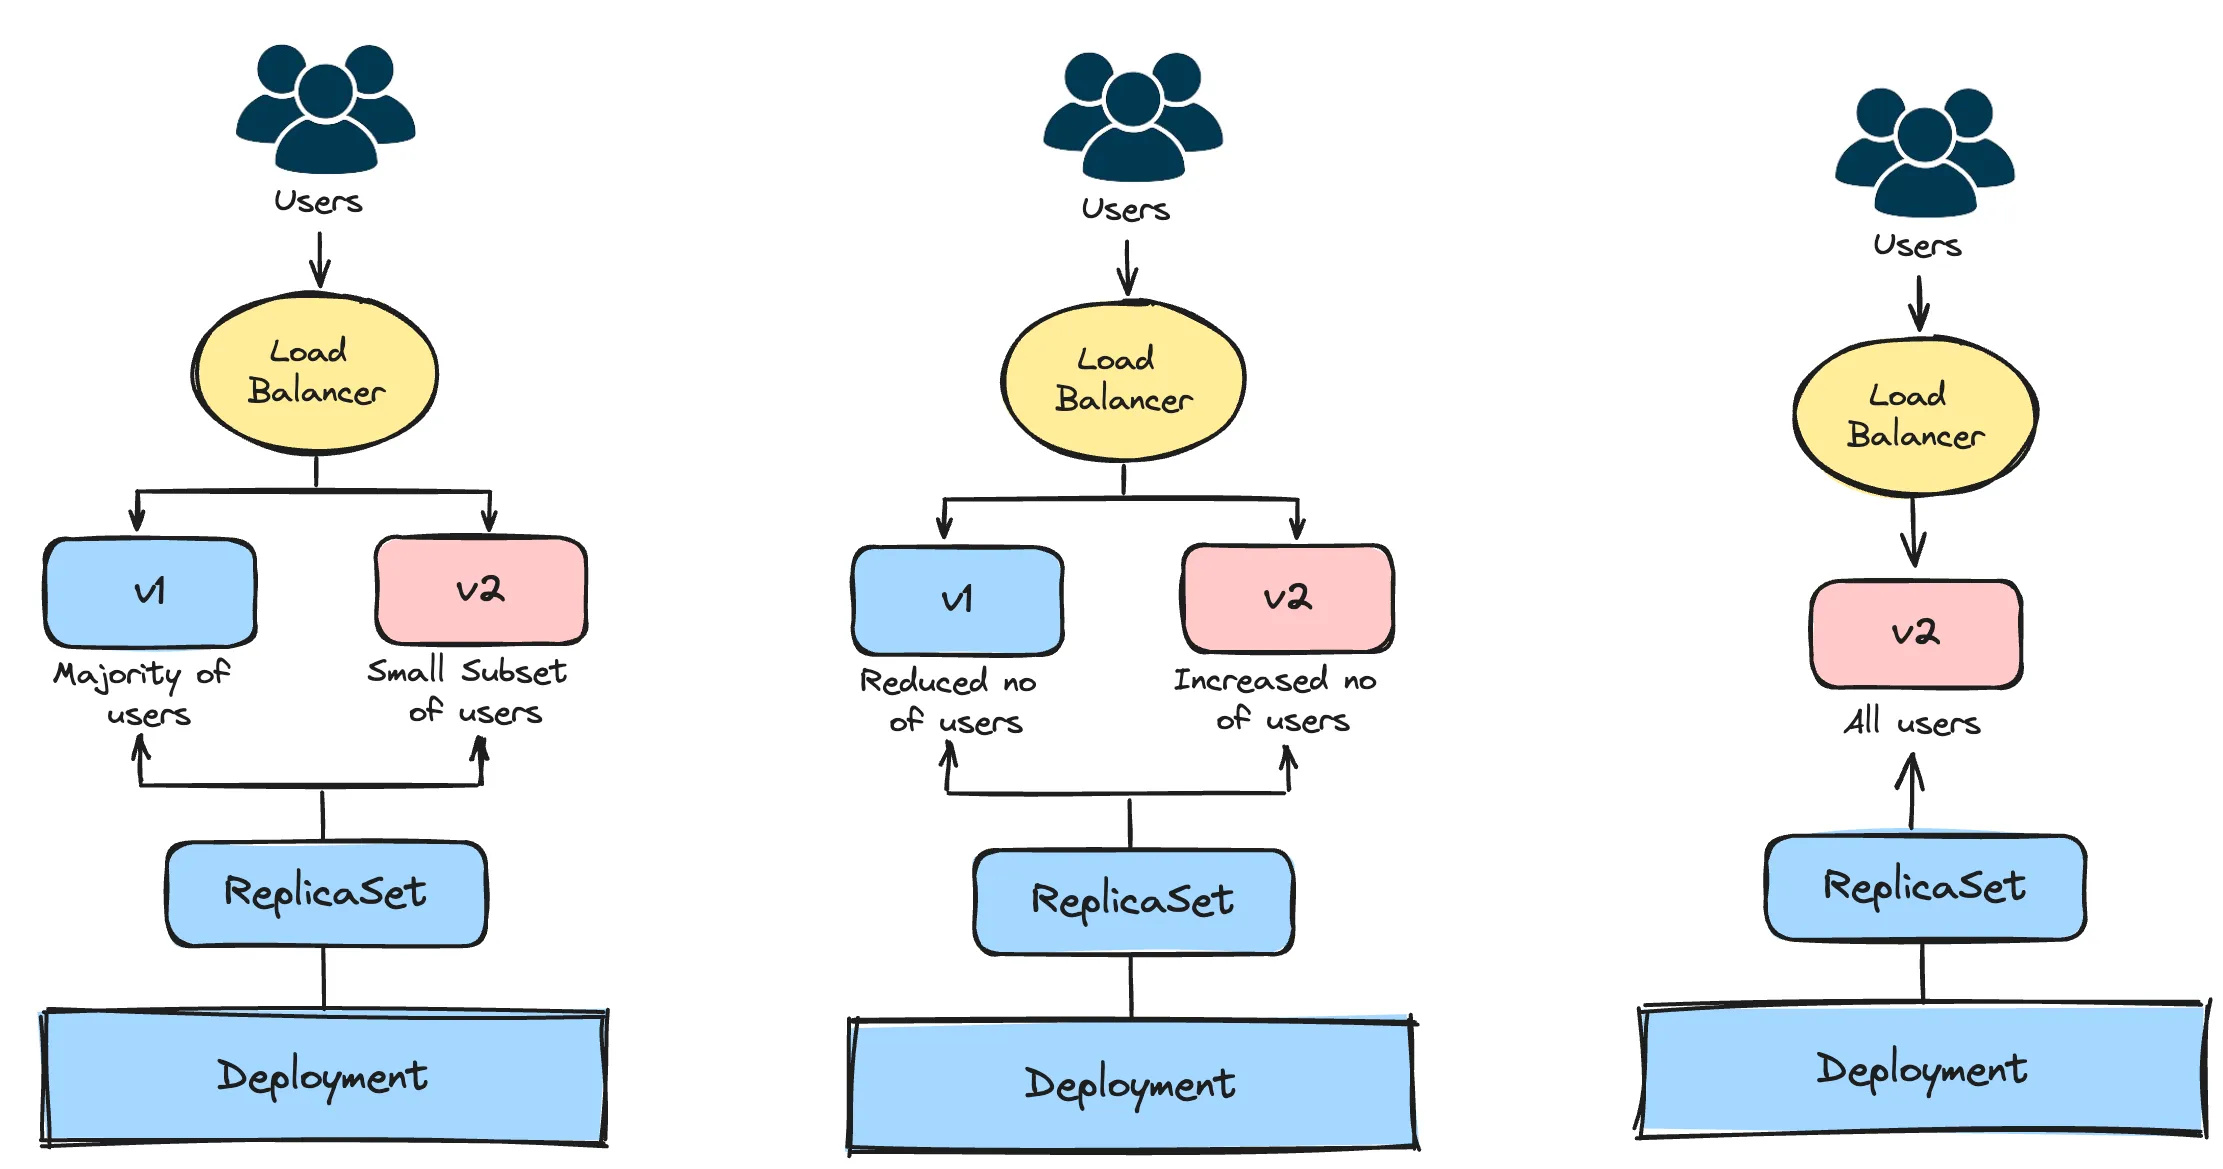
Canary deployment is another strategy used to reduce the risk of introducing a new software version into production. It involves gradually rolling out the new version to a small subset of users before rolling it out to the entire user base. This allows you to monitor the new version for issues on a smaller scale and make adjustments before a full rollout.
Example:
Using Kubernetes native objects, we will see how canary deployments can be carried out in Kubernetes. For the initial version of your application, create a deployment and a service:
apiVersion: apps/v1
kind: Deployment
metadata:
  name: my-app-v1
spec:
  replicas: 5
  selector:
    matchLabels:
      app: my-app
      version: v1
  template:
    metadata:
      labels:
        app: my-app
        version: v1
    spec:
      containers:
        - name: my-app
          image: my-app:v1
          ports:
            - containerPort: 80
---
apiVersion: v1
kind: Service
metadata:
  name: my-app
spec:
  selector:
    app: my-app
  ports:
    - protocol: TCP
      port: 80
      targetPort: 80
Create a Deployment for the new version of your application:
apiVersion: apps/v1
kind: Deployment
metadata:
  name: my-app-v2
spec:
  replicas: 1
  selector:
    matchLabels:
      app: my-app
      version: v2
  template:
    metadata:
      labels:
        app: my-app
        version: v2
    spec:
      containers:
        - name: my-app
          image: my-app:v2
          ports:
            - containerPort: 80
Keep the number of replicas for the new deployment less than the initial deployment. This is to limit the number of users that will be exposed to this new version in case of issues that may arise.
Kubernetes services use a round-robin mechanism to select pods to distribute traffic among pods that match the service selector so traffic will be split between the initial deployment and the new deployment version.
This canary deployment is manual, requiring you to adjust the number of replicas in each deployment over time. To increase the number of users that can access the new version, you will need to increase the number of replicas in the new deployment version and decrease the number of replicas in the initial version.
For more advanced control and an automated process, you can use tools like Argo Rollouts or Flagger, which can handle progressive delivery, traffic shifting, and rollback automatically based on metrics and health checks or service meshes like Istio and Linkerd to manage traffic splitting.
When to Use the Canary Deployment Strategy
- When rolling out new features, canary deployment allows you to expose a small percentage of users to the new version, minimizing potential disruptions if issues arise.
- Testing new application versions in the production environment, where real user interactions can reveal issues not caught in staging or testing environments.
When Not to Use the Canary Deployment Strategy
- If your application has a very limited number of users, conducting a canary deployment might not provide enough statistical significance to detect potential issues.
- For minor updates or changes that are unlikely to cause major problems, a canary deployment might be overkill.
How to Choose the Right Deployment Strategy
Choosing the right deployment strategy for your application in Kubernetes involves considering various factors to ensure smooth and efficient updates while minimizing disruption to users. Here's a guide to help you make an informed decision:
- Understand Application Requirements: Begin by understanding the specific needs and characteristics of your application. Consider factors such as its architecture, scalability requirements, dependencies, and criticality to the business.
- Assess Risk Tolerance: Evaluate your organization's tolerance for risk and downtime. Some deployment strategies, such as blue-green deployment, offer zero-downtime updates and easy rollback capabilities, making them suitable for mission-critical applications. Others, like canary deployment, allow for gradual testing and validation but may involve some level of risk during the rollout.
- Consider Update Frequency: Determine how frequently you need to deploy updates to your application. For applications requiring frequent updates, a rolling update strategy may be more suitable, as it allows for continuous deployment with minimal disruption. For less frequent updates, a blue-green or canary deployment strategy may offer better control and testing capabilities.
- Evaluate Testing Requirements: Assess the importance of testing and validation before deploying updates to production. Canary deployment and A/B testing strategies provide opportunities for real-world testing and feedback gathering, which can be valuable for ensuring the stability and performance of new releases.
- Review Infrastructure Constraints: Consider the infrastructure constraints and resources available in your Kubernetes cluster. Some deployment strategies, such as blue-green deployment, require maintaining duplicate environments, which may impact resource utilization and cost. Ensure that your cluster can support the chosen strategy without compromising performance or scalability.
- Plan for Rollback: Regardless of the chosen deployment strategy, always have a rollback plan in place in case issues arise during the update process. Kubernetes provides rollback capabilities that allow you to quickly revert to a previous version of the application if necessary. Ensure that your team is familiar with these rollback procedures and can execute them effectively.
Monitoring Kubernetes Deployments in SigNoz
SigNoz is an open-source observability platform that provides real-time insights into your applications and infrastructure. SigNoz is built on OpenTelemetry, an emerging standard for generating telemetry data. It seamlessly integrates metrics, logs, and traces within a unified interface.
With SigNoz, you can monitor your Kubernetes Deployments. By leveraging its integration capabilities with OpenTelemetry, SigNoz allows you to collect and visualize metrics, logs and traces directly from your Kubernetes environments. This comprehensive view ensures that you can quickly identify and troubleshoot issues, optimize performance, and ensure the reliability of your applications running on Kubernetes.
Getting started with SigNoz
SigNoz Cloud is the easiest way to run SigNoz. Sign up for a free account and get 30 days of unlimited access to all features.
You can also install and self-host SigNoz yourself since it is open-source. With 24,000+ GitHub stars, open-source SigNoz is loved by developers. Find the instructions to self-host SigNoz.
