Complete Guide to Implementing OpenTelemetry in Go Applications
Modern Golang applications often run in distributed environments with multiple services, containers, background jobs, async processing, and external dependencies. As the complexity of these systems increases, answering basic debugging questions as below becomes complex:
- Why is this request slow?
- Which service introduced latency?
- Where did the error originate?
- What series of events led to the failure?
That's where OpenTelemetry becomes the difference between guessing and knowing. It is an open-source observability framework that enables applications to generate, collect, and export telemetry data such as logs, metrics, and traces in a standardized format across many languages and platforms.
In this tutorial, we will use the OpenTelemetry Golang libraries to instrument a Golang application and then visualize it with a unified observability platform - SigNoz.
Instrumenting Your Golang Application With OpenTelemetry
Follow the steps below to instrument your Golang application with OpenTelemetry:
Step 1: Prerequisites
- Go Installed (v1.20 or later): Required to build and run the application.
- Git Installed: Needed to clone the sample repository
- SQLite Installed: The sample app uses SQLite as its database through Gorm.
- SigNoz Cloud: A destination for your telemetry data (we will use SigNoz Cloud for the examples, but the concepts apply to any OTLP-compliant backend).
Step 2: Get a Sample Golang App From GitHub
In this tutorial, we have created a sample Golang app repo that contains the boilerplate code that builds a sample Golang app using Gin and Gorm.
If you want to follow along with the tutorial, clone the without-instrumentation branch:
git clone -b without-instrumentation https://github.com/SigNoz/sample-golang-app.git
cd sample-golang-app
NOTE: Make sure to install golang in your system before running the above application.
Step 3: Install OpenTelemetry Dependencies for Go
Dependencies for the OpenTelemetry exporter and SDK must be installed first. Note that we are assuming you are using gin request router. If you are using other request routers, check out the corresponding package.
Run the commands below after navigating to the application source folder:
  go get go.opentelemetry.io/otel \
  go.opentelemetry.io/otel/trace \
  go.opentelemetry.io/otel/sdk \
  go.opentelemetry.io/contrib/instrumentation/github.com/gin-gonic/gin/otelgin \
  go.opentelemetry.io/otel/exporters/otlp/otlptrace \
  go.opentelemetry.io/otel/exporters/otlp/otlptrace/otlptracegrpc
Step 4: Declare Environment Variables for Configuring OpenTelemetry
Declare the following global variables in the main.go file after the import block, which will be used to configure OpenTelemetry:
var (
    serviceName = os.Getenv("OTEL_SERVICE_NAME")
    collectorURL = os.Getenv("OTEL_EXPORTER_OTLP_ENDPOINT")
    insecure = os.Getenv("INSECURE_MODE")
)
The environment variables used here are explained in detail in Step 8 to help you configure them correctly.
Step 5: Instrument Your Go Application With OpenTelemetry
To configure your application to send data, we will need a function to initialize OpenTelemetry.
Let's start by importing the necessary packages in your main.go file:
import (
    "context"
    "log"
    "os"
    "strings"
 ...existing imports...
    "google.golang.org/grpc/credentials"
    "go.opentelemetry.io/otel"
    "go.opentelemetry.io/otel/attribute"
    "go.opentelemetry.io/otel/exporters/otlp/otlptrace"
    "go.opentelemetry.io/otel/exporters/otlp/otlptrace/otlptracegrpc"

    "go.opentelemetry.io/otel/sdk/resource"
    sdktrace "go.opentelemetry.io/otel/sdk/trace"
)
Now, we will configure the OpenTelemetry tracer provider by adding the following function after the environment variable declaration (var) block that we added in Step 4:
func initTracer() func(context.Context) error {

    var secureOption otlptracegrpc.Option

    // Decide whether to use secure TLS or insecure transfer based on the environment variable
    if strings.ToLower(insecure) == "false" || insecure == "0" || strings.ToLower(insecure) == "f" {
        secureOption = otlptracegrpc.WithTLSCredentials(credentials.NewClientTLSFromCert(nil, ""))
 } else {
        secureOption = otlptracegrpc.WithInsecure()
 }

    // Create OTLP trace exporter to send spans to collector
    exporter, err := otlptrace.New(
        context.Background(),
        otlptracegrpc.NewClient(
            secureOption,
            otlptracegrpc.WithEndpoint(collectorURL), // OTLP receiver URL
 ),
 )

    if err != nil {
        log.Fatalf("Failed to create exporter: %v", err)
 }

    // Define resource metadata for this service (identifies the application)
    resources, err := resource.New(
        context.Background(),
        resource.WithAttributes(
            attribute.String("service.name", serviceName),   // logical service name
            attribute.String("telemetry.sdk.language", "go"),      // programming language
 ),
 )
    if err != nil {
        log.Fatalf("Could not set resources: %v", err)
 }

    // Configure OpenTelemetry tracer provider
    otel.SetTracerProvider(
        sdktrace.NewTracerProvider(
            sdktrace.WithSampler(sdktrace.AlwaysSample()),  // capture every trace without sampling, not advised in prod.
            sdktrace.WithBatcher(exporter),                 // batch spans for efficient delivery
            sdktrace.WithResource(resources),               // attach resource metadata to each trace
 ),
 )

    // Return shutdown function to flush remaining traces on exit
    return exporter.Shutdown
}
The function above configures OpenTelemetry tracing for your Go service. It creates the OTLP exporter that pushes traces to your collector and assigns metadata. Hence, the backend knows which service the traces belong to and configures the tracer provider to sample, batch, and manage spans efficiently. It also returns a shutdown function that flushes all pending traces when the app stops.
Step 6: Initialize Tracing Inside main.go
Now we activate tracing at the very start of the application lifecycle, modify the main function to initialize the tracer in main.go:
func main() {
    cleanup := initTracer()
    defer cleanup(context.Background())

 ...existing code...
}
Calling initTracer() bootstraps telemetry, and defer cleanup(context.Background()) ensures that when your service stops, all buffered spans are sent before shutdown, helping provide clean, complete trace data in your observability backend.
Step 7: Add the OpenTelemetry Gin Middleware
Configure Gin to use the middleware by adding the following lines in main.go.
import (
 ...existing imports...
  "go.opentelemetry.io/contrib/instrumentation/github.com/gin-gonic/gin/otelgin"
)

func main() {
 ...existing code...
    r.Use(otelgin.Middleware(serviceName))
 ...existing code...
}
By importing otelgin and adding r.Use(otelgin.Middleware(serviceName)), every incoming HTTP request automatically gets traced, including route, latency, status, and context propagation without needing manual instrumentation in each handler. It basically plugs in middleware, and your Gin service becomes observable.
Your main.go file should look like below after instrumentation:
package main

import (
    "context"
    "log"
    "os"
    "strings"

    "github.com/SigNoz/sample-golang-app/controllers"
    "github.com/SigNoz/sample-golang-app/models"

    "github.com/gin-gonic/gin"

    // For secure/insecure OTLP communication over gRPC
    "google.golang.org/grpc/credentials"

    // Core OpenTelemetry libraries
    "go.opentelemetry.io/otel"
    "go.opentelemetry.io/otel/attribute"
    "go.opentelemetry.io/otel/exporters/otlp/otlptrace"
    "go.opentelemetry.io/otel/exporters/otlp/otlptrace/otlptracegrpc"

    // Define service identity & metadata
    "go.opentelemetry.io/otel/sdk/resource"

    // Tracing provider + span management
    sdktrace "go.opentelemetry.io/otel/sdk/trace"

    // Auto-instrumentation for Gin HTTP requests
    "go.opentelemetry.io/contrib/instrumentation/github.com/gin-gonic/gin/otelgin"
)

var (
    // App/service name sent to SigNoz
    serviceName = os.Getenv("OTEL_SERVICE_NAME")

    // SigNoz / OTLP endpoint
    collectorURL = os.Getenv("OTEL_EXPORTER_OTLP_ENDPOINT")

    // Whether to use TLS or not
    insecure = os.Getenv("INSECURE_MODE")
)

func initTracer() func(context.Context) error {

    var secureOption otlptracegrpc.Option

    // Choose secure vs insecure OTLP connection based on config
    if strings.ToLower(insecure) == "false" || insecure == "0" || strings.ToLower(insecure) == "f" {
        secureOption = otlptracegrpc.WithTLSCredentials(credentials.NewClientTLSFromCert(nil, ""))
 } else {
        secureOption = otlptracegrpc.WithInsecure()
 }

    // Initialize OTLP trace exporter
    exporter, err := otlptrace.New(
        context.Background(),
        otlptracegrpc.NewClient(
            secureOption,
            otlptracegrpc.WithEndpoint(collectorURL),
 ),
 )
    if err != nil {
        log.Fatalf("Failed to create exporter: %v", err)
 }

    // Attach metadata such as service.name & language
    resources, err := resource.New(
        context.Background(),
        resource.WithAttributes(
            attribute.String("service.name", serviceName),
            attribute.String("library.language", "go"),
 ),
 )
    if err != nil {
        log.Fatalf("Could not set resources: %v", err)
 }

    // Configure tracer provider: always sample + batch export
    otel.SetTracerProvider(
        sdktrace.NewTracerProvider(
            sdktrace.WithSampler(sdktrace.AlwaysSample()),
            sdktrace.WithBatcher(exporter),
            sdktrace.WithResource(resources),
 ),
 )

    // Return cleanup function
    return exporter.Shutdown
}

func main() {
    // Start tracer/cleanup when program exits
    cleanup := initTracer()
    defer cleanup(context.Background())

    r := gin.Default()

    // Automatically trace all HTTP requests
    r.Use(otelgin.Middleware(serviceName))

    // Connect DB
    models.ConnectDatabase()

    // Application routes
    r.GET("/books", controllers.FindBooks)
    r.GET("/books/:id", controllers.FindBook)
    r.POST("/books", controllers.CreateBook)
    r.PATCH("/books/:id", controllers.UpdateBook)
    r.DELETE("/books/:id", controllers.DeleteBook)

    // Start web server
    r.Run(":8090")
}
If you still face any dependency-related errors, run the following command to install all the dependencies:
go mod tidy
Step 8: Run Your Go Gin Application
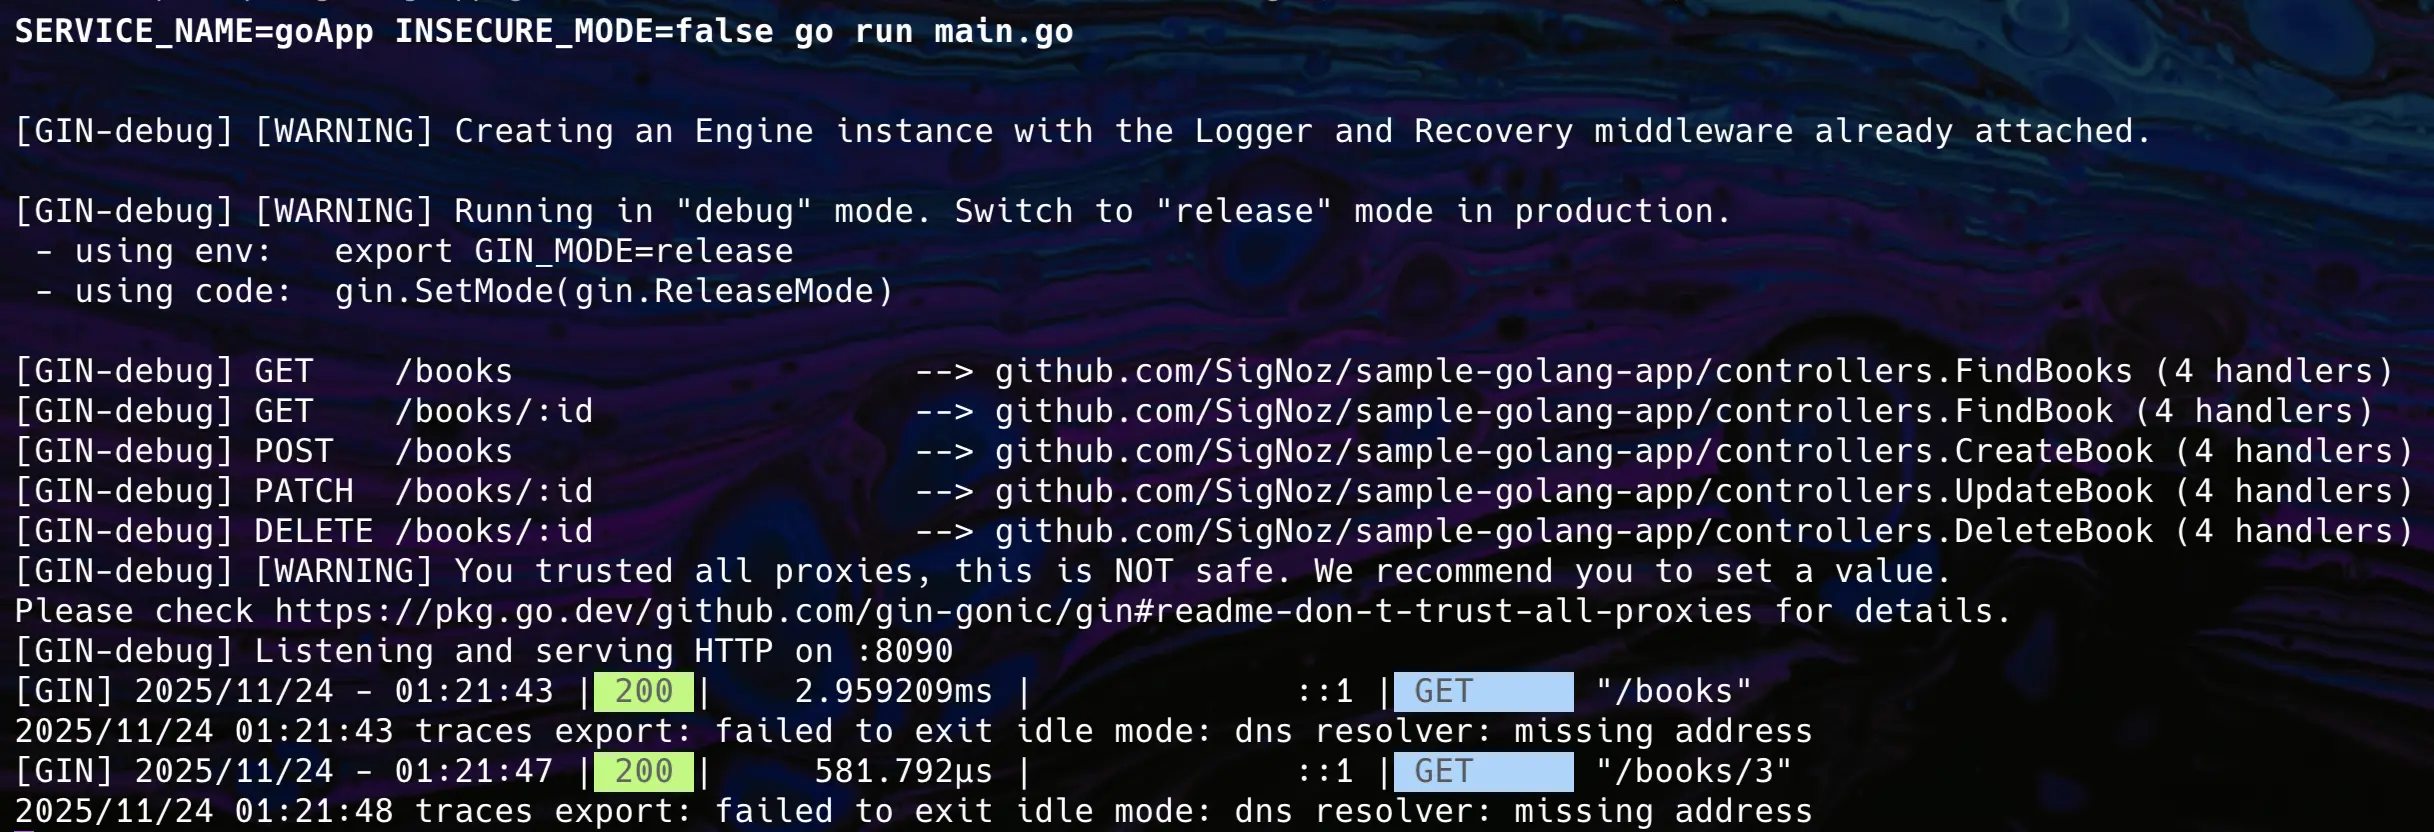
Now that you have fully set up the application, it's time to run some CRUD operations. Run the following command to set the environment variables and start the application:
OTEL_SERVICE_NAME=goApp INSECURE_MODE=false go run main.go
OTEL_SERVICE_NAME: This variable defines the name of your Golang application and helps in identifying telemetry data from this specific service. You can name it as you prefer.INSECURE_MODE: When set tofalse, this ensures that the connection between your application and backend service is secure (using TLS). It's recommended to keep it set tofalsein production environments.
And congratulations! You have successfully instrumented and started your sample Golang application.
Step 9: Generate Traffic
To verify the instrumentation, you need to interact with the application. Since the OpenTelemetry middleware is active, every request you make now creates a span internally.
The application supports a full set of CRUD operations, including:
GET /booksGET /books/:idPOST /booksPATCH /books/:idDELETE /books/:id
You can test the endpoints manually using curl:
# Create a book
curl -X POST http://localhost:8090/books \
 -H "Content-Type: application/json" \
  -d '{"title":"Go Programming", "author":"John Doe"}'

# Get all books
curl http://localhost:8090/books
You can also use the generate_traffic.sh script to simulate continuous traffic as follows:
chmod +x generate_traffic.sh
./generate_traffic.sh
Now that your application is instrumented and generating traces, let's configure the backend to collect and visualize them.
Monitoring Your Go Application
To visualize and analyze the telemetry data we are generating, we need a backend that supports the OpenTelemetry Protocol (OTLP). We will use SigNoz, which ingests this data natively.
Setting Up SigNoz
You can choose between various deployment options in SigNoz. The easiest way to get started with SigNoz is SigNoz cloud. We offer a 30-day free trial account with access to all features.
Those who have data privacy concerns and can't send their data outside their infrastructure can sign up for either enterprise self-hosted or BYOC offering.
Those who have the expertise to manage SigNoz themselves or just want to start with a free self-hosted option can use our community edition.
Once you have your SigNoz account, you need two details to configure your application:
- Ingestion Key: You can find this in the SigNoz dashboard under Settings > General.
- Region: The region you selected during sign-up (US, IN, or EU).
Note: Read the detailed guide on how to get ingestion key and region from the SigNoz cloud dashboard.
Now that you have your credentials, restart the application with the environment variables required to send data to SigNoz Cloud:
OTEL_SERVICE_NAME=goApp INSECURE_MODE=false OTEL_EXPORTER_OTLP_HEADERS=signoz-ingestion-key=<SIGNOZ-INGESTION-KEY> OTEL_EXPORTER_OTLP_ENDPOINT=ingest.{region}.signoz.cloud:443 go run main.go
With the application running, ensure your traffic generator (from Step 9) is still active, or manually hit the endpoints a few times.
Visualizing With SigNoz
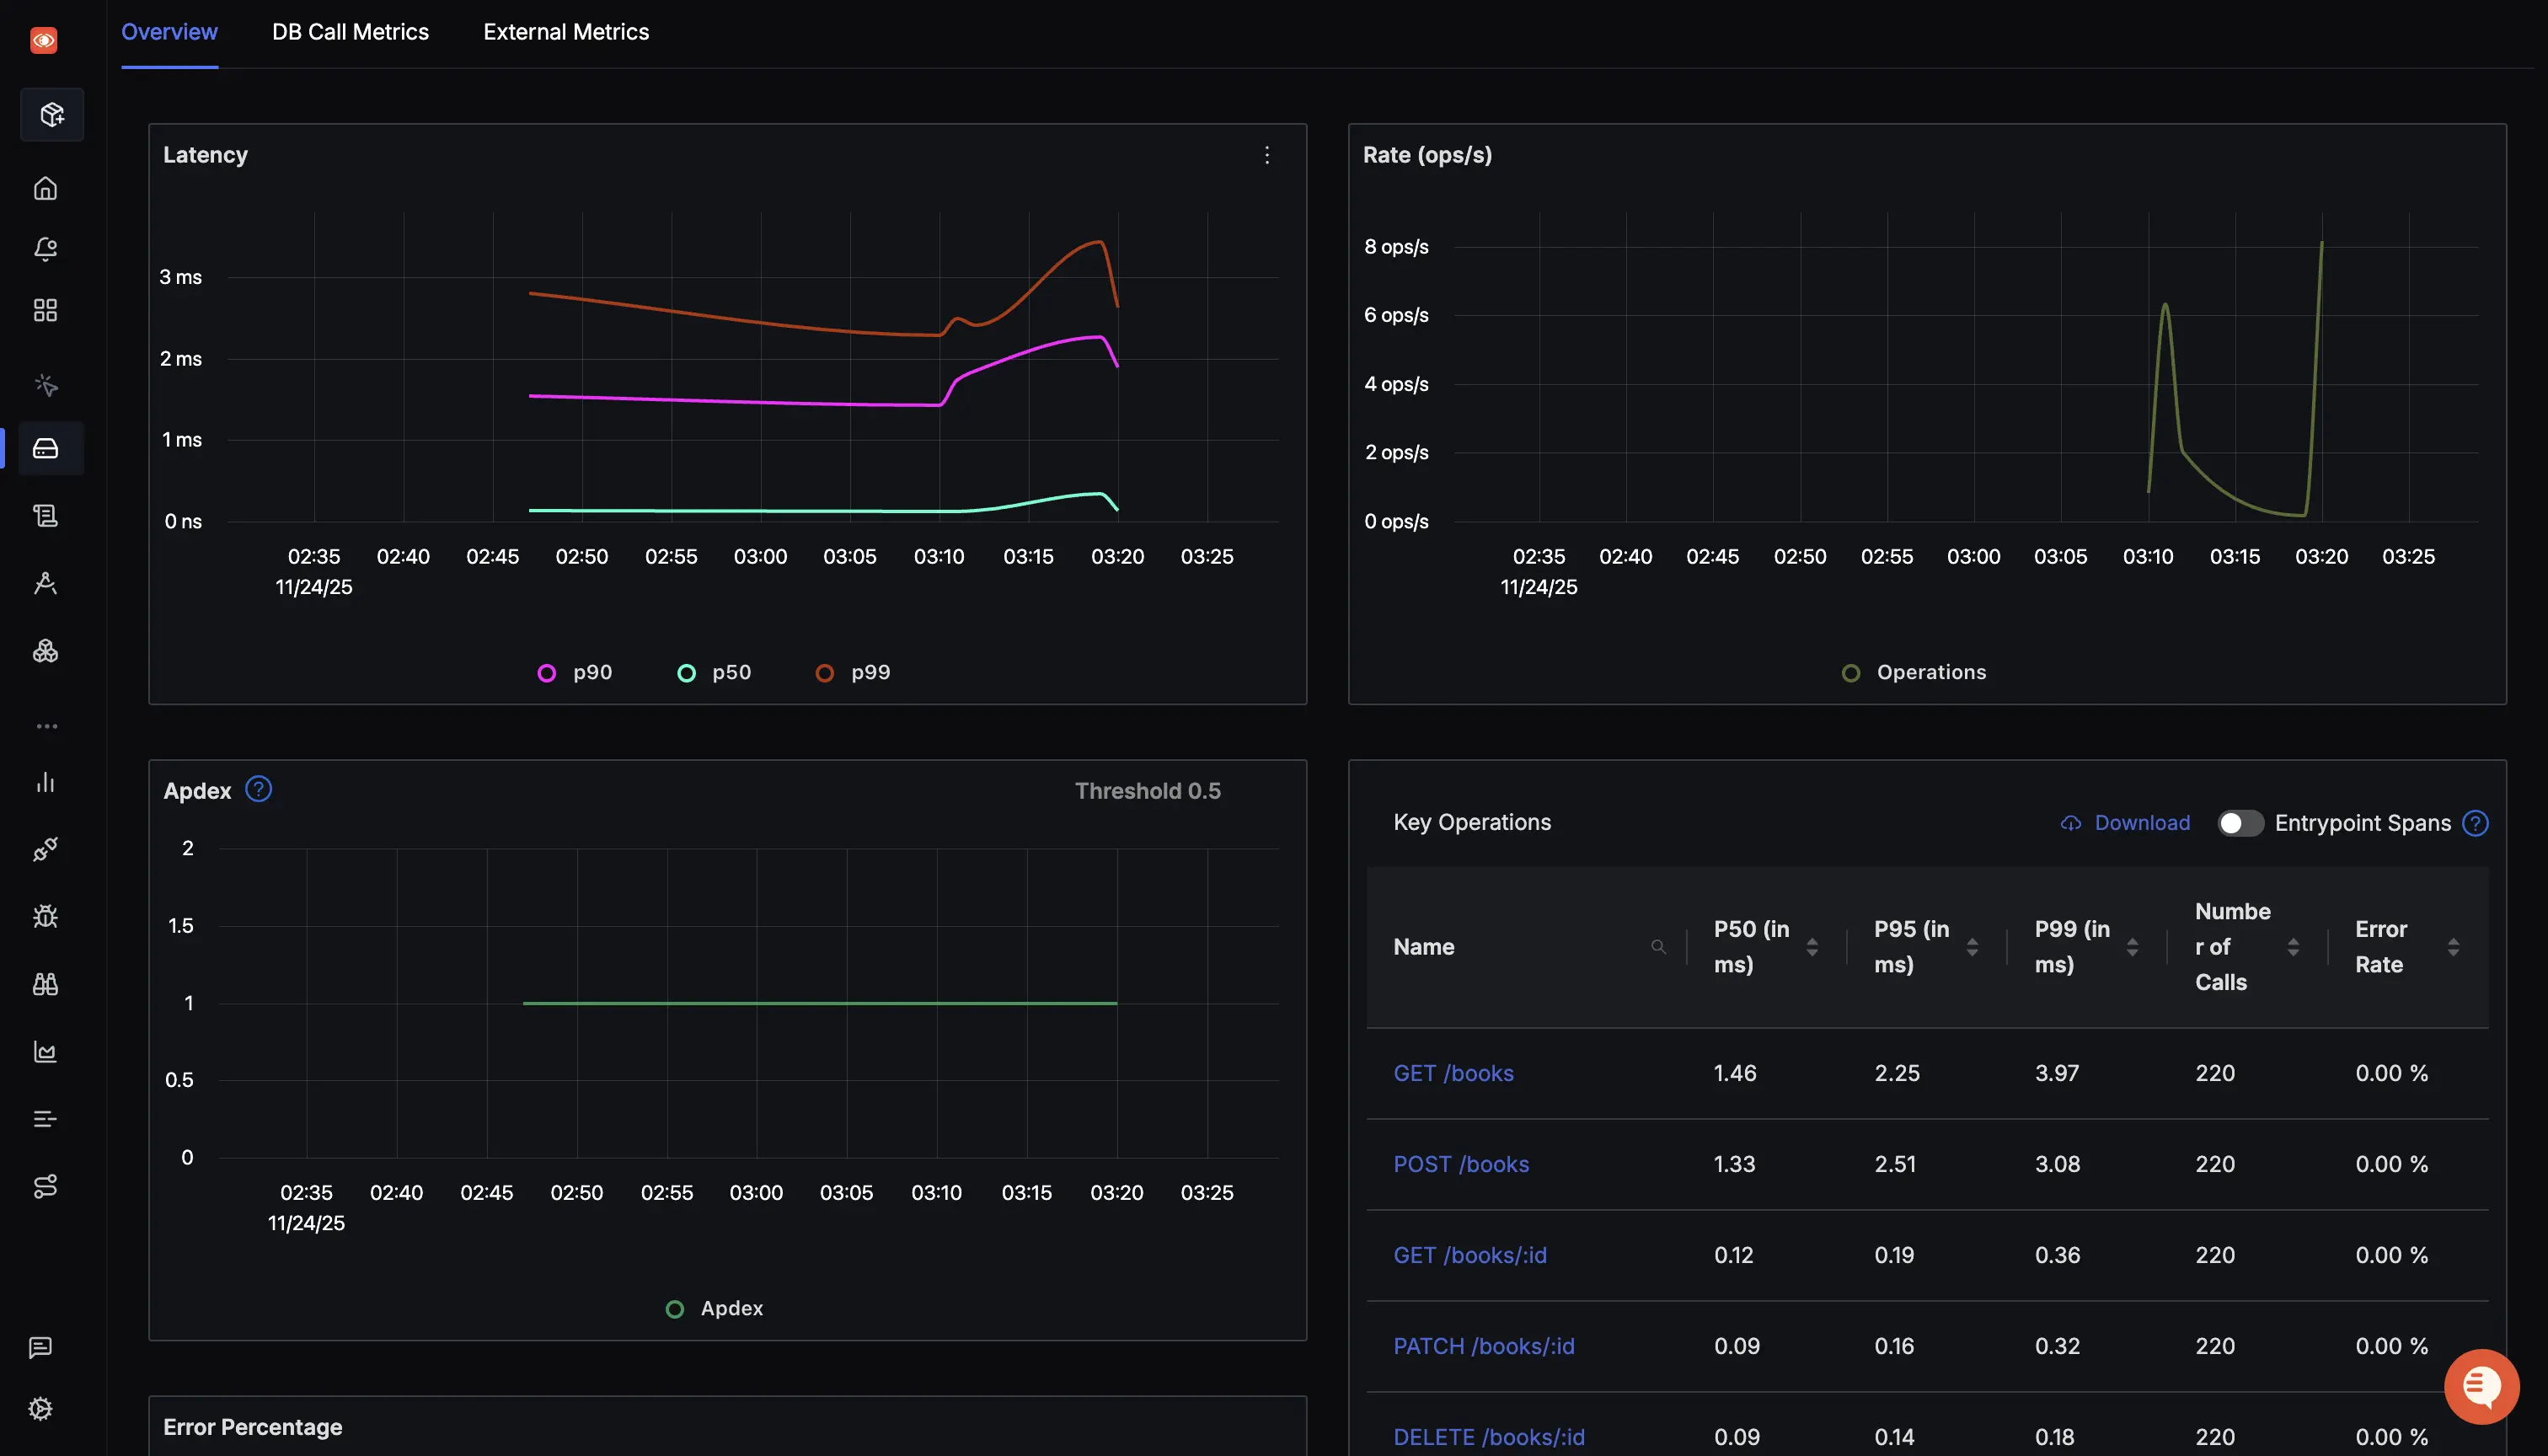
Navigate to the Services tab in your SigNoz dashboard. You should see goApp listed.

Click on the goApp service to view the Metrics page, where you can monitor application latency, requests per second, and error rates.
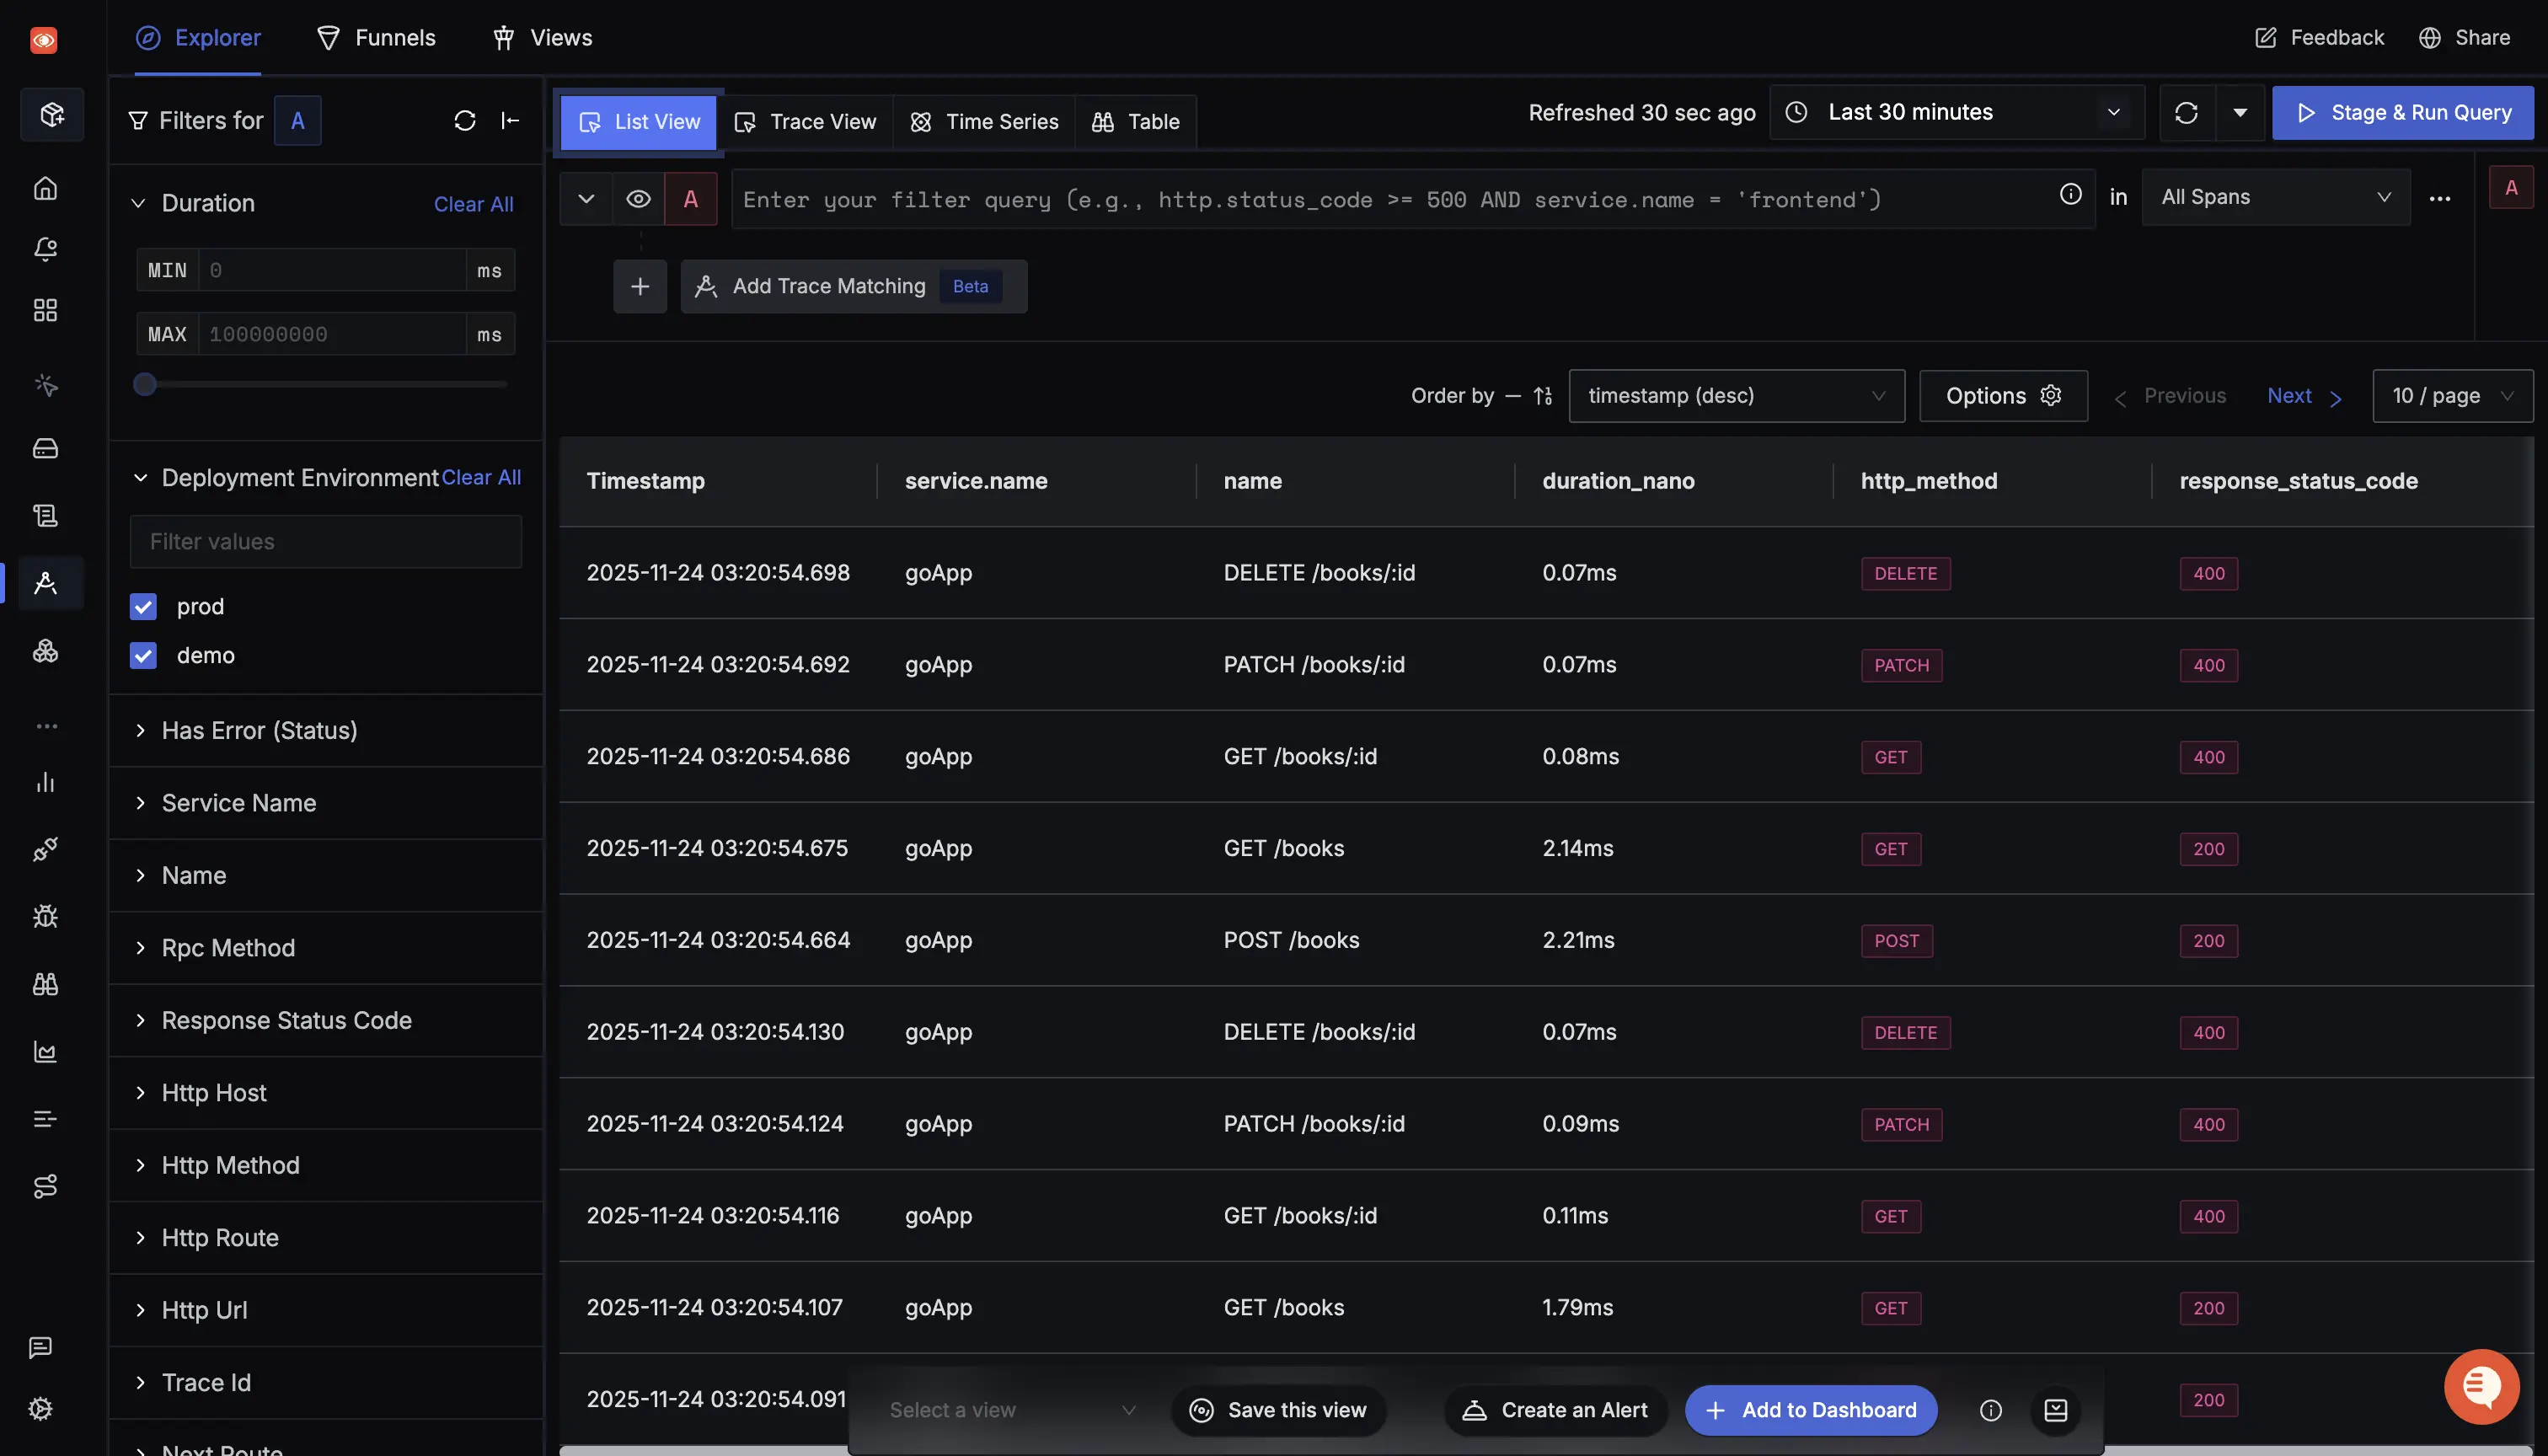
To dive deeper, switch to the Traces tab. Here you can analyze individual requests using filters for status codes, service names, and operation duration.
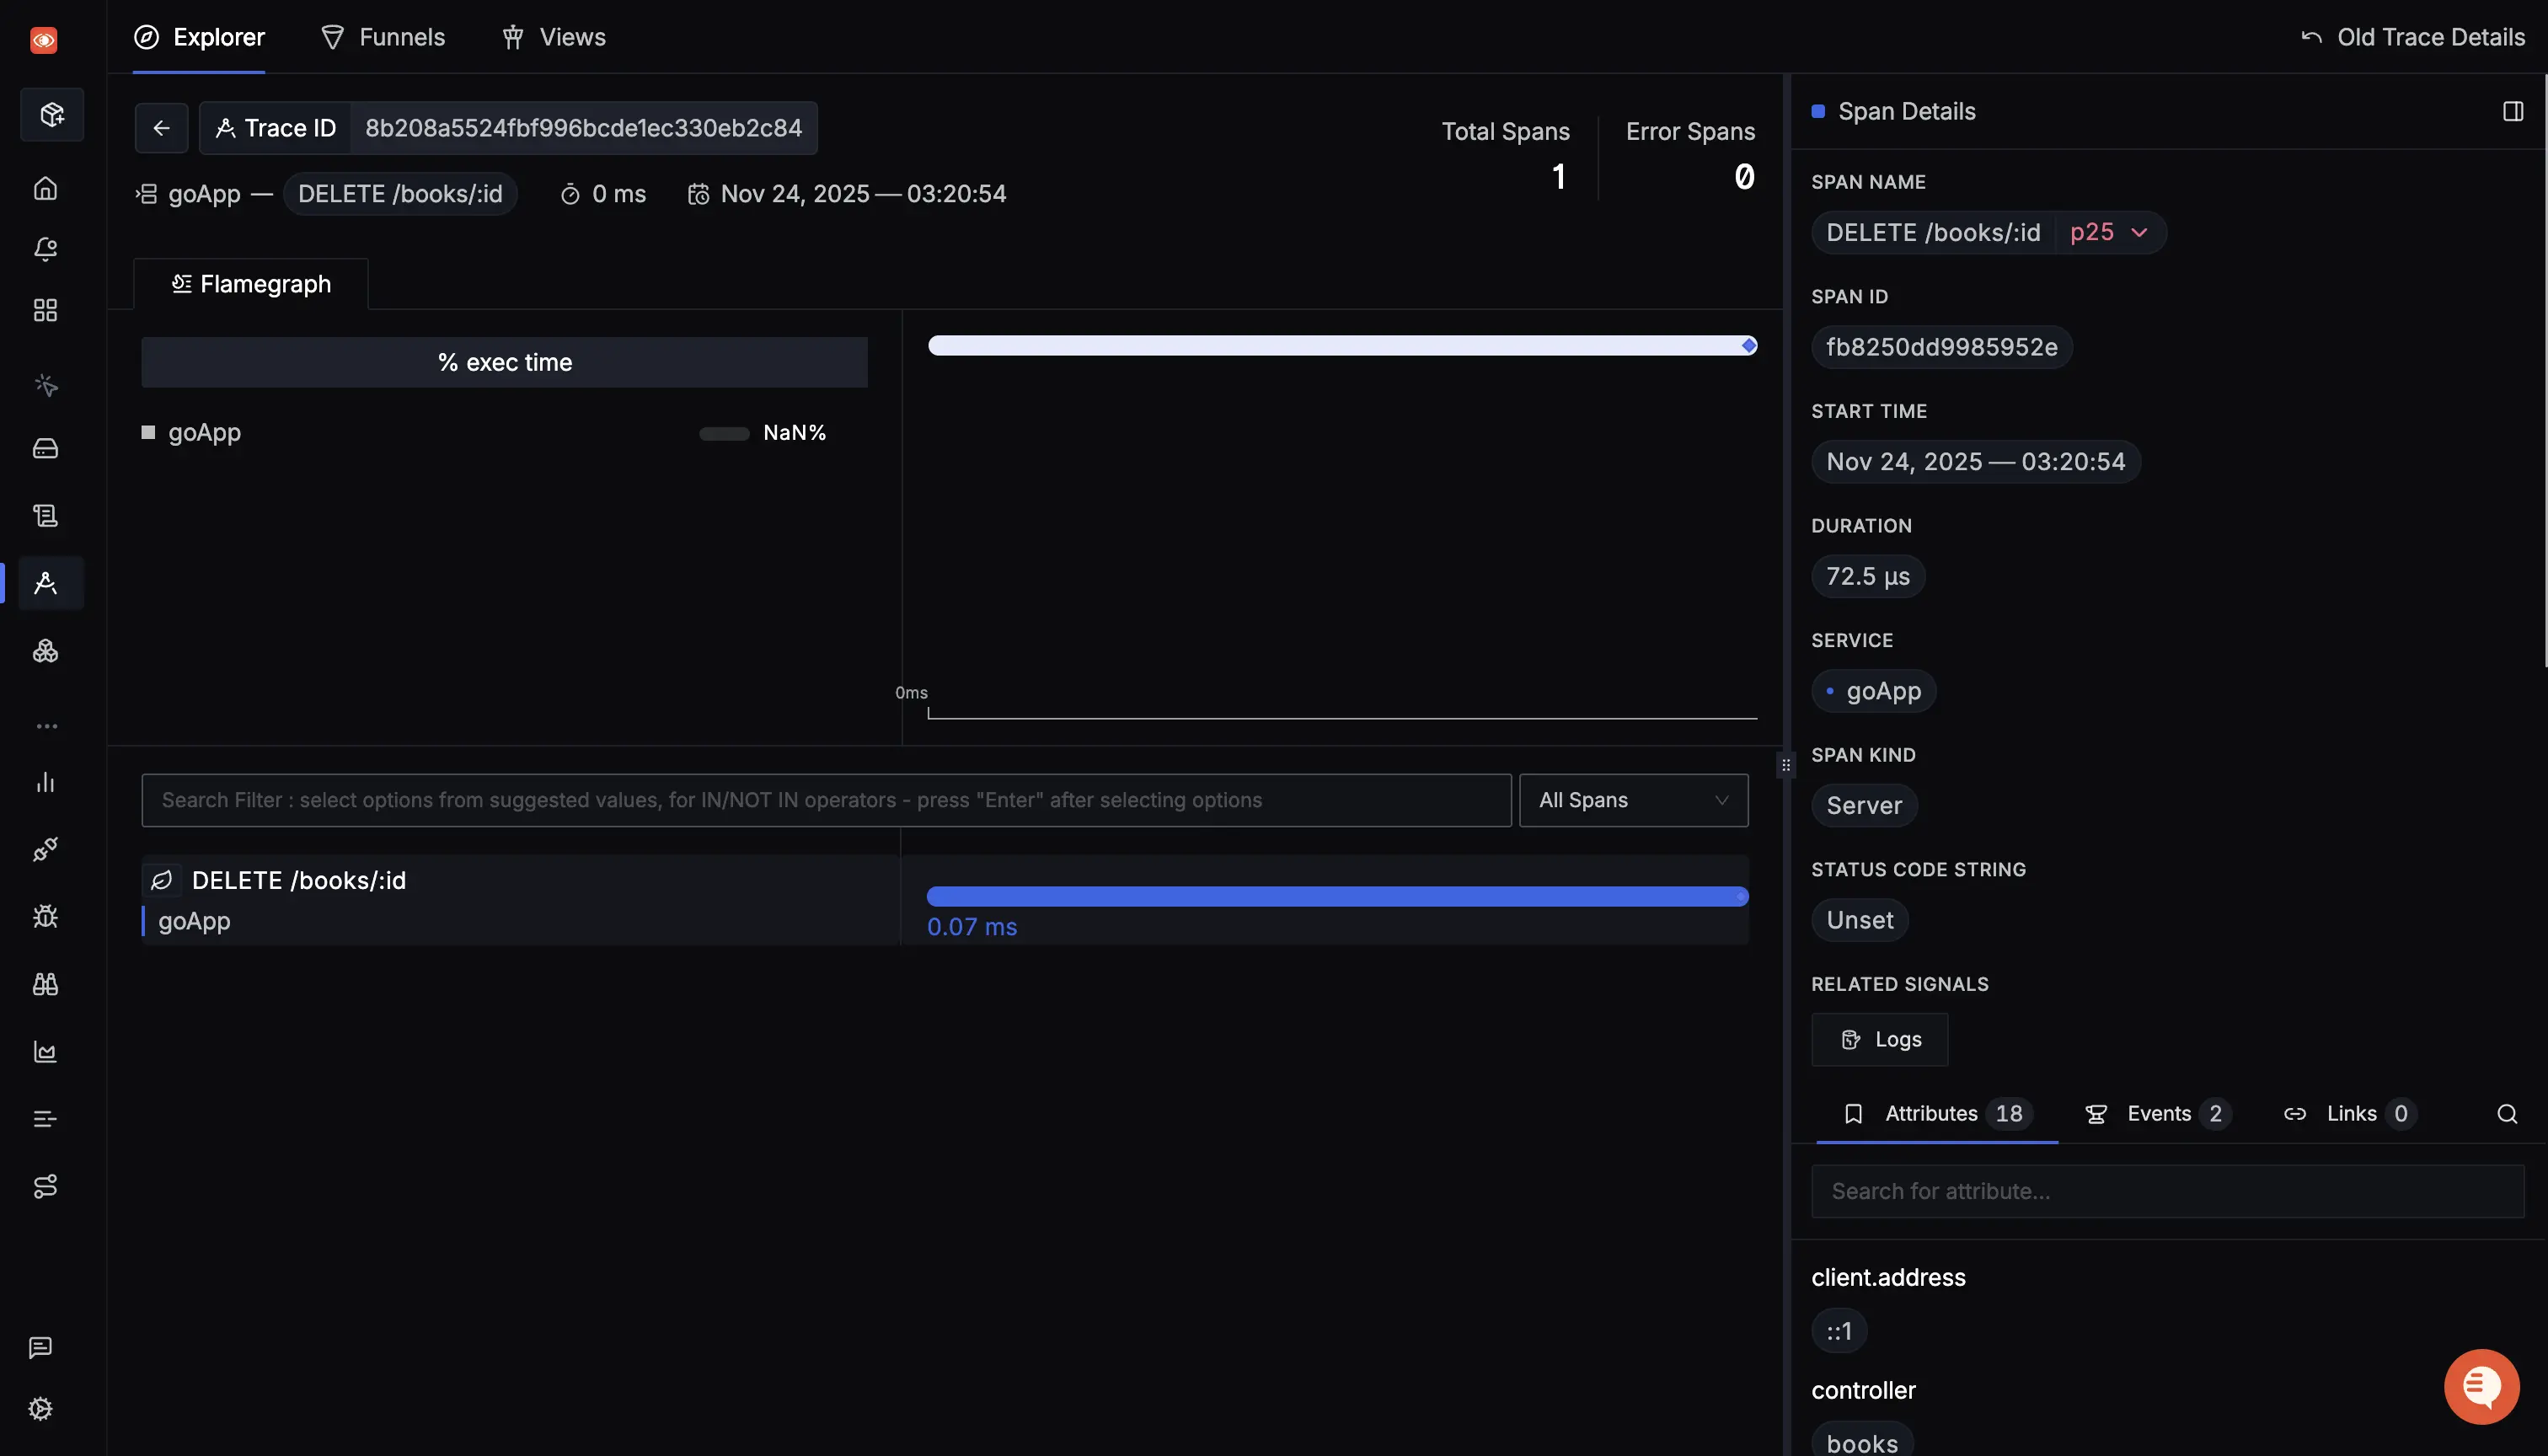
You can also visualize your tracing data with flamegraphs and Gantt charts to identify exactly which part of a request caused a delay.
Adding OpenTelemetry Custom Attributes and Events in Go Applications
Auto-instrumentation captures technical details like latency, HTTP methods, and status codes. However, effective debugging often requires business context.
For example: Knowing that a request took 2 seconds is useful, but knowing it took 2 seconds for user_id: 105 while processing book_id: 88 allows you to reproduce and fix the issue.
OpenTelemetry allows you to attach this context using Attributes and Events:
- Attributes: Key-value pairs representing state (e.g.,
user_id,region,app_version). These are indexed by backends like SigNoz, enabling you to filter traces (e.g., "Show me all failed requests forbook_id: 88"). - Events: Time-stamped logs attached to a span. Use these to record specific moments in the execution flow, such as Cache miss or Validation failed.
Here’s how you can add custom attributes and custom events to spans in your Go application:
Step 1: Import Trace and Attribute Libraries
To add attributes and events to spans, you’ll need to import the necessary OpenTelemetry libraries. In your controllers/books.go file, include the following imports:
import (
 ...
    "go.opentelemetry.io/otel/attribute"
    "go.opentelemetry.io/otel/trace"
)
go.opentelemetry.io/otel/attribute: This package is used to define attributes for spans.go.opentelemetry.io/otel/trace: This package provides the functionality for managing spans, including adding events and attributes.
Step 2: Fetch Current Span from Context
In OpenTelemetry, each span is associated with a request context. To add attributes and events to a span, you first need to fetch the span from the context related to the incoming request. You can do this by using:
span := trace.SpanFromContext(c.Request.Context())
Here, c.Request.Context() gets the context of the HTTP request, which carries the current span.
Step 3: Set Custom Attributes on the Span
Attributes are key-value pairs that provide additional metadata to a span. You can add custom attributes to the current span using span.SetAttributes():
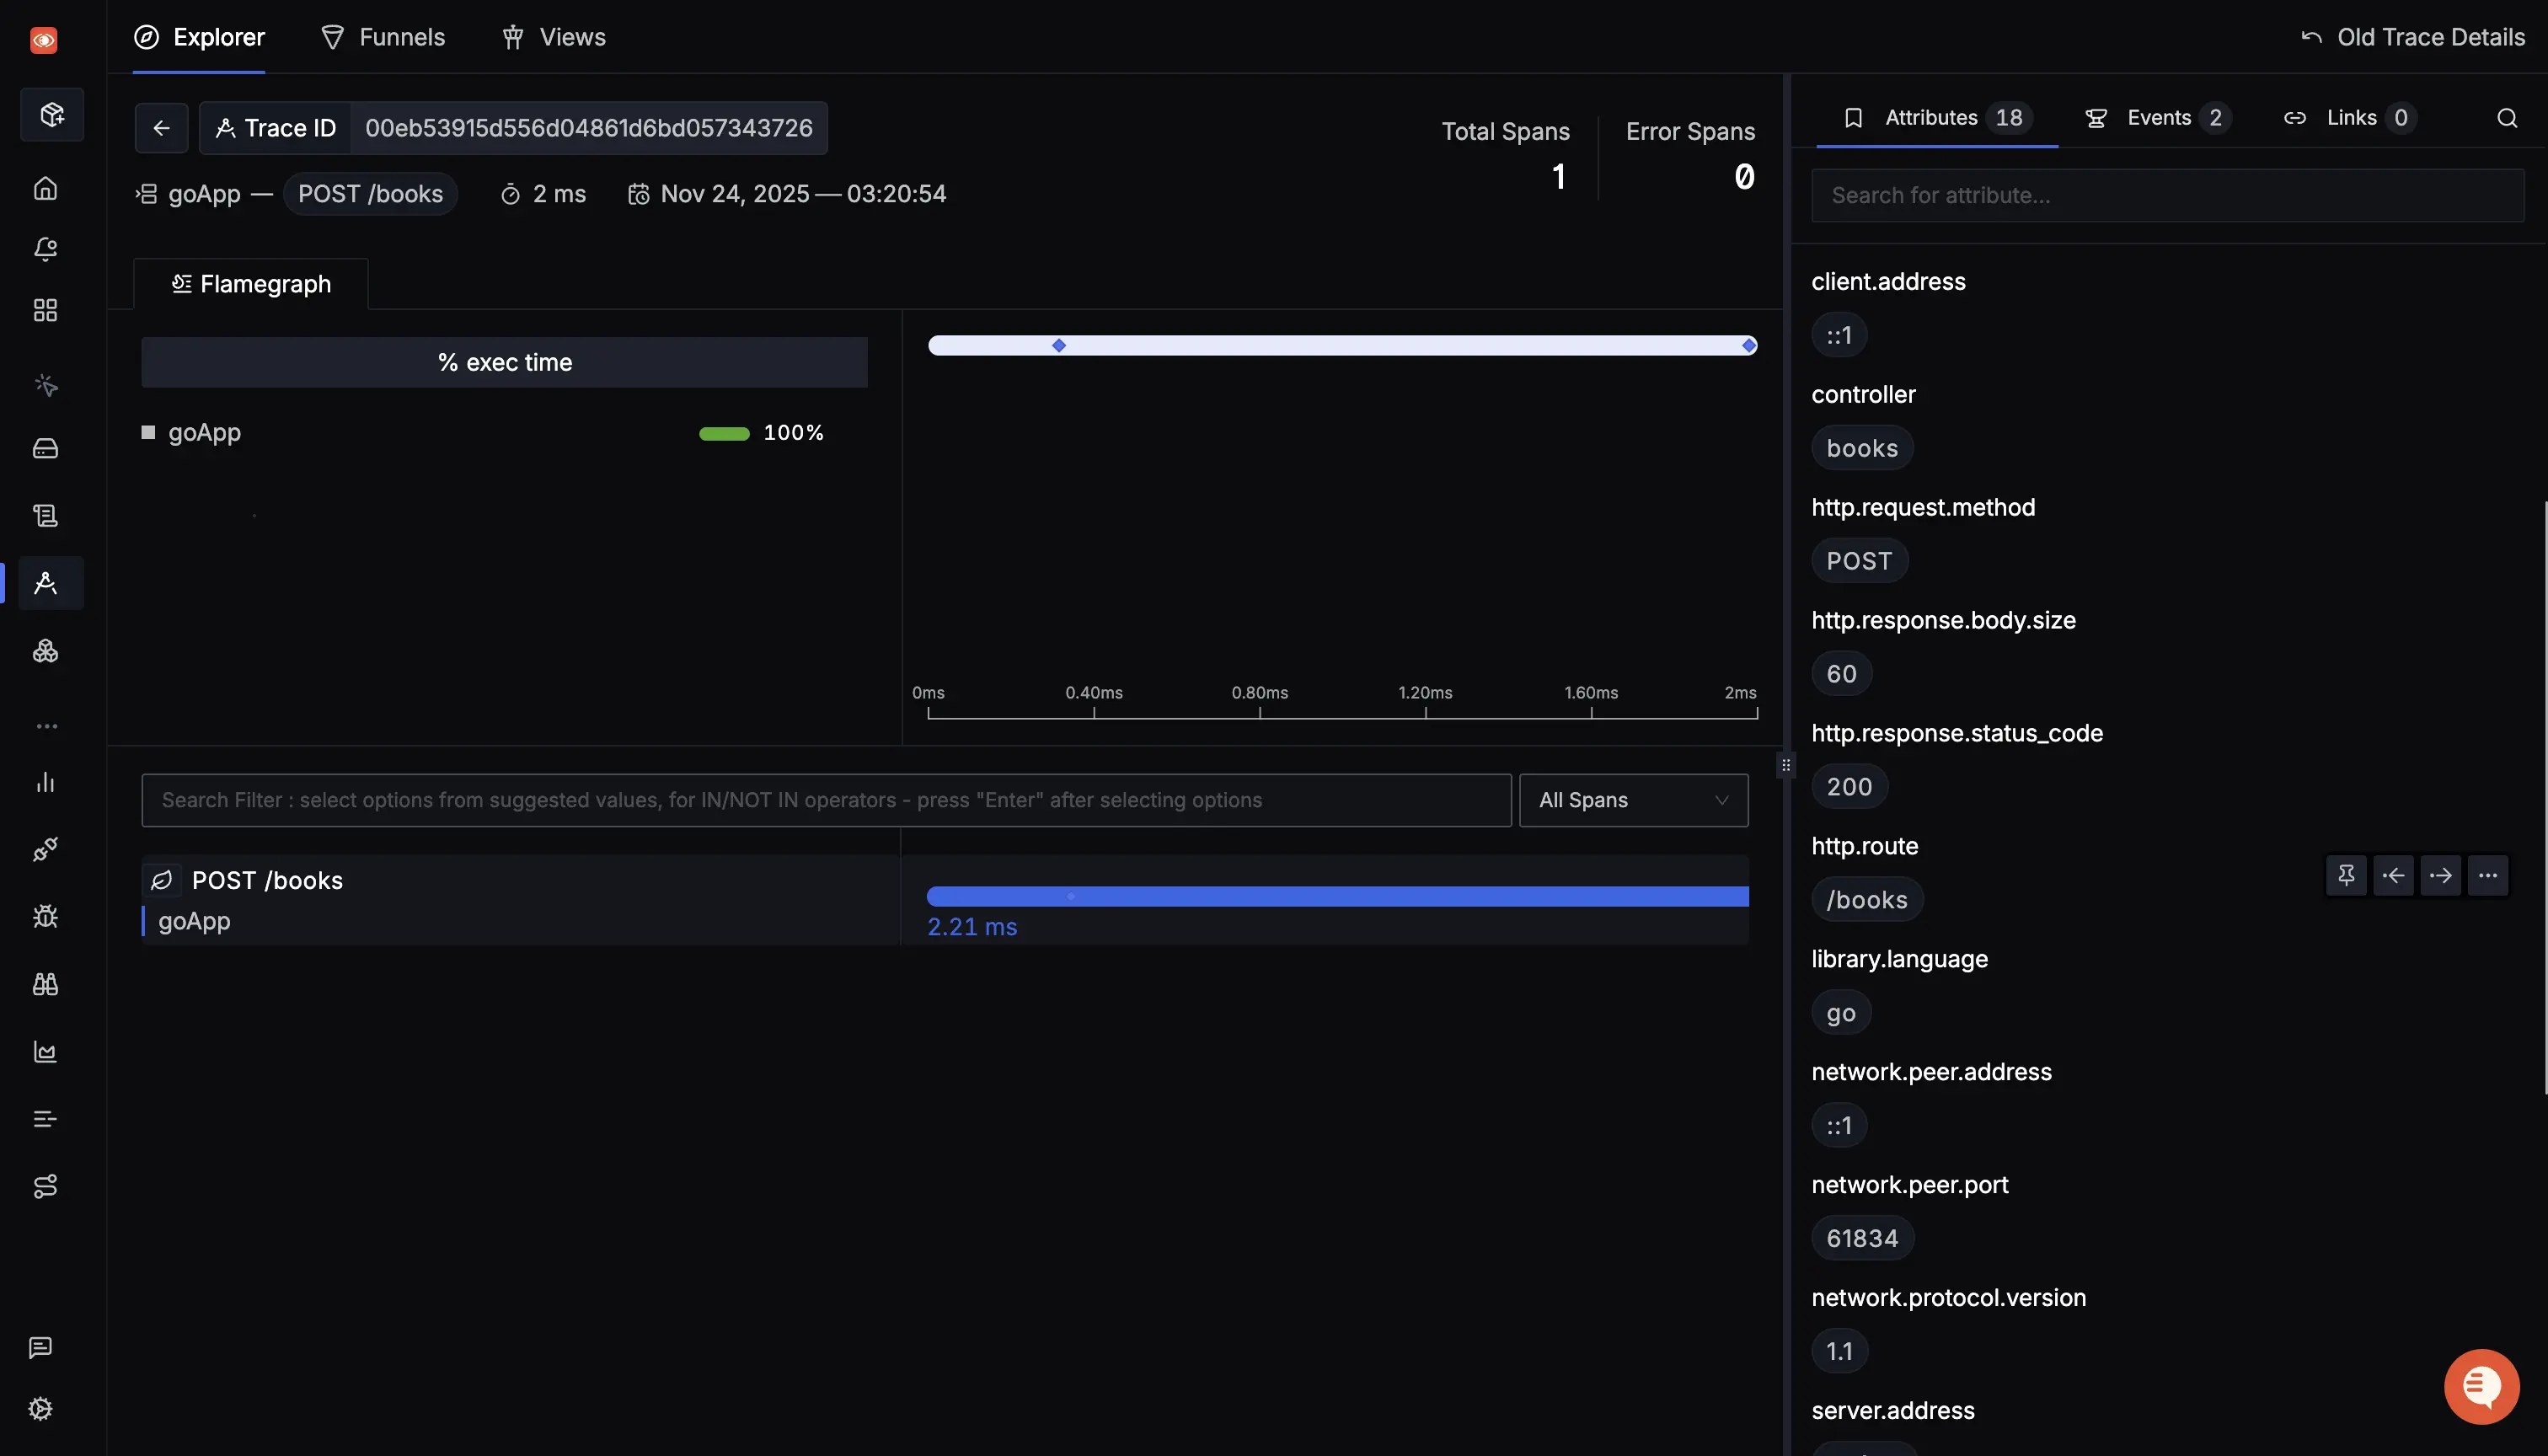
span.SetAttributes(attribute.String("controller", "books"))
This adds an attribute "controller" = "books" to the span, helping you identify which part of the application (in this case, the "books" controller) is responsible for the span.
Step 4: Add Custom Events to the OpenTelemetry Span
Events provide a way to track specific actions or errors within the span’s context. You can add events to a span using span.AddEvent():
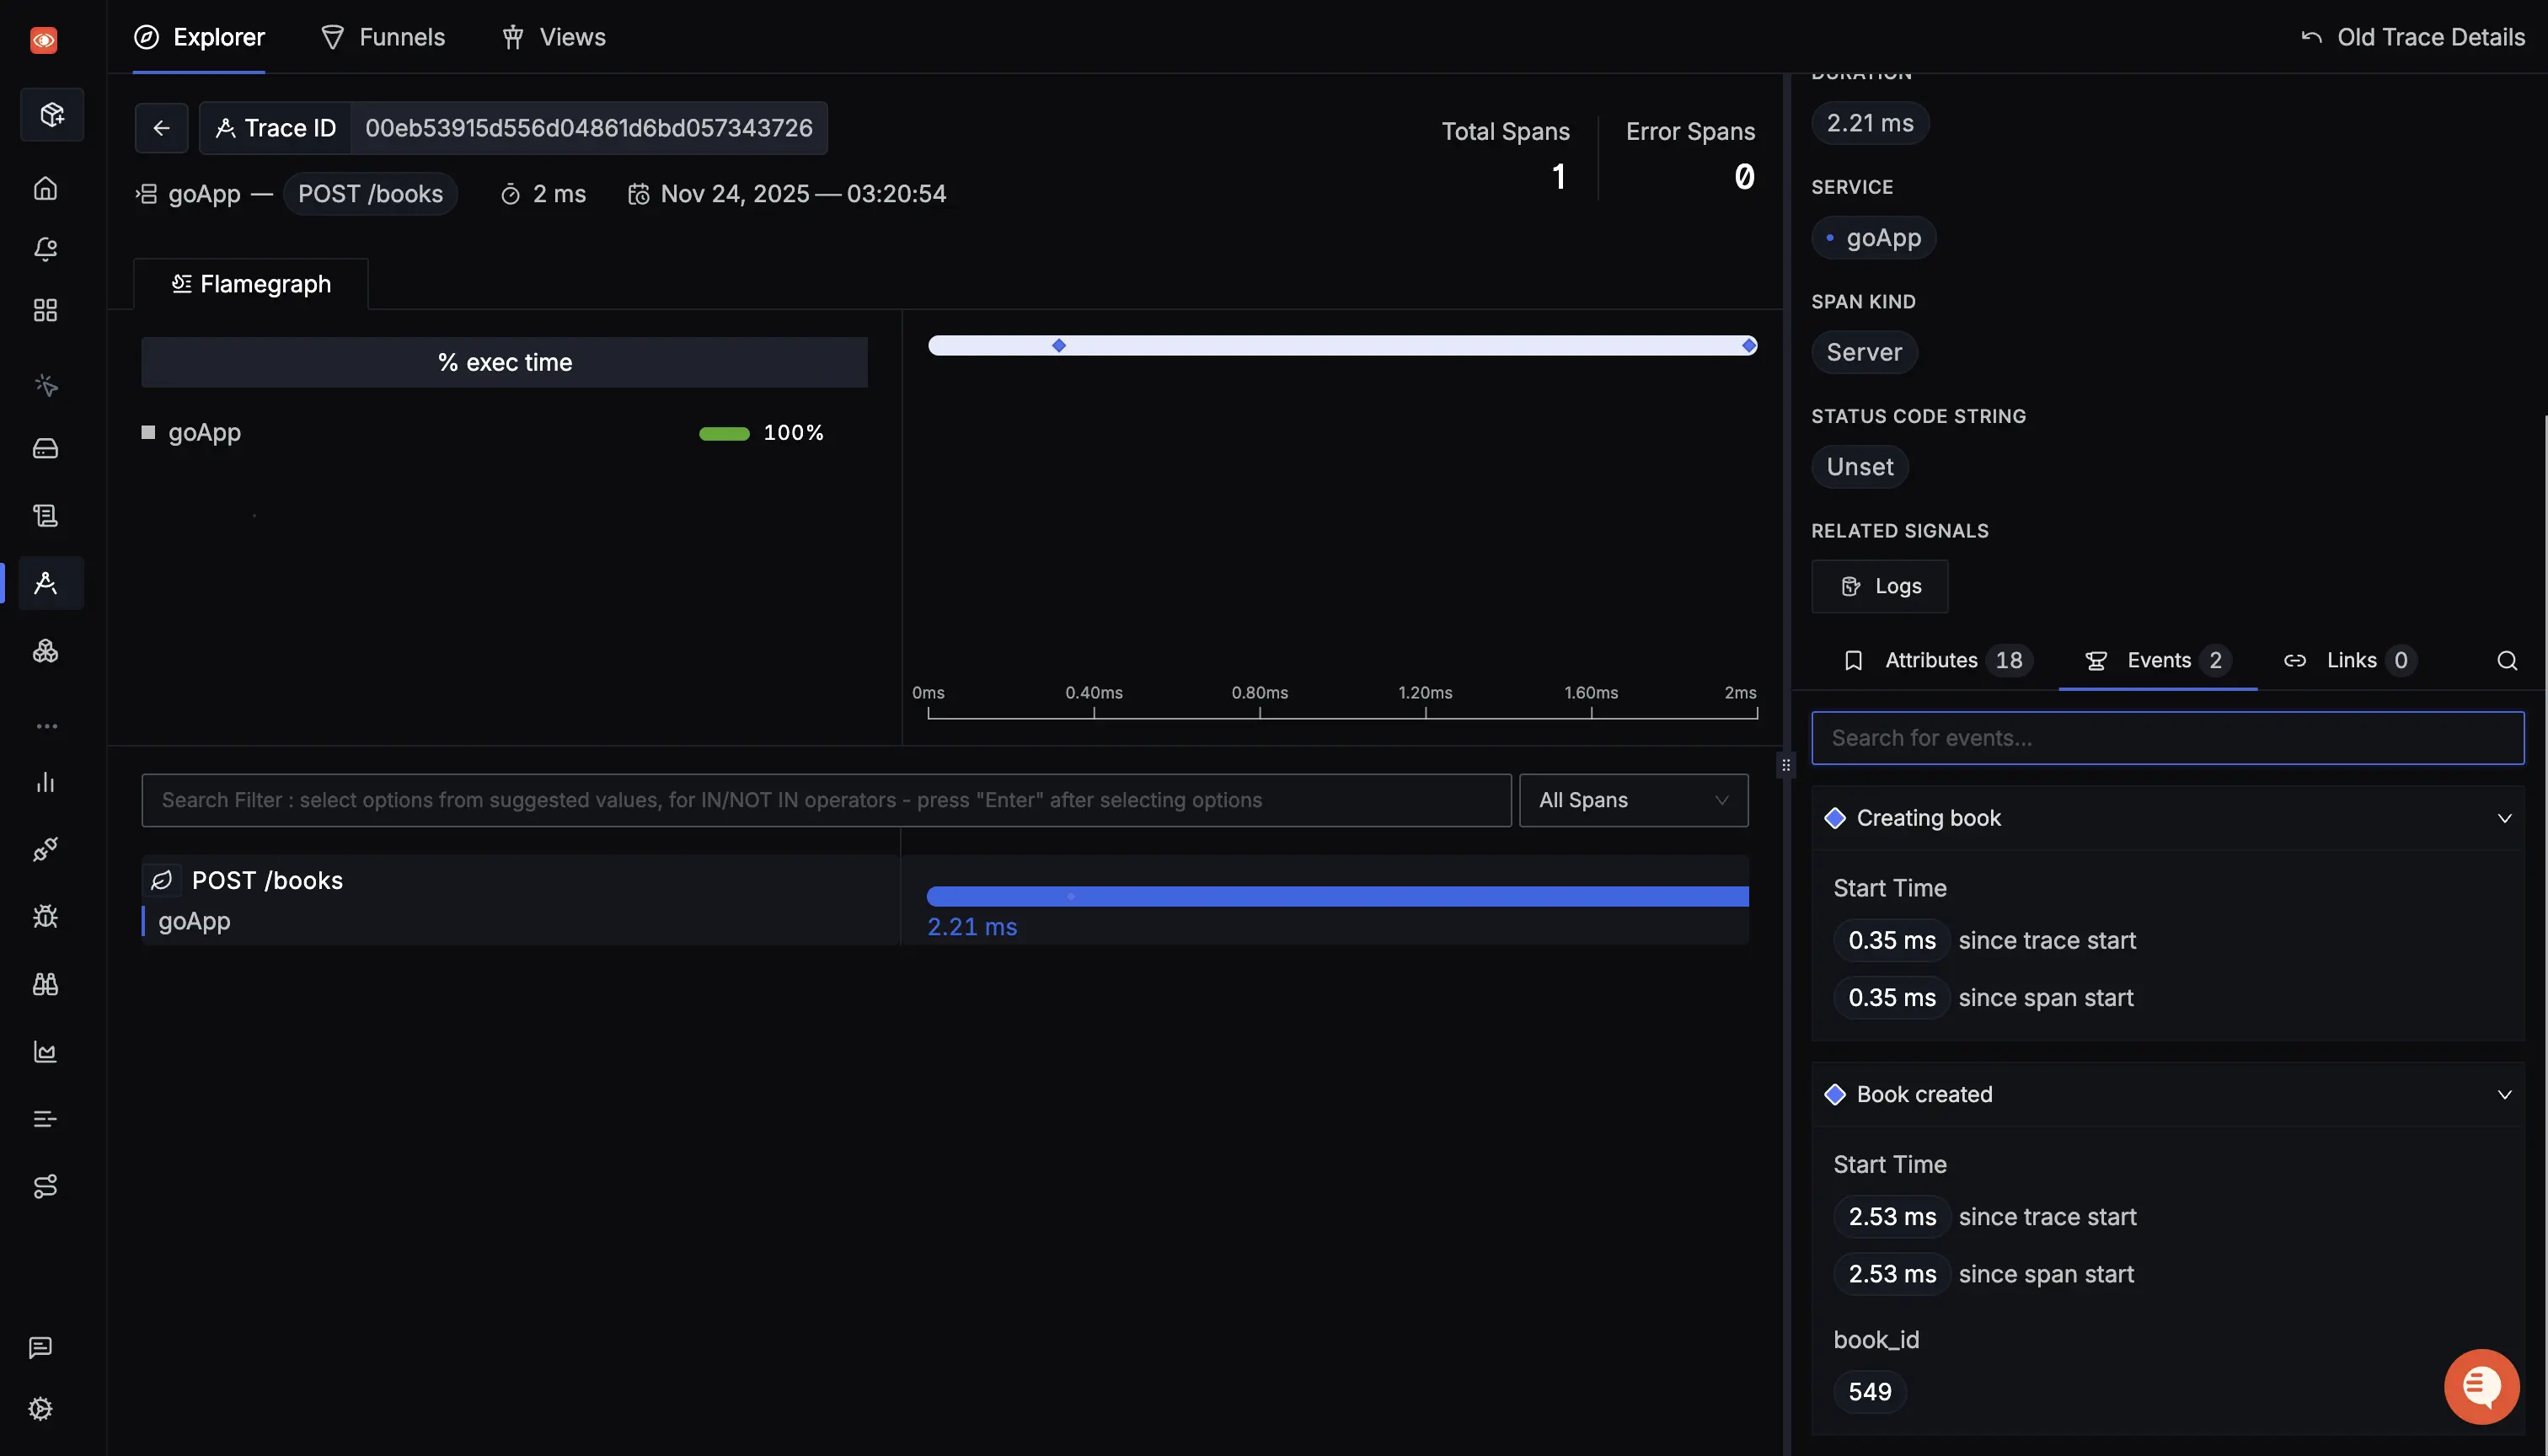
span.AddEvent("This is a sample event", trace.WithAttributes(attribute.Int("pid", 4328), attribute.String("sampleAttribute", "Test")))
In this example, an event named "This is a sample event" is added to the span, with custom attributes "pid" = 4328 and "sampleAttribute" = "Test". These events can help you track specific actions or errors within the span's context.
Implementation in your goGin Application
In your project folder directory, open the controllers/books.go file and add the above configuration in the function blocks:
...
func FindBooks(c *gin.Context) {
    span := trace.SpanFromContext(c.Request.Context())
    span.SetAttributes(attribute.String("controller", "books"))
    span.AddEvent("Fetching books")

    var books []models.Book
    models.DB.Find(&books)

    c.JSON(http.StatusOK, gin.H{"data": books})
}

// GET /books/:id
// Find a book
func FindBook(c *gin.Context) {
    span := trace.SpanFromContext(c.Request.Context())
    span.SetAttributes(attribute.String("controller", "books"))
    span.AddEvent("Fetching single book")

    // Get model if exist
    var book models.Book
    if err := models.DB.Where("id = ?", c.Param("id")).First(&book).Error; err != nil {
        span.AddEvent("Book not found", trace.WithAttributes(
            attribute.String("book_id", c.Param("id")),
 ))
        c.JSON(http.StatusBadRequest, gin.H{"error": "Record not found!"})
        return
 }

    c.JSON(http.StatusOK, gin.H{"data": book})
}

// POST /books
// Create new book
func CreateBook(c *gin.Context) {
    span := trace.SpanFromContext(c.Request.Context())
    span.SetAttributes(attribute.String("controller", "books"))
    span.AddEvent("Creating book")

    // Validate input
    var input CreateBookInput
    if err := c.ShouldBindJSON(&input); err != nil {
        span.AddEvent("Book creation failed", trace.WithAttributes(
            attribute.String("error", err.Error()),
 ))
        c.JSON(http.StatusBadRequest, gin.H{"error": err.Error()})
        return
 }

    // Create book
    book := models.Book{Title: input.Title, Author: input.Author}
    models.DB.Create(&book)

    span.AddEvent("Book created", trace.WithAttributes(
        attribute.Int("book_id", int(book.ID)),
 ))

    c.JSON(http.StatusOK, gin.H{"data": book})
}

// PATCH /books/:id
// Update a book
func UpdateBook(c *gin.Context) {
    span := trace.SpanFromContext(c.Request.Context())
    span.SetAttributes(attribute.String("controller", "books"))
    span.AddEvent("Updating book")

    // Get model if exist
    var book models.Book
    if err := models.DB.Where("id = ?", c.Param("id")).First(&book).Error; err != nil {
        span.AddEvent("Book not found", trace.WithAttributes(
            attribute.String("book_id", c.Param("id")),
 ))
        c.JSON(http.StatusBadRequest, gin.H{"error": "Record not found!"})
        return
 }

    // Validate input
    var input UpdateBookInput
    if err := c.ShouldBindJSON(&input); err != nil {
        span.AddEvent("Book update failed", trace.WithAttributes(
            attribute.String("error", err.Error()),
 ))
        c.JSON(http.StatusBadRequest, gin.H{"error": err.Error()})
        return
 }

    models.DB.Model(&book).Updates(input)

    span.AddEvent("Book updated", trace.WithAttributes(
        attribute.Int("book_id", int(book.ID)),
 ))

    c.JSON(http.StatusOK, gin.H{"data": book})
}

// DELETE /books/:id
// Delete a book
func DeleteBook(c *gin.Context) {
    span := trace.SpanFromContext(c.Request.Context())
    span.SetAttributes(attribute.String("controller", "books"))
    span.AddEvent("Deleting book")

    // Get model if it exist
    var book models.Book
    if err := models.DB.Where("id = ?", c.Param("id")).First(&book).Error; err != nil {
        span.AddEvent("Book not found", trace.WithAttributes(  // Added error event
            attribute.String("book_id", c.Param("id")),
 ))
        c.JSON(http.StatusBadRequest, gin.H{"error": "Record not found!"})
        return
 }

    models.DB.Delete(&book)

    span.AddEvent("Book deleted", trace.WithAttributes(  // Added success event
        attribute.Int("book_id", int(book.ID)),
 ))

    c.JSON(http.StatusOK, gin.H{"data": true})
}
Once you've updated your application, restart it and generate new telemetry data. Then, navigate to your SigNoz cloud account and select one of the traces. You should be able to see the custom attributes and events that you've added. These will provide deeper insights into the activities within your application, improving observability and the debugging process.
Next Steps
Now that your Go application is sending traces to SigNoz, here is what you should do next to get the most value out of your observability stack:
- Create Custom Dashboard: Use the attributes you added (like
book_id) to build charts that track specific business KPIs, such as "Most requested books" or "Error rates by controller." - Set Up Alerts: Configure alerts in SigNoz to notify your team via Slack or PagerDuty whenever the error rate exceeds a threshold or latency spikes.
Distributed tracing is just one piece of the puzzle. Enhance your visibility by correlating traces with logs and metrics.
- Golang Monitoring Guide - Traces, Logs, APM and Go Runtime Metrics
- Complete Guide to Logging in Go - Golang Log
Hope we answered all your questions regarding OpenTelemetry in Go. If you have more questions, feel free to use the SigNoz AI chatbot or join our Slack community.
You can also subscribe to our newsletter for insights from observability nerds at SigNoz, get open source, OpenTelemetry, and devtool building stories straight to your inbox.
